User Manual
Page 2
...National Conventions...4 Power ...5 Installation...6 Cleaning ...7 Other...8 Setup ...9 Contents in Box ...9 Setup Stand & Base...10 Adjusting Viewing Angle...11 Connecting the Monitor...12 Wall Mounting ...13 Adjusting ...14 Setting Optimal Resolution ...14 Windows Vista ...14 Windows XP ...16 Windows ME/2000...17 Hotkeys ...18 OSD Setting...19 Luminance ...20 Image Setup ...22 Color Temperature ...24 Color Boost...26 Picture Boost ...28 OSD Setup ...30 Extra ...32 Reset ...34 Exit ...36 LED Indicator ...37 Driver ...38 Monitor Driver ...38 Windows 7 ...38 Windows Vista ...42 Windows XP ...44...
...National Conventions...4 Power ...5 Installation...6 Cleaning ...7 Other...8 Setup ...9 Contents in Box ...9 Setup Stand & Base...10 Adjusting Viewing Angle...11 Connecting the Monitor...12 Wall Mounting ...13 Adjusting ...14 Setting Optimal Resolution ...14 Windows Vista ...14 Windows XP ...16 Windows ME/2000...17 Hotkeys ...18 OSD Setting...19 Luminance ...20 Image Setup ...22 Color Temperature ...24 Color Boost...26 Picture Boost ...28 OSD Setup ...30 Extra ...32 Reset ...34 Exit ...36 LED Indicator ...37 Driver ...38 Monitor Driver ...38 Windows 7 ...38 Windows Vista ...42 Windows XP ...44...
User Manual
Page 5
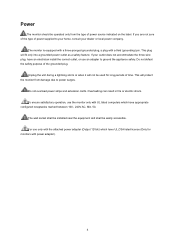
... wall socket shall be installed near the equipment and shall be used for monitors with power adapter). 5 To ensure satisfactory operation, use an adapter to your home, consult your outlet does not accommodate the three-wire plug, have UL,CSA listed license (Only for long periods of power supplied to ground the appliance safely. Do not overload power strips and extension cords. The monitor...
... wall socket shall be installed near the equipment and shall be used for monitors with power adapter). 5 To ensure satisfactory operation, use an adapter to your home, consult your outlet does not accommodate the three-wire plug, have UL,CSA listed license (Only for long periods of power supplied to ground the appliance safely. Do not overload power strips and extension cords. The monitor...
User Manual
Page 10
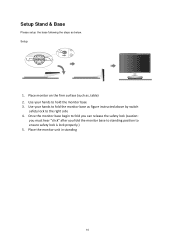
Use your hands to fold the monitor base as figure instructed above by switch safety lock to the right side 4. Setup: 1. Place monitor on the firm surface (such as below. Once the monitor base begin to fold you can release the safety lock (caution: you must hear "click" after you fold the monitor base to standing position to hold the monitor base 3. Use your hands to ensure safety lock is lock properly.) 5. Place the monitor unit in standing 10 Setup Stand & Base Please setup the base following the steps as , table) 2.
Use your hands to fold the monitor base as figure instructed above by switch safety lock to the right side 4. Setup: 1. Place monitor on the firm surface (such as below. Once the monitor base begin to fold you can release the safety lock (caution: you must hear "click" after you fold the monitor base to standing position to hold the monitor base 3. Use your hands to ensure safety lock is lock properly.) 5. Place the monitor unit in standing 10 Setup Stand & Base Please setup the base following the steps as , table) 2.
User Manual
Page 12
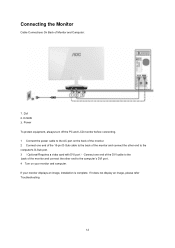
...'s D-Sub port. 3 (Optional-Requires a video card with DVI port)-Connect one end of the DVI cable to the computer's DVI port. 4 Turn on your monitor displays an image, installation is complete. If your monitor and computer. DVI 2. If it does not display an image, please refer Troubleshooting. 12 Power To protect equipment, always turn off the PC and LCD monitor before connecting. 1 Connect the power cable to the AC port on the back of the monitor. 2 Connect one end...
...'s D-Sub port. 3 (Optional-Requires a video card with DVI port)-Connect one end of the DVI cable to the computer's DVI port. 4 Turn on your monitor displays an image, installation is complete. If your monitor and computer. DVI 2. If it does not display an image, please refer Troubleshooting. 12 Power To protect equipment, always turn off the PC and LCD monitor before connecting. 1 Connect the power cable to the AC port on the back of the monitor. 2 Connect one end...
User Manual
Page 13
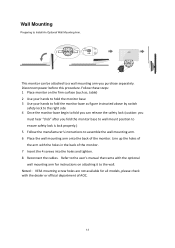
.... 8 Reconnect the cables. Wall Mounting Preparing to the wall. Follow these steps: 1 Place monitor on attaching it to Install An Optional Wall Mounting Arm. Disconnect power before this procedure. Noted : VESA mounting screw holes are not available for instructions on the firm surface (such as, table) 2 Use your hands to hold the monitor base 3 Use your hands to fold the monitor base as figure instructed above by switch safety lock to the...
.... 8 Reconnect the cables. Wall Mounting Preparing to the wall. Follow these steps: 1 Place monitor on attaching it to Install An Optional Wall Mounting Arm. Disconnect power before this procedure. Noted : VESA mounting screw holes are not available for instructions on the firm surface (such as, table) 2 Use your hands to hold the monitor base 3 Use your hands to fold the monitor base as figure instructed above by switch safety lock to the...
User Manual
Page 18
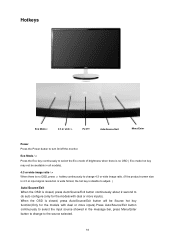
... the Power button to do auto configure (only for the models with dual or more inputs).Press Auto/Source/Exit button continuously to select the input source showed in the message bar, press Menu/Enter button to change 4:3 or wide image ratio. (If the product screen size is 4:3 or input signal resolution is wide format, the hot key is disable to adjust. ) Auto/Source/Exit When the OSD is closed , press Auto/Source/Exit button continuously about 2 second to turn...
... the Power button to do auto configure (only for the models with dual or more inputs).Press Auto/Source/Exit button continuously to select the input source showed in the message bar, press Menu/Enter button to change 4:3 or wide image ratio. (If the product screen size is 4:3 or input signal resolution is wide format, the hot key is disable to adjust. ) Auto/Source/Exit When the OSD is closed , press Auto/Source/Exit button continuously about 2 second to turn...
User Manual
Page 19
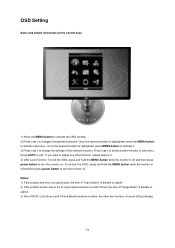
... only one signal input, the item of "Input Select" is disable to adjust. 2) If the product screen size is 4:3 or input signal resolution is wide format, the item of "Image Ratio" is disable to change the settings of DCR, Color Boost, and Picture Boost functions is active, the other function, repeat steps 2-3. 4) OSD Lock Function: To lock the OSD, press and hold the MENU button while the monitor is highlighted, press the MENU-button to exit...
... only one signal input, the item of "Input Select" is disable to adjust. 2) If the product screen size is 4:3 or input signal resolution is wide format, the item of "Image Ratio" is disable to change the settings of DCR, Color Boost, and Picture Boost functions is active, the other function, repeat steps 2-3. 4) OSD Lock Function: To lock the OSD, press and hold the MENU button while the monitor is highlighted, press the MENU-button to exit...

User Manual
Page 33
Input Select Auto Config Image Ratio DDC-CI Off Timer Information Auto Analog DVI yes or no wide or 4:3 yes or no 0~24hours Select to Auto Detect input signal Select Analog Signal Source as Input Select DVI Signal Source as Input Auto adjust the picture to default Select wide or 4:3 format for display Turn ON/OFF DDC-CI Support Select timing to turn off the monitor. Show t he infor mation of the main ima ge a nd sub-image source 33
Input Select Auto Config Image Ratio DDC-CI Off Timer Information Auto Analog DVI yes or no wide or 4:3 yes or no 0~24hours Select to Auto Detect input signal Select Analog Signal Source as Input Select DVI Signal Source as Input Auto adjust the picture to default Select wide or 4:3 format for display Turn ON/OFF DDC-CI Support Select timing to turn off the monitor. Show t he infor mation of the main ima ge a nd sub-image source 33
User Manual
Page 38
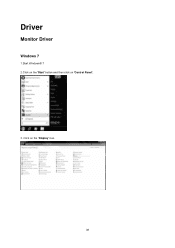
Click on 'Control Panel'. 3. Driver Monitor Driver Windows 7 1.Start Windows® 7 2.Click on the 'Start' button and then click on the 'Display' icon. 38
Click on 'Control Panel'. 3. Driver Monitor Driver Windows 7 1.Start Windows® 7 2.Click on the 'Start' button and then click on the 'Display' icon. 38
User Manual
Page 43
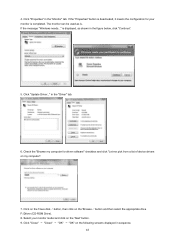
... monitor can be used as shown in sequence. 43 If the "Properties" button is deactivated, it means the configuration for driver software" checkbox and click "Let me pick from a list of device drivers on the following screens displayed in the figure below, click "Continue". 5. is displayed, as is completed. button and then select the appropriate drive F:\Driver (CD-ROM Drive). 8. Check the...
... monitor can be used as shown in sequence. 43 If the "Properties" button is deactivated, it means the configuration for driver software" checkbox and click "Let me pick from a list of device drivers on the following screens displayed in the figure below, click "Continue". 5. is displayed, as is completed. button and then select the appropriate drive F:\Driver (CD-ROM Drive). 8. Check the...
User Manual
Page 45
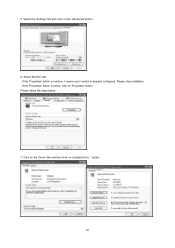
5. Please stop installation. - Please follow the steps below. 7. Click on the 'Driver' tab and then click on 'Properties' button. button. 45 If the 'Properties' button is inactive, it means your monitor is active, click on 'Update Driver...' Select 'Monitor' tab - If the 'Properties' button is properly configured. Select the 'Settings' tab then click on the 'Advanced' button. 6.
5. Please stop installation. - Please follow the steps below. 7. Click on the 'Driver' tab and then click on 'Properties' button. button. 45 If the 'Properties' button is inactive, it means your monitor is active, click on 'Update Driver...' Select 'Monitor' tab - If the 'Properties' button is properly configured. Select the 'Settings' tab then click on the 'Advanced' button. 6.
User Manual
Page 46
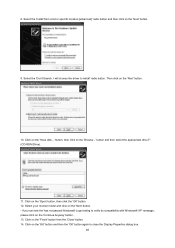
... disk...' Click on the 'OK' button and then the 'OK' button again to close the Display Properties dialog box. 46 Click on the 'Finish' button then the 'Close' button. 14. 8. button, then click on the 'Next' button. - Select your monitor model and click on the 'Browse...' Select the 'Install from a list or specific location [advanced]' radio button and then click on the...
... disk...' Click on the 'OK' button and then the 'OK' button again to close the Display Properties dialog box. 46 Click on the 'Finish' button then the 'Close' button. 14. 8. button, then click on the 'Next' button. - Select your monitor model and click on the 'Browse...' Select the 'Install from a list or specific location [advanced]' radio button and then click on the...
User Manual
Page 47
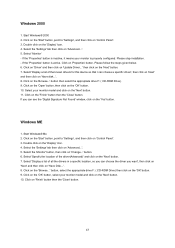
... driver you can choose a specific driver', then click on 'Next' and then click on the 'Display' Icon. 4. Click on the 'Open' button, then click on the 'Next' button. 10. Start Windows® Me 2. Select 'Display a list of the known drivers for this device so that I can see the 'Digital Signature Not Found' window, click on 'Have Disk...'. 8. Click on the 'OK' button, select your monitor model...
... driver you can choose a specific driver', then click on 'Next' and then click on the 'Display' Icon. 4. Click on the 'Open' button, then click on the 'Next' button. 10. Start Windows® Me 2. Select 'Display a list of the known drivers for this device so that I can see the 'Digital Signature Not Found' window, click on 'Have Disk...'. 8. Click on the 'OK' button, select your monitor model...

User Manual
Page 49
..., Sleep or Screen Saver); The AOC e-Saver features Smart Shutdown functions for your preferences (see example below . 49 You can click "RESET" to set the e-Saver to its default settings like below ). e-Saver Welcome to complete software installation. Under each of the four PC status, you may choose from the pull-down menu the desired time (in sleep/stand-by mode. 4) The monitor will...
..., Sleep or Screen Saver); The AOC e-Saver features Smart Shutdown functions for your preferences (see example below . 49 You can click "RESET" to set the e-Saver to its default settings like below ). e-Saver Welcome to complete software installation. Under each of the four PC status, you may choose from the pull-down menu the desired time (in sleep/stand-by mode. 4) The monitor will...
User Manual
Page 51
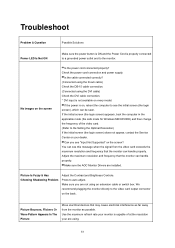
... in the applicable mode (the safe mode for Windows ME/XP/2000) and then change the frequency of at the resolution your dealer. Make sure the AOC Monitor Drivers are using. 51 Press to the video card output connector on every model. Picture Is Fuzzy & Has Ghosting Shadowing Problem Adjust the Contrast and Brightness Controls. Use the maximum refresh rate your monitor is not available on the back . No images on the screen? Picture Bounces, Flickers Or Wave Pattern...
... in the applicable mode (the safe mode for Windows ME/XP/2000) and then change the frequency of at the resolution your dealer. Make sure the AOC Monitor Drivers are using. 51 Press to the video card output connector on every model. Picture Is Fuzzy & Has Ghosting Shadowing Problem Adjust the Contrast and Brightness Controls. Use the maximum refresh rate your monitor is not available on the back . No images on the screen? Picture Bounces, Flickers Or Wave Pattern...
User Manual
Page 52
...-key (AUTO). or sized properly Picture has color defects (white does not look white) Adjust RGB color or select desired color temperature. Make sure your computer is damaged. Missing one of the primary colors (RED, GREEN, or BLUE) Inspect the monitor's video cable and make sure no pin is operational by hitting the CAPS LOCK key on the screen Use Windows 95/98/2000/ME/XP shut-down mode Adjust CLOCK and FOCUS. Horizontal or vertical disturbances...
...-key (AUTO). or sized properly Picture has color defects (white does not look white) Adjust RGB color or select desired color temperature. Make sure your computer is damaged. Missing one of the primary colors (RED, GREEN, or BLUE) Inspect the monitor's video cable and make sure no pin is operational by hitting the CAPS LOCK key on the screen Use Windows 95/98/2000/ME/XP shut-down mode Adjust CLOCK and FOCUS. Horizontal or vertical disturbances...

User Manual
Page 53
...) 53 Display Color Dot Clock e2343F /e2343Fk /e2343Fb TFT Color LED 58.42cm diagoanl 0.265mm(H) x 0.265mm(V) R, G, B Analog lnterface & Digital Interface H/V TTL 16.7M Colors 148.5 MHz Horizontal scan range 30 kHz - 83 kHz Horizontal scan Size(Maximum) 509.2mm Vertical scan range 55 Hz - 75 Hz Vertical scan Size(Maximum) 286.4mm Optimal preset resolution 1920 x 1080 (60 Hz) Highest preset resolution Resolution Plug & Play 1920 x 1080 (60 Hz) VESA DDC2B/CI Input Connector Input Video Signal Power Source Power Consumption...
...) 53 Display Color Dot Clock e2343F /e2343Fk /e2343Fb TFT Color LED 58.42cm diagoanl 0.265mm(H) x 0.265mm(V) R, G, B Analog lnterface & Digital Interface H/V TTL 16.7M Colors 148.5 MHz Horizontal scan range 30 kHz - 83 kHz Horizontal scan Size(Maximum) 509.2mm Vertical scan range 55 Hz - 75 Hz Vertical scan Size(Maximum) 286.4mm Optimal preset resolution 1920 x 1080 (60 Hz) Highest preset resolution Resolution Plug & Play 1920 x 1080 (60 Hz) VESA DDC2B/CI Input Connector Input Video Signal Power Source Power Consumption...
User Manual
Page 57
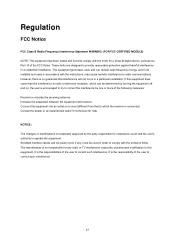
... responsible for help. It is the responsibility of the following measures: Reorient or relocate the receiving antenna. Shielded interface cables and AC power cord, if any, must be determined by turning the equipment off and on a circuit different from that interference will not occur in a residential installation. Connect the equipment into an outlet on , the user is not...
... responsible for help. It is the responsibility of the following measures: Reorient or relocate the receiving antenna. Shielded interface cables and AC power cord, if any, must be determined by turning the equipment off and on a circuit different from that interference will not occur in a residential installation. Connect the equipment into an outlet on , the user is not...
User Manual
Page 60
...parts by anyone other than an AOC Authorized Service Center Improper environment Excessive or inadequate heating or air conditioning or electrical powers failures, surges, or other than ordinary commercial or industrial application Adjustment by non-authorized source Repair, modification, or installation of purchase, to the AOC Authorized Service Center. Service Warranty Statement for Europe LIMITED THREE-YEAR WARRANTY* AOC Color Monitors sold within Europe AOC.... AOC International (Europe) GmbH is responsible neither for any of the product firmware or hardware that are replaced become...
...parts by anyone other than an AOC Authorized Service Center Improper environment Excessive or inadequate heating or air conditioning or electrical powers failures, surges, or other than ordinary commercial or industrial application Adjustment by non-authorized source Repair, modification, or installation of purchase, to the AOC Authorized Service Center. Service Warranty Statement for Europe LIMITED THREE-YEAR WARRANTY* AOC Color Monitors sold within Europe AOC.... AOC International (Europe) GmbH is responsible neither for any of the product firmware or hardware that are replaced become...

User Manual
Page 62
... for CRT Tube or LCD Panel after the original date of product across international borders. The parts or product that are replaced become the property of the countries within North America as a result of: Shipping or improper installation or maintenance Misuse Neglect Any cause other than ordinary commercial or industrial application Adjustment by non-authorized source Repair, modification, or installation...
... for CRT Tube or LCD Panel after the original date of product across international borders. The parts or product that are replaced become the property of the countries within North America as a result of: Shipping or improper installation or maintenance Misuse Neglect Any cause other than ordinary commercial or industrial application Adjustment by non-authorized source Repair, modification, or installation...


