
User's Manual_e960Srda
Page 2
......9 Setup Stand & Base ...10 Adjusting Viewing Angle...12 Connecting the Monitor...14 Wall Mounting...15 Adjusting ...16 Setting Optimal Resolution...16 Windows Vista ...16 Windows XP...18 Windows ME/2000...19 Windows 8...19 Hotkeys ...22 OSD Setting ...24 Luminance...25 Image Setup ...27 Color Setup ...28 Picture Boost ...29 OSD Setup ...30 Extra ...31 Exit ...32 LED Indicator...33 Driver ...34 Monitor Driver...34 Windows 2000 ...34 Windows ME ...34 Windows XP...35 Windows Vista ...38 Windows 7...40 Windows 8...44 i-Menu ...44 e-Saver ...45 Screen+ ...46 Troubleshoot ...47 Specification...50...
......9 Setup Stand & Base ...10 Adjusting Viewing Angle...12 Connecting the Monitor...14 Wall Mounting...15 Adjusting ...16 Setting Optimal Resolution...16 Windows Vista ...16 Windows XP...18 Windows ME/2000...19 Windows 8...19 Hotkeys ...22 OSD Setting ...24 Luminance...25 Image Setup ...27 Color Setup ...28 Picture Boost ...29 OSD Setup ...30 Extra ...31 Exit ...32 LED Indicator...33 Driver ...34 Monitor Driver...34 Windows 2000 ...34 Windows ME ...34 Windows XP...35 Windows Vista ...38 Windows 7...40 Windows 8...44 i-Menu ...44 e-Saver ...45 Screen+ ...46 Troubleshoot ...47 Specification...50...

User's Manual_e960Srda
Page 5
... of power source indicated on the label. Power The monitor should be used for monitors with power adapter). 5 Unplug the unit during a lightning storm or when it will not be operated only from damage due to your home, consult your outlet does not accommodate the three-wire plug, have an electrician install the correct outlet, or use only with the attached power adapter...
... of power source indicated on the label. Power The monitor should be used for monitors with power adapter). 5 Unplug the unit during a lightning storm or when it will not be operated only from damage due to your home, consult your outlet does not accommodate the three-wire plug, have an electrician install the correct outlet, or use only with the attached power adapter...
User's Manual_e960Srda
Page 14
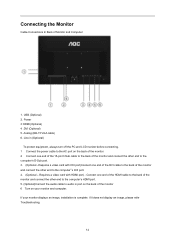
... monitor displays an image, installation is complete. Analog (DB-15 VGA cable) 6. Connecting the Monitor Cable Connections In Back of the monitor and connect the other end to the computer's D-Sub port. 3. (Optional -Requires a video card with HDMI port) - Connect one end of the HDMI cable to the back of the monitor and connect the other end to the computer‟s DVI port. 4. (Optional - USB (Optional) 2. If it does not display an image, please refer Troubleshooting. 14 Line in port...
... monitor displays an image, installation is complete. Analog (DB-15 VGA cable) 6. Connecting the Monitor Cable Connections In Back of the monitor and connect the other end to the computer's D-Sub port. 3. (Optional -Requires a video card with HDMI port) - Connect one end of the HDMI cable to the back of the monitor and connect the other end to the computer‟s DVI port. 4. (Optional - USB (Optional) 2. If it does not display an image, please refer Troubleshooting. 14 Line in port...

User's Manual_e960Srda
Page 15
... user's manual that came with the holes in the back of the arm with the optional wall mounting arm for all models, please check with the dealer or official department of the monitor. Follow these steps: 1 Remove the base. 2 Follow the manufacturer's instructions to the wall. Line up the holes of the monitor. 4 Insert the 4 screws into the holes and tighten. 5 Reconnect the cables...
... user's manual that came with the holes in the back of the arm with the optional wall mounting arm for all models, please check with the dealer or official department of the monitor. Follow these steps: 1 Remove the base. 2 Follow the manufacturer's instructions to the wall. Line up the holes of the monitor. 4 Insert the 4 screws into the holes and tighten. 5 Reconnect the cables...
User's Manual_e960Srda
Page 23
E2060SW: 1 Auto/Exit 2 ECO(DCR)/< 3 4:3 or Wide / > 4 Menu/Enter 5 Power E960SRD: 1 2 3 4 5 Source/Auto/Exit ECO(DCR)/< > Menu/Enter Power Power Press the Power button to turn on when there is no OSD. ( Eco mode hot key may not be available in all models). Volume / > When there is no OSD,Press Volume button to select the Eco mode of brightness and DCR/I -Care)/ < Press the Eco key continuously to active volume adjustment bar,Press Eco (DCR/I -Care on /off the monitor.
E2060SW: 1 Auto/Exit 2 ECO(DCR)/< 3 4:3 or Wide / > 4 Menu/Enter 5 Power E960SRD: 1 2 3 4 5 Source/Auto/Exit ECO(DCR)/< > Menu/Enter Power Power Press the Power button to turn on when there is no OSD. ( Eco mode hot key may not be available in all models). Volume / > When there is no OSD,Press Volume button to select the Eco mode of brightness and DCR/I -Care)/ < Press the Eco key continuously to active volume adjustment bar,Press Eco (DCR/I -Care on /off the monitor.

User's Manual_e960Srda
Page 24
... power button to turn the monitor on . MENU button Notes: 1) If the product has only one signal input, the item of "Input Select" is disable to adjust. 2) If the product screen size is 4:3 or input signal resolution is wide format, the item of "Image Ratio" is off accordingly. 24 OSD Setting Basic and simple instruction on the control keys. 1) Press the MENU-button to activate the OSD window. 2) Press < or > to navigate through the sub-menu functions. AUTO...
... power button to turn the monitor on . MENU button Notes: 1) If the product has only one signal input, the item of "Input Select" is disable to adjust. 2) If the product screen size is 4:3 or input signal resolution is wide format, the item of "Image Ratio" is off accordingly. 24 OSD Setting Basic and simple instruction on the control keys. 1) Press the MENU-button to activate the OSD window. 2) Press < or > to navigate through the sub-menu functions. AUTO...

User's Manual_e960Srda
Page 31
... display. Reset the menu to enter. to default. Show the information of the main image and sub-image source. 31 Turn ON/OFF DDC-CI Support. Input Select Auto / Analog / DVI / HDMI Input Select Auto / Analog / DVI Input Select Auto Config Off timer Image Ratio DDC-CI Reset Analog yes or no 0-24hrs wide or 4:3 yes or no yes or no Information Select input signal source. ( E2260PHU/E2260SHU/ E2460PW HU/E2460SW HU/E2460SHU/E2460PHU) Select input signal source...
... display. Reset the menu to enter. to default. Show the information of the main image and sub-image source. 31 Turn ON/OFF DDC-CI Support. Input Select Auto / Analog / DVI / HDMI Input Select Auto / Analog / DVI Input Select Auto Config Off timer Image Ratio DDC-CI Reset Analog yes or no 0-24hrs wide or 4:3 yes or no yes or no Information Select input signal source. ( E2260PHU/E2260SHU/ E2460PW HU/E2460SW HU/E2460SHU/E2460PHU) Select input signal source...

User's Manual_e960Srda
Page 34
... can see the 'Digital Signature Not Found' window, click on 'Control Panel'. 3. Select the 'Monitor' button, then click on 'Properties' button. Select 'Specify the location of the known drivers for this device so that I can choose a specific driver', then click on 'Next' and then click on 'Have Disk...'. 8. Click on the 'OK' button. 10. Please stop installation. - Click on the 'Open' button, then click...
... can see the 'Digital Signature Not Found' window, click on 'Control Panel'. 3. Select the 'Monitor' button, then click on 'Properties' button. Select 'Specify the location of the known drivers for this device so that I can choose a specific driver', then click on 'Next' and then click on 'Have Disk...'. 8. Click on the 'OK' button. 10. Please stop installation. - Click on the 'Open' button, then click...

User's Manual_e960Srda
Page 36
Select 'Monitor' tab - Please follow the steps below. 7. If the 'Properties' button is inactive, it means your monitor is active, click on 'Properties' button. Click on the 'Driver' tab and then click on the 'Advanced' button. 6. 5. button. 36 Please stop installation. - Select the 'Settings' tab then click on 'Update Driver...' If the 'Properties' button is properly configured.
Select 'Monitor' tab - Please follow the steps below. 7. If the 'Properties' button is inactive, it means your monitor is active, click on 'Properties' button. Click on the 'Driver' tab and then click on the 'Advanced' button. 6. 5. button. 36 Please stop installation. - Select the 'Settings' tab then click on 'Update Driver...' If the 'Properties' button is properly configured.

User's Manual_e960Srda
Page 39
... disk...' The monitor can be used as shown in the "Monitor" tab. Check the "Browse my computer for your monitor model and click on the 'Browse...' in sequence. 39 4. Click on my computer". 7. button, then click on the 'Next' button. 9. Select your monitor is . is displayed, as is completed. If the message "Windows needs..." button and then select the appropriate drive F:\Driver (CD-ROM...
... disk...' The monitor can be used as shown in the "Monitor" tab. Check the "Browse my computer for your monitor model and click on the 'Browse...' in sequence. 39 4. Click on my computer". 7. button, then click on the 'Next' button. 9. Select your monitor is . is displayed, as is completed. If the message "Windows needs..." button and then select the appropriate drive F:\Driver (CD-ROM...

User's Manual_e960Srda
Page 44
... on the monitor. Click the "Driver" tab. 9. Windows 8 1. Click on the "Change display settings" button. 6. i-Menu makes it easy to the following directory: X:\Driver\module name (where X is the drive letter designator for driver software" button. 10. The system will be copied from a list of device drivers on the "Display" icon. 5. Start Windows® 8 2. Click the "Advanced Settings" button. 7. The files will automatically select the maximum refresh rate and corresponding Color Matching...
... on the monitor. Click the "Driver" tab. 9. Windows 8 1. Click on the "Change display settings" button. 6. i-Menu makes it easy to the following directory: X:\Driver\module name (where X is the drive letter designator for driver software" button. 10. The system will be copied from a list of device drivers on the "Display" icon. 5. Start Windows® 8 2. Click the "Advanced Settings" button. 7. The files will automatically select the maximum refresh rate and corresponding Color Matching...

User's Manual_e960Srda
Page 46
... pull-down menu the desired time (in minutes) for your preferences (see example below . Under each pane displays a different window. You can click "RESET" to set the e-Saver to complete software installation. the actual shutdown time depends on "driver/e-Saver/setup.exe" to start installing the e-Saver software, follow the install wizard to its default settings like below ). You only need to drag the window to automatically...
... pull-down menu the desired time (in minutes) for your preferences (see example below . Under each pane displays a different window. You can click "RESET" to set the e-Saver to complete software installation. the actual shutdown time depends on "driver/e-Saver/setup.exe" to start installing the e-Saver software, follow the install wizard to its default settings like below ). You only need to drag the window to automatically...

User's Manual_e960Srda
Page 48
... the video card. (Refer to the computer. Press to see "Input Not Supported" on the screen? Can you are installed. Make sure you see the initial screen (the login screen), which can handle properly. Check the power cord connection and power supply. You can see this message when the signal from the monitor as possible. Make sure the AOC Monitor Drivers are not using the DVI cable) Check the DVI cable connection. * DVI input is operational by hitting the CAPS LOCK...
... the video card. (Refer to the computer. Press to see "Input Not Supported" on the screen? Can you are installed. Make sure you see the initial screen (the login screen), which can handle properly. Check the power cord connection and power supply. You can see this message when the signal from the monitor as possible. Make sure the AOC Monitor Drivers are not using the DVI cable) Check the DVI cable connection. * DVI input is operational by hitting the CAPS LOCK...
User's Manual_e960Srda
Page 49
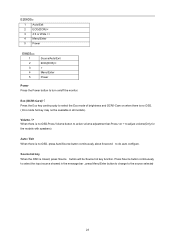
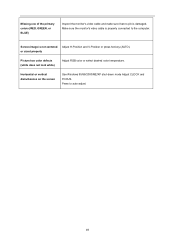
Missing one of the primary colors (RED, GREEN, or BLUE) Inspect the monitor's video cable and make sure that no pin is not centered Adjust H-Position and V-Position or press hot-key (AUTO). Horizontal or vertical disturbances on the screen Use Windows 95/98/2000/ME/XP shut-down mode Adjust CLOCK and FOCUS. Make sure the monitor's video cable is properly connected to auto-adjust. 49 Screen image is damaged. or sized properly Picture has color defects (white does not look white) Adjust RGB color or select desired color temperature. Press to the computer.
Missing one of the primary colors (RED, GREEN, or BLUE) Inspect the monitor's video cable and make sure that no pin is not centered Adjust H-Position and V-Position or press hot-key (AUTO). Horizontal or vertical disturbances on the screen Use Windows 95/98/2000/ME/XP shut-down mode Adjust CLOCK and FOCUS. Make sure the monitor's video cable is properly connected to auto-adjust. 49 Screen image is damaged. or sized properly Picture has color defects (white does not look white) Adjust RGB color or select desired color temperature. Press to the computer.
User's Manual_e960Srda
Page 50
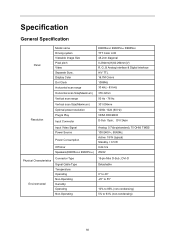
...-condensing) 50 Display Color Dot Clock Horizontal scan range Horizontal scan Size(Maximum) Vertical scan range Vertical scan Size(Maximum) Optimal preset resolution Plug & Play Input Connector E960SRDA/ E960PRDA/ E960SRD TFT Color LCD 48.2cm diagonal 0.294mm(H)X0.294mm(V) R, G, B Analog lnterface & Digital Interface H/V TTL 16.7M Colors 108MHz 30 kHz - 83 kHz 376.32mm 50 Hz - 76 Hz 301.056mm 1280x 1024 (60 Hz) VESA DDC2B/CI D-Sub 15pin; DVI 24pin Input Video Signal Power Source Power Consumption Off...
...-condensing) 50 Display Color Dot Clock Horizontal scan range Horizontal scan Size(Maximum) Vertical scan range Vertical scan Size(Maximum) Optimal preset resolution Plug & Play Input Connector E960SRDA/ E960PRDA/ E960SRD TFT Color LCD 48.2cm diagonal 0.294mm(H)X0.294mm(V) R, G, B Analog lnterface & Digital Interface H/V TTL 16.7M Colors 108MHz 30 kHz - 83 kHz 376.32mm 50 Hz - 76 Hz 301.056mm 1280x 1024 (60 Hz) VESA DDC2B/CI D-Sub 15pin; DVI 24pin Input Video Signal Power Source Power Consumption Off...
User's Manual_e960Srda
Page 53
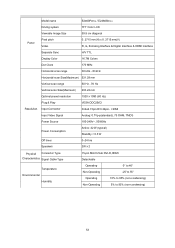
... TFT Color LCD Viewable Image Size 59.8 cm diagonal Panel Pixel pitch Video 0. 2715 mm(H) x 0. 2715 mm(V) R, G, B Analog lnterface & Digital Interface & HDMI lnterface Separate Sync H/V TTL Display Color 16.7M Colors Dot Clock 170 MHz Horizontal scan range 30 kHz - 83 kHz Horizontal scan Size(Maximum) 521.28 mm Vertical scan range 50 Hz - 76 Hz Vertical scan Size(Maximum) 293.22 mm Optimal preset resolution 1920 x 1080 (60 Hz) Plug & Play Resolution Input Connector VESA DDC2B/CI D-Sub 15pin DVI...
... TFT Color LCD Viewable Image Size 59.8 cm diagonal Panel Pixel pitch Video 0. 2715 mm(H) x 0. 2715 mm(V) R, G, B Analog lnterface & Digital Interface & HDMI lnterface Separate Sync H/V TTL Display Color 16.7M Colors Dot Clock 170 MHz Horizontal scan range 30 kHz - 83 kHz Horizontal scan Size(Maximum) 521.28 mm Vertical scan range 50 Hz - 76 Hz Vertical scan Size(Maximum) 293.22 mm Optimal preset resolution 1920 x 1080 (60 Hz) Plug & Play Resolution Input Connector VESA DDC2B/CI D-Sub 15pin DVI...
User's Manual_e960Srda
Page 54
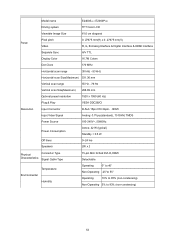
... TFT Color LCD Viewable Image Size 61.0 cm diagonal Panel Pixel pitch Video 0. 27675 mm(H) x 0. 27675 mm(V) R, G, B Analog lnterface & Digital Interface & HDMI lnterface Separate Sync H/V TTL Display Color 16.7M Colors Dot Clock 170 MHz Horizontal scan range 30 kHz - 83 kHz Horizontal scan Size(Maximum) 531.36 mm Vertical scan range 55 Hz - 76 Hz Vertical scan Size(Maximum) 298.89 mm Optimal preset resolution 1920 x 1080 (60 Hz) Resolution Plug & Play Input Connector VESA DDC2B/CI D-Sub 15pin DVI...
... TFT Color LCD Viewable Image Size 61.0 cm diagonal Panel Pixel pitch Video 0. 27675 mm(H) x 0. 27675 mm(V) R, G, B Analog lnterface & Digital Interface & HDMI lnterface Separate Sync H/V TTL Display Color 16.7M Colors Dot Clock 170 MHz Horizontal scan range 30 kHz - 83 kHz Horizontal scan Size(Maximum) 531.36 mm Vertical scan range 55 Hz - 76 Hz Vertical scan Size(Maximum) 298.89 mm Optimal preset resolution 1920 x 1080 (60 Hz) Resolution Plug & Play Input Connector VESA DDC2B/CI D-Sub 15pin DVI...

User's Manual_e960Srda
Page 65
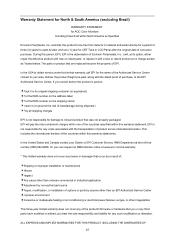
... Service Center under the following condition: Make sure the LCD Monitor is not available for warranty instructions. Deliver the product freight pre-paid, along with the dated proof of manufacturing indicated on the product. AOC International (Europe) B.V. This includes the international border within the European Union. will start 3 months after the original date of options or parts...
... Service Center under the following condition: Make sure the LCD Monitor is not available for warranty instructions. Deliver the product freight pre-paid, along with the dated proof of manufacturing indicated on the product. AOC International (Europe) B.V. This includes the international border within the European Union. will start 3 months after the original date of options or parts...
User's Manual_e960Srda
Page 67
... (3) years for parts & labor and one of the countries specified within one (1) year for CRT Tube or LCD Panel after the original...Adjustment by non-authorized source Repair, modification, or installation of options or parts by anyone other than an EPI Authorized Service Center Improper environment Excessive or inadequate heating or air conditioning or electrical power failures, surges, or other irregularities This three-year limited warranty does not cover any of the product's firmware or hardware that are replaced...AOC Color Monitors Including those Sold within this warranty statements.
... (3) years for parts & labor and one of the countries specified within one (1) year for CRT Tube or LCD Panel after the original...Adjustment by non-authorized source Repair, modification, or installation of options or parts by anyone other than an EPI Authorized Service Center Improper environment Excessive or inadequate heating or air conditioning or electrical power failures, surges, or other irregularities This three-year limited warranty does not cover any of the product's firmware or hardware that are replaced...AOC Color Monitors Including those Sold within this warranty statements.

Spec Sheet_e2260Sd
Page 1
...) Horizontal: 30K~83KHz Vertical: 50~76 Hz 146MHz (max) 1680x1050@60Hz 1680x1050@60Hz 640x480@60/72/67/75Hz, 720x400@60Hz 800x600@56/60/72/75Hz, 832x624@75Hz 1024x768@60/75Hz, 1280x1024@60/75Hz, 1440x900@60Hz, 1680x1050@60Hz Color Signal Input Digital Input Connectors Power Source Power Consumption Plug & Play User Control OSD Languages Regulations 16.7M Analog: 0.7Vp-p(standard), 75 OHM, Positive DVI-D with HDCP* Analog RGB Signal: 15-pin D-sub Male Digital Signal...
...) Horizontal: 30K~83KHz Vertical: 50~76 Hz 146MHz (max) 1680x1050@60Hz 1680x1050@60Hz 640x480@60/72/67/75Hz, 720x400@60Hz 800x600@56/60/72/75Hz, 832x624@75Hz 1024x768@60/75Hz, 1280x1024@60/75Hz, 1440x900@60Hz, 1680x1050@60Hz Color Signal Input Digital Input Connectors Power Source Power Consumption Plug & Play User Control OSD Languages Regulations 16.7M Analog: 0.7Vp-p(standard), 75 OHM, Positive DVI-D with HDCP* Analog RGB Signal: 15-pin D-sub Male Digital Signal...


