Spec Sheet_i2269Vw
Page 1
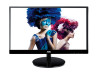
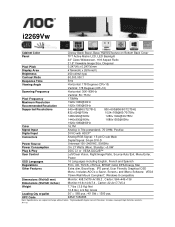
i2269Vw Cabinet Color Panel Pixel Pitch Display Area Brightness Contrast Ratio Response Time Viewing Angle Glossy Black Bezel, Base; Hairline texture on Bottom Back Cover TFT ... Ratio 21.5" Viewable Image Size, Diagonal 0.247(H) x 0.247(V)mm 476mm(H) x 267mm(V) 250 cd/m2 (typ) 50,000,000:1 5ms Horizontal: 178 Degrees (CR>10) Vertical: 178 Degrees (CR>10) Scanning Frequency Horizontal: 30K~83KHz Vertical: 50~75 Hz Pixel Frequency Maximum Resolution Recommended Resolution 170MHz 1920x1080@60Hz 1920x1080@60Hz Supported Resolutions Color...
i2269Vw Cabinet Color Panel Pixel Pitch Display Area Brightness Contrast Ratio Response Time Viewing Angle Glossy Black Bezel, Base; Hairline texture on Bottom Back Cover TFT ... Ratio 21.5" Viewable Image Size, Diagonal 0.247(H) x 0.247(V)mm 476mm(H) x 267mm(V) 250 cd/m2 (typ) 50,000,000:1 5ms Horizontal: 178 Degrees (CR>10) Vertical: 178 Degrees (CR>10) Scanning Frequency Horizontal: 30K~83KHz Vertical: 50~75 Hz Pixel Frequency Maximum Resolution Recommended Resolution 170MHz 1920x1080@60Hz 1920x1080@60Hz Supported Resolutions Color...
User's Manual_i2269Vw
Page 2
... Other ...7 Setup ...8 Contents in Box ...8 Setup Stand & Base ...9 Adjusting Viewing Angle...10 Connecting the Monitor...11 Adjusting ...12 Setting Optimal Resolution ...12 Windows Vista ...12 Windows XP ...14 Windows ME/2000...15 Hotkeys ...16 Using"Mobile High-Defintion Link" ...17 OSD Setting...20 Luminance ... OSD Setup ...29 Extra ...31 Exit...33 LED Indicator ...34 Driver ...35 Monitor Driver ...35 Windows 7 ...35 Windows Vista ...39 Windows XP ...41 Windows 2000 ...44 Windows ME...44 i-Menu ...45 e-Saver ...46 Screen+ ...47 Troubleshoot ...48 Specification...49 General Specification...49...
... Other ...7 Setup ...8 Contents in Box ...8 Setup Stand & Base ...9 Adjusting Viewing Angle...10 Connecting the Monitor...11 Adjusting ...12 Setting Optimal Resolution ...12 Windows Vista ...12 Windows XP ...14 Windows ME/2000...15 Hotkeys ...16 Using"Mobile High-Defintion Link" ...17 OSD Setting...20 Luminance ... OSD Setup ...29 Extra ...31 Exit...33 LED Indicator ...34 Driver ...35 Monitor Driver ...35 Windows 7 ...35 Windows Vista ...39 Windows XP ...41 Windows 2000 ...44 Windows ME...44 i-Menu ...45 e-Saver ...46 Screen+ ...47 Troubleshoot ...48 Specification...49 General Specification...49...
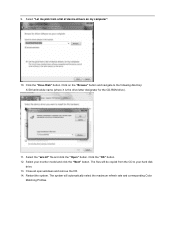
User's Manual_i2269Vw
Page 39
... icons". 4. Click the "Advanced Settings" button. 7. Open the "Update Driver Software-Generic PnP Monitor" window by " to the following directory: X:\Driver\module name (where X is the drive letter designator for driver software" button. 10. Close all open windows and remove the CD. 15. Click on the 'Start' button and then click on my...
... icons". 4. Click the "Advanced Settings" button. 7. Open the "Update Driver Software-Generic PnP Monitor" window by " to the following directory: X:\Driver\module name (where X is the drive letter designator for driver software" button. 10. Close all open windows and remove the CD. 15. Click on the 'Start' button and then click on my...
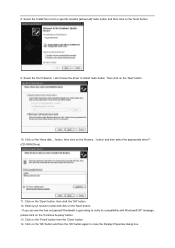
User's Manual_i2269Vw
Page 42
Click on my computer". 10. The system will be copied from a list of device drivers on the "Browse" button and navigate to your monitor model and click the "Next" button. ... from the CD to the following directory: X:\Driver\module name (where X is the drive letter designator for the CD-ROM drive). 11. Close all open windows and remove the CD. 14. The files will automatically select the maximum refresh rate and corresponding Color Matching Profiles.
Click on my computer". 10. The system will be copied from a list of device drivers on the "Browse" button and navigate to your monitor model and click the "Next" button. ... from the CD to the following directory: X:\Driver\module name (where X is the drive letter designator for the CD-ROM drive). 11. Close all open windows and remove the CD. 14. The files will automatically select the maximum refresh rate and corresponding Color Matching Profiles.
User's Manual_i2269Vw
Page 47
... the 'OK' button and then the 'OK' button again to close the Display Properties dialog box. I will choose the driver to verify its compatibility with Windows® XP' message, please click on the 'Continue Anyway' button. 13. Select your monitor model and click on the 'Finish' button then the 'Close' button... select the appropriate drive F: (CD-ROM Drive). 11. Click on the 'Next' button. - Then click on the 'Browse...' button, then click on the 'Next' button. 10. If you can see the 'has not passed Windows® Logo testing to install' radio button.
... the 'OK' button and then the 'OK' button again to close the Display Properties dialog box. I will choose the driver to verify its compatibility with Windows® XP' message, please click on the 'Continue Anyway' button. 13. Select your monitor model and click on the 'Finish' button then the 'Close' button... select the appropriate drive F: (CD-ROM Drive). 11. Click on the 'Next' button. - Then click on the 'Browse...' button, then click on the 'Next' button. 10. If you can see the 'has not passed Windows® Logo testing to install' radio button.
User's Manual_i2269Vw
Page 48
...click on the 'OK' button. 9. Windows ME 1. button, select the appropriate drive F: ( CD-ROM Drive) then click on the 'Next' button. 7. If the 'Properties' button is inactive, it means your monitor model and click on the 'Next' button. 10. Click on 'Advanced...'. 5. If ...you can choose the driver you can see the 'Digital Signature Not Found' window, click on 'Change...' Select the 'Settings' tab then click on the 'Browse...' button. 6....
...click on the 'OK' button. 9. Windows ME 1. button, select the appropriate drive F: ( CD-ROM Drive) then click on the 'Next' button. 7. If the 'Properties' button is inactive, it means your monitor model and click on the 'Next' button. 10. Click on 'Advanced...'. 5. If ...you can choose the driver you can see the 'Digital Signature Not Found' window, click on 'Change...' Select the 'Settings' tab then click on the 'Browse...' button. 6....


