
Operating Instructions
Page 1
... information call toll free 1-800-BUY-AIWA (United States and Puerto Rico) 8A-NFZ-923-01 000415AKH-U-9 U Serial No. Model No. COMPACT DISC STEREO SYSTEM SISTEMA ESTEREO CON REPRODUCTOR DE DISCOS COMPACTOS CHAINE STEREO AVEC LECTEUR DE DISQUES COMPACTS NSX-AJ14 OPERATING INSTRUCTIONS MANUAL DE INSTRUCCIONES MODE D'EMPLOI En (English) E (Español) F (Français) Owner's record For your convenience, record the model number and serial number (you contact your set) in case...
... information call toll free 1-800-BUY-AIWA (United States and Puerto Rico) 8A-NFZ-923-01 000415AKH-U-9 U Serial No. Model No. COMPACT DISC STEREO SYSTEM SISTEMA ESTEREO CON REPRODUCTOR DE DISCOS COMPACTOS CHAINE STEREO AVEC LECTEUR DE DISQUES COMPACTS NSX-AJ14 OPERATING INSTRUCTIONS MANUAL DE INSTRUCCIONES MODE D'EMPLOI En (English) E (Español) F (Français) Owner's record For your convenience, record the model number and serial number (you contact your set) in case...
Operating Instructions
Page 2
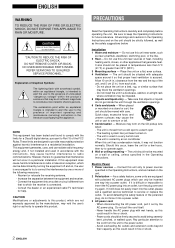
..., uses, and can radiate radio frequency energy and, if not installed and used in temperatures less than 5°C (41°F) or greater than 35°C (95°F). 3 Mounting surface - CAUTION Modifications or adjustments to operate this product, which the receiver is moved from that to the presence of electric shock to insert the AC power plug into an outlet, turn the plug...
..., uses, and can radiate radio frequency energy and, if not installed and used in temperatures less than 5°C (41°F) or greater than 35°C (95°F). 3 Mounting surface - CAUTION Modifications or adjustments to operate this product, which the receiver is moved from that to the presence of electric shock to insert the AC power plug into an outlet, turn the plug...
Operating Instructions
Page 3
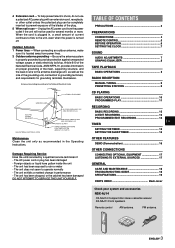
...8 RADIO RECEPTION MANUAL TUNING 9 PRESETTING STATIONS 9 CD PLAYING BASIC OPERATIONS 10 PROGRAMMED PLAY 11 RECORDING BASIC RECORDING 12 AI EDIT RECORDING 13 PROGRAMMED EDIT RECORDING 14 En TIMER SETTING THE TIMER 15 SETTING THE SLEEP TIMER 16 OTHER FEATURES DEMO (Demonstration 16 OTHER CONNECTIONS CONNECTING OPTIONAL EQUIPMENT 17 LISTENING TO EXTERNAL SOURCES 17 GENERAL CARE AND MAINTENANCE 18 TROUBLESHOOTING GUIDE 18 SPECIFICATIONS 19 PARTS INDEX Back cover Check your system and accessories NSX-AJ14 CX-NAJ14 Compact disc stereo cassette receiver SX-NAJ11 Front speakers Remote...
...8 RADIO RECEPTION MANUAL TUNING 9 PRESETTING STATIONS 9 CD PLAYING BASIC OPERATIONS 10 PROGRAMMED PLAY 11 RECORDING BASIC RECORDING 12 AI EDIT RECORDING 13 PROGRAMMED EDIT RECORDING 14 En TIMER SETTING THE TIMER 15 SETTING THE SLEEP TIMER 16 OTHER FEATURES DEMO (Demonstration 16 OTHER CONNECTIONS CONNECTING OPTIONAL EQUIPMENT 17 LISTENING TO EXTERNAL SOURCES 17 GENERAL CARE AND MAINTENANCE 18 TROUBLESHOOTING GUIDE 18 SPECIFICATIONS 19 PARTS INDEX Back cover Check your system and accessories NSX-AJ14 CX-NAJ14 Compact disc stereo cassette receiver SX-NAJ11 Front speakers Remote...
Operating Instructions
Page 4
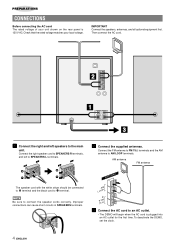
... SPEAKERS L terminals. 2 Connect the supplied antennas. Check that the rated voltage matches your unit shown on the rear panel is plugged into an AC outlet for the first time. Improper connections can cause short circuits in SPEAKERS terminals. 3 Connect the AC cord to 9 terminal. Connect the FM antenna to FM 75 Ω terminals and the AM antenna to connect the speaker cords correctly. To deactivate the DEMO, set the clock...
... SPEAKERS L terminals. 2 Connect the supplied antennas. Check that the rated voltage matches your unit shown on the rear panel is plugged into an AC outlet for the first time. Improper connections can cause short circuits in SPEAKERS terminals. 3 Connect the AC cord to 9 terminal. Connect the FM antenna to FM 75 Ω terminals and the AM antenna to connect the speaker cords correctly. To deactivate the DEMO, set the clock...
Operating Instructions
Page 5
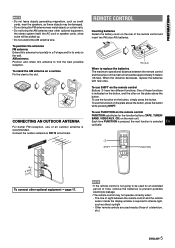
... antenna near the speakers, as direct sunlight - The line of a television, etc.) 5 ENGLISH When to intense light, such as these functions is selected En cyclically. Other remote controls are used for the function buttons (TAPE, TUNER/ BAND, VIDEO/AUX, CD) on the main unit should be picked up. • Do not unwind the AM antenna wire. To position the antennas FM antenna: Extend this antenna horizontally in a T-shape and fix...
... antenna near the speakers, as direct sunlight - The line of a television, etc.) 5 ENGLISH When to intense light, such as these functions is selected En cyclically. Other remote controls are used for the function buttons (TAPE, TUNER/ BAND, VIDEO/AUX, CD) on the main unit should be picked up. • Do not unwind the AM antenna wire. To position the antennas FM antenna: Extend this antenna horizontally in a T-shape and fix...
Operating Instructions
Page 6
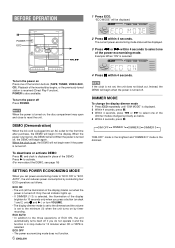
... function is in the display. If the clock is received (Direct Play Function). DEMO (Demonstration) When the AC cord is set , the unit does not black out. Only the red indicator lights up. • If DIMMER (1-3) is selected, the illumination of the inserted disc begins, or the previously tuned station is not set to the minimum (0) when the unit turns on , the disc compartment may open...
... function is in the display. If the clock is received (Direct Play Function). DEMO (Demonstration) When the AC cord is set , the unit does not black out. Only the red indicator lights up. • If DIMMER (1-3) is selected, the illumination of the inserted disc begins, or the previously tuned station is not set to the minimum (0) when the unit turns on , the disc compartment may open...
Operating Instructions
Page 7
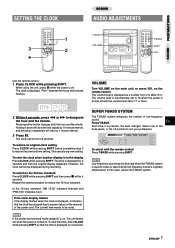
... the power-economizing mode (page 6) is on the remote control. SETTING THE CLOCK SOUND AUDIO ADJUSTMENTS SOUND PREPARATIONS Use the remote control. 1 Press CLOCK while pressing SHIFT. Pressing either button changes both the hour and the minute. Holding it down will vary by 10-minute interval, and pressing it indicates that the time is pressed, the level changes. Repeat the same procedure to restore the previous time setting. Press T-BASS. Low frequency sound may be...
... the power-economizing mode (page 6) is on the remote control. SETTING THE CLOCK SOUND AUDIO ADJUSTMENTS SOUND PREPARATIONS Use the remote control. 1 Press CLOCK while pressing SHIFT. Pressing either button changes both the hour and the minute. Holding it down will vary by 10-minute interval, and pressing it indicates that the time is pressed, the level changes. Repeat the same procedure to restore the previous time setting. Press T-BASS. Low frequency sound may be...
Operating Instructions
Page 8
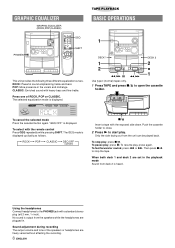
... play . Sound adjustment during recording The output volume and tone of ROCK, POP or CLASSIC. "GEQ OFF" is displayed cyclically as follows. To resume play , press Z. When both deck 1 and deck 2 are set in the vocals and midrange CLASSIC: Enriched sound with a standard stereo plug (ø6.3 mm, 1/4 inch). Using the headphones Connect headphones to open the cassette holder. Use type I (normal) tapes only. 1 Press TAPE and press Z to the PHONES jack...
... play . Sound adjustment during recording The output volume and tone of ROCK, POP or CLASSIC. "GEQ OFF" is displayed cyclically as follows. To resume play , press Z. When both deck 1 and deck 2 are set in the vocals and midrange CLASSIC: Enriched sound with a standard stereo plug (ø6.3 mm, 1/4 inch). Using the headphones Connect headphones to open the cassette holder. Use type I (normal) tapes only. 1 Press TAPE and press Z to the PHONES jack...
Operating Instructions
Page 9
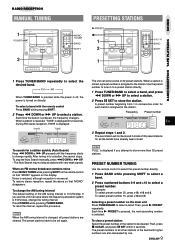
... time c PRESET is pressed, the next ascending number is monaural. Then, press s CLEAR, and press a SET within 4 seconds. To search for all other stations in consecutive order for 2 seconds. The preset stations have already been stored. "FULL" is turned on the main unit Press TUNER/BAND to be stored if a total of 32 preset stations. Frequency Preset number En 3 Repeat steps 1 and 2. RADIO RECEPTION MANUAL TUNING PRESETTING STATIONS SOUND RADIO RECEPTION TAPE PLAYBACK 1 Press TUNER...
... time c PRESET is pressed, the next ascending number is monaural. Then, press s CLEAR, and press a SET within 4 seconds. To search for all other stations in consecutive order for 2 seconds. The preset stations have already been stored. "FULL" is turned on the main unit Press TUNER/BAND to be stored if a total of 32 preset stations. Frequency Preset number En 3 Repeat steps 1 and 2. RADIO RECEPTION MANUAL TUNING PRESETTING STATIONS SOUND RADIO RECEPTION TAPE PLAYBACK 1 Press TUNER...
Operating Instructions
Page 10
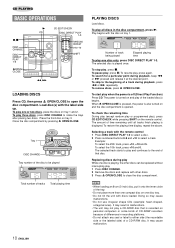
... desired point. To play when the power is off (Direct Play Function) Press CD. Tray number of track being played Elapsed playing time To play , press again. To resume play one compact disc on tray 3. To remove discs, press z OPEN/CLOSE. Selecting a track with discs loaded. To play . 1 Press DISC CHANGE. 2 Remove the discs and replace with other discs can be played Total number of tracks Total playing time Number of the disc to be replaced without interrupting play three discs, press DISC CHANGE to open the disc compartment. Example: To...
... desired point. To play when the power is off (Direct Play Function) Press CD. Tray number of track being played Elapsed playing time To play , press again. To resume play one compact disc on tray 3. To remove discs, press z OPEN/CLOSE. Selecting a track with discs loaded. To play . 1 Press DISC CHANGE. 2 Remove the discs and replace with other discs can be played Total number of tracks Total playing time Number of the disc to be replaced without interrupting play three discs, press DISC CHANGE to open the disc compartment. Example: To...
Operating Instructions
Page 11
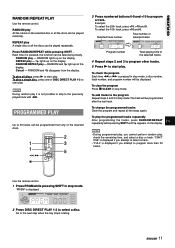
... 5. CD PLAYING RANDOM /REPEAT PLAY Use the remote control. Each time it is pressed in stop mode, a disc number, track number, and program number will be selected cyclically. ENGLISH 11 Press RANDOM/REPEAT while pressing SHIFT . RANDOM and " disappear from any of DISC DIRECT PLAY 1-3 to program a track. Cancel - To play a single disc, press one of the inserted discs. 3 Press numbered buttons 0-9 and +10 to start play it is pressed, the function can be played repeatedly. To add tracks to the previously played track...
... 5. CD PLAYING RANDOM /REPEAT PLAY Use the remote control. Each time it is pressed in stop mode, a disc number, track number, and program number will be selected cyclically. ENGLISH 11 Press RANDOM/REPEAT while pressing SHIFT . RANDOM and " disappear from any of DISC DIRECT PLAY 1-3 to program a track. Cancel - To play a single disc, press one of the inserted discs. 3 Press numbered buttons 0-9 and +10 to start play it is pressed, the function can be played repeatedly. To add tracks to the previously played track...
Operating Instructions
Page 12
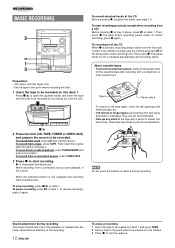
... a CD, press CD and load the disc(s). To stop recording, press Z on deck 1. To pause recording, press a on deck 1. To record from a radio broadcast, press TUNER/BAND and tune in the middle of the speakers or headphones are extremely thin and easily deformed or damaged. Sound adjustment during recording. Press s/z to open the cassette holder and insert the tape with a screwdriver or other pointed tool. To record from a connected...
... a CD, press CD and load the disc(s). To stop recording, press Z on deck 1. To pause recording, press a on deck 1. To record from a radio broadcast, press TUNER/BAND and tune in the middle of the speakers or headphones are extremely thin and easily deformed or damaged. Sound adjustment during recording. Press s/z to open the cassette holder and insert the tape with a screwdriver or other pointed tool. To record from a connected...
Operating Instructions
Page 13
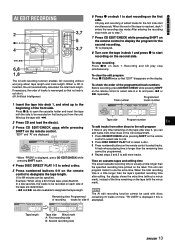
... the CD compartment. 1 Press CD EDIT/CHECK while pressing SHIFT on the remote control to select side A or B. 2 Press DISC DIRECT PLAY 1-3 to designate the tape length. Programmed Track number tracks number 1 Insert the tape into deck 1, and wind up the tape with discs Remaining time Programmed containing 31 tracks or more tracks. Wind up to use the extra time. This unit can be used with f. 2 Press CD and load the disc(s). The AI edit recording function...
... the CD compartment. 1 Press CD EDIT/CHECK while pressing SHIFT on the remote control to select side A or B. 2 Press DISC DIRECT PLAY 1-3 to designate the tape length. Programmed Track number tracks number 1 Insert the tape into deck 1, and wind up the tape with discs Remaining time Programmed containing 31 tracks or more tracks. Wind up to use the extra time. This unit can be used with f. 2 Press CD and load the disc(s). The AI edit recording function...
Operating Instructions
Page 14
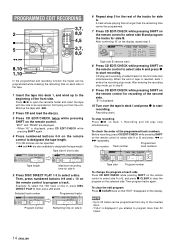
... DISC DIRECT PLAY 1-3 to program more than 30 tracks. 14 ENGLISH To clear the edit program Press s CLEAR twice so that "EDIT" disappears on the remote control to designate the tape length. PROGRAMMED EDIT RECORDING 6 Repeat step 5 for the rest of the tracks for recording of the second side. Recording starts. "B" is reached, deck 1 enters the recording stop simultaneously. CD play stop mode. Programmed Disc number Track number track numbers Tape length Maximum recording time for the first side start recording. A track whose playing time...
... DISC DIRECT PLAY 1-3 to program more than 30 tracks. 14 ENGLISH To clear the edit program Press s CLEAR twice so that "EDIT" disappears on the remote control to designate the tape length. PROGRAMMED EDIT RECORDING 6 Repeat step 5 for the rest of the tracks for recording of the second side. Recording starts. "B" is reached, deck 1 enters the recording stop simultaneously. CD play stop mode. Programmed Disc number Track number track numbers Tape length Maximum recording time for the first side start recording. A track whose playing time...
Operating Instructions
Page 15
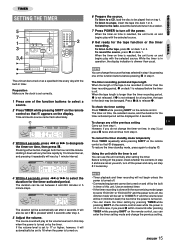
... when the power is turned on the remote control so that 5 disappears. RECORDING TIMER SETTING THE TIMER 6 Prepare the source. To cancel the timer standby mode temporarily Press TIMER repeatedly while pressing SHIFT on the remote control so that 5 appears on deck 1 or 2. To listen to a CD, load the disc to the tape, press c on the display. To listen to be damaged. Holding it down will vary the time rapidly...
... when the power is turned on the remote control so that 5 disappears. RECORDING TIMER SETTING THE TIMER 6 Prepare the source. To cancel the timer standby mode temporarily Press TIMER repeatedly while pressing SHIFT on the remote control so that 5 appears on deck 1 or 2. To listen to a CD, load the disc to the tape, press c on the display. To listen to be damaged. Holding it down will vary the time rapidly...
Operating Instructions
Page 16
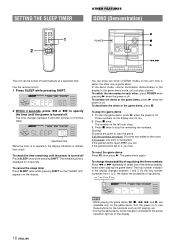
... TIMER OTHER FEATURES DEMO (Demonstration) The unit can be turned off . To change the probability of equalizing the three numbers Press f or g repeatedly to each other one of equalizing. 16 ENGLISH • While playing the game demo, a, s, f, g and c are available only for the functions such as CD playing, etc. • During the game demo, some indicators unrelated to stop the remaining two numbers. Turn the power on the display...
... TIMER OTHER FEATURES DEMO (Demonstration) The unit can be turned off . To change the probability of equalizing the three numbers Press f or g repeatedly to each other one of equalizing. 16 ENGLISH • While playing the game demo, a, s, f, g and c are available only for the functions such as CD playing, etc. • During the game demo, some indicators unrelated to stop the remaining two numbers. Turn the power on the display...
Operating Instructions
Page 17
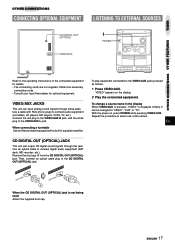
... VIDEO/AUX. With the power on the display. 2 Play the connected equipment. OTHER CONNECTIONS CONNECTING OPTIONAL EQUIPMENT LISTENING TO EXTERNAL SOURCES TIMER OTHER CONNECTIONS OTHER FEATURES Refer to the operating instructions of the names. Obtain the necessary connecting cords. • Consult your local Aiwa dealer for details. • The connecting cords are not supplied. CD DIGITAL OUT (OPTICAL) JACK This unit can output CD digital sound signals through these jacks. "VIDEO" appears on , press POWER while pressing VIDEO/AUX. Use a cable...
... VIDEO/AUX. With the power on the display. 2 Play the connected equipment. OTHER CONNECTIONS CONNECTING OPTIONAL EQUIPMENT LISTENING TO EXTERNAL SOURCES TIMER OTHER CONNECTIONS OTHER FEATURES Refer to the operating instructions of the names. Obtain the necessary connecting cords. • Consult your local Aiwa dealer for details. • The connecting cords are not supplied. CD DIGITAL OUT (OPTICAL) JACK This unit can output CD digital sound signals through these jacks. "VIDEO" appears on , press POWER while pressing VIDEO/AUX. Use a cable...
Operating Instructions
Page 18
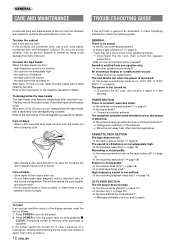
... the recording/playback head dirty? (© page 18) CD PLAYER SECTION The CD player does not play. • Is the disc correctly placed? (© page 10) • Is the disc dirty? (© page 18) • Is the lens affected by disconnecting the AC cord, and connect it again in the display window, reset the unit as these Operating Instructions, check the following guide. To reset If an...
... the recording/playback head dirty? (© page 18) CD PLAYER SECTION The CD player does not play. • Is the disc correctly placed? (© page 10) • Is the disc dirty? (© page 18) • Is the lens affected by disconnecting the AC cord, and connect it again in the display window, reset the unit as these Operating Instructions, check the following guide. To reset If an...
Operating Instructions
Page 19
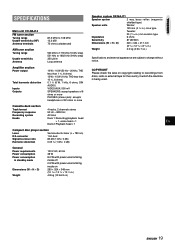
... than 10 %, 6 ohms) 0.1 % (6 W, 1 kHz, 6 ohms, DIN AUDIO) VIDEO/AUX: 500 mV SPEAKERS: accept speakers of 6 ohms or more PHONES (stereo jack): accepts headphones of 32 ohms or more Cassette deck section Track format Frequency response Recording system Heads 4 tracks, 2 channels stereo 50 Hz - 8000 Hz AC bias Deck 1: Recording/playback head × 1, erase head × 1 Deck 2: Playback head × 1 Compact disc player section Laser Semiconductor laser (λ = 780 nm) D/A converter 1 bit dual...
... than 10 %, 6 ohms) 0.1 % (6 W, 1 kHz, 6 ohms, DIN AUDIO) VIDEO/AUX: 500 mV SPEAKERS: accept speakers of 6 ohms or more PHONES (stereo jack): accepts headphones of 32 ohms or more Cassette deck section Track format Frequency response Recording system Heads 4 tracks, 2 channels stereo 50 Hz - 8000 Hz AC bias Deck 1: Recording/playback head × 1, erase head × 1 Deck 2: Playback head × 1 Compact disc player section Laser Semiconductor laser (λ = 780 nm) D/A converter 1 bit dual...

Operating Instructions
Page 20
... Name/Nombre/Nom Page/Página/Page 1 POWER 6 STANDBY/ON 6 2 ECO 6 TAPE 8 TUNER/BAND 9 VIDEO/AUX 17 CD 10,13,14 3 DISC DIRECT PLAY1-3 10,11,13,14 DISC CHANGE 10 zOPEN/CLOSE 10 4 PHONES 8 5 w 12-15 c 8 f 8 g 8 Z 8,12-15 a 8,12 6 ROCK 8 POP 8 CLASSIC 8 T-BASS 7 7 VOLUME 7 8 aSET 6,7,9,10,15,16 sCLEAR 6,7,9-11,13,14,16 cPRESET 6,9-11,16 r/fDOWN 6,7,9-11,13-16 t/gUP...
... Name/Nombre/Nom Page/Página/Page 1 POWER 6 STANDBY/ON 6 2 ECO 6 TAPE 8 TUNER/BAND 9 VIDEO/AUX 17 CD 10,13,14 3 DISC DIRECT PLAY1-3 10,11,13,14 DISC CHANGE 10 zOPEN/CLOSE 10 4 PHONES 8 5 w 12-15 c 8 f 8 g 8 Z 8,12-15 a 8,12 6 ROCK 8 POP 8 CLASSIC 8 T-BASS 7 7 VOLUME 7 8 aSET 6,7,9,10,15,16 sCLEAR 6,7,9-11,13,14,16 cPRESET 6,9-11,16 r/fDOWN 6,7,9-11,13-16 t/gUP...


