Owner's Manual
Page 1
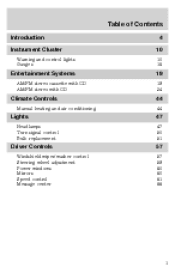
Table of Contents Introduction Instrument Cluster Warning and control lights Gauges 4 10 10 16 Entertainment Systems AM/FM stereo cassette with CD AM/FM stereo with CD 19 19 34 Climate Controls Manual heating and air conditioning 44 44 Lights Headlamps Turn signal control Bulb replacement 47 47 50 51 Driver Controls Windshield wiper/washer control Steering wheel adjustment Power windows Mirrors Speed control Message center 57 57 59 60 60 61 66 1
Table of Contents Introduction Instrument Cluster Warning and control lights Gauges 4 10 10 16 Entertainment Systems AM/FM stereo cassette with CD AM/FM stereo with CD 19 19 34 Climate Controls Manual heating and air conditioning 44 44 Lights Headlamps Turn signal control Bulb replacement 47 47 50 51 Driver Controls Windshield wiper/washer control Steering wheel adjustment Power windows Mirrors Speed control Message center 57 57 59 60 60 61 66 1
Owner's Manual
Page 10
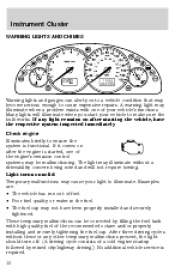
...enough to cause expensive repairs. If it comes on solid: Temporary malfunctions may not have the respective system inspected immediately. Light turns on after starting the vehicle, have been properly installed and securely tightened. After three driving cycles without a driveability ... the fuel. • The fuel cap may cause your vehicle to make sure the bulb works. Instrument Cluster WARNING LIGHTS AND CHIMES Warning lights and gauges can be malfunctioning. A warning light may illuminate without these or any light remains on after the engine is functional. Many...
...enough to cause expensive repairs. If it comes on solid: Temporary malfunctions may not have the respective system inspected immediately. Light turns on after starting the vehicle, have been properly installed and securely tightened. After three driving cycles without a driveability ... the fuel. • The fuel cap may cause your vehicle to make sure the bulb works. Instrument Cluster WARNING LIGHTS AND CHIMES Warning lights and gauges can be malfunctioning. A warning light may illuminate without these or any light remains on after the engine is functional. Many...
Owner's Manual
Page 13
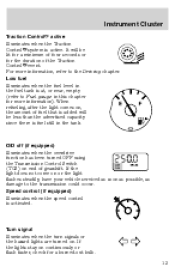
... , the amount of gearshift. Instrument Cluster Traction Control active Illuminates when the Traction Control system is activated. When refueling, after the light comes on continuously or flash faster, check for more information, refer to the transmission could occur. Low fuel Illuminates when the fuel level... fuel tank is added will be less than the advertised capacity since there is fuel still in this chapter for a burned-out bulb. 13 If the light does not come on or the light flashes steadily, have your vehicle serviced as soon as possible, as damage to the Driving chapter.
... , the amount of gearshift. Instrument Cluster Traction Control active Illuminates when the Traction Control system is activated. When refueling, after the light comes on continuously or flash faster, check for more information, refer to the transmission could occur. Low fuel Illuminates when the fuel level... fuel tank is added will be less than the advertised capacity since there is fuel still in this chapter for a burned-out bulb. 13 If the light does not come on or the light flashes steadily, have your vehicle serviced as soon as possible, as damage to the Driving chapter.
Owner's Manual
Page 51
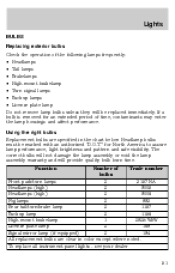
...brakelamp 1 2825/W5W License plate lamp 2 168 Signal mirror lamp (if equipped) 2 194 All replacement bulbs are specified in color except where noted. To replace all instrument panel lights - Number of the following lamps frequently: • Headlamps • Tail lamps • Brakelamps •...License plate lamp Do not remove lamp bulbs unless they will provide quality bulb burn time. If a bulb is removed for North America to assure lamp performance, light brightness and pattern and safe visibility. Using the right bulbs Replacement bulbs are clear in the chart below. see...
...brakelamp 1 2825/W5W License plate lamp 2 168 Signal mirror lamp (if equipped) 2 194 All replacement bulbs are specified in color except where noted. To replace all instrument panel lights - Number of the following lamps frequently: • Headlamps • Tail lamps • Brakelamps •...License plate lamp Do not remove lamp bulbs unless they will provide quality bulb burn time. If a bulb is removed for North America to assure lamp performance, light brightness and pattern and safe visibility. Using the right bulbs Replacement bulbs are clear in the chart below. see...
Owner's Manual
Page 52
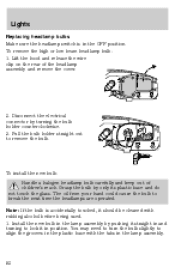
... in and turning to break the next time the headlamps are operated. The oil from your hand could cause the bulb to lock it in position. Lights Replacing headlamp bulbs Make sure the headlamp switch is accidentally touched, it should be cleaned with the tabs in the lamp assembly. 52... To install the new bulb: Handle a halogen headlamp bulb carefully and keep out of the headlamp assembly and remove the cover. 2. To ...
... in and turning to break the next time the headlamps are operated. The oil from your hand could cause the bulb to lock it in position. Lights Replacing headlamp bulbs Make sure the headlamp switch is accidentally touched, it should be cleaned with the tabs in the lamp assembly. 52... To install the new bulb: Handle a halogen headlamp bulb carefully and keep out of the headlamp assembly and remove the cover. 2. To ...

Owner's Manual
Page 53
... parking lamp/turn signal, tail and backup lamps bulbs are located in the same portion of the socket and press in the new bulb. 5. Remove the headlamp assembly cover. 2. Push the complete light assembly to the bulb. 3. Lights 2. Remove the bulb socket by turning clockwise. Install the bulb socket into the assembly by turning it clockwise. Replacing...
... parking lamp/turn signal, tail and backup lamps bulbs are located in the same portion of the socket and press in the new bulb. 5. Remove the headlamp assembly cover. 2. Push the complete light assembly to the bulb. 3. Lights 2. Remove the bulb socket by turning clockwise. Install the bulb socket into the assembly by turning it clockwise. Replacing...

Owner's Manual
Page 54
... retainer nuts and pull the lamp assembly out. 3. Turn the bulb counterclockwise and pull it . 4. Replace the lamp assembly and turn it clockwise to secure it out. 3. Replacing foglamp bulbs (if equipped) For bulb replacement, see a dealer or qualified technician. 54 From the trunk..., locate the parking lamp on the trunk wall near the tail lamp. 2. Lights 1. Replace the defective bulb. 5. Replacing the rear parking lamps 1. Turn the bulb socket counterclockwise and ...
... retainer nuts and pull the lamp assembly out. 3. Turn the bulb counterclockwise and pull it . 4. Replace the lamp assembly and turn it clockwise to secure it out. 3. Replacing foglamp bulbs (if equipped) For bulb replacement, see a dealer or qualified technician. 54 From the trunk..., locate the parking lamp on the trunk wall near the tail lamp. 2. Lights 1. Replace the defective bulb. 5. Replacing the rear parking lamps 1. Turn the bulb socket counterclockwise and ...

Owner's Manual
Page 55
... assembly and turn it clockwise 2. To replace the bulb, insert bulb and turn it clockwise to remove. 3. Remove the push pins and cover from the underside of the push pin insert inward and pull the insert out.) 2. Remove the light assembly from the liftgate. (To remove the push pins..., press the two tabs of the liftgate. 2. Turn the bulb socket counterclockwise. 3. To install the lamp assembly: 1. Replace the cover and the push pins...
... assembly and turn it clockwise 2. To replace the bulb, insert bulb and turn it clockwise to remove. 3. Remove the push pins and cover from the underside of the push pin insert inward and pull the insert out.) 2. Remove the light assembly from the liftgate. (To remove the push pins..., press the two tabs of the liftgate. 2. Turn the bulb socket counterclockwise. 3. To install the lamp assembly: 1. Replace the cover and the push pins...

Owner's Manual
Page 56
Open the lamp assembly. 3. Open the reading lamp assembly. 2. Pull out and replace the bulb. After the bulb has been replaced, close the lamp assembly. 56 Release the reflector at the side. 4. Pull the bulb straight out and replace it. 3. Switch off the interior lamps (middle switch position). 2. Replacing reading bulbs (if equipped) 1. Lights Replacing interior lamps 1.
Open the lamp assembly. 3. Open the reading lamp assembly. 2. Pull out and replace the bulb. After the bulb has been replaced, close the lamp assembly. 56 Release the reflector at the side. 4. Pull the bulb straight out and replace it. 3. Switch off the interior lamps (middle switch position). 2. Replacing reading bulbs (if equipped) 1. Lights Replacing interior lamps 1.
Owner's Manual
Page 207
... specification ...201 Automatic transmission ...120 Axle lubricant specifications ...200 B Battery ...175 acid, treating emergencies ...175 charging system warning light ...12 jumping a disabled battery ...145 maintenance-free ...175 replacement, specifications ...198 servicing ...175 BeltMinder ...89 Brakes ...116 anti..., 117 brake warning light ...11 fluid, checking and adding ...191 fluid, refill capacities ...199 fluid, specifications ...200-201 lubricant specifications ..200-201 parking ...118 shift interlock ...120 Break-in period ...6 Bulbs ...51 C Capacities for refilling fluids ...199 ...
... specification ...201 Automatic transmission ...120 Axle lubricant specifications ...200 B Battery ...175 acid, treating emergencies ...175 charging system warning light ...12 jumping a disabled battery ...145 maintenance-free ...175 replacement, specifications ...198 servicing ...175 BeltMinder ...89 Brakes ...116 anti..., 117 brake warning light ...11 fluid, checking and adding ...191 fluid, refill capacities ...199 fluid, specifications ...200-201 lubricant specifications ..200-201 parking ...118 shift interlock ...120 Break-in period ...6 Bulbs ...51 C Capacities for refilling fluids ...199 ...
Owner's Manual
Page 209
... fuel ...182-183, 186 filter, specifications ...198 fuel pump shut-off switch ...135 gauge ...17 improving fuel economy ...186 low fuel warning light ...13 octane rating ...185, 201 quality ...185 safety information relating to automotive fuels ...182 Fuses ...136-137 G Gas cap (see Fuel ...129 calculating ...129 definition ...129 driving with a heavy load ...129 location ...129 H Hazard flashers ...135 Headlamps ...47 aiming ...49 bulb specifications ...51 daytime running lights ...47 flash to pass ...48 high beam ...14, 48 turning on and off ...47 warning chime ...15 Heating heating and air ...
... fuel ...182-183, 186 filter, specifications ...198 fuel pump shut-off switch ...135 gauge ...17 improving fuel economy ...186 low fuel warning light ...13 octane rating ...185, 201 quality ...185 safety information relating to automotive fuels ...182 Fuses ...136-137 G Gas cap (see Fuel ...129 calculating ...129 definition ...129 driving with a heavy load ...129 location ...129 H Hazard flashers ...135 Headlamps ...47 aiming ...49 bulb specifications ...51 daytime running lights ...47 flash to pass ...48 high beam ...14, 48 turning on and off ...47 warning chime ...15 Heating heating and air ...

Owner's Manual
Page 210
...your vehicle ...145 K Keys ...74-76 key in ignition chime ...16 positions of the ignition ...112 L Lamps bulb replacement specifications chart ...51 cargo lamps ...48 daytime running light ...47 fog lamps ...47 headlamps ...47 headlamps, flash to pass ...48 instrument panel, dimming ...48 interior lamps ......50 replacing bulbs ...51 Lane change indicator (see Turn signal) ...50 Lights, warning and indicator ...10 air bag ...12 anti-lock brakes (ABS) ...11, 117 brake ...11 charging system...
...your vehicle ...145 K Keys ...74-76 key in ignition chime ...16 positions of the ignition ...112 L Lamps bulb replacement specifications chart ...51 cargo lamps ...48 daytime running light ...47 fog lamps ...47 headlamps ...47 headlamps, flash to pass ...48 instrument panel, dimming ...48 interior lamps ......50 replacing bulbs ...51 Lane change indicator (see Turn signal) ...50 Lights, warning and indicator ...10 air bag ...12 anti-lock brakes (ABS) ...11, 117 brake ...11 charging system...


