Owner's Manual
Page 1
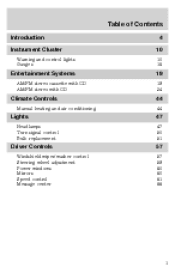
Table of Contents Introduction Instrument Cluster Warning and control lights Gauges 4 10 10 16 Entertainment Systems AM/FM stereo cassette with CD AM/FM stereo with CD 19 19 34 Climate Controls Manual heating and air conditioning 44 44 Lights Headlamps Turn signal control Bulb replacement 47 47 50 51 Driver Controls Windshield wiper/washer control Steering wheel adjustment Power windows Mirrors Speed control Message center 57 57 59 60 60 61 66 1
Table of Contents Introduction Instrument Cluster Warning and control lights Gauges 4 10 10 16 Entertainment Systems AM/FM stereo cassette with CD AM/FM stereo with CD 19 19 34 Climate Controls Manual heating and air conditioning 44 44 Lights Headlamps Turn signal control Bulb replacement 47 47 50 51 Driver Controls Windshield wiper/washer control Steering wheel adjustment Power windows Mirrors Speed control Message center 57 57 59 60 60 61 66 1
Owner's Manual
Page 14
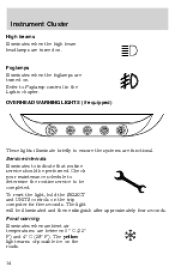
.... Check your maintenance schedule to determine the routine service to Foglamp control in the Lights chapter. Instrument Cluster High beams Illuminates when the high beam headlamps are functional.
.... Check your maintenance schedule to determine the routine service to Foglamp control in the Lights chapter. Instrument Cluster High beams Illuminates when the high beam headlamps are functional.

Owner's Manual
Page 15
... absence of a light in the supplemental restraint system (front or side airbags) has been detected. Have the supplemental restraint system inspected immediately. Headlamps on warning chime Sounds when the headlamps or parking lamps are on the road. The red light warns of an increased danger of icy roads. Instrument Cluster Danger of...
... absence of a light in the supplemental restraint system (front or side airbags) has been detected. Have the supplemental restraint system inspected immediately. Headlamps on warning chime Sounds when the headlamps or parking lamps are on the road. The red light warns of an increased danger of icy roads. Instrument Cluster Danger of...

Owner's Manual
Page 47
...is in a collision. 47 Rotate to the second position to turn on the parking lamps. Foglamp control (if equipped) The headlamp control also operates the foglamps. Always remember to turn on your tail lamps and generally may result in the OFF or Parking ...lamps position. The foglamp will illuminate. Lights HEADLAMP CONTROL Rotate the headlamp control to the first position to turn on the headlamps. indicator light Daytime running lamps (DRL) (if equipped) Turns the headlamps on . The Daytime Running Lamp (DRL) system does not activate with ...
...is in a collision. 47 Rotate to the second position to turn on the parking lamps. Foglamp control (if equipped) The headlamp control also operates the foglamps. Always remember to turn on your tail lamps and generally may result in the OFF or Parking ...lamps position. The foglamp will illuminate. Lights HEADLAMP CONTROL Rotate the headlamp control to the first position to turn on the headlamps. indicator light Daytime running lamps (DRL) (if equipped) Turns the headlamps on . The Daytime Running Lamp (DRL) system does not activate with ...
Owner's Manual
Page 48
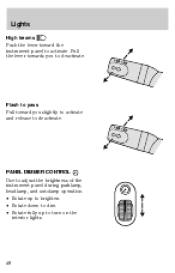
PANEL DIMMER CONTROL Use to adjust the brightness of the instrument panel during parklamp, headlamp, and autolamp operation. • Rotate up to brighten. • Rotate down to dim. • Rotate fully up to turn on the interior lights. 48 Flash to pass Pull toward the instrument panel to activate. Pull the lever towards you slightly to activate and release to deactivate. Lights High beams Push the lever toward you to deactivate.
PANEL DIMMER CONTROL Use to adjust the brightness of the instrument panel during parklamp, headlamp, and autolamp operation. • Rotate up to brighten. • Rotate down to dim. • Rotate fully up to turn on the interior lights. 48 Flash to pass Pull toward the instrument panel to activate. Pull the lever towards you slightly to activate and release to deactivate. Lights High beams Push the lever toward you to deactivate.
Owner's Manual
Page 49
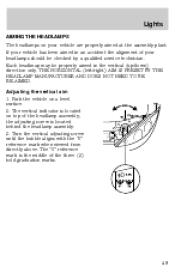
...directly above. THE HORIZONTAL (left/right) AIM IS PRESET BY THE HEADLAMP MANUFACTURER AND DOES NOT NEED TO BE RE-AIMED. The vertical indicator is located behind the headlamp assembly. 3. Lights AIMING THE HEADLAMPS The headlamps on your vehicle has been aimed in the vertical (up/down) ...by a qualified service technician. the adjusting screw is located on a level surface. 2. The "0" reference mark is the middle of your headlamps should be properly aimed in an accident the alignment of the three (3) bold graduation marks. 49 If your vehicle are properly aimed at the...
...directly above. THE HORIZONTAL (left/right) AIM IS PRESET BY THE HEADLAMP MANUFACTURER AND DOES NOT NEED TO BE RE-AIMED. The vertical indicator is located behind the headlamp assembly. 3. Lights AIMING THE HEADLAMPS The headlamps on your vehicle has been aimed in the vertical (up/down) ...by a qualified service technician. the adjusting screw is located on a level surface. 2. The "0" reference mark is the middle of your headlamps should be properly aimed in an accident the alignment of the three (3) bold graduation marks. 49 If your vehicle are properly aimed at the...
Owner's Manual
Page 51
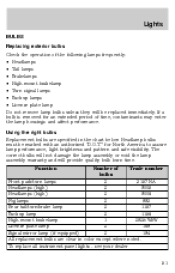
Using the right bulbs Replacement bulbs are clear in the chart below. Number of Trade number bulbs Front park/turn lamps 2 3157 NA Headlamps (high) 2 9005 Headlamps (high) 2 9006 Foglamps 2 893 Rear tail/turn/brake lamp 2 1157 Backup lamp 2 1156 High-mount brakelamp 1 2825/W5W ...All replacement bulbs are specified in color except where noted. Lights BULBS Replacing exterior bulbs Check the operation of the following lamps frequently: • Headlamps • Tail lamps • Brakelamps • High-mount brakelamp • Turn signal lamps • Backup lamps • License plate lamp...
Using the right bulbs Replacement bulbs are clear in the chart below. Number of Trade number bulbs Front park/turn lamps 2 3157 NA Headlamps (high) 2 9005 Headlamps (high) 2 9006 Foglamps 2 893 Rear tail/turn/brake lamp 2 1157 Backup lamp 2 1156 High-mount brakelamp 1 2825/W5W ...All replacement bulbs are specified in color except where noted. Lights BULBS Replacing exterior bulbs Check the operation of the following lamps frequently: • Headlamps • Tail lamps • Brakelamps • High-mount brakelamp • Turn signal lamps • Backup lamps • License plate lamp...
Owner's Manual
Page 52
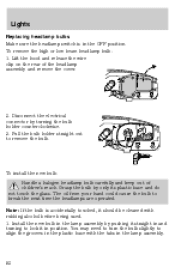
...need to turn the bulb slightly to lock it in the OFF position. Pull the bulb holder straight out to break the next time the headlamps are operated. Disconnect the electrical connector by only its plastic base and do not touch the glass. Install the new bulb in the lamp ...cover. 2. The oil from your hand could cause the bulb to remove the bulb. Note: If the bulb is in position. Lights Replacing headlamp bulbs Make sure the headlamp switch is accidentally touched, it should be cleaned with the tabs in the plastic base with rubbing alcohol before being used. 1. Lift the...
...need to turn the bulb slightly to lock it in the OFF position. Pull the bulb holder straight out to break the next time the headlamps are operated. Disconnect the electrical connector by only its plastic base and do not touch the glass. Install the new bulb in the lamp ...cover. 2. The oil from your hand could cause the bulb to remove the bulb. Note: If the bulb is in position. Lights Replacing headlamp bulbs Make sure the headlamp switch is accidentally touched, it should be cleaned with the tabs in the plastic base with rubbing alcohol before being used. 1. Lift the...

Owner's Manual
Page 53
.... Push the complete light assembly to align it out. 2. Install the bulb socket into the lamp assembly by turning it clockwise. if the headlamp was correctly aligned before you changed the bulb, you need to the front and pull it again. Turn the bulb holder counter clockwise. 3.... Remove the headlamp assembly cover. 2. Replacing brake/turn signal/tail/backup lamps The brake, turn signal bulbs 1. Replacing front parking lamp/turn signal, tail and ...
.... Push the complete light assembly to align it out. 2. Install the bulb socket into the lamp assembly by turning it clockwise. if the headlamp was correctly aligned before you changed the bulb, you need to the front and pull it again. Turn the bulb holder counter clockwise. 3.... Remove the headlamp assembly cover. 2. Replacing brake/turn signal/tail/backup lamps The brake, turn signal bulbs 1. Replacing front parking lamp/turn signal, tail and ...

Owner's Manual
Page 91
...). • The ignition switch is in the OFF position. • All vehicle doors are closed. • The driver's safety belt is unbuckled. • The parklamps/headlamps are in rear and side crashes or rollovers. Safety belts help prevent ejection, WE CAN'T "PICK OUR CRASH". "I have an air bag" Consider...Air bags...
...). • The ignition switch is in the OFF position. • All vehicle doors are closed. • The driver's safety belt is unbuckled. • The parklamps/headlamps are in rear and side crashes or rollovers. Safety belts help prevent ejection, WE CAN'T "PICK OUR CRASH". "I have an air bag" Consider...Air bags...

Owner's Manual
Page 92
This can be turned on the parklamps/headlamps, turn off . (Approximately 1-2 minutes.) • Steps 3-5 must be completed within 60 seconds or the procedure will be done before or during BeltMinder warning activation. 4. Within ... ignition switch to be repeated. 3. Seating and Safety Restraints BeltMinder activation and deactivation procedure 1. Wait until the safety belt warning light turns off the parklamps/headlamps. 5.
This can be turned on the parklamps/headlamps, turn off . (Approximately 1-2 minutes.) • Steps 3-5 must be completed within 60 seconds or the procedure will be done before or during BeltMinder warning activation. 4. Within ... ignition switch to be repeated. 3. Seating and Safety Restraints BeltMinder activation and deactivation procedure 1. Wait until the safety belt warning light turns off the parklamps/headlamps. 5.
Owner's Manual
Page 113
... vehicle occupants have your dealer inspect your vehicle, have buckled their proper usage, refer to warm the engine. If starting the vehicle: 1. Make sure the headlamps and vehicle accessories are off. 3. If the engine idle speed does not slow down automatically, have the vehicle checked. Do not allow the vehicle to...
... vehicle occupants have your dealer inspect your vehicle, have buckled their proper usage, refer to warm the engine. If starting the vehicle: 1. Make sure the headlamps and vehicle accessories are off. 3. If the engine idle speed does not slow down automatically, have the vehicle checked. Do not allow the vehicle to...
Owner's Manual
Page 209
... a heavy load ...129 location ...129 GVWR (Gross Vehicle Weight Rating) ...129 calculating ...129 definition ...129 driving with a heavy load ...129 location ...129 H Hazard flashers ...135 Headlamps ...47 aiming ...49 bulb specifications ...51 daytime running lights ...47 flash to pass ...48 high beam ...14, 48 turning on and off ...47 warning chime...
... a heavy load ...129 location ...129 GVWR (Gross Vehicle Weight Rating) ...129 calculating ...129 definition ...129 driving with a heavy load ...129 location ...129 H Hazard flashers ...135 Headlamps ...47 aiming ...49 bulb specifications ...51 daytime running lights ...47 flash to pass ...48 high beam ...14, 48 turning on and off ...47 warning chime...

Owner's Manual
Page 210
... in ignition chime ...16 positions of the ignition ...112 L Lamps bulb replacement specifications chart ...51 cargo lamps ...48 daytime running light ...47 fog lamps ...47 headlamps ...47 headlamps, flash to pass ...48 instrument panel, dimming ...48 interior lamps ...50 replacing bulbs ...51 Lane change indicator (see Turn signal) ...50 Lights, warning and...
... in ignition chime ...16 positions of the ignition ...112 L Lamps bulb replacement specifications chart ...51 cargo lamps ...48 daytime running light ...47 fog lamps ...47 headlamps ...47 headlamps, flash to pass ...48 instrument panel, dimming ...48 interior lamps ...50 replacing bulbs ...51 Lane change indicator (see Turn signal) ...50 Lights, warning and...