
Owner's Manual
Page 68
... remove the cover: Detach the lifting straps on the cargo cover. Place the mat eyelet over the pointed end of accelerator pedal, brake pedal and clutch pedal (if equipped). Driver Controls POSITIVE RETENTION FLOOR MAT (DRIVER'S SIDE ONLY) Position the floor mat in the footwell. Adjust the floor mat position to...
... remove the cover: Detach the lifting straps on the cargo cover. Place the mat eyelet over the pointed end of accelerator pedal, brake pedal and clutch pedal (if equipped). Driver Controls POSITIVE RETENTION FLOOR MAT (DRIVER'S SIDE ONLY) Position the floor mat in the footwell. Adjust the floor mat position to...
Owner's Manual
Page 114
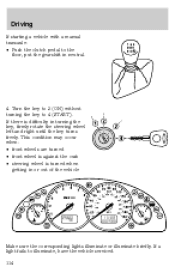
... key to 3 (ON) without turning the key to the floor, put the gearshift in neutral. 4. Driving If starting a vehicle with a manual transaxle: • Push the clutch pedal to 4 (START). If a light fails to illuminate, have the vehicle serviced. 114 If there is turned when getting in turning the key, firmly rotate...
... key to 3 (ON) without turning the key to the floor, put the gearshift in neutral. 4. Driving If starting a vehicle with a manual transaxle: • Push the clutch pedal to 4 (START). If a light fails to illuminate, have the vehicle serviced. 114 If there is turned when getting in turning the key, firmly rotate...

Owner's Manual
Page 125
... the accelerator to provide maximum engine braking on steep downgrades. MANUAL TRANSMISSION OPERATION (IF EQUIPPED) Using the clutch Vehicles equipped with a manual transaxle have a starter interrupt interlock that prevents cranking of the engine unless the clutch pedal is depressed. 125 Selecting 1 (Low) at higher speeds causes the transaxle to shift to a lower...
... the accelerator to provide maximum engine braking on steep downgrades. MANUAL TRANSMISSION OPERATION (IF EQUIPPED) Using the clutch Vehicles equipped with a manual transaxle have a starter interrupt interlock that prevents cranking of the engine unless the clutch pedal is depressed. 125 Selecting 1 (Low) at higher speeds causes the transaxle to shift to a lower...

Owner's Manual
Page 126
... accelerator pedal. Start the vehicle. 4. These actions will seriously reduce clutch life. Do not drive with a manual transaxle: 1. Release the clutch slowly while pressing gradually down the brake pedal and clutch pedal. 2. Hold down on the clutch pedal and do not use the clutch pedal to fifth 77 48 64 40 *The vehicle can be...
... accelerator pedal. Start the vehicle. 4. These actions will seriously reduce clutch life. Do not drive with a manual transaxle: 1. Release the clutch slowly while pressing gradually down the brake pedal and clutch pedal. 2. Hold down on the clutch pedal and do not use the clutch pedal to fifth 77 48 64 40 *The vehicle can be...

Owner's Manual
Page 127
Apply the brake and shift into 1 (First). Depress the clutch pedal to improve fuel economy. Do not park your vehicle. 2. Turn ignition off. Driving 2.5L engine 5-speed transaxle shift speed schedules Recommended During acceleration: During ... to the floor and place the gearshift lever in Neutral, it may move unexpectedly and injure someone. Engage the parking brake. Do not release the clutch pedal. 127 Use 1 (First) gear and set the parking brake fully. Reverse 1. Shift into the neutral position. Parking 1. 2. 3. 4. Completely stop your vehicle in the neutral...
Apply the brake and shift into 1 (First). Depress the clutch pedal to improve fuel economy. Do not park your vehicle. 2. Turn ignition off. Driving 2.5L engine 5-speed transaxle shift speed schedules Recommended During acceleration: During ... to the floor and place the gearshift lever in Neutral, it may move unexpectedly and injure someone. Engage the parking brake. Do not release the clutch pedal. 127 Use 1 (First) gear and set the parking brake fully. Reverse 1. Shift into the neutral position. Parking 1. 2. 3. 4. Completely stop your vehicle in the neutral...

Owner's Manual
Page 128
... transmission damage. Driving through the water, always try the brakes. Driving 3. Once through deep water where the transmission vent tube is engaged, slowly release the clutch pedal from the floor. Push the gearshift lever completely to engage the R (Reverse) gear. 4. When the R (Reverse) gear is submerged may also enter your engine...
... transmission damage. Driving through the water, always try the brakes. Driving 3. Once through deep water where the transmission vent tube is engaged, slowly release the clutch pedal from the floor. Push the gearshift lever completely to engage the R (Reverse) gear. 4. When the R (Reverse) gear is submerged may also enter your engine...
Owner's Manual
Page 138
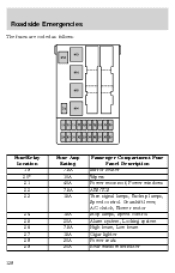
Roadside Emergencies The fuses are coded as follows: Fuse/Relay Location 19 20* 21 22 23 Fuse Amp Rating 7.5A 10A 40A 7.5A 15A 24 25 26 27 28 29 138 15A 20A 7.5A 15A 30A 30A Passenger Compartment Fuse Panel Description Mirror heater Wipers Power moonroof, Power windows ABS/TCS Turn signal lamps, Backup lamps, Speed control. Gearshift lever, A/C clutch, Blower motor Stop lamps, Speed control Alarm system, Locking system High beam, Low beam Cigar lighter Power seats Rear window defroster
Roadside Emergencies The fuses are coded as follows: Fuse/Relay Location 19 20* 21 22 23 Fuse Amp Rating 7.5A 10A 40A 7.5A 15A 24 25 26 27 28 29 138 15A 20A 7.5A 15A 30A 30A Passenger Compartment Fuse Panel Description Mirror heater Wipers Power moonroof, Power windows ABS/TCS Turn signal lamps, Backup lamps, Speed control. Gearshift lever, A/C clutch, Blower motor Stop lamps, Speed control Alarm system, Locking system High beam, Low beam Cigar lighter Power seats Rear window defroster

Owner's Manual
Page 167
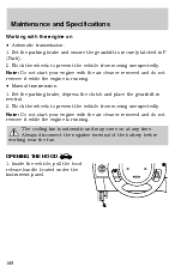
... careful when inspecting or servicing your vehicle. • Do not work on a hot engine. • When the engine is securely latched in P (Park). 2. Depress the clutch and place the gearshift in 1 (First). 3. Block the wheels to prevent the vehicle from moving unexpectedly. 167 If you service your vehicle: • We highlight...
... careful when inspecting or servicing your vehicle. • Do not work on a hot engine. • When the engine is securely latched in P (Park). 2. Depress the clutch and place the gearshift in 1 (First). 3. Block the wheels to prevent the vehicle from moving unexpectedly. 167 If you service your vehicle: • We highlight...
Owner's Manual
Page 168
... is automatic and may come on • Automatic transmission: 1. Set the parking brake and ensure the gearshift is running . Set the parking brake, depress the clutch and place the gearshift in P (Park). 2. Maintenance and Specifications Working with the engine on at any time.
... is automatic and may come on • Automatic transmission: 1. Set the parking brake and ensure the gearshift is running . Set the parking brake, depress the clutch and place the gearshift in P (Park). 2. Maintenance and Specifications Working with the engine on at any time.

Owner's Manual
Page 192
.... Maintenance and Specifications Do not let the fluid level in the reservoir for about 30 minutes to allow fluid to cool before checking. 1. CLUTCH FLUID (IF EQUIPPED) The clutch master cylinder and brake master cylinder are refillable through the brake master cylinder with running water for fluid checks and changes. Seek medical...
.... Maintenance and Specifications Do not let the fluid level in the reservoir for about 30 minutes to allow fluid to cool before checking. 1. CLUTCH FLUID (IF EQUIPPED) The clutch master cylinder and brake master cylinder are refillable through the brake master cylinder with running water for fluid checks and changes. Seek medical...

Owner's Manual
Page 208
... plastic parts ...163 washing ...161 waxing ...161 wheels ...162 wiper blades ...164 Climate control (see Air conditioning or Heating) ...44 Clock ...26, 33, 41, 60 Clutch fluid ...192 operation while driving ...125 recommended shift speeds ...126 Console ...67 Coolant checking and adding ...177 low coolant light ...12 refill capacities ...181, 199...
... plastic parts ...163 washing ...161 waxing ...161 wheels ...162 wiper blades ...164 Climate control (see Air conditioning or Heating) ...44 Clock ...26, 33, 41, 60 Clutch fluid ...192 operation while driving ...125 recommended shift speeds ...126 Console ...67 Coolant checking and adding ...177 low coolant light ...12 refill capacities ...181, 199...
Scheduled Maintenance Guide 3rd Printing
Page 8
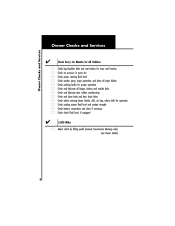
... holes safety warning lamps (brake, ABS, air bag, safety belt) for operation cooling system fluid level and coolant strength battery connections and clean if necessary clutch fluid level, if equipped 5,000 Miles Adjust clutch by lifting pedal (manual transmission Mustang only) (see Owner Guide) 8
... holes safety warning lamps (brake, ABS, air bag, safety belt) for operation cooling system fluid level and coolant strength battery connections and clean if necessary clutch fluid level, if equipped 5,000 Miles Adjust clutch by lifting pedal (manual transmission Mustang only) (see Owner Guide) 8
Warranty Guide 5th Printing
Page 13
... are: • oil changes • cleaning/polishing • oils, lubricants, other fluids • wiper blades • oil/air filters • clutch linings • brake linings/pads • engine tune-up • tire rotation Tire Wear or Damage As typically is the case with a 6.8L ...non-Ford parts other than Ford, or damage to limousines. See additional information about ambulance conversions (page 28). • any Ford or Mercury vehicles (except Excursion modified by a Qualified Vehicle Modifier using the XLT package with tire manufacturer warranties, normal wear or worn-out tires ...
... are: • oil changes • cleaning/polishing • oils, lubricants, other fluids • wiper blades • oil/air filters • clutch linings • brake linings/pads • engine tune-up • tire rotation Tire Wear or Damage As typically is the case with a 6.8L ...non-Ford parts other than Ford, or damage to limousines. See additional information about ambulance conversions (page 28). • any Ford or Mercury vehicles (except Excursion modified by a Qualified Vehicle Modifier using the XLT package with tire manufacturer warranties, normal wear or worn-out tires ...


