Owner's Manual
Page 1
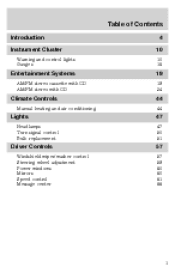
Table of Contents Introduction Instrument Cluster Warning and control lights Gauges 4 10 10 16 Entertainment Systems AM/FM stereo cassette with CD AM/FM stereo with CD 19 19 34 Climate Controls Manual heating and air conditioning 44 44 Lights Headlamps Turn signal control Bulb replacement 47 47 50 51 Driver Controls Windshield wiper/washer control Steering wheel adjustment Power windows Mirrors Speed control Message center 57 57 59 60 60 61 66 1
Table of Contents Introduction Instrument Cluster Warning and control lights Gauges 4 10 10 16 Entertainment Systems AM/FM stereo cassette with CD AM/FM stereo with CD 19 19 34 Climate Controls Manual heating and air conditioning 44 44 Lights Headlamps Turn signal control Bulb replacement 47 47 50 51 Driver Controls Windshield wiper/washer control Steering wheel adjustment Power windows Mirrors Speed control Message center 57 57 59 60 60 61 66 1
Owner's Manual
Page 8
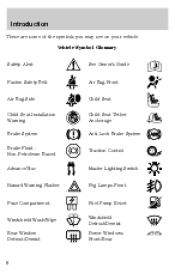
Vehicle Symbol Glossary Safety Alert See Owner's Guide Fasten Safety Belt Air Bag-Front Air Bag-Side Child Seat Installation Warning Brake System Brake Fluid Non-Petroleum Based AdvanceTrac Child Seat Child Seat Tether Anchorage Anti-Lock Brake System Traction Control Master Lighting Switch Hazard Warning Flasher Fog Lamps-Front Fuse Compartment Fuel Pump Reset Windshield Defrost/Demist Power Windows Front/Rear Windshield Wash/Wipe Rear Window Defrost/Demist 8 Introduction These are some of the symbols you may see on your vehicle.
Vehicle Symbol Glossary Safety Alert See Owner's Guide Fasten Safety Belt Air Bag-Front Air Bag-Side Child Seat Installation Warning Brake System Brake Fluid Non-Petroleum Based AdvanceTrac Child Seat Child Seat Tether Anchorage Anti-Lock Brake System Traction Control Master Lighting Switch Hazard Warning Flasher Fog Lamps-Front Fuse Compartment Fuel Pump Reset Windshield Defrost/Demist Power Windows Front/Rear Windshield Wash/Wipe Rear Window Defrost/Demist 8 Introduction These are some of the symbols you may see on your vehicle.
Owner's Manual
Page 10
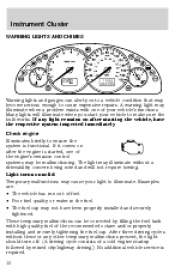
... have been properly installed and securely tightened. These temporary malfunctions can alert you start your vehicle to illuminate. Instrument Cluster WARNING LIGHTS AND CHIMES Warning lights and gauges can be malfunctioning. If it comes on solid: Temporary malfunctions may become serious enough to ensure the system is...of fuel. • Poor fuel quality or water in the fuel. • The fuel cap may illuminate without these or any light remains on after the engine is started, one of the engine's emission control systems may be corrected by mixed city/highway driving.) No...
... have been properly installed and securely tightened. These temporary malfunctions can alert you start your vehicle to illuminate. Instrument Cluster WARNING LIGHTS AND CHIMES Warning lights and gauges can be malfunctioning. If it comes on solid: Temporary malfunctions may become serious enough to ensure the system is...of fuel. • Poor fuel quality or water in the fuel. • The fuel cap may illuminate without these or any light remains on after the engine is started, one of the engine's emission control systems may be corrected by mixed city/highway driving.) No...
Owner's Manual
Page 11
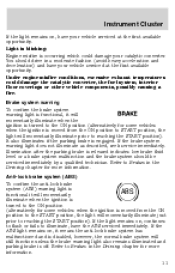
... conditions, excessive exhaust temperatures could damage your catalytic converter. Illumination after the parking brake is engaged. Instrument Cluster If the light remains on, have your vehicle serviced at the first available opportunity. You should be serviced immediately by a qualified technician....illuminate prior to illuminate, have your vehicle serviced at the first available opportunity. Brake system warning To confirm the brake system warning light is functional, it means the anti-lock brake system has malfunctioned and is disabled, however, the normal brake system will still...
... conditions, excessive exhaust temperatures could damage your catalytic converter. Illumination after the parking brake is engaged. Instrument Cluster If the light remains on, have your vehicle serviced at the first available opportunity. You should be serviced immediately by a qualified technician....illuminate prior to illuminate, have your vehicle serviced at the first available opportunity. Brake system warning To confirm the brake system warning light is functional, it means the anti-lock brake system has malfunctioned and is disabled, however, the normal brake system will still...
Owner's Manual
Page 12
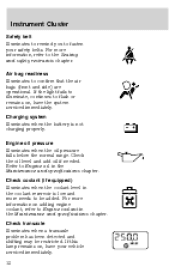
If the light fails to illuminate, continues to flash or remains on, have your safety belts. For more information on , have the system serviced immediately. Engine oil pressure ...
If the light fails to illuminate, continues to flash or remains on, have your safety belts. For more information on , have the system serviced immediately. Engine oil pressure ...
Owner's Manual
Page 13
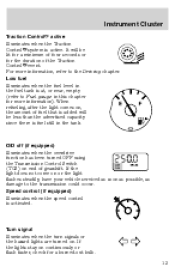
...has been turned OFF using the Transmission Control Switch (TCS) on . Turn signal Illuminates when the turn signals or the hazard lights are turned on end of the Traction Control event. When refueling, after the light comes on continuously or flash faster, check for a burned-out bulb. 13 If the... the transmission could occur. Instrument Cluster Traction Control active Illuminates when the Traction Control system is fuel still in the tank. If the light does not come on or the light flashes steadily, have your vehicle serviced as soon as possible, as damage to the Driving chapter.
...has been turned OFF using the Transmission Control Switch (TCS) on . Turn signal Illuminates when the turn signals or the hazard lights are turned on end of the Traction Control event. When refueling, after the light comes on continuously or flash faster, check for a burned-out bulb. 13 If the... the transmission could occur. Instrument Cluster Traction Control active Illuminates when the Traction Control system is fuel still in the tank. If the light does not come on or the light flashes steadily, have your vehicle serviced as soon as possible, as damage to the Driving chapter.
Owner's Manual
Page 14
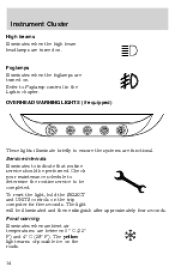
...the foglamps are functional. To reset the light, hold the SELECT and UNITS controls on the roads. 14 The yellow light warns of possible ice on the trip computer for five seconds. OVERHEAD WARNING LIGHTS (if equipped) These lights illuminate briefly to indicate that routine service ...should be illuminated and then extinguish after approximately four seconds. Service intervals Illuminates to ensure the systems are turned on . The light will be performed. Check your...
...the foglamps are functional. To reset the light, hold the SELECT and UNITS controls on the roads. 14 The yellow light warns of possible ice on the trip computer for five seconds. OVERHEAD WARNING LIGHTS (if equipped) These lights illuminate briefly to indicate that routine service ...should be illuminated and then extinguish after approximately four seconds. Service intervals Illuminates to ensure the systems are turned on . The light will be performed. Check your...

Owner's Manual
Page 15
Instrument Cluster Danger of icy roads. The red light warns of an increased danger of ice warning Illuminates when ambient air temperature is 0° C (32° F) and below. BeltMinder chime Sounds intermittently to remind ... door or liftgate is no risk of ice on , the key is removed from the ignition and the driver's door is low. The absence of a light in the supplemental restraint system (front or side airbags) has been detected. Have the supplemental restraint system inspected immediately. Safety belt warning chime Sounds to...
Instrument Cluster Danger of icy roads. The red light warns of an increased danger of ice warning Illuminates when ambient air temperature is 0° C (32° F) and below. BeltMinder chime Sounds intermittently to remind ... door or liftgate is no risk of ice on , the key is removed from the ignition and the driver's door is low. The absence of a light in the supplemental restraint system (front or side airbags) has been detected. Have the supplemental restraint system inspected immediately. Safety belt warning chime Sounds to...

Owner's Manual
Page 38
... 2. Press and hold the LOAD control until the CD door opens. The CD is displayed. Due to the radio. It is recommended that specific circle lights. When a disc is no CD in Ford CD players. If the circle is empty, there is loaded into the player after the door has been...
... 2. Press and hold the LOAD control until the CD door opens. The CD is displayed. Due to the radio. It is recommended that specific circle lights. When a disc is no CD in Ford CD players. If the circle is empty, there is loaded into the player after the door has been...
Owner's Manual
Page 43
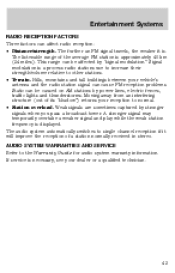
... can be affected by stronger signals when you pass a broadcast tower. This range can be caused on AM stations by power lines, electric fences, traffic lights and thunderstorms. Moving away from an interfering structure (out of the average FM station is approximately 40 km (24 miles). Hills, mountains and tall buildings...
... can be affected by stronger signals when you pass a broadcast tower. This range can be caused on AM stations by power lines, electric fences, traffic lights and thunderstorms. Moving away from an interfering structure (out of the average FM station is approximately 40 km (24 miles). Hills, mountains and tall buildings...

Owner's Manual
Page 47
...turn on the parking lamps. To activate: • the ignition must be turned on your headlamps under these conditions may not provide adequate lighting during inclement weather. Always remember to turn on . Foglamp control (if equipped) The headlamp control also operates the foglamps. The foglamp will ...illuminate. The foglamps can be in the ON position and • the headlamp control is in a collision. 47 indicator light Daytime running lamps (DRL) (if equipped) Turns the headlamps on with your tail lamps and generally may result in the the position and ...
...turn on the parking lamps. To activate: • the ignition must be turned on your headlamps under these conditions may not provide adequate lighting during inclement weather. Always remember to turn on . Foglamp control (if equipped) The headlamp control also operates the foglamps. The foglamp will ...illuminate. The foglamps can be in the ON position and • the headlamp control is in a collision. 47 indicator light Daytime running lamps (DRL) (if equipped) Turns the headlamps on with your tail lamps and generally may result in the the position and ...
Owner's Manual
Page 48
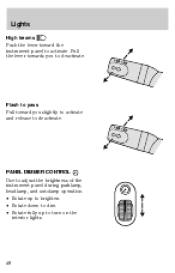
Lights High beams Push the lever toward you to deactivate. PANEL DIMMER CONTROL Use to adjust the brightness of the instrument panel during parklamp, headlamp, and autolamp operation. • Rotate up to brighten. • Rotate down to dim. • Rotate fully up to activate. Flash to pass Pull toward the instrument panel to turn on the interior lights. 48 Pull the lever towards you slightly to activate and release to deactivate.
Lights High beams Push the lever toward you to deactivate. PANEL DIMMER CONTROL Use to adjust the brightness of the instrument panel during parklamp, headlamp, and autolamp operation. • Rotate up to brighten. • Rotate down to dim. • Rotate fully up to activate. Flash to pass Pull toward the instrument panel to turn on the interior lights. 48 Pull the lever towards you slightly to activate and release to deactivate.
Owner's Manual
Page 49
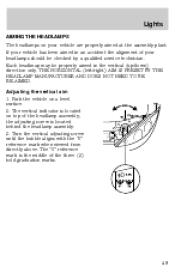
... your vehicle has been aimed in the vertical (up/down) direction only. Adjusting the vertical aim 1. The "0" reference mark is located behind the headlamp assembly. 3. Lights AIMING THE HEADLAMPS The headlamps on your headlamps should be properly aimed in an accident the alignment of the three (3) bold graduation marks. 49 the...
... your vehicle has been aimed in the vertical (up/down) direction only. Adjusting the vertical aim 1. The "0" reference mark is located behind the headlamp assembly. 3. Lights AIMING THE HEADLAMPS The headlamps on your headlamps should be properly aimed in an accident the alignment of the three (3) bold graduation marks. 49 the...

Owner's Manual
Page 50
... of the turn signals will shut off switches and can be adjusted to door delay, the interior light stays on . INTERIOR LAMPS The interior lamps have three switch positions: door delay, off and on for 12 seconds after the doors are operated by ...separate on/off the highbeams in the desired direction. 50 When the control is switched to point in daytime driving. Lights TURN SIGNAL CONTROL • Push down to activate the left turn signal. • Push up to activate the right turn signal. • In vehicles equipped...
... of the turn signals will shut off switches and can be adjusted to door delay, the interior light stays on . INTERIOR LAMPS The interior lamps have three switch positions: door delay, off and on for 12 seconds after the doors are operated by ...separate on/off the highbeams in the desired direction. 50 When the control is switched to point in daytime driving. Lights TURN SIGNAL CONTROL • Push down to activate the left turn signal. • Push up to activate the right turn signal. • In vehicles equipped...
Owner's Manual
Page 51
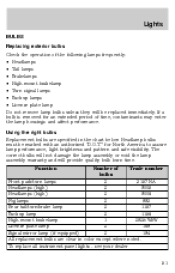
Lights BULBS Replacing exterior bulbs Check the operation of Trade number bulbs Front park/turn lamps 2 3157 NA Headlamps (high) 2 9005 Headlamps (high) 2 9006 Foglamps 2 893 ... are clear in the chart below. If a bulb is removed for North America to assure lamp performance, light brightness and pattern and safe visibility. see your dealer Function 51 To replace all instrument panel lights - The correct bulbs will not damage the lamp assembly or void the lamp assembly warranty and will...
Lights BULBS Replacing exterior bulbs Check the operation of Trade number bulbs Front park/turn lamps 2 3157 NA Headlamps (high) 2 9005 Headlamps (high) 2 9006 Foglamps 2 893 ... are clear in the chart below. If a bulb is removed for North America to assure lamp performance, light brightness and pattern and safe visibility. see your dealer Function 51 To replace all instrument panel lights - The correct bulbs will not damage the lamp assembly or void the lamp assembly warranty and will...
Owner's Manual
Page 52
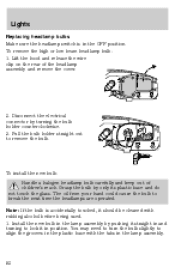
... to remove the bulb. To install the new bulb: Handle a halogen headlamp bulb carefully and keep out of the headlamp assembly and remove the cover. 2. Lights Replacing headlamp bulbs Make sure the headlamp switch is accidentally touched, it in the OFF position. To remove the high or low beam headlamp bulb...
... to remove the bulb. To install the new bulb: Handle a halogen headlamp bulb carefully and keep out of the headlamp assembly and remove the cover. 2. Lights Replacing headlamp bulbs Make sure the headlamp switch is accidentally touched, it in the OFF position. To remove the high or low beam headlamp bulb...

Owner's Manual
Page 53
... assembly by turning clockwise. Install the protective cover and secure it . 4. Install the bulb socket into the assembly by turning it again. Push the complete light assembly to the bulb. 3. if the headlamp was correctly aligned before you changed the bulb, you need to replace either bulb. 53 Follow the same... out from the assembly by turning it out. 2. Turn the headlamps on and make sure they work properly. Remove the socket from the lamp assembly. 4. Lights 2. Pull the bulb straight out and replace it with the wire clips. 4.
... assembly by turning clockwise. Install the protective cover and secure it . 4. Install the bulb socket into the assembly by turning it again. Push the complete light assembly to the bulb. 3. if the headlamp was correctly aligned before you changed the bulb, you need to replace either bulb. 53 Follow the same... out from the assembly by turning it out. 2. Turn the headlamps on and make sure they work properly. Remove the socket from the lamp assembly. 4. Lights 2. Pull the bulb straight out and replace it with the wire clips. 4.

Owner's Manual
Page 54
... socket. 5. Turn the bulb socket counterclockwise and pull it in place. Replacing foglamp bulbs (if equipped) For bulb replacement, see a dealer or qualified technician. 54 Lights 1. Replace the lamp assembly and turn it in place. From the trunk, remove the carpet cover from the lamp assembly. 2.
... socket. 5. Turn the bulb socket counterclockwise and pull it in place. Replacing foglamp bulbs (if equipped) For bulb replacement, see a dealer or qualified technician. 54 Lights 1. Replace the lamp assembly and turn it in place. From the trunk, remove the carpet cover from the lamp assembly. 2.

Owner's Manual
Page 55
... push pins and cover from the underside of the push pin insert inward and pull the insert out.) 2. Turn the bulb socket counterclockwise. 3. Remove the light assembly from the liftgate. (To remove the push pins, press the two tabs of the liftgate. 2. Replace the cover and the push pins. Turn the...
... push pins and cover from the underside of the push pin insert inward and pull the insert out.) 2. Turn the bulb socket counterclockwise. 3. Remove the light assembly from the liftgate. (To remove the push pins, press the two tabs of the liftgate. 2. Replace the cover and the push pins. Turn the...

Owner's Manual
Page 56
Switch off the interior lamps (middle switch position). 2. Release the reflector at the side. 4. Replacing reading bulbs (if equipped) 1. After the bulb has been replaced, close the lamp assembly. 56 Open the lamp assembly. 3. Pull the bulb straight out and replace it. 3. Lights Replacing interior lamps 1. Pull out and replace the bulb. Open the reading lamp assembly. 2.
Switch off the interior lamps (middle switch position). 2. Release the reflector at the side. 4. Replacing reading bulbs (if equipped) 1. After the bulb has been replaced, close the lamp assembly. 56 Open the lamp assembly. 3. Pull the bulb straight out and replace it. 3. Lights Replacing interior lamps 1. Pull out and replace the bulb. Open the reading lamp assembly. 2.


