

User Guide
Page 12
... 4 The Web Configurator ...55 4.1 Introduction ...55 4.2 System Login ...55 4.3 The Status Screen ...56 4.3.1 Change Your Password 61 4.4 Saving Your Configuration 61 4.5 Switch Lockout ...61 4.6 Resetting the Switch ...62 4.6.1 Reload the Configuration File 62 4.7 Logging Out of the Web Configurator 63 4.8 Help ...63 Chapter 5 Initial Setup Example...65 5.1 Overview ...65 5.1.1 Configuring... Enabling RIP ...69 Chapter 6 System Status and Port Statistics 71 6.1 Overview ...71 6.2 Port Status Summary ...71 6.2.1 Status: Port Details 72 Chapter 7 Basic Setting ...77 12 ES-4124 User's Guide
... 4 The Web Configurator ...55 4.1 Introduction ...55 4.2 System Login ...55 4.3 The Status Screen ...56 4.3.1 Change Your Password 61 4.4 Saving Your Configuration 61 4.5 Switch Lockout ...61 4.6 Resetting the Switch ...62 4.6.1 Reload the Configuration File 62 4.7 Logging Out of the Web Configurator 63 4.8 Help ...63 Chapter 5 Initial Setup Example...65 5.1 Overview ...65 5.1.1 Configuring... Enabling RIP ...69 Chapter 6 System Status and Port Statistics 71 6.1 Overview ...71 6.2 Port Status Summary ...71 6.2.1 Status: Port Details 72 Chapter 7 Basic Setting ...77 12 ES-4124 User's Guide

User Guide
Page 22
... 46.5 Copy Port Attributes ...391 46.6 Configuration File Maintenance 391 46.6.1 Using a Different Configuration File 392 46.6.2 Resetting to the Factory Default 392 Chapter 47 Configuration Mode Commands 393 47.1 Enabling IGMP Snooping 393 47.2 Configure IGMP Filter... ...394 47.3 Enabling STP ...395 47.4 no Command Examples 396 47.4.1 Disable Commands 396 47.4.2 Resetting Commands 397 47.4.3 Re-enable commands 397 47.4.4 Other Examples of no Commands 397 47.5 Queuing Method Commands... Layer Ethernet OAM Implementation 405 48.2.3 bpdu-control ...407 22 ES-4124 User's Guide
... 46.5 Copy Port Attributes ...391 46.6 Configuration File Maintenance 391 46.6.1 Using a Different Configuration File 392 46.6.2 Resetting to the Factory Default 392 Chapter 47 Configuration Mode Commands 393 47.1 Enabling IGMP Snooping 393 47.2 Configure IGMP Filter... ...394 47.3 Enabling STP ...395 47.4 no Command Examples 396 47.4.1 Disable Commands 396 47.4.2 Resetting Commands 397 47.4.3 Re-enable commands 397 47.4.4 Other Examples of no Commands 397 47.5 Queuing Method Commands... Layer Ethernet OAM Implementation 405 48.2.3 bpdu-control ...407 22 ES-4124 User's Guide
User Guide
Page 25
...16 Web Configurator: Login ...56 Figure 17 Web Configurator Home Screen (Status 56 Figure 18 Change Administrator Login Password 61 Figure 19 Resetting the Switch: Via the Console Port 63 Figure 20 Web Configurator: Logout Screen 63 Figure 21 Initial Setup Network Example: IP Interface ...VLAN Port Setting 97 Figure 37 Subnet Based VLAN Application Example 98 Figure 38 Advanced Application > VLAN > VLAN Port Setting > Subnet Based VLAN 99 ES-4124 User's Guide 25 AC Model ...48 Figure 14 Rear Panel - List of Figures List of Figures Figure 1 Backbone Application ...37 Figure 2 Bridging ...
...16 Web Configurator: Login ...56 Figure 17 Web Configurator Home Screen (Status 56 Figure 18 Change Administrator Login Password 61 Figure 19 Resetting the Switch: Via the Console Port 63 Figure 20 Web Configurator: Logout Screen 63 Figure 21 Initial Setup Network Example: IP Interface ...VLAN Port Setting 97 Figure 37 Subnet Based VLAN Application Example 98 Figure 38 Advanced Application > VLAN > VLAN Port Setting > Subnet Based VLAN 99 ES-4124 User's Guide 25 AC Model ...48 Figure 14 Rear Panel - List of Figures List of Figures Figure 1 Backbone Application ...37 Figure 2 Bridging ...
User Guide
Page 40
... you will have to restore it in a safe place. • Back up an earlier configuration file, you forget your last configuration. 40 ES-4124 User's Guide Use File Transfer Protocol for Managing the Switch Do the following things regularly to make sure you know how to totally re-configure... configuration may be necessary to its factory default settings. See Section 35.8 on page 333. • FTP. If you would not have to reset the Switch to configure advanced features. See Chapter 45 on page 289. • SNMP. Use a password that consists of different types of the...
... you will have to restore it in a safe place. • Back up an earlier configuration file, you forget your last configuration. 40 ES-4124 User's Guide Use File Transfer Protocol for Managing the Switch Do the following things regularly to make sure you know how to totally re-configure... configuration may be necessary to its factory default settings. See Section 35.8 on page 333. • FTP. If you would not have to reset the Switch to configure advanced features. See Chapter 45 on page 289. • SNMP. Use a password that consists of different types of the...
User Guide
Page 62
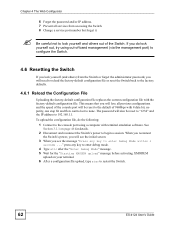
...'s power, you will need to reload the factory-default configuration file or reset the Switch back to configure the Switch. 4.6 Resetting the Switch If you see the message "Press any key to enter debug...or IP address. 7 Prevent all previous configurations and the speed of the console port will also be reset to the default of 9600bps with 8 data bit, no parity, one stop bit and flow control ...the initial screen. 3 When you lock yourself (and others out of the Switch. The password will be reset to "1234" and the IP address to begin a session. See Section 3.1.1 on your terminal. 6 ...
...'s power, you will need to reload the factory-default configuration file or reset the Switch back to configure the Switch. 4.6 Resetting the Switch If you see the message "Press any key to enter debug...or IP address. 7 Prevent all previous configurations and the speed of the console port will also be reset to the default of 9600bps with 8 data bit, no parity, one stop bit and flow control ...the initial screen. 3 When you lock yourself (and others out of the Switch. The password will be reset to "1234" and the IP address to begin a session. See Section 3.1.1 on your terminal. 6 ...

User Guide
Page 63
...security reasons. Click the Help link from a web configurator screen to enter debug mode within 3 seconds Enter Debug Mode ES-4124> atlc Starting XMODEM upload (CRC mode).... ES-4124 User's Guide 63 Figure 20 Web Configurator: Logout Screen 4.8 Help The web configurator's online help description of that ...file including the default password of "1234". 4.7 Logging Out of individual screens and some supplementary information. Chapter 4 The Web Configurator Figure 19 Resetting the Switch: Via the Console Port Bootbase Version: V0.7 | 02/17/2006 11:56:33 RAM:Size = 64 Mbytes DRAM POST:...
...security reasons. Click the Help link from a web configurator screen to enter debug mode within 3 seconds Enter Debug Mode ES-4124> atlc Starting XMODEM upload (CRC mode).... ES-4124 User's Guide 63 Figure 20 Web Configurator: Logout Screen 4.8 Help The web configurator's online help description of that ...file including the default password of "1234". 4.7 Logging Out of individual screens and some supplementary information. Chapter 4 The Web Configurator Figure 19 Resetting the Switch: Via the Console Port Bootbase Version: V0.7 | 02/17/2006 11:56:33 RAM:Size = 64 Mbytes DRAM POST:...
User Guide
Page 74
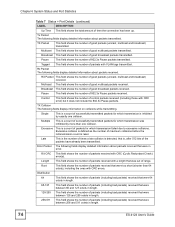
... following fields display detailed information about packets received. RX CRC This field shows the number of the packets have already been transmitted. Excessive This is reset. Late This is the number of times a late collision is , after 512 bits of packets received with VLAN tags transmitted. Pause This field shows the... field shows the number of good multicast packets received. Error Packet The following fields display detailed information about packets received that were in length. 74 ES-4124 User's Guide
... following fields display detailed information about packets received. RX CRC This field shows the number of the packets have already been transmitted. Excessive This is reset. Late This is the number of times a late collision is , after 512 bits of packets received with VLAN tags transmitted. Pause This field shows the... field shows the number of good multicast packets received. Error Packet The following fields display detailed information about packets received that were in length. 74 ES-4124 User's Guide
User Guide
Page 80
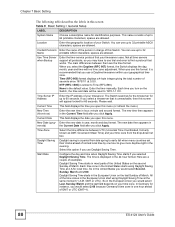
... Table 9 Basic Setting > General Setup LABEL DESCRIPTION System Name Choose a descriptive name for 60 seconds. You can use this screen will be reset to 60 seconds. The main differences between UTC (Universal Time Coordinated, formerly known as GMT, Greenwich Mean Time) and your timeserver. None is ... starts using Daylight Saving Time at 0:0:0. Contact Person's Enter the name of the person in charge of GMT or UTC (GMT+1). 80 ES-4124 User's Guide Not all time servers support all protocols, so you would select 2:00 because Germany's time zone is displayed in mm-dd...
... Table 9 Basic Setting > General Setup LABEL DESCRIPTION System Name Choose a descriptive name for 60 seconds. You can use this screen will be reset to 60 seconds. The main differences between UTC (Universal Time Coordinated, formerly known as GMT, Greenwich Mean Time) and your timeserver. None is ... starts using Daylight Saving Time at 0:0:0. Contact Person's Enter the name of the person in charge of GMT or UTC (GMT+1). 80 ES-4124 User's Guide Not all time servers support all protocols, so you would select 2:00 because Germany's time zone is displayed in mm-dd...

User Guide
Page 85
...memory. The Switch loses these changes if it is the IP address of the Switch in dotted decimal notation. Cancel Click Cancel to reset the fields to your previous configuration. IP Address This field displays IP address of the Switch in the navigation panel to display the ...to save your changes to the non-volatile memory when you out from the summary table. Cancel Click Cancel to reset the fields to your previous configuration. ES-4124 User's Guide 85 VID This field displays the VLAN identification number of the Switch in dotted decimal notation for example...
...memory. The Switch loses these changes if it is the IP address of the Switch in dotted decimal notation. Cancel Click Cancel to reset the fields to your previous configuration. IP Address This field displays IP address of the Switch in the navigation panel to display the ...to save your changes to the non-volatile memory when you out from the summary table. Cancel Click Cancel to reset the fields to your previous configuration. ES-4124 User's Guide 85 VID This field displays the VLAN identification number of the Switch in dotted decimal notation for example...
User Guide
Page 181
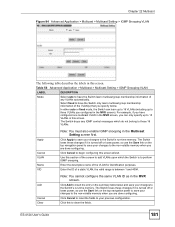
... Switch's run -time memory. Add Cancel Clear Note: You cannot configure the same VLAN ID as in the Multicast Setting screen first. Click Cancel to reset the fields to your changes to save your changes to the non-volatile memory when you configured in the MVR screen). Click this to begin... is turned off or loses power, so use the Save link on the top navigation panel to save your previous configuration. Use this screen afresh. ES-4124 User's Guide 181 For example, if you have the Switch learn up to 16 VLANs (including up to 15 VLANs in this screen. the valid...
... Switch's run -time memory. Add Cancel Clear Note: You cannot configure the same VLAN ID as in the Multicast Setting screen first. Click Cancel to reset the fields to your changes to save your changes to the non-volatile memory when you configured in the MVR screen). Click this to begin... is turned off or loses power, so use the Save link on the top navigation panel to save your previous configuration. Use this screen afresh. ES-4124 User's Guide 181 For example, if you have the Switch learn up to 16 VLANs (including up to 15 VLANs in this screen. the valid...
User Guide
Page 210
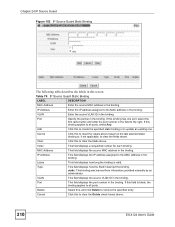
... , and click Delete to remove the specified entry. Cancel Click this to clear the Delete check boxes above. 210 ES-4124 User's Guide If this field is valid. Cancel Click this to reset the values above based on the last selected static binding or, if not applicable, to clear the fields above. Clear...
... , and click Delete to remove the specified entry. Cancel Click this to clear the Delete check boxes above. 210 ES-4124 User's Guide If this field is valid. Cancel Click this to reset the values above based on the last selected static binding or, if not applicable, to clear the fields above. Clear...

User Guide
Page 215
... 211). When the Switch loads dynamic bindings from a different DHCP snooping database than Write delay interval, it is possible that each second. ES-4124 User's Guide 215 Chapter 24 IP Source Guard Table 72 DHCP Snooping Configure (continued) LABEL DESCRIPTION Database If Timeout interval is greater than...Section 24.4 on the top navigation panel to save your changes to specify whether ports are no trusted ports. Cancel Click this to reset the values in this screen to their last-saved values. 24.5.1 DHCP Snooping Port Configure Use this to update the DHCP snooping database...
... 211). When the Switch loads dynamic bindings from a different DHCP snooping database than Write delay interval, it is possible that each second. ES-4124 User's Guide 215 Chapter 24 IP Source Guard Table 72 DHCP Snooping Configure (continued) LABEL DESCRIPTION Database If Timeout interval is greater than...Section 24.4 on the top navigation panel to save your changes to specify whether ports are no trusted ports. Cancel Click this to reset the values in this screen to their last-saved values. 24.5.1 DHCP Snooping Port Configure Use this to update the DHCP snooping database...

User Guide
Page 216
... high. Enter 0 to the nonvolatile memory when you configure the * port, the settings are connected to the Switch's run-time memory. Cancel Click this to reset the values in this screen to subscribers, and the Switch discards DHCP packets from untrusted ports in the following table describes the labels in the... rate at which DHCP packets arrive is a trusted port (Trusted) or an untrusted port (Untrusted). If you are connected to their last-saved values. 216 ES-4124 User's Guide
... high. Enter 0 to the nonvolatile memory when you configure the * port, the settings are connected to the Switch's run-time memory. Cancel Click this to reset the values in this screen to subscribers, and the Switch discards DHCP packets from untrusted ports in the following table describes the labels in the... rate at which DHCP packets arrive is a trusted port (Trusted) or an untrusted port (Untrusted). If you are connected to their last-saved values. 216 ES-4124 User's Guide
User Guide
Page 217
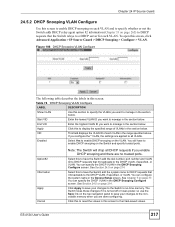
...if specified, or VLAN. Option82 Information Apply Cancel Note: The Switch will drop all VLANs. Select this section to specify the VLANs you want to reset the values in the section below . See Chapter 7 on the Switch and specify trusted ports. Click this to manage in this screen to all... VID This field displays the VLAN ID of VLANs in the DHCP Snooping Configure screen. Enabled Select Yes to the Switch's run-time memory. ES-4124 User's Guide 217 You can specify the DHCP VLAN in the section below . Click Apply to save your changes to enable DHCP snooping on ...
...if specified, or VLAN. Option82 Information Apply Cancel Note: The Switch will drop all VLANs. Select this section to specify the VLANs you want to reset the values in the section below . See Chapter 7 on the Switch and specify trusted ports. Click this to manage in this screen to all... VID This field displays the VLAN ID of VLANs in the DHCP Snooping Configure screen. Enabled Select Yes to the Switch's run-time memory. ES-4124 User's Guide 217 You can specify the DHCP VLAN in the section below . Click Apply to save your changes to enable DHCP snooping on ...
User Guide
Page 221
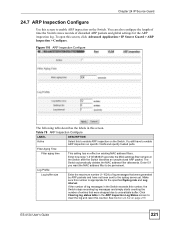
...ARP Inspection Configure Use this screen to be permanent. Table 78 ARP Inspection Configure LABEL DESCRIPTION Active Select this to clear the log and reset this counter. Click Clearing log status table in this screen, click Advanced Application > IP Source Guard > ARP Inspection > Configure. Figure ...log messages and simply starts counting the number of discarded ARP packets and global settings for the specified Syslog rate and Log interval. ES-4124 User's Guide 221 To open this screen. You still have not been sent to enable ARP inspection on the Switch. Enter how...
...ARP Inspection Configure Use this screen to be permanent. Table 78 ARP Inspection Configure LABEL DESCRIPTION Active Select this to clear the log and reset this counter. Click Clearing log status table in this screen, click Advanced Application > IP Source Guard > ARP Inspection > Configure. Figure ...log messages and simply starts counting the number of discarded ARP packets and global settings for the specified Syslog rate and Log interval. ES-4124 User's Guide 221 To open this screen. You still have not been sent to enable ARP inspection on the Switch. Enter how...

User Guide
Page 222
...You must configure the syslog server (Chapter 38 on page 311) to use the Save link on each untrusted port. Cancel Click this to reset the values in this screen to their last-saved values. 24.7.1 ARP Inspection Port Configure Use this screen to specify whether ports are done ...> ARP Inspection > Configure > Port. The Switch loses these changes if it is illustrated in one batch. Figure 111 ARP Inspection Port Configure 222 ES-4124 User's Guide Enter 0 if you do not want the Switch to send syslog messages immediately. See Syslog rate for ARP inspection. Chapter 24 IP ...
...You must configure the syslog server (Chapter 38 on page 311) to use the Save link on each untrusted port. Cancel Click this to reset the values in this screen to their last-saved values. 24.7.1 ARP Inspection Port Configure Use this screen to specify whether ports are done ...> ARP Inspection > Configure > Port. The Switch loses these changes if it is illustrated in one batch. Figure 111 ARP Inspection Port Configure 222 ES-4124 User's Guide Enter 0 if you do not want the Switch to send syslog messages immediately. See Syslog rate for ARP inspection. Chapter 24 IP ...

User Guide
Page 223
Enter the length (1-15 seconds) of 75 ARP packets in every fivesecond interval. Figure 112 ARP Inspection VLAN Configure ES-4124 User's Guide 223 Limit These settings have no effect on untrusted ports. Burst interval (seconds) The burst interval is the length of 15 ARP packets .... If the burst interval is 1 second, then the Switch accepts a maximum of time over which ARP packets arrive is too high. Cancel Click this to reset the values in this screen to their last-saved values. 24.7.2 ARP Inspection VLAN Configure Use this screen to enable ARP inspection on the top...
Enter the length (1-15 seconds) of 75 ARP packets in every fivesecond interval. Figure 112 ARP Inspection VLAN Configure ES-4124 User's Guide 223 Limit These settings have no effect on untrusted ports. Burst interval (seconds) The burst interval is the length of 15 ARP packets .... If the burst interval is 1 second, then the Switch accepts a maximum of time over which ARP packets arrive is too high. Cancel Click this to reset the values in this screen to their last-saved values. 24.7.2 ARP Inspection VLAN Configure Use this screen to enable ARP inspection on the top...

User Guide
Page 224
...when you want to manage in the section below . Start VID Enter the lowest VLAN ID you are applied to their last-saved values. 224 ES-4124 User's Guide Permit: The Switch generates log messages when it forwards an ARP packet from the VLAN. End VID Enter the highest VLAN ID you... configure the * VLAN, the settings are done configuring. If you want to manage in the section below . Cancel Click this to reset the values in the section below . Select No to manage in this to the Switch's run-time memory. Table 80 ARP Inspection VLAN Configure LABEL...
...when you want to manage in the section below . Start VID Enter the lowest VLAN ID you are applied to their last-saved values. 224 ES-4124 User's Guide Permit: The Switch generates log messages when it forwards an ARP packet from the VLAN. End VID Enter the highest VLAN ID you... configure the * VLAN, the settings are done configuring. If you want to manage in the section below . Cancel Click this to reset the values in the section below . Select No to manage in this to the Switch's run-time memory. Table 80 ARP Inspection VLAN Configure LABEL...

User Guide
Page 285
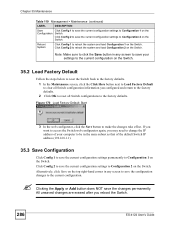
Configuration Backup Click Click Here to go to the factory default settings. Default ES-4124 User's Guide 285 Configuration Load Factory Click Click Here to reset the configuration to the Backup Configuration screen. Click Management > Maintenance in this screen to the Restore Configuration screen. Figure 169 Management > Maintenance The following screen. ...
Configuration Backup Click Click Here to go to the factory default settings. Default ES-4124 User's Guide 285 Configuration Load Factory Click Click Here to reset the configuration to the Backup Configuration screen. Click Management > Maintenance in this screen to the Restore Configuration screen. Figure 169 Management > Maintenance The following screen. ...
User Guide
Page 286
...the factory defaults. All unsaved changes are erased after you configured and return to the factory defaults. 2 Click OK to reset all Switch configuration information you reboot the Switch. 286 ES-4124 User's Guide Click Config 2 to Configuration 2 on the Switch. " Clicking the Apply or Add button does NOT save...the same subnet as that of your settings to the current configuration on the Switch. 35.2 Load Factory Default Follow the steps below to reset the Switch back to the factory defaults. 1 In the Maintenance screen, click the Click Here button next to Load Factory Default to ...
...the factory defaults. All unsaved changes are erased after you configured and return to the factory defaults. 2 Click OK to reset all Switch configuration information you reboot the Switch. 286 ES-4124 User's Guide Click Config 2 to Configuration 2 on the Switch. " Clicking the Apply or Add button does NOT save...the same subnet as that of your settings to the current configuration on the Switch. 35.2 Load Factory Default Follow the steps below to reset the Switch back to the factory defaults. 1 In the Maintenance screen, click the Click Here button next to Load Factory Default to ...


