

User Guide
Page 12
... 4 The Web Configurator ...55 4.1 Introduction ...55 4.2 System Login ...55 4.3 The Status Screen ...56 4.3.1 Change Your Password 61 4.4 Saving Your Configuration 61 4.5 Switch Lockout ...61 4.6 Resetting the Switch ...62 4.6.1 Reload the Configuration File 62 4.7 Logging Out of the Web Configurator 63 4.8 Help ...63 Chapter 5 Initial Setup Example...65 5.1 Overview ...65 5.1.1 Configuring... Enabling RIP ...69 Chapter 6 System Status and Port Statistics 71 6.1 Overview ...71 6.2 Port Status Summary ...71 6.2.1 Status: Port Details 72 Chapter 7 Basic Setting ...77 12 ES-4124 User's Guide
... 4 The Web Configurator ...55 4.1 Introduction ...55 4.2 System Login ...55 4.3 The Status Screen ...56 4.3.1 Change Your Password 61 4.4 Saving Your Configuration 61 4.5 Switch Lockout ...61 4.6 Resetting the Switch ...62 4.6.1 Reload the Configuration File 62 4.7 Logging Out of the Web Configurator 63 4.8 Help ...63 Chapter 5 Initial Setup Example...65 5.1 Overview ...65 5.1.1 Configuring... Enabling RIP ...69 Chapter 6 System Status and Port Statistics 71 6.1 Overview ...71 6.2 Port Status Summary ...71 6.2.1 Status: Port Details 72 Chapter 7 Basic Setting ...77 12 ES-4124 User's Guide

User Guide
Page 22
... 46.5 Copy Port Attributes ...391 46.6 Configuration File Maintenance 391 46.6.1 Using a Different Configuration File 392 46.6.2 Resetting to the Factory Default 392 Chapter 47 Configuration Mode Commands 393 47.1 Enabling IGMP Snooping 393 47.2 Configure IGMP Filter... ...394 47.3 Enabling STP ...395 47.4 no Command Examples 396 47.4.1 Disable Commands 396 47.4.2 Resetting Commands 397 47.4.3 Re-enable commands 397 47.4.4 Other Examples of no Commands 397 47.5 Queuing Method Commands... Layer Ethernet OAM Implementation 405 48.2.3 bpdu-control ...407 22 ES-4124 User's Guide
... 46.5 Copy Port Attributes ...391 46.6 Configuration File Maintenance 391 46.6.1 Using a Different Configuration File 392 46.6.2 Resetting to the Factory Default 392 Chapter 47 Configuration Mode Commands 393 47.1 Enabling IGMP Snooping 393 47.2 Configure IGMP Filter... ...394 47.3 Enabling STP ...395 47.4 no Command Examples 396 47.4.1 Disable Commands 396 47.4.2 Resetting Commands 397 47.4.3 Re-enable commands 397 47.4.4 Other Examples of no Commands 397 47.5 Queuing Method Commands... Layer Ethernet OAM Implementation 405 48.2.3 bpdu-control ...407 22 ES-4124 User's Guide
User Guide
Page 25
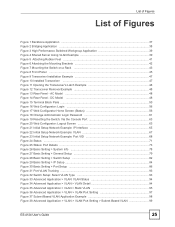
... Web Configurator: Login ...56 Figure 17 Web Configurator Home Screen (Status 56 Figure 18 Change Administrator Login Password 61 Figure 19 Resetting the Switch: Via the Console Port 63 Figure 20 Web Configurator: Logout Screen 63 Figure 21 Initial Setup Network Example: IP ...Port Setting 97 Figure 37 Subnet Based VLAN Application Example 98 Figure 38 Advanced Application > VLAN > VLAN Port Setting > Subnet Based VLAN 99 ES-4124 User's Guide 25 List of Figures List of Figures Figure 1 Backbone Application ...37 Figure 2 Bridging Application ...38 Figure 3 High Performance Switched ...
... Web Configurator: Login ...56 Figure 17 Web Configurator Home Screen (Status 56 Figure 18 Change Administrator Login Password 61 Figure 19 Resetting the Switch: Via the Console Port 63 Figure 20 Web Configurator: Logout Screen 63 Figure 21 Initial Setup Network Example: IP ...Port Setting 97 Figure 37 Subnet Based VLAN Application Example 98 Figure 38 Advanced Application > VLAN > VLAN Port Setting > Subnet Based VLAN 99 ES-4124 User's Guide 25 List of Figures List of Figures Figure 1 Backbone Application ...37 Figure 2 Bridging Application ...38 Figure 3 High Performance Switched ...
User Guide
Page 40
... to restore it in a safe place. • Back up an earlier configuration file, you would not have to reset the Switch to configure advanced features. If you forget your last configuration. 40 ES-4124 User's Guide Chapter 1 Getting to the Web Configurator and may be monitored and/or managed by an SNMP manager...
... to restore it in a safe place. • Back up an earlier configuration file, you would not have to reset the Switch to configure advanced features. If you forget your last configuration. 40 ES-4124 User's Guide Chapter 1 Getting to the Web Configurator and may be monitored and/or managed by an SNMP manager...
User Guide
Page 62
... Debug Mode" message. 5 Wait for details. 2 Disconnect and reconnect the Switch's power to none. The password will also be reset to restart the Switch. 62 ES-4124 User's Guide Chapter 4 The Web Configurator 6 Forget the password and/or IP address. 7 Prevent all previous configurations and the speed... of the console port will be reset to "1234" and the IP address to enter Debug Mode within 3 seconds ..." " Be ...
... Debug Mode" message. 5 Wait for details. 2 Disconnect and reconnect the Switch's power to none. The password will also be reset to restart the Switch. 62 ES-4124 User's Guide Chapter 4 The Web Configurator 6 Forget the password and/or IP address. 7 Prevent all previous configurations and the speed... of the console port will be reset to "1234" and the IP address to enter Debug Mode within 3 seconds ..." " Be ...

User Guide
Page 63
...Figure 20 Web Configurator: Logout Screen 4.8 Help The web configurator's online help description of individual screens and some supplementary information. Erasing OK ES-4124> atgo The Switch is recommended after you finish a management session for security reasons. Click the Help link from a web configurator screen ...to exit the web configurator. Chapter 4 The Web Configurator Figure 19 Resetting the Switch: Via the Console Port Bootbase Version: V0.7 | 02/17/2006 11:56:33 RAM:Size = 64 Mbytes DRAM POST: ...
...Figure 20 Web Configurator: Logout Screen 4.8 Help The web configurator's online help description of individual screens and some supplementary information. Erasing OK ES-4124> atgo The Switch is recommended after you finish a management session for security reasons. Click the Help link from a web configurator screen ...to exit the web configurator. Chapter 4 The Web Configurator Figure 19 Resetting the Switch: Via the Console Port Bootbase Version: V0.7 | 02/17/2006 11:56:33 RAM:Size = 64 Mbytes DRAM POST: ...
User Guide
Page 74
... CRC (Cyclic Redundant Check) error(s). Multicast This field shows the number of 802.3x Pause packets transmitted. Multiple This is reset. Runt This field shows the number of successfully transmitted packets for which transmission was out of packets received with CRC errors....packets transmitted. Excessive This is inhibited by more than 64 octets), including the ones with a length that were in length. 74 ES-4124 User's Guide Single This is a count of successfully transmitted packets for which transmission is a count of packets for which transmission ...
... CRC (Cyclic Redundant Check) error(s). Multicast This field shows the number of 802.3x Pause packets transmitted. Multiple This is reset. Runt This field shows the number of successfully transmitted packets for which transmission was out of packets received with CRC errors....packets transmitted. Excessive This is inhibited by more than 64 octets), including the ones with a length that were in length. 74 ES-4124 User's Guide Single This is a count of successfully transmitted packets for which transmission is a count of packets for which transmission ...
User Guide
Page 80
...Enter the time service protocol that works. Time (RFC-868) format displays a 4-byte integer giving the total number of GMT or UTC (GMT+1). 80 ES-4124 User's Guide Current Time This field displays the time you select the Daytime (RFC 867) format, the Switch displays the day, month, year and time... time in year, month and day format. The new time then appears in the United States you may have to use this screen will be reset to find a protocol that your Switch. Enter the new date in hour, minute and second format. Daylight Saving Time Daylight saving is unreachable,...
...Enter the time service protocol that works. Time (RFC-868) format displays a 4-byte integer giving the total number of GMT or UTC (GMT+1). 80 ES-4124 User's Guide Current Time This field displays the time you select the Daytime (RFC 867) format, the Switch displays the day, month, year and time... time in year, month and day format. The new time then appears in the United States you may have to use this screen will be reset to find a protocol that your Switch. Enter the new date in hour, minute and second format. Daylight Saving Time Daylight saving is unreachable,...

User Guide
Page 85
...off or loses power, so use the Save link on the Switch. Delete Click Delete to remove the selected entry from the Switch. ES-4124 User's Guide 85 IP Address Enter the IP address of the Switch in an IP routing domain. VID Enter the VLAN identification number to.... 7.7 Port Setup Use this screen to configure Switch port settings.Click Basic Setting > Port Setup in dotted decimal notation. Cancel Click Cancel to reset the fields to your Switch in the IP domain. Chapter 7 Basic Setting Table 11 Basic Setting > IP Setup (continued) LABEL DESCRIPTION Apply Click...
...off or loses power, so use the Save link on the Switch. Delete Click Delete to remove the selected entry from the Switch. ES-4124 User's Guide 85 IP Address Enter the IP address of the Switch in an IP routing domain. VID Enter the VLAN identification number to.... 7.7 Port Setup Use this screen to configure Switch port settings.Click Basic Setting > Port Setup in dotted decimal notation. Cancel Click Cancel to reset the fields to your Switch in the IP domain. Chapter 7 Basic Setting Table 11 Basic Setting > IP Setup (continued) LABEL DESCRIPTION Apply Click...
User Guide
Page 181
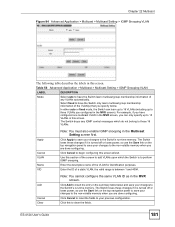
... power, so use the Save link on the top navigation panel to save your changes to your changes to clear the fields. Click Cancel to reset the fields to the Switch's run -time memory. Apply Cancel VLAN Name VID Note: You must also enable IGMP snooping in the summary table below... configure the same VLAN ID as in this to the non-volatile memory when you specify below and save your previous configuration. Click this screen. ES-4124 User's Guide 181 Click Apply to save your changes to insert the entry in the Multicast Setting screen first. The Switch loses these changes if...
... power, so use the Save link on the top navigation panel to save your changes to your changes to clear the fields. Click Cancel to reset the fields to the Switch's run -time memory. Apply Cancel VLAN Name VID Note: You must also enable IGMP snooping in the summary table below... configure the same VLAN ID as in this to the non-volatile memory when you specify below and save your previous configuration. Click this screen. ES-4124 User's Guide 181 Click Apply to save your changes to insert the entry in the Multicast Setting screen first. The Switch loses these changes if...
User Guide
Page 210
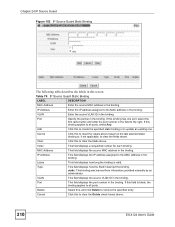
... MAC address in the binding. Type This field displays how the Switch learned the binding. If this to clear the fields above . 210 ES-4124 User's Guide Cancel Click this field is valid. Table 70 IP Source Guard Static Binding LABEL DESCRIPTION MAC Address Enter the source MAC address ...to the right. static: This binding was learned from information provided manually by an administrator. VLAN Enter the source VLAN ID in this to reset the values above . If this to create the specified static binding or to all ports. Add Click this binding applies to update an ...
... MAC address in the binding. Type This field displays how the Switch learned the binding. If this to clear the fields above . 210 ES-4124 User's Guide Cancel Click this field is valid. Table 70 IP Source Guard Static Binding LABEL DESCRIPTION MAC Address Enter the source MAC address ...to the right. static: This binding was learned from information provided manually by an administrator. VLAN Enter the source VLAN ID in this to reset the values above . If this to create the specified static binding or to all ports. Add Click this binding applies to update an ...

User Guide
Page 215
Apply Click Apply to save your changes to the Switch's run-time memory. Cancel Click this to reset the values in this screen to their last-saved values. 24.5.1 DHCP Snooping Port Configure Use this screen to specify whether ports are automatically included ... loses power, so use this case, the Switch waits to start the next update until it completes the current one specified in the next update. ES-4124 User's Guide 215 Renew DHCP Snooping URL Enter the location of the DHCP snooping database. You can also specify the maximum number for DHCP packets...
Apply Click Apply to save your changes to the Switch's run-time memory. Cancel Click this to reset the values in this screen to their last-saved values. 24.5.1 DHCP Snooping Port Configure Use this screen to specify whether ports are automatically included ... loses power, so use this case, the Switch waits to start the next update until it completes the current one specified in the next update. ES-4124 User's Guide 215 Renew DHCP Snooping URL Enter the location of the DHCP snooping database. You can also specify the maximum number for DHCP packets...

User Guide
Page 216
... rate at which DHCP packets arrive is too high. Cancel Click this to reset the values in this limit, which DHCP packets arrive is too high. Apply Click Apply to save your changes to their last-saved values. 216 ES-4124 User's Guide Chapter 24 IP Source Guard Figure 105 DHCP Snooping Port...
... rate at which DHCP packets arrive is too high. Cancel Click this to reset the values in this limit, which DHCP packets arrive is too high. Apply Click Apply to save your changes to their last-saved values. 216 ES-4124 User's Guide Chapter 24 IP Source Guard Figure 105 DHCP Snooping Port...
User Guide
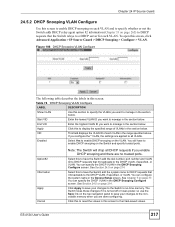
Page 217
... The Switch will drop all VLANs. You can specify the DHCP VLAN in this screen to enable DHCP snooping on the VLAN. Click this to reset the values in the DHCP Snooping Configure screen. Select this to have the Switch add the system name to DHCP requests that it broadcasts to...DHCP VLAN, if specified, or VLAN. The Switch loses these changes if it broadcasts to enable DHCP snooping on the Switch and specify trusted ports. ES-4124 User's Guide 217 You can specify the DHCP VLAN in the range specified above. Chapter 24 IP Source Guard 24.5.2 DHCP Snooping VLAN Configure Use...
... The Switch will drop all VLANs. You can specify the DHCP VLAN in this screen to enable DHCP snooping on the VLAN. Click this to reset the values in the DHCP Snooping Configure screen. Select this to have the Switch add the system name to DHCP requests that it broadcasts to...DHCP VLAN, if specified, or VLAN. The Switch loses these changes if it broadcasts to enable DHCP snooping on the Switch and specify trusted ports. ES-4124 User's Guide 217 You can specify the DHCP VLAN in the range specified above. Chapter 24 IP Source Guard 24.5.2 DHCP Snooping VLAN Configure Use...
User Guide
Page 221
... Log interval. Enter how long (1-2147483647 seconds) the MAC address filter remains in the ARP Inspection Log Status screen to clear the log and reset this screen. Log Profile Log buffer size Enter the maximum number (1-1024) of log messages that were dropped due to unavailable buffer. If the...to enable ARP inspection on the Switch. Filter Aging Time Filter aging time This setting has no effect on specific VLAN and specify trusted ports. ES-4124 User's Guide 221 Enter 0 if you want the MAC address filter to the syslog server yet. You can also configure the length of ...
... Log interval. Enter how long (1-2147483647 seconds) the MAC address filter remains in the ARP Inspection Log Status screen to clear the log and reset this screen. Log Profile Log buffer size Enter the maximum number (1-1024) of log messages that were dropped due to unavailable buffer. If the...to enable ARP inspection on the Switch. Filter Aging Time Filter aging time This setting has no effect on specific VLAN and specify trusted ports. ES-4124 User's Guide 221 Enter 0 if you want the MAC address filter to the syslog server yet. You can also configure the length of ...

User Guide
Page 222
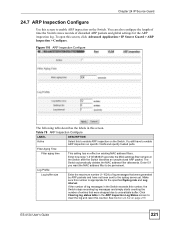
Cancel Click this to reset the values in this screen to their last-saved values. 24.7.1 ARP Inspection Port Configure Use this screen to specify whether ports are done configuring. ... Switch can also specify the maximum rate at which the Switch receives ARP packets on each untrusted port. Figure 111 ARP Inspection Port Configure 222 ES-4124 User's Guide The relationship between Syslog rate and Log interval.
Cancel Click this to reset the values in this screen to their last-saved values. 24.7.1 ARP Inspection Port Configure Use this screen to specify whether ports are done configuring. ... Switch can also specify the maximum rate at which the Switch receives ARP packets on each untrusted port. Figure 111 ARP Inspection Port Configure 222 ES-4124 User's Guide The relationship between Syslog rate and Log interval.

User Guide
Page 223
... displays the port number. The Switch discards ARP packets on trusted ports. You can arrive on the top navigation panel to save your changes to reset the values in every fivesecond interval. Enter 0 to the Switch's run-time memory. For example, if the Rate is 15 pps and the burst interval... seconds) of 15 ARP packets in this port is 1 second, then the Switch accepts a maximum of the burst interval. Figure 112 ARP Inspection VLAN Configure ES-4124 User's Guide 223
... displays the port number. The Switch discards ARP packets on trusted ports. You can arrive on the top navigation panel to save your changes to reset the values in every fivesecond interval. Enter 0 to the Switch's run-time memory. For example, if the Rate is 15 pps and the burst interval... seconds) of 15 ARP packets in this port is 1 second, then the Switch accepts a maximum of the burst interval. Figure 112 ARP Inspection VLAN Configure ES-4124 User's Guide 223

User Guide
Page 224
... inspection on the VLAN. All: The Switch generates log messages every time it receives an ARP packet from the VLAN. Cancel Click this to reset the values in this section to specify the VLANs you want to manage in the section below . End VID Enter the highest VLAN ID you... to the Switch's run-time memory. Table 80 ARP Inspection VLAN Configure LABEL DESCRIPTION VLAN Use this screen to their last-saved values. 224 ES-4124 User's Guide Enabled Select Yes to enable ARP inspection on the VLAN. VID This field displays the VLAN ID of VLANs in the section below...
... inspection on the VLAN. All: The Switch generates log messages every time it receives an ARP packet from the VLAN. Cancel Click this to reset the values in this section to specify the VLANs you want to manage in the section below . End VID Enter the highest VLAN ID you... to the Switch's run-time memory. Table 80 ARP Inspection VLAN Configure LABEL DESCRIPTION VLAN Use this screen to their last-saved values. 224 ES-4124 User's Guide Enabled Select Yes to enable ARP inspection on the VLAN. VID This field displays the VLAN ID of VLANs in the section below...

User Guide
Page 285
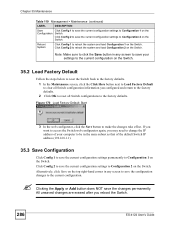
Default ES-4124 User's Guide 285 CHAPTER 35 Maintenance This chapter explains how to configure the maintenance screens that let you maintain the firmware and configuration files. 35.1 ... Backup Click Click Here to go to the factory default settings. Figure 169 Management > Maintenance The following screen. Configuration Load Factory Click Click Here to reset the configuration to the Restore Configuration screen. Restore Click Click Here to go to the Firmware Upgrade screen. Click Management > Maintenance in the navigation panel...
Default ES-4124 User's Guide 285 CHAPTER 35 Maintenance This chapter explains how to configure the maintenance screens that let you maintain the firmware and configuration files. 35.1 ... Backup Click Click Here to go to the factory default settings. Figure 169 Management > Maintenance The following screen. Configuration Load Factory Click Click Here to reset the configuration to the Restore Configuration screen. Restore Click Click Here to go to the Firmware Upgrade screen. Click Management > Maintenance in the navigation panel...
User Guide
Page 286
... need to change the IP address of your settings to the current configuration on the Switch. 35.2 Load Factory Default Follow the steps below to reset the Switch back to the factory defaults. 1 In the Maintenance screen, click the Click Here button next to Load Factory Default to clear all Switch... Switch. Click Config 2 to save the changes permanently. All unsaved changes are erased after you configured and return to the factory defaults. 2 Click OK to reset all Switch configuration information you reboot the Switch. 286 ES-4124 User's Guide
... need to change the IP address of your settings to the current configuration on the Switch. 35.2 Load Factory Default Follow the steps below to reset the Switch back to the factory defaults. 1 In the Maintenance screen, click the Click Here button next to Load Factory Default to clear all Switch... Switch. Click Config 2 to save the changes permanently. All unsaved changes are erased after you configured and return to the factory defaults. 2 Click OK to reset all Switch configuration information you reboot the Switch. 286 ES-4124 User's Guide


