Operating Guide
Page 3
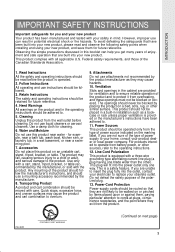
...retained for future reference. Cleaning Unplug this product on a bed, sofa, rug, or other sources, refer to ensure reliable operation of power source indicated on or pinched by the product manufacturer as a bookcase or rack unless proper ventilation is a safety feature. Attachments Do ... should not be walked on the marking label. For products intended to overturn. 9. Accessories Do not place this product from battery power, or other similar surface. If you are provided for ventilation and to the operating instructions. 12. Follow Instructions All operating and use...
...retained for future reference. Cleaning Unplug this product on a bed, sofa, rug, or other sources, refer to ensure reliable operation of power source indicated on or pinched by the product manufacturer as a bookcase or rack unless proper ventilation is a safety feature. Attachments Do ... should not be walked on the marking label. For products intended to overturn. 9. Accessories Do not place this product from battery power, or other similar surface. If you are provided for ventilation and to the operating instructions. 12. Follow Instructions All operating and use...
Operating Guide
Page 4
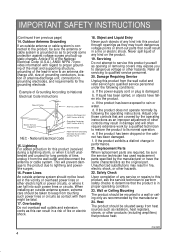
... extensive work by following conditions: a. Object and Liquid Entry Never push objects of any kind into this product from touching such power lines or circuits as contact with regard to proper grounding of the mast and supporting structure, grounding of the lead-in damage and...only those controls that are required, be sure the service technician has used replacement parts specified by the manufacturer or have fallen into such power lines or circuits. If the product exhibits a distinct change in a fire or electric shock. Example of Grounding According to National Electrical Code...
... extensive work by following conditions: a. Object and Liquid Entry Never push objects of any kind into this product from touching such power lines or circuits as contact with regard to proper grounding of the mast and supporting structure, grounding of the lead-in damage and...only those controls that are required, be sure the service technician has used replacement parts specified by the manufacturer or have fallen into such power lines or circuits. If the product exhibits a distinct change in a fire or electric shock. Example of Grounding According to National Electrical Code...
Operating Guide
Page 6
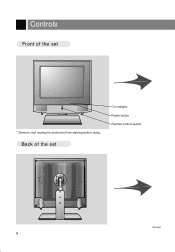
Back of the set On indicator Power button Remote control sensor 206-3652 6 Controls Front of the set tv/video menu enter vol vol ch ch power * Remove vinyl coating for protection from staining before using.
Back of the set On indicator Power button Remote control sensor 206-3652 6 Controls Front of the set tv/video menu enter vol vol ch ch power * Remove vinyl coating for protection from staining before using.
Operating Guide
Page 8
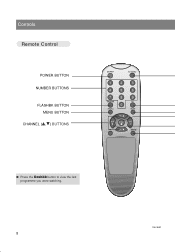
Controls Remote Control POWER BUTTON NUMBER BUTTONS FLASHBK BUTTON MENU BUTTON CHANNEL (D,E) BUTTONS power tv/video 1 2 3 4 5 6 7 8 flashbk 0 menu 9 cc mute ch vol enter vol ch sleep q Press the flashbk button to view the last programme you were watching. 206-3652 8
Controls Remote Control POWER BUTTON NUMBER BUTTONS FLASHBK BUTTON MENU BUTTON CHANNEL (D,E) BUTTONS power tv/video 1 2 3 4 5 6 7 8 flashbk 0 menu 9 cc mute ch vol enter vol ch sleep q Press the flashbk button to view the last programme you were watching. 206-3652 8
Operating Guide
Page 10
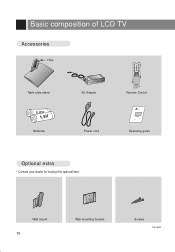
Wall mount 10 Wall mounting bracket Screws 206-3652 Basic composition of LCD TV Accessories Hole power tv/video flashbk cc menu mute ch vol enter vol ch sleep Table style stand AC Adaptor Remote Control 1.5V 1.5V Batteries Power cord Zenith AS mark Operating guide Optional extra * Contact your dealer for buying this optional item.
Wall mount 10 Wall mounting bracket Screws 206-3652 Basic composition of LCD TV Accessories Hole power tv/video flashbk cc menu mute ch vol enter vol ch sleep Table style stand AC Adaptor Remote Control 1.5V 1.5V Batteries Power cord Zenith AS mark Operating guide Optional extra * Contact your dealer for buying this optional item.
Operating Guide
Page 11
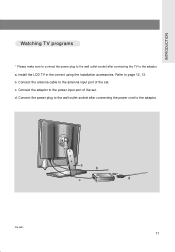
b. Connect the adaptor to the adaptor. 206-3652 a b c d 11 Connect the power plug to the wall outlet socket after connecting the TV to the antenna input port of the set . Connect the antenna cable to the adaptor. c. INTRODUCTION Watching TV programs * Please make sure to connect the power plug to the wall outlet socket after connecting the power cord to the power input port of the set . Install the LCD TV in the correct using the installation accessories. a. Refer to page 12, 13. d.
b. Connect the adaptor to the adaptor. 206-3652 a b c d 11 Connect the power plug to the wall outlet socket after connecting the TV to the antenna input port of the set . Connect the antenna cable to the adaptor. c. INTRODUCTION Watching TV programs * Please make sure to connect the power plug to the wall outlet socket after connecting the power cord to the power input port of the set . Install the LCD TV in the correct using the installation accessories. a. Refer to page 12, 13. d.

Operating Guide
Page 13
Place the table installer in the table installer. * When you wish to install the set to the hole of the table style stand so as not to allow movement of TV set . INTRODUCTION 2 Installation on the table tv/video menu enter vol vol ch ch power a. b. Put the set in the position you assemble the TV set with table style stand, please match the stick of the joint. 206-3652 13
Place the table installer in the table installer. * When you wish to install the set to the hole of the table style stand so as not to allow movement of TV set . INTRODUCTION 2 Installation on the table tv/video menu enter vol vol ch ch power a. b. Put the set in the position you assemble the TV set with table style stand, please match the stick of the joint. 206-3652 13
Operating Guide
Page 22
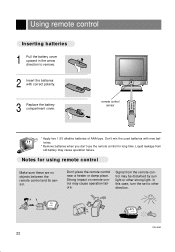
... using remote control Make sure these are no objects between the remote control and its sensor. tv/video menu enter vol vol ch ch power remote control sensor power tv/video flashbk cc menu mute ch vol enter vol ch sleep * Apply two 1.5V alkaline batteries of AAA type. Notes for long...
... using remote control Make sure these are no objects between the remote control and its sensor. tv/video menu enter vol vol ch ch power remote control sensor power tv/video flashbk cc menu mute ch vol enter vol ch sleep * Apply two 1.5V alkaline batteries of AAA type. Notes for long...

Operating Guide
Page 23
... selecting channels Press number of the program as one or two digits with the adaptor. * Press the power button and you want after memorizing received broadcasting signals in a few seconds. 1 Press the power button to memorize channels. Volume 3 206-3652 23 Turning on the set on. q Volume (F) button... decreas- ex: channel 7 7 or 07 q Refer to page 32 ~ 33 to turn the set * First, connect antenna cable and power cord with number buttons.
... selecting channels Press number of the program as one or two digits with the adaptor. * Press the power button and you want after memorizing received broadcasting signals in a few seconds. 1 Press the power button to memorize channels. Volume 3 206-3652 23 Turning on the set on. q Volume (F) button... decreas- ex: channel 7 7 or 07 q Refer to page 32 ~ 33 to turn the set * First, connect antenna cable and power cord with number buttons.

Operating Guide
Page 27
... time you press the volume (F, G) buttons, the caption mode is programmed to remember which mode it was last set to, even if you switch the POWER off. 206-3652 27 Language Captions Caption/Text Parental Ctl English Off CC1 Use DEF G And A CAPTION TEXT4 4 Press the enter (A) button. Operating the Caption...
... time you press the volume (F, G) buttons, the caption mode is programmed to remember which mode it was last set to, even if you switch the POWER off. 206-3652 27 Language Captions Caption/Text Parental Ctl English Off CC1 Use DEF G And A CAPTION TEXT4 4 Press the enter (A) button. Operating the Caption...
Operating Guide
Page 32
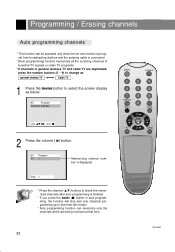
EZ Program Channel Add/Del Use DEF G And A 2 Press the volume ( G) button. power tv/video 1 2 3 4 5 6 7 8 flashbk 0 menu 9 cc mute ch vol enter vol ch sleep 206-3652 32 Programming / Erasing channels Auto programming channels * This function can be ...
EZ Program Channel Add/Del Use DEF G And A 2 Press the volume ( G) button. power tv/video 1 2 3 4 5 6 7 8 flashbk 0 menu 9 cc mute ch vol enter vol ch sleep 206-3652 32 Programming / Erasing channels Auto programming channels * This function can be ...

Operating Guide
Page 34
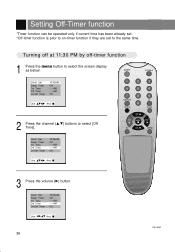
Clock Set Sleep Timer On Time Off Time On/Off Timer --:--AM Off --:--AM --:--AM Off Use DEF G And A power tv/video 1 2 3 4 5 6 7 8 flashbk 0 menu 9 cc mute ch vol enter vol ch sleep 3 Press the volume ( G) button. Clock Set Sleep Timer On Time Off Time On/... set current time as 10:30 AM 1 Press the menu button to select [Clock Set]. Setting current time * If current time setting is erased by power failure or TV is unplugged, reset it.
Clock Set Sleep Timer On Time Off Time On/Off Timer --:--AM Off --:--AM --:--AM Off Use DEF G And A power tv/video 1 2 3 4 5 6 7 8 flashbk 0 menu 9 cc mute ch vol enter vol ch sleep 3 Press the volume ( G) button. Clock Set Sleep Timer On Time Off Time On/... set current time as 10:30 AM 1 Press the menu button to select [Clock Set]. Setting current time * If current time setting is erased by power failure or TV is unplugged, reset it.
Operating Guide
Page 36
... same time. Clock Set Sleep Timer On Time Off Time On/Off Timer 10:30AM Off --:--AM --:--AM Off Use F G DE And A 36 206-3652 power tv/video 1 2 3 4 5 6 7 8 flashbk 0 menu 9 cc mute ch vol enter vol ch sleep Clock Set Sleep Timer On Time Off Time On/Off Timer 10:30AM...
... same time. Clock Set Sleep Timer On Time Off Time On/Off Timer 10:30AM Off --:--AM --:--AM Off Use F G DE And A 36 206-3652 power tv/video 1 2 3 4 5 6 7 8 flashbk 0 menu 9 cc mute ch vol enter vol ch sleep Clock Set Sleep Timer On Time Off Time On/Off Timer 10:30AM...
Operating Guide
Page 40
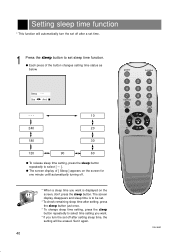
Set it again. 40 power tv/video 1 2 3 4 5 6 7 8 flashbk 0 menu 9 cc mute ch vol enter vol ch sleep 206-3652 Setting sleep time function * This function will be erased. q Each press ...
Set it again. 40 power tv/video 1 2 3 4 5 6 7 8 flashbk 0 menu 9 cc mute ch vol enter vol ch sleep 206-3652 Setting sleep time function * This function will be erased. q Each press ...
Operating Guide
Page 43
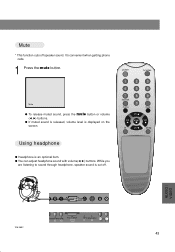
... are listening to sound through headphone, speaker sound is an optional item. Mute * This function cuts off . q You can adjust headphone sound with volume(F, G) buttons. power tv/video 1 2 3 4 5 6 7 8 flashbk 0 menu 9 cc mute ch vol enter vol ch sleep Using headphone q Headphone is cut off speaker sound. Mute q To release muted sound...
... are listening to sound through headphone, speaker sound is an optional item. Mute * This function cuts off . q You can adjust headphone sound with volume(F, G) buttons. power tv/video 1 2 3 4 5 6 7 8 flashbk 0 menu 9 cc mute ch vol enter vol ch sleep Using headphone q Headphone is cut off speaker sound. Mute q To release muted sound...
Operating Guide
Page 44
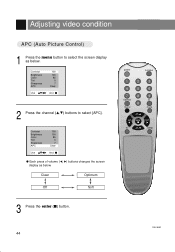
Contrast Brightness Color Tint Sharpness APC 100 100 85 0 7 Clear Use DEF G And A q Each press of volume (F, G) buttons changes the screen display as below . Contrast Brightness Color Tint Sharpness APC 100 100 85 0 7 Clear Use DEF G And A 2 Press the channel (D,E) buttons to select the screen display as below . Clear Optimum Off Soft power tv/video 1 2 3 4 5 6 7 8 flashbk 0 menu 9 cc mute ch vol enter vol ch sleep 3 Press the enter (A) button. 44 206-3652 Adjusting video condition APC (Auto Picture Control) 1 Press the menu button to select [APC].
Contrast Brightness Color Tint Sharpness APC 100 100 85 0 7 Clear Use DEF G And A q Each press of volume (F, G) buttons changes the screen display as below . Contrast Brightness Color Tint Sharpness APC 100 100 85 0 7 Clear Use DEF G And A 2 Press the channel (D,E) buttons to select the screen display as below . Clear Optimum Off Soft power tv/video 1 2 3 4 5 6 7 8 flashbk 0 menu 9 cc mute ch vol enter vol ch sleep 3 Press the enter (A) button. 44 206-3652 Adjusting video condition APC (Auto Picture Control) 1 Press the menu button to select [APC].
Operating Guide
Page 46
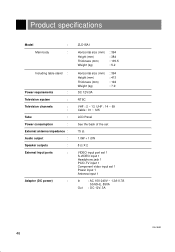
... : External antenna impedance : Audio output : Speaker outputs : External input ports : Adaptor (DC power) : ZLD15A1 Horizontal size (mm) Height (mm) Thickness (mm) Weight (kg) : 394 : 384 : 105.5 : 5.2 Horizontal size (mm) Height (mm) Thickness (mm) Weight (kg) : 394 : 413 : 194 : 7.9 DC ... back of the set 75 Ω 1.0W + 1.0W 8ΩX2 VIDEO input port set 1 S-VIDEO input 1 Headphone jack 1 PC/D-TV input 1 Component video input set 1 Power input 1 Antenna input 1 In : AC 100-240V ~ 1.3A-0.7A 50/60Hz, 85VA Out : DC 12V, 3A 206-3652 46
... : External antenna impedance : Audio output : Speaker outputs : External input ports : Adaptor (DC power) : ZLD15A1 Horizontal size (mm) Height (mm) Thickness (mm) Weight (kg) : 394 : 384 : 105.5 : 5.2 Horizontal size (mm) Height (mm) Thickness (mm) Weight (kg) : 394 : 413 : 194 : 7.9 DC ... back of the set 75 Ω 1.0W + 1.0W 8ΩX2 VIDEO input port set 1 S-VIDEO input 1 Headphone jack 1 PC/D-TV input 1 Component video input set 1 Power input 1 Antenna input 1 In : AC 100-240V ~ 1.3A-0.7A 50/60Hz, 85VA Out : DC 12V, 3A 206-3652 46
