Operating Guide
Page 2
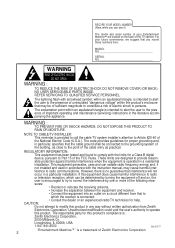
... model and serial number of Zenith Electronics Corporation 2 The exclamation point within the product's enclosure that to which can radiate radio frequency energy and, if not installed and used in the literature accompanying the appliance. REGULATORY INFORMATION: This equipment has been tested and found to correct the interference by one or more of important operating and maintenance (servicing) instructions...
... model and serial number of Zenith Electronics Corporation 2 The exclamation point within the product's enclosure that to which can radiate radio frequency energy and, if not installed and used in the literature accompanying the appliance. REGULATORY INFORMATION: This equipment has been tested and found to correct the interference by one or more of important operating and maintenance (servicing) instructions...
Operating Guide
Page 3
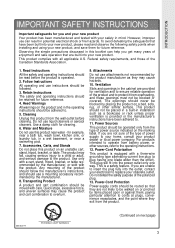
... your new product. Use only with a cart, stand, tripod, bracket, or table recommended by items placed upon or against them for cleaning. 6. Attachments Do not use can help you and your new product Your product has been manufactured and tested with a three-wire grounding type alternating-current line plug (a plug having one way. Power-Cord Polarization This product is operated. 2. If you...
... your new product. Use only with a cart, stand, tripod, bracket, or table recommended by items placed upon or against them for cleaning. 6. Attachments Do not use can help you and your new product Your product has been manufactured and tested with a three-wire grounding type alternating-current line plug (a plug having one way. Power-Cord Polarization This product is operated. 2. If you...
Operating Guide
Page 4
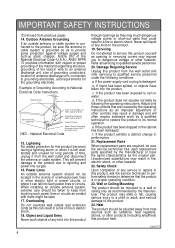
... Requiring Service Unplug this product (receiver) during a lightning storm, or when it is grounded so as to keep from heat sources such as opening or removing covers may result in fire, electric shock, or other hazards. 22. If the power-supply cord or plug is in wire to an antenna discharge unit, size of grounding conductors, location of antenna-discharge unit, connection to a wall...
... Requiring Service Unplug this product (receiver) during a lightning storm, or when it is grounded so as to keep from heat sources such as opening or removing covers may result in fire, electric shock, or other hazards. 22. If the power-supply cord or plug is in wire to an antenna discharge unit, size of grounding conductors, location of antenna-discharge unit, connection to a wall...
Operating Guide
Page 5
...14 External Equipment Connections 15 DVD Player Connections 16 DTV (Set-top Box) Connections 17 PC/Computer Connections 18 (use TV as a Monitor) PC Mode Functions Check 20 PC Mode Adjustments 21 3 Remote Control: Installing Batteries/Operation 26 To turn the TV on 27 TV Mode Available Menus 28 Menu Language Selection 29 Auto Programming: Finding/Erasing channels 30 4 Setting the Clock 32 Setting Off Timer 33 Setting On Timer 35 Sleep Timer Setup 37 5 Video/Picture Setup 38 Audio/Sound Setup 42 6 Closed Captions 48 Parental Control 51 Auto Off 54 Key Lock...
...14 External Equipment Connections 15 DVD Player Connections 16 DTV (Set-top Box) Connections 17 PC/Computer Connections 18 (use TV as a Monitor) PC Mode Functions Check 20 PC Mode Adjustments 21 3 Remote Control: Installing Batteries/Operation 26 To turn the TV on 27 TV Mode Available Menus 28 Menu Language Selection 29 Auto Programming: Finding/Erasing channels 30 4 Setting the Clock 32 Setting Off Timer 33 Setting On Timer 35 Sleep Timer Setup 37 5 Video/Picture Setup 38 Audio/Sound Setup 42 6 Closed Captions 48 Parental Control 51 Auto Off 54 Key Lock...

Operating Guide
Page 7
INTRODUCTION Back of the TV Connection Panel PC PC INPUT SOUND H/P S-VIDEO IN VIDEO(MONO) L AUDIO R DVD/DTV IN COMPONENT(480i/480p/720p/1080i) AUDIO Y PB PR LR ANT IN +75 Ω DC 12V PC input S-Video input PC sound input DVD/DTV IN DC 12V input (Component (480i/480p/720p/1080i), AUDIO) input Headphone jack Audio/Video input Antenna input 206-03777 7
INTRODUCTION Back of the TV Connection Panel PC PC INPUT SOUND H/P S-VIDEO IN VIDEO(MONO) L AUDIO R DVD/DTV IN COMPONENT(480i/480p/720p/1080i) AUDIO Y PB PR LR ANT IN +75 Ω DC 12V PC input S-Video input PC sound input DVD/DTV IN DC 12V input (Component (480i/480p/720p/1080i), AUDIO) input Headphone jack Audio/Video input Antenna input 206-03777 7

Operating Guide
Page 11
Remove the connection panel cover as shown below. Reinstall the connection panel cover. q Some dot defects may appear on the TV. a. Connect the antenna cable to the antenna input port on the screen, like red, green or blue spots. e. q Avoid touching the LCD screen or holding your finger(s) against it for long periods of time. Connect the adapter to the touch, there may produce some temporary distortion effects on the...
Remove the connection panel cover as shown below. Reinstall the connection panel cover. q Some dot defects may appear on the TV. a. Connect the antenna cable to the antenna input port on the screen, like red, green or blue spots. e. q Avoid touching the LCD screen or holding your finger(s) against it for long periods of time. Connect the adapter to the touch, there may produce some temporary distortion effects on the...
Operating Guide
Page 14
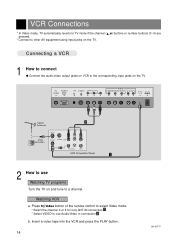
... TV mode if the channel (D,E) buttons or number buttons (0~9) are pressed. * Connect to a channel. Watching VCR a. PC PC INPUT SOUND H/P S-VIDEO IN VIDEO(MONO) L AUDIO R DVD/DTV IN COMPONENT(480i/480p/720p/1080i) AUDIO Y PB PR LR ANT IN +75 Ω DC 12V Typical 2 Antennas ANT IN Direct connection ANT OUT S-VIDEO OUT CH3 IN CH4 (R) AUDIO(L) VIDEO VCR Connection Panel 1 2 How to use Audio/Video In connection 2 . Insert a video tape into the VCR and press the PLAY button...
... TV mode if the channel (D,E) buttons or number buttons (0~9) are pressed. * Connect to a channel. Watching VCR a. PC PC INPUT SOUND H/P S-VIDEO IN VIDEO(MONO) L AUDIO R DVD/DTV IN COMPONENT(480i/480p/720p/1080i) AUDIO Y PB PR LR ANT IN +75 Ω DC 12V Typical 2 Antennas ANT IN Direct connection ANT OUT S-VIDEO OUT CH3 IN CH4 (R) AUDIO(L) VIDEO VCR Connection Panel 1 2 How to use Audio/Video In connection 2 . Insert a video tape into the VCR and press the PLAY button...

Operating Guide
Page 15
External Equipment Connections CONNECTIONS Watching external A/V source 1 How to connect q Connect the audio/video output jacks on the external A/V equipment to select Video mode. tv/video Video On Remote Control 206-03777 15 q Turn the TV on and press tv/video button to the corresponding input jacks on the external A/V equipment. H/P S-VIDEO IN VIDEO(MONO) L AUDIO R DVD/DTV IN COMPONENT(480i/480p/720p/1080i) Y PB PR TV Connection Panel Camcorder CDGP R AUDIO L VIDEO External Equipment Connection Panel Video Game set CDI VCDP 2 How to use q Turn on the TV.
External Equipment Connections CONNECTIONS Watching external A/V source 1 How to connect q Connect the audio/video output jacks on the external A/V equipment to select Video mode. tv/video Video On Remote Control 206-03777 15 q Turn the TV on and press tv/video button to the corresponding input jacks on the external A/V equipment. H/P S-VIDEO IN VIDEO(MONO) L AUDIO R DVD/DTV IN COMPONENT(480i/480p/720p/1080i) Y PB PR TV Connection Panel Camcorder CDGP R AUDIO L VIDEO External Equipment Connection Panel Video Game set CDI VCDP 2 How to use q Turn on the TV.

Operating Guide
Page 16
... DVD player. DVD Player Connections q Connect DVD/DTV output jacks to select Component source. q See DVD/DTV user's manual for operating instructions. q Turn the TV on and use q Turn on TV. 1 How to connect PC PC INPUT SOUND H/P S-VIDEO IN VIDEO(MONO) L AUDIO R DVD/DTV IN COMPONENT(480i/480p/720p/1080i) AUDIO Y PB PR LR ANT IN +75 Ω DC 12V TV Connection Panel DVD Connection Panel PB PR R AUDIO L Note: TV INPUT Y PB PR DVD OUTPUT Y Y Y Y Cb Cr B-Y R-Y Pb Pr PB PR 2 How to use tv/video button...
... DVD player. DVD Player Connections q Connect DVD/DTV output jacks to select Component source. q See DVD/DTV user's manual for operating instructions. q Turn the TV on and use q Turn on TV. 1 How to connect PC PC INPUT SOUND H/P S-VIDEO IN VIDEO(MONO) L AUDIO R DVD/DTV IN COMPONENT(480i/480p/720p/1080i) AUDIO Y PB PR LR ANT IN +75 Ω DC 12V TV Connection Panel DVD Connection Panel PB PR R AUDIO L Note: TV INPUT Y PB PR DVD OUTPUT Y Y Y Y Cb Cr B-Y R-Y Pb Pr PB PR 2 How to use tv/video button...

Operating Guide
Page 17
... DTV receiver (Set-top Box). tv/video Component On Remote Control 206-03777 17 q Turn the TV on and use q Turn on the TV. Note: A DTV set-top box is required to receive DTV programming. 1 How to connect PC PC INPUT SOUND H/P S-VIDEO IN VIDEO(MONO) L AUDIO R DVD/DTV IN COMPONENT(480i/480p/720p/1080i) AUDIO Y PB PR LR ANT IN +75 Ω DC 12V TV Connections Panel PB PR R AUDIO L DTV Receiver (Set-top Box) Connections Panel 2 How to use tv/video button...
... DTV receiver (Set-top Box). tv/video Component On Remote Control 206-03777 17 q Turn the TV on and use q Turn on the TV. Note: A DTV set-top box is required to receive DTV programming. 1 How to connect PC PC INPUT SOUND H/P S-VIDEO IN VIDEO(MONO) L AUDIO R DVD/DTV IN COMPONENT(480i/480p/720p/1080i) AUDIO Y PB PR LR ANT IN +75 Ω DC 12V TV Connections Panel PB PR R AUDIO L DTV Receiver (Set-top Box) Connections Panel 2 How to use tv/video button...

Operating Guide
Page 18
q Connect the PC audio output to the PC with the PC cable. q Turn the TV on and use q Turn on the PC before connecting to the TV. PC/Computer Connections (using TV as a Monitor) * After setup, be sure to set TV to PC source. 1 How to connect q Set the monitor output resolution on the PC/Computer. PC PC INPUT SOUND H/P S-VIDEO IN VIDEO(MONO) L AUDIO R TV Connections Panel PC Connections Panel 2 How to use tv/video button to select RGB-PC source. tv/video RGB-PC On Remote Control 18 206-03777 q Connect the TV to the TV's PC SOUND input. See the next page.
q Connect the PC audio output to the PC with the PC cable. q Turn the TV on and use q Turn on the PC before connecting to the TV. PC/Computer Connections (using TV as a Monitor) * After setup, be sure to set TV to PC source. 1 How to connect q Set the monitor output resolution on the PC/Computer. PC PC INPUT SOUND H/P S-VIDEO IN VIDEO(MONO) L AUDIO R TV Connections Panel PC Connections Panel 2 How to use tv/video button to select RGB-PC source. tv/video RGB-PC On Remote Control 18 206-03777 q Connect the TV to the TV's PC SOUND input. See the next page.
Operating Guide
Page 22
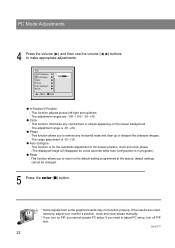
.... PC H-Position G 0 V-Position G Clock G Phase G Auto configure G Reset G FG Adjust A Back q H-Position/V-Position : This function adjusts picture left/right and up or sharpen the character images. default settings cannot be changed. 5 Press the enter (A) button. * Some signals from some graphics boards may not function properly. If you cannot access PC setup. PC Mode Adjustments 4 Press the volume (G) and then use the volume (F, G) buttons to adjust PC setup, turn on the screen background.
.... PC H-Position G 0 V-Position G Clock G Phase G Auto configure G Reset G FG Adjust A Back q H-Position/V-Position : This function adjusts picture left/right and up or sharpen the character images. default settings cannot be changed. 5 Press the enter (A) button. * Some signals from some graphics boards may not function properly. If you cannot access PC setup. PC Mode Adjustments 4 Press the volume (G) and then use the volume (F, G) buttons to adjust PC setup, turn on the screen background.

Operating Guide
Page 27
... viewing source by pressing tv/video on TV Operation Overview 1 First, connect antenna cable and power cord with the adapter. Press on . q Volume (F) button decreases the sound level. q In standby mode, press the power, ch (D,E), tv/video and number button on the remote control or ch (D,E), tv/video on the TV side panel to receive channels in your local broadcast area. 4 After viewing, press the power button on the TV side panel. BASIC FUNCTIONS To turn the TV on the remote control...
... viewing source by pressing tv/video on TV Operation Overview 1 First, connect antenna cable and power cord with the adapter. Press on . q Volume (F) button decreases the sound level. q In standby mode, press the power, ch (D,E), tv/video and number button on the remote control or ch (D,E), tv/video on the TV side panel to receive channels in your local broadcast area. 4 After viewing, press the power button on the TV side panel. BASIC FUNCTIONS To turn the TV on the remote control...
Operating Guide
Page 33
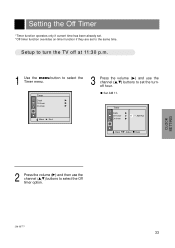
Setup to turn the TV off at 11:30 p.m. 1 Use the menu button to select the Off timer option. q Set AM 11. AM Run On-timer G Move F G Adjust A Back 2 Press the volume (G) and then use the channel (D,E) buttons to the same time. FG FG CLOCK SETTING 206-03777 33 Setting the Off Timer *Timer function operates only if current time has been already set. *Off-timer function overrides on-timer function if they are...
Setup to turn the TV off at 11:30 p.m. 1 Use the menu button to select the Off timer option. q Set AM 11. AM Run On-timer G Move F G Adjust A Back 2 Press the volume (G) and then use the channel (D,E) buttons to the same time. FG FG CLOCK SETTING 206-03777 33 Setting the Off Timer *Timer function operates only if current time has been already set. *Off-timer function overrides on-timer function if they are...

Operating Guide
Page 34
... channel (D,E) button changes the screen display as below. q Hold, Off Timer will disappear if you hold the channel (D) button, the minute display is progressed from previous page) 4 6 Press the volume (G) and use the channel (D,E) buttons to set the minutes. q Time is changed in the sequence of 00 01 02 ...58 59, and changed in the reverse sequence for channel (E) button. Timer CH. Run Hold q The screen display will not work . 7 Press the enter (A) button. Setting...
... channel (D,E) button changes the screen display as below. q Hold, Off Timer will disappear if you hold the channel (D) button, the minute display is progressed from previous page) 4 6 Press the volume (G) and use the channel (D,E) buttons to set the minutes. q Time is changed in the sequence of 00 01 02 ...58 59, and changed in the reverse sequence for channel (E) button. Timer CH. Run Hold q The screen display will not work . 7 Press the enter (A) button. Setting...
Operating Guide
Page 35
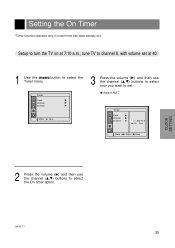
...-timer G -7- : -- Setup to turn the TV on at 7:10 a.m., tune TV to channel 8, with volume set . Timer CH. AM TV 3 Vol 30 Run Move F G Adjust A Back 2 Press the volume (G) and then use the channel (D,E) buttons to select hour you want to set at 40. 1 Use the menu button to select the On timer option. Clock G Off-timer G On-timer G Move G Next 3 Press the volume (G) and then use the channel (D,E) buttons to select the Timer menu. Setting...
...-timer G -7- : -- Setup to turn the TV on at 7:10 a.m., tune TV to channel 8, with volume set . Timer CH. AM TV 3 Vol 30 Run Move F G Adjust A Back 2 Press the volume (G) and then use the channel (D,E) buttons to select hour you want to set at 40. 1 Use the menu button to select the On timer option. Clock G Off-timer G On-timer G Move G Next 3 Press the volume (G) and then use the channel (D,E) buttons to select the Timer menu. Setting...
Operating Guide
Page 37
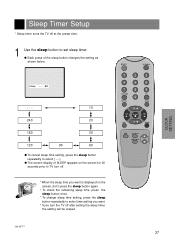
power tv/video 1 2 3 4 5 6 7 8 9 flashbk cc 0 menu mute ch vol enter vol mts ch sleep pip position pip input ch CLOCK SETTING 206-03777 37 F G - - - 10 240 20 180 30 120 90 60 q To cancel sleep time setting, press the sleep button repeatedly to select time setting you want is displayed on the screen, don't press the sleep button again. * To check the remaining sleep time, press the sleep button once. * To change sleep time setting, press the sleep button repeatedly...
power tv/video 1 2 3 4 5 6 7 8 9 flashbk cc 0 menu mute ch vol enter vol mts ch sleep pip position pip input ch CLOCK SETTING 206-03777 37 F G - - - 10 240 20 180 30 120 90 60 q To cancel sleep time setting, press the sleep button repeatedly to select time setting you want is displayed on the screen, don't press the sleep button again. * To check the remaining sleep time, press the sleep button once. * To change sleep time setting, press the sleep button repeatedly...
Operating Guide
Page 53
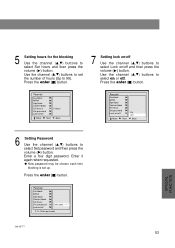
... block Content block Set hours Set password Lock on /off . Parental Aux.block MPAA Age block Content block Set hours Set password Lock on /off G G G G G G G On OOffff Move G Next F Back FG FG SPECIAL FUNCTION 6 Setting Password Use the channel (D,E) buttons to select Lock on or off G G G G G G Enter code::-------- 5 Setting hours for the blocking Use the channel (D,E) buttons to 99). q New password may be chosen each time blocking is set the number of hours (Up...
... block Content block Set hours Set password Lock on /off . Parental Aux.block MPAA Age block Content block Set hours Set password Lock on /off G G G G G G G On OOffff Move G Next F Back FG FG SPECIAL FUNCTION 6 Setting Password Use the channel (D,E) buttons to select Lock on or off G G G G G G Enter code::-------- 5 Setting hours for the blocking Use the channel (D,E) buttons to 99). q New password may be chosen each time blocking is set the number of hours (Up...
Operating Guide
Page 56
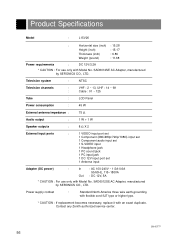
Product Specifications Model : L15V26 : Horizontal size (inch) : 15.28 Height (inch) : 15.17 Thickness (inch) : 6.86 Weight (pound) : 11.68 Power requirements : DC 12V/3.2A * CAUTION : For use only with Model No. SAD6012SE AC Adapter, manufactured by SERONICS CO., LTD. Television system : NTSC Television channels : VHF : 2 ~ 13, UHF : 14 ~ 69 : Cable : 01 ~ 125 Tube : LCD Panel Power consumption : External antenna impedance : 45 W 75 Ω Audio output Speaker outputs : 1 W + 1 W : 8ΩX2 External input ports : 1 VIDEO input port set 1 Component ...
Product Specifications Model : L15V26 : Horizontal size (inch) : 15.28 Height (inch) : 15.17 Thickness (inch) : 6.86 Weight (pound) : 11.68 Power requirements : DC 12V/3.2A * CAUTION : For use only with Model No. SAD6012SE AC Adapter, manufactured by SERONICS CO., LTD. Television system : NTSC Television channels : VHF : 2 ~ 13, UHF : 14 ~ 69 : Cable : 01 ~ 125 Tube : LCD Panel Power consumption : External antenna impedance : 45 W 75 Ω Audio output Speaker outputs : 1 W + 1 W : 8ΩX2 External input ports : 1 VIDEO input port set 1 Component ...
Operating Guide
Page 60
..., installation, maintenance, or separate system components; The repaired or replacement product will repair or replace defective product as it proves to the original purchaser of Purchase, and Original Packaging Material for shipping defective product for Return Merchandise Authorization (RMA) and your Sales Receipt to the requirements or precautions in the United States, including US Territories. LCD TV Model #: L15V26 Serial #: WARRANTY...
..., installation, maintenance, or separate system components; The repaired or replacement product will repair or replace defective product as it proves to the original purchaser of Purchase, and Original Packaging Material for shipping defective product for Return Merchandise Authorization (RMA) and your Sales Receipt to the requirements or precautions in the United States, including US Territories. LCD TV Model #: L15V26 Serial #: WARRANTY...


