Owner's Manual
Page 5
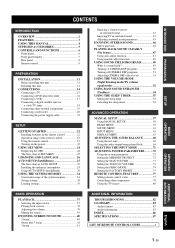
... VCR 17 Connecting a digital satellite tuner or a cable TV tuner 18 Connecting other external components 19 Connecting a subwoofer 20 Connecting the power supply cable 21 SETUP GETTING STARTED 22 Installing batteries in the remote control 22 Operation range of the remote control 22 Using the remote control 23 Turning on the... 51 Adjusting CINEMA DSP effect levels 51 USING THE VOLUME MODE (Night listening mode/TV volume equal mode 52 USING BASS SOUND ENHANCER (TruBass 54 USING THE SLEEP TIMER 55 Setting the sleep timer 55 Canceling the sleep timer 56 ADVANCED OPERATION MANUAL ...
... VCR 17 Connecting a digital satellite tuner or a cable TV tuner 18 Connecting other external components 19 Connecting a subwoofer 20 Connecting the power supply cable 21 SETUP GETTING STARTED 22 Installing batteries in the remote control 22 Operation range of the remote control 22 Using the remote control 23 Turning on the... 51 Adjusting CINEMA DSP effect levels 51 USING THE VOLUME MODE (Night listening mode/TV volume equal mode 52 USING BASS SOUND ENHANCER (TruBass 54 USING THE SLEEP TIMER 55 Setting the sleep timer 55 Canceling the sleep timer 56 ADVANCED OPERATION MANUAL ...
Owner's Manual
Page 7
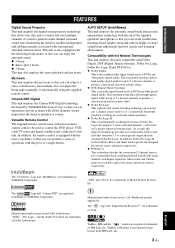
...other purely digital media. INTRODUCTION FEATURES FEATURES Digital Sound Projector This unit employs the digital sound projector technology that allows one slim unit to control and steer multiple channels of sound to generate multi channel surround sound, thus ...Digital This unit employs the Cinema DSP Digital technology developed by YAMAHA Electronics Corp. In addition, the remote control is fundamentally a redesigned version of SRS Labs, Inc. The " " logo and "IntelliBeam" are registered trademarks of Dolby Laboratories. You can achieve a clear sound in a surround sound...
...other purely digital media. INTRODUCTION FEATURES FEATURES Digital Sound Projector This unit employs the digital sound projector technology that allows one slim unit to control and steer multiple channels of sound to generate multi channel surround sound, thus ...Digital This unit employs the Cinema DSP Digital technology developed by YAMAHA Electronics Corp. In addition, the remote control is fundamentally a redesigned version of SRS Labs, Inc. The " " logo and "IntelliBeam" are registered trademarks of Dolby Laboratories. You can achieve a clear sound in a surround sound...
Owner's Manual
Page 8
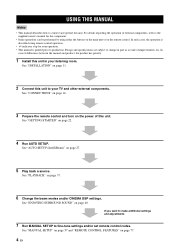
In case of improvements, etc. See "CONNECTIONS" on page 14. 3 Prepare the remote control and turn on the remote control. See "PLAYBACK" on page 40. See "ENJOYING SURROUND SOUND" on page 37. 6 Change the beam modes and/or CINEMA DSP settings. If you want to make additional settings and adjustments 7 Run MANUAL SETUP to ...
In case of improvements, etc. See "CONNECTIONS" on page 14. 3 Prepare the remote control and turn on the remote control. See "PLAYBACK" on page 40. See "ENJOYING SURROUND SOUND" on page 37. 6 Change the beam modes and/or CINEMA DSP settings. If you want to make additional settings and adjustments 7 Run MANUAL SETUP to ...
Owner's Manual
Page 9
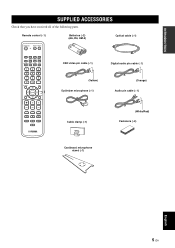
Remote control (×1) Batteries (×2) (AA, R6, UM-3) Optical cable (×1) STANDBY/ON POWER POWER AV TV STB VCR DVD AUX TV INPUT1 INPUT2 MACRO TV AUTO VOL MODE SETUP INPUTMODE SLEEP 5BEAM 1 ST+3BEAM 2 3BEAM 3 STEREO 4 MY BEAM SURROUND 5 6 MUSIC 7 MOVIE 8 SPORTS 9 OFF 0 +10 CH LEVEL MENU TEST ENTER TV/AV YSP... RETURN VOLUME CH TV VOL OSD video pin cable (×1) Digital audio pin cable (×1) (Yellow) Optimizer microphone (×1) (Orange) Audio pin ...
Remote control (×1) Batteries (×2) (AA, R6, UM-3) Optical cable (×1) STANDBY/ON POWER POWER AV TV STB VCR DVD AUX TV INPUT1 INPUT2 MACRO TV AUTO VOL MODE SETUP INPUTMODE SLEEP 5BEAM 1 ST+3BEAM 2 3BEAM 3 STEREO 4 MY BEAM SURROUND 5 6 MUSIC 7 MOVIE 8 SPORTS 9 OFF 0 +10 CH LEVEL MENU TEST ENTER TV/AV YSP... RETURN VOLUME CH TV VOL OSD video pin cable (×1) Digital audio pin cable (×1) (Yellow) Optimizer microphone (×1) (Orange) Audio pin ...

Owner's Manual
Page 10
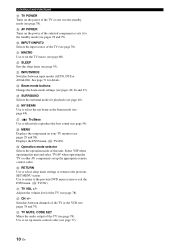
...8226; When you turn on the power of this unit or sets it can reproduce sound. • In the standby mode, this unit consumes a small amount of power in order to receive infrared-signals from the remote control. 4 INPUT Press repeatedly to switch between input sources (TV, VCR, DVD or ...AUX). Outputs a test tone to experience the sound beam (see page 68). 5 VOLUME -/+ Controls the volume level of all audio channels (see page 39). 6 ...
...8226; When you turn on the power of this unit or sets it can reproduce sound. • In the standby mode, this unit consumes a small amount of power in order to receive infrared-signals from the remote control. 4 INPUT Press repeatedly to switch between input sources (TV, VCR, DVD or ...AUX). Outputs a test tone to experience the sound beam (see page 68). 5 VOLUME -/+ Controls the volume level of all audio channels (see page 39). 6 ...
Owner's Manual
Page 13
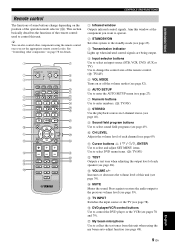
...2-channel stereo (see page 46). 9 Sound field program buttons Use to select sound field programs (see page 49). 0 CH LEVEL Adjusts the volume level of the operation...YSP RETURN VOLUME CH TV VOL MUTE TV INPUT TV MUTE CODE SET 1 Infrared window Outputs infrared control signals. A Cursor buttons / / / , ENTER Use to select and adjust SET MENU items. Use to collect the test tones from this unit when using the remote control...You can also control other components" on the position of each speaker (see page 68). Aim this window at the component you set the appropriate remote control codes. G ...
...2-channel stereo (see page 46). 9 Sound field program buttons Use to select sound field programs (see page 49). 0 CH LEVEL Adjusts the volume level of the operation...YSP RETURN VOLUME CH TV VOL MUTE TV INPUT TV MUTE CODE SET 1 Infrared window Outputs infrared control signals. A Cursor buttons / / / , ENTER Use to select and adjust SET MENU items. Use to collect the test tones from this unit when using the remote control...You can also control other components" on the position of each speaker (see page 68). Aim this window at the component you set the appropriate remote control codes. G ...
Owner's Manual
Page 14
...DVD menu. (S: TV/AV) U TV VOL +/- Use to return to effectively reproduce the bass sound (see page 54). V CH +/- L SLEEP Sets the sleep timer (see page 40). N Beam mode buttons Change the beam ...mode settings (see pages 40, 46 and 47). See page 71 for playback (see page 55). Select YSP when ... Selects the operation mode of the selected component or sets it to set up the appropriate remote control codes. I AV POWER Turns on the power of this unit and select TV/AV when operating...
...DVD menu. (S: TV/AV) U TV VOL +/- Use to return to effectively reproduce the bass sound (see page 54). V CH +/- L SLEEP Sets the sleep timer (see page 40). N Beam mode buttons Change the beam ...mode settings (see pages 40, 46 and 47). See page 71 for playback (see page 55). Select YSP when ... Selects the operation mode of the selected component or sets it to set up the appropriate remote control codes. I AV POWER Turns on the power of this unit and select TV/AV when operating...

Owner's Manual
Page 26
...8226; Exhausted batteries may be erased in the following types of conditions: - The buttons on the remote control. • Do not drop the remote control. • Do not leave or store the remote control in the following cases: - Approximately 6 m (20 ft) Notes • Do not spill ..., such as alkaline and manganese batteries) together. Clean the battery compartment thoroughly before using the remote control. The remote control is unwantedly erased, insert new batteries and reset the remote control codes again. If this happens, replace the batteries with new ones. • Do not ...
...8226; Exhausted batteries may be erased in the following types of conditions: - The buttons on the remote control. • Do not drop the remote control. • Do not leave or store the remote control in the following cases: - Approximately 6 m (20 ft) Notes • Do not spill ..., such as alkaline and manganese batteries) together. Clean the battery compartment thoroughly before using the remote control. The remote control is unwantedly erased, insert new batteries and reset the remote control codes again. If this happens, replace the batteries with new ones. • Do not ...
Owner's Manual
Page 27
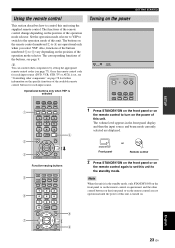
... MENU TEST ENTER TV/AV YSP RETURN VOLUME CH TV VOL 8 9 Turning on the power VOLUME + STANDBY/ON STANDBY/ON POWER POWER AV TV STB VCR DVD AUX TV INPUT1 INPUT2 MACRO TV 1 Press STANDBY/ON on the front panel or on the remote control to set , see "Controlling other components" on page 78 for...
... MENU TEST ENTER TV/AV YSP RETURN VOLUME CH TV VOL 8 9 Turning on the power VOLUME + STANDBY/ON STANDBY/ON POWER POWER AV TV STB VCR DVD AUX TV INPUT1 INPUT2 MACRO TV 1 Press STANDBY/ON on the front panel or on the remote control to set , see "Controlling other components" on page 78 for...
Owner's Manual
Page 28
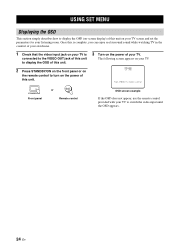
... real surround sound while watching TV in the comfort of your own home. 1 Check that the video input jack on your TV is connected to the VIDEO OUT jack of this unit to display the OSD of this unit. 2 Press STANDBY/ON on the front panel or on the remote control to turn... on the power of your TV. YSP-900 Push [MENU] to begin set the parameters for your listening room. USING SET MENU USING SET MENU Displaying the OSD This...
... real surround sound while watching TV in the comfort of your own home. 1 Check that the video input jack on your TV is connected to the VIDEO OUT jack of this unit to display the OSD of this unit. 2 Press STANDBY/ON on the front panel or on the remote control to turn... on the power of your TV. YSP-900 Push [MENU] to begin set the parameters for your listening room. USING SET MENU USING SET MENU Displaying the OSD This...

Owner's Manual
Page 30
... display. 3 Press / to the previous screen while using SET MENU, press RETURN on the remote control. • To cancel the SET MENU screen, press MENU once more. • You can also perform the...displayed on your TV. ENGLISH DEUTSCH Francais ESPANOL [ ]/[ ]:Select [ENTER]:Return 26 En TV/AV YSP 2 Press MENU on your TV. The following operations in the SET MENU of this unit. 4 Press... screen appears on the bottom of this unit. 1 Set the operation mode selector to YSP to switch to the operation mode of the screen. • To return to select LANGUAGE SETUP and then press ENTER.
... display. 3 Press / to the previous screen while using SET MENU, press RETURN on the remote control. • To cancel the SET MENU screen, press MENU once more. • You can also perform the...displayed on your TV. ENGLISH DEUTSCH Francais ESPANOL [ ]/[ ]:Select [ENTER]:Return 26 En TV/AV YSP 2 Press MENU on your TV. The following operations in the SET MENU of this unit. 4 Press... screen appears on the bottom of this unit. 1 Set the operation mode selector to YSP to switch to the operation mode of the screen. • To return to select LANGUAGE SETUP and then press ENTER.
Owner's Manual
Page 32
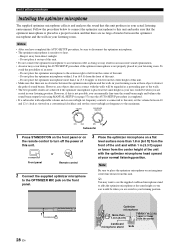
... the optimizer microphone within 1 m (3.3 ft) upper or lower from the center Cardboard microphone stand Sofa STANDBY/ON Front panel or Remote control 2 Connect the supplied optimizer microphone to the maximum. However, if this is not possible, you are no obstacles between the optimizer microphone...microphone to heat. - AUTO SETUP (IntelliBeam) Installing the optimizer microphone The supplied optimizer microphone collects and analyzes the sound that this unit. Note Be sure to place the optimizer microphone on the remote control to turn off the power of an error: -
... the optimizer microphone within 1 m (3.3 ft) upper or lower from the center Cardboard microphone stand Sofa STANDBY/ON Front panel or Remote control 2 Connect the supplied optimizer microphone to the maximum. However, if this is not possible, you are no obstacles between the optimizer microphone...microphone to heat. - AUTO SETUP (IntelliBeam) Installing the optimizer microphone The supplied optimizer microphone collects and analyzes the sound that this unit. Note Be sure to place the optimizer microphone on the remote control to turn off the power of an error: -
Owner's Manual
Page 33
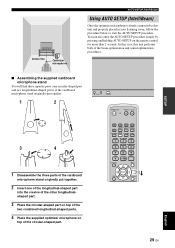
... 2 3 STEREO MY BEAM SURROUND 4 5 6 MUSIC 7 MOVIE 8 SPORTS 9 OFF 0 +10 CH LEVEL MENU TEST ENTER TV/AV YSP RETURN English 29 En You can also enter the AUTO SETUP procedure simply by pressing and holding AUTO SETUP ...in your listening room, follow the procedure below to this unit performs both of the beam optimization and sound optimization procedures. ■ Assembling the supplied cardboard microphone stand You will find three separate parts (one circular... longitudinal-shaped parts. 4 Place the supplied optimizer microphone on the remote control for more than 2 seconds.
... 2 3 STEREO MY BEAM SURROUND 4 5 6 MUSIC 7 MOVIE 8 SPORTS 9 OFF 0 +10 CH LEVEL MENU TEST ENTER TV/AV YSP RETURN English 29 En You can also enter the AUTO SETUP procedure simply by pressing and holding AUTO SETUP ...in your listening room, follow the procedure below to this unit performs both of the beam optimization and sound optimization procedures. ■ Assembling the supplied cardboard microphone stand You will find three separate parts (one circular... longitudinal-shaped parts. 4 Place the supplied optimizer microphone on the remote control for more than 2 seconds.
Owner's Manual
Page 34
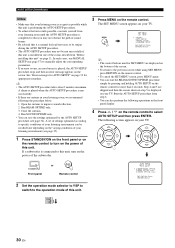
... MENU are skipped and then the screen shown in step 5 is displayed on your TV. ENTER ENTER STANDBY/ON Front panel or Remote control 2 Set the operation mode selector to YSP to switch to the operation mode of this unit, turn on the power of the rooms described in "Before installing this unit.... 4. Start the AUTO SETUP procedure from your listening room until the AUTO SETUP procedure is completed so that you may not obstruct the path of sound beams. • Be advised that it is normal for loud test tones to be output during the AUTO SETUP procedure. • The AUTO SETUP procedure...
... MENU are skipped and then the screen shown in step 5 is displayed on your TV. ENTER ENTER STANDBY/ON Front panel or Remote control 2 Set the operation mode selector to YSP to switch to the operation mode of this unit, turn on the power of the rooms described in "Before installing this unit.... 4. Start the AUTO SETUP procedure from your listening room until the AUTO SETUP procedure is completed so that you may not obstruct the path of sound beams. • Be advised that it is normal for loud test tones to be output during the AUTO SETUP procedure. • The AUTO SETUP procedure...

Owner's Manual
Page 37
...operations were performed on the remote control in progress. is installed in step 3 is displayed, press RETURN. ERROR E-6 Volume level is not connected to this unit. The optimizer microphone cannot collect the sound produced by this unit. If the problem persists, contact the nearest YAMAHA service center for AUTO ... AUTO SETUP on this unit. Run the MANUAL SETUP if the problem is not much unwanted noise in Please test in front of YSP. Some other operations while the AUTO SETUP procedure is in progress. Please check MIC position/connection and re-try . Please re-try...
...operations were performed on the remote control in progress. is installed in step 3 is displayed, press RETURN. ERROR E-6 Volume level is not connected to this unit. The optimizer microphone cannot collect the sound produced by this unit. If the problem persists, contact the nearest YAMAHA service center for AUTO ... AUTO SETUP on this unit. Run the MANUAL SETUP if the problem is not much unwanted noise in Please test in front of YSP. Some other operations while the AUTO SETUP procedure is in progress. Please check MIC position/connection and re-try . Please re-try...

Owner's Manual
Page 38
... ENTER. The following screen appears on your TV. The SET MENU screen appears on your TV. The following screen appears on the remote control. USING THE SYSTEM MEMORY USING THE SYSTEM MEMORY Convenient usage of the system memory You can also perform the following operations in the ... curtains in the system memory of this unit. When the curtains are open or closed 3 Press / to the varying conditions of this unit. TV/AV YSP 4 Press / to the operation mode of your TV. ENTER ENTER ;MEMORY . 1)LOAD 2)SAVE [ ]/[ ]:Up/Down [ENTER]:Enter p p Saving settings 1 Set ...
... ENTER. The following screen appears on your TV. The SET MENU screen appears on your TV. The following screen appears on the remote control. USING THE SYSTEM MEMORY USING THE SYSTEM MEMORY Convenient usage of the system memory You can also perform the following operations in the ... curtains in the system memory of this unit. When the curtains are open or closed 3 Press / to the varying conditions of this unit. TV/AV YSP 4 Press / to the operation mode of your TV. ENTER ENTER ;MEMORY . 1)LOAD 2)SAVE [ ]/[ ]:Up/Down [ENTER]:Enter p p Saving settings 1 Set ...
Owner's Manual
Page 39
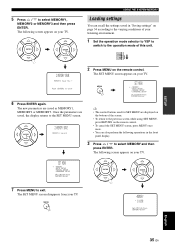
SETUP p 5 Press / to Save 2 Press MENU on the remote control. Push [ENTER] to select MEMORY1, MEMORY2 or MEMORY3 and then press ENTER. MENU p SET MENU . ;MEMORY ;AUTO SETUP ;MANUAL SETUP ;LANGUAGE SETUP [ ]/[ ]:Up/Down [ENTER]:... TV. TV/AV YSP 2)MEMORY SAVE MEMORY1 Save Now ? MENU p ;MEMORY . 1)LOAD 2)SAVE [ ]/[ ]:Up/Down [ENTER]:Enter English p 35 En Once the parameters are saved as MEMORY1, MEMORY2 or MEMORY3. ENTER ENTER USING THE SYSTEM MEMORY Loading settings You can recall the settings saved in "Saving settings" on the remote control. • To...
SETUP p 5 Press / to Save 2 Press MENU on the remote control. Push [ENTER] to select MEMORY1, MEMORY2 or MEMORY3 and then press ENTER. MENU p SET MENU . ;MEMORY ;AUTO SETUP ;MANUAL SETUP ;LANGUAGE SETUP [ ]/[ ]:Up/Down [ENTER]:... TV. TV/AV YSP 2)MEMORY SAVE MEMORY1 Save Now ? MENU p ;MEMORY . 1)LOAD 2)SAVE [ ]/[ ]:Up/Down [ENTER]:Enter English p 35 En Once the parameters are saved as MEMORY1, MEMORY2 or MEMORY3. ENTER ENTER USING THE SYSTEM MEMORY Loading settings You can recall the settings saved in "Saving settings" on the remote control. • To...
Owner's Manual
Page 41
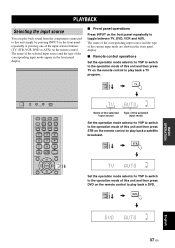
...SPORTS 9 OFF 0 +10 CH LEVEL MENU TEST ENTER TV/AV YSP RETURN VOL Name of the selected Type of the selected input source input mode Set the operation mode selector to YSP to switch to the operation mode of this unit and then press STB on the remote control to play back a satellite ...broadcast. PLAYBACK PLAYBACK Selecting the input source You can play back sound from the components connected to this unit and ...
...SPORTS 9 OFF 0 +10 CH LEVEL MENU TEST ENTER TV/AV YSP RETURN VOL Name of the selected Type of the selected input source input mode Set the operation mode selector to YSP to switch to the operation mode of this unit and then press STB on the remote control to play back a satellite ...broadcast. PLAYBACK PLAYBACK Selecting the input source You can play back sound from the components connected to this unit and ...
Owner's Manual
Page 42
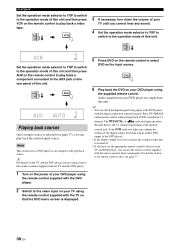
..., bitstream output, and/or DTS output of your TV using the remote control supplied with the digital connection (optical/coaxial). PLAYBACK Set the operation mode selector to YSP to switch to the operation mode of the playback source. TV/AV YSP AUX VOL Playing back sources Once an input source is selected (see... select DVD as an example of this unit to around 45. • If you have set remote control codes, see page 37), you cannot hear any sound. 4 Set the operation mode selector to YSP to switch to the operation mode of this unit. Press ST+3BEAM on your DVD player are ...
..., bitstream output, and/or DTS output of your TV using the remote control supplied with the digital connection (optical/coaxial). PLAYBACK Set the operation mode selector to YSP to switch to the operation mode of the playback source. TV/AV YSP AUX VOL Playing back sources Once an input source is selected (see... select DVD as an example of this unit to around 45. • If you have set remote control codes, see page 37), you cannot hear any sound. 4 Set the operation mode selector to YSP to switch to the operation mode of this unit. Press ST+3BEAM on your DVD player are ...
Owner's Manual
Page 43
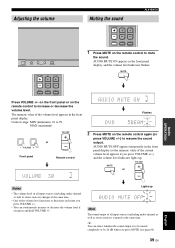
Adjusting the volume Muting the sound VOLUME CH TV VOL PLAYBACK INPUT VOLUME + STANDBY/ON VOLUME CH TV VOL MUTE TV INPUT TV MUTE CODE SET 1 Press MUTE on the remote control to increase or decrease the volume level. VOLUME MUTE or Notes • The volume level of all input sources (including... • One of all input sources (including multi-channel as well as stereo sources) is to resume the sound output. on the front panel or on the remote control to mute the sound. Lights up . y You can continuously increase or decrease the volume level if you press MUTE (see page ...
Adjusting the volume Muting the sound VOLUME CH TV VOL PLAYBACK INPUT VOLUME + STANDBY/ON VOLUME CH TV VOL MUTE TV INPUT TV MUTE CODE SET 1 Press MUTE on the remote control to increase or decrease the volume level. VOLUME MUTE or Notes • The volume level of all input sources (including... • One of all input sources (including multi-channel as well as stereo sources) is to resume the sound output. on the front panel or on the remote control to mute the sound. Lights up . y You can continuously increase or decrease the volume level if you press MUTE (see page ...


