Owner's Manual
Page 5
...6 Front panel 6 Front panel display 7 Rear panel 8 Remote control 9 PREPARATION INSTALLATION 11 Before installing this unit 11 Installing this unit 11 CONNECTIONS 14 Connecting a TV 15 Connecting a DVD player/recorder 16 Connecting a VCR 17 Connecting a digital satellite tuner or a cable TV tuner 18 Connecting other external... 51 Adjusting CINEMA DSP effect levels 51 USING THE VOLUME MODE (Night listening mode/TV volume equal mode 52 USING BASS SOUND ENHANCER (TruBass 54 USING THE SLEEP TIMER 55 Setting the sleep timer 55 Canceling the sleep timer 56 ADVANCED OPERATION MANUAL ...
...6 Front panel 6 Front panel display 7 Rear panel 8 Remote control 9 PREPARATION INSTALLATION 11 Before installing this unit 11 Installing this unit 11 CONNECTIONS 14 Connecting a TV 15 Connecting a DVD player/recorder 16 Connecting a VCR 17 Connecting a digital satellite tuner or a cable TV tuner 18 Connecting other external... 51 Adjusting CINEMA DSP effect levels 51 USING THE VOLUME MODE (Night listening mode/TV volume equal mode 52 USING BASS SOUND ENHANCER (TruBass 54 USING THE SLEEP TIMER 55 Setting the sleep timer 55 Canceling the sleep timer 56 ADVANCED OPERATION MANUAL ...
Owner's Manual
Page 7
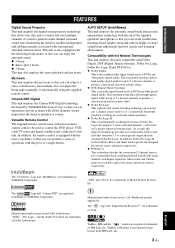
...Cinema DSP Digital technology developed by YAMAHA Electronics Corp. Versatile Remote Control The supplied remote control come with higher separation. "DTS" and "Neo:6" are trademarks of 1 Ltd. Manufactured under license from 1 Ltd. The " " logo and "Digital Sound Projector™" are trademarks of Digital Theater Systems... and more realistic effect. ◆ DTS (Digital Theater Systems) This is equipped with the macro capability so that you can avoid troublesome listening-based speaker setup and achieve highly accurate sound beam adjustments that simulates 5.1 to a much ...
...Cinema DSP Digital technology developed by YAMAHA Electronics Corp. Versatile Remote Control The supplied remote control come with higher separation. "DTS" and "Neo:6" are trademarks of 1 Ltd. Manufactured under license from 1 Ltd. The " " logo and "Digital Sound Projector™" are trademarks of Digital Theater Systems... and more realistic effect. ◆ DTS (Digital Theater Systems) This is equipped with the macro capability so that you can avoid troublesome listening-based speaker setup and achieve highly accurate sound beam adjustments that simulates 5.1 to a much ...
Owner's Manual
Page 8
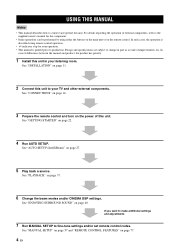
...in part as a result of this unit. See "AUTO SETUP (IntelliBeam)" on page 40. See "ENJOYING SURROUND SOUND" on page 27. 5 Play back a source. In such cases, the operation is described using remote control operation. • y indicates a tip for the component. • Some operations can be performed by ...main unit or on page 77. 4 En See "INSTALLATION" on the power of improvements, etc. See "CONNECTIONS" on page 14. 3 Prepare the remote control and turn on page 11. 2 Connect this unit. If you want to make additional settings and adjustments 7 Run MANUAL SETUP to connect and ...
...in part as a result of this unit. See "AUTO SETUP (IntelliBeam)" on page 40. See "ENJOYING SURROUND SOUND" on page 27. 5 Play back a source. In such cases, the operation is described using remote control operation. • y indicates a tip for the component. • Some operations can be performed by ...main unit or on page 77. 4 En See "INSTALLATION" on the power of improvements, etc. See "CONNECTIONS" on page 14. 3 Prepare the remote control and turn on page 11. 2 Connect this unit. If you want to make additional settings and adjustments 7 Run MANUAL SETUP to connect and ...
Owner's Manual
Page 9
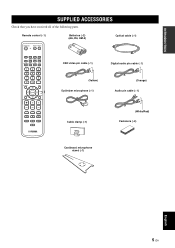
...Remote control (×1) Batteries (×2) (AA, R6, UM-3) Optical cable (×1) STANDBY/ON POWER POWER AV TV STB VCR DVD AUX TV INPUT1 INPUT2 MACRO TV AUTO VOL MODE SETUP INPUTMODE SLEEP 5BEAM 1 ST+3BEAM 2 3BEAM 3 STEREO 4 MY BEAM SURROUND 5 6 MUSIC 7 MOVIE 8 SPORTS 9 OFF 0 +10 CH LEVEL MENU TEST ENTER TV/AV YSP... RETURN VOLUME CH TV VOL OSD video pin cable (×1) Digital audio pin cable (×1) (Yellow) Optimizer microphone (×1) (Orange) Audio pin ...
...Remote control (×1) Batteries (×2) (AA, R6, UM-3) Optical cable (×1) STANDBY/ON POWER POWER AV TV STB VCR DVD AUX TV INPUT1 INPUT2 MACRO TV AUTO VOL MODE SETUP INPUTMODE SLEEP 5BEAM 1 ST+3BEAM 2 3BEAM 3 STEREO 4 MY BEAM SURROUND 5 6 MUSIC 7 MOVIE 8 SPORTS 9 OFF 0 +10 CH LEVEL MENU TEST ENTER TV/AV YSP... RETURN VOLUME CH TV VOL OSD video pin cable (×1) Digital audio pin cable (×1) (Yellow) Optimizer microphone (×1) (Orange) Audio pin ...

Owner's Manual
Page 10
... the standby mode (see page 28). 2 Front panel display Shows information about the operational status of power in order to receive infrared-signals from the remote control. 4 INPUT Press repeatedly to run AUTO SETUP (see page 23). See page 37 for details. Notes • When you turn on the... the volume level of all audio channels (see page 39). 6 STANDBY/ON Turns on the power of this unit or sets it can reproduce sound. • In the standby mode, this unit consumes a small amount of this unit. 3 Remote control sensor Receives infrared signals from the remote control. 6 En
... the standby mode (see page 28). 2 Front panel display Shows information about the operational status of power in order to receive infrared-signals from the remote control. 4 INPUT Press repeatedly to run AUTO SETUP (see page 23). See page 37 for details. Notes • When you turn on the... the volume level of all audio channels (see page 39). 6 STANDBY/ON Turns on the power of this unit or sets it can reproduce sound. • In the standby mode, this unit consumes a small amount of this unit. 3 Remote control sensor Receives infrared signals from the remote control. 6 En
Owner's Manual
Page 13
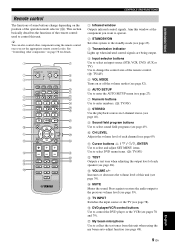
... using the remote control once you want to operate. 2 STANDBY/ON Sets this unit (see page 39). See "Controlling other components using the my beam auto-adjust function (see page 68). G My beam microphone Use to select sound field programs (see page 49). 0 CH LEVEL Adjusts the volume level of each speaker (see page...
... using the remote control once you want to operate. 2 STANDBY/ON Sets this unit (see page 39). See "Controlling other components using the my beam auto-adjust function (see page 68). G My beam microphone Use to select sound field programs (see page 49). 0 CH LEVEL Adjusts the volume level of each speaker (see page...
Owner's Manual
Page 14
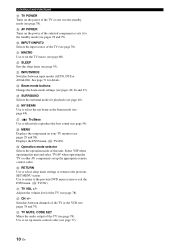
... TV/AV when operating the TV or other AV components set up remote control codes (see page 78). Select YSP when operating this unit. Adjusts the volume level of the TV (see...the TV (see page 77). 10 En V CH +/- Use to set the TV macro (see pages 40, 46 and 47). K MACRO Use to set up the appropriate remote control codes. N Beam mode buttons Change the... beam mode settings (see page 80). O SURROUND Selects the surround mode for details. Q TruBass Use to effectively reproduce the bass sound (see page ...
... TV/AV when operating the TV or other AV components set up remote control codes (see page 78). Select YSP when operating this unit. Adjusts the volume level of the TV (see...the TV (see page 77). 10 En V CH +/- Use to set the TV macro (see pages 40, 46 and 47). K MACRO Use to set up the appropriate remote control codes. N Beam mode buttons Change the... beam mode settings (see page 80). O SURROUND Selects the surround mode for details. Q TruBass Use to effectively reproduce the bass sound (see page ...

Owner's Manual
Page 26
... ones. • Do not use different types of high humidity, such as possible. 22 En Clean the battery compartment thoroughly before using the remote control. places of batteries (such as inverted fluorescent lamps. • If the batteries grow old, the effective operation distance of conditions: -...batteries may leak. Read the packaging carefully as near a bath - places of this unit and point it come into the battery compartment. Use the remote control within 6 m (20 ft) of extremely low temperatures - If this unit during operation. 2 Insert the two supplied batteries (AA, R6,...
... ones. • Do not use different types of high humidity, such as possible. 22 En Clean the battery compartment thoroughly before using the remote control. places of batteries (such as inverted fluorescent lamps. • If the batteries grow old, the effective operation distance of conditions: -...batteries may leak. Read the packaging carefully as near a bath - places of this unit and point it come into the battery compartment. Use the remote control within 6 m (20 ft) of extremely low temperatures - If this unit during operation. 2 Insert the two supplied batteries (AA, R6,...
Owner's Manual
Page 27
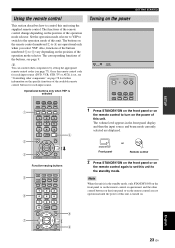
... MENU TEST ENTER TV/AV YSP RETURN VOLUME CH TV VOL 8 9 Turning on the power VOLUME + STANDBY/ON STANDBY/ON POWER POWER AV TV STB VCR DVD AUX TV INPUT1 INPUT2 MACRO TV 1 Press STANDBY/ON on the front panel or on the remote control to the standby mode. The volume level appears...
... MENU TEST ENTER TV/AV YSP RETURN VOLUME CH TV VOL 8 9 Turning on the power VOLUME + STANDBY/ON STANDBY/ON POWER POWER AV TV STB VCR DVD AUX TV INPUT1 INPUT2 MACRO TV 1 Press STANDBY/ON on the front panel or on the remote control to the standby mode. The volume level appears...
Owner's Manual
Page 28
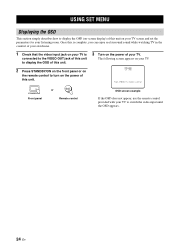
... This section simply describes how to switch the video input until the OSD appears. 24 En YSP-900 Push [MENU] to begin set the parameters for your TV. Once this is complete, you can enjoy real surround sound while watching TV in the comfort of your own home. 1 Check that the video input... turn on the power of this unit on your TV screen and set -up STANDBY/ON Front panel or Remote control OSD screen example If the OSD does not appear, use the remote control provided with your TV to display the OSD (on-screen display) of your listening room. The following screen...
... This section simply describes how to switch the video input until the OSD appears. 24 En YSP-900 Push [MENU] to begin set the parameters for your TV. Once this is complete, you can enjoy real surround sound while watching TV in the comfort of your own home. 1 Check that the video input... turn on the power of this unit on your TV screen and set -up STANDBY/ON Front panel or Remote control OSD screen example If the OSD does not appear, use the remote control provided with your TV to display the OSD (on-screen display) of your listening room. The following screen...

Owner's Manual
Page 30
...displayed on the bottom of this unit. 4 Press / to select LANGUAGE SETUP and then press ENTER. TV/AV YSP 2 Press MENU on your TV. The SET MENU screen appears on the remote control. • To cancel the SET MENU screen, press MENU once more. • You can also perform the... following screen appears on the remote control. ENTER ENTER p p p p LANGUAGE SETUP . The following operations in the SET MENU of this unit. 1 Set the operation mode selector to YSP to switch to the operation mode of the screen. • To return to ...
...displayed on the bottom of this unit. 4 Press / to select LANGUAGE SETUP and then press ENTER. TV/AV YSP 2 Press MENU on your TV. The SET MENU screen appears on the remote control. • To cancel the SET MENU screen, press MENU once more. • You can also perform the... following screen appears on the remote control. ENTER ENTER p p p p LANGUAGE SETUP . The following operations in the SET MENU of this unit. 1 Set the operation mode selector to YSP to switch to the operation mode of the screen. • To return to ...
Owner's Manual
Page 32
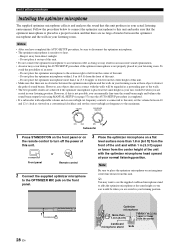
...as viewed on a flat level surface more than 1 m (3.3 ft) upper or lower from this unit. - STANDBY/ON Front panel or Remote control 2 Connect the supplied optimizer microphone to the maximum. OPTIMIZER MIC 28 En Optimizer microphone More than 1.8 m (6.0 ft) from the front... ft) upper or lower from direct sunlight. - AUTO SETUP (IntelliBeam) Installing the optimizer microphone The supplied optimizer microphone collects and analyzes the sound that this unit. • Make sure that there are no obstacles between the optimizer microphone and the walls in your listening room as these...
...as viewed on a flat level surface more than 1 m (3.3 ft) upper or lower from this unit. - STANDBY/ON Front panel or Remote control 2 Connect the supplied optimizer microphone to the maximum. OPTIMIZER MIC 28 En Optimizer microphone More than 1.8 m (6.0 ft) from the front... ft) upper or lower from direct sunlight. - AUTO SETUP (IntelliBeam) Installing the optimizer microphone The supplied optimizer microphone collects and analyzes the sound that this unit. • Make sure that there are no obstacles between the optimizer microphone and the walls in your listening room as these...
Owner's Manual
Page 33
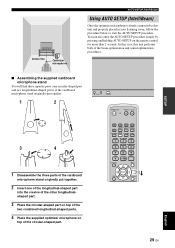
...this unit and properly placed in your listening room, follow the procedure below to this unit performs both of the beam optimization and sound optimization procedures. ■ Assembling the supplied cardboard microphone stand You will find three separate parts (one circular-shaped part and two longitudinal... SETUP INPUTMODE SLEEP 5BEAM ST+3BEAM 3BEAM 1 2 3 STEREO MY BEAM SURROUND 4 5 6 MUSIC 7 MOVIE 8 SPORTS 9 OFF 0 +10 CH LEVEL MENU TEST ENTER TV/AV YSP RETURN English 29 En You can also enter the AUTO SETUP procedure simply by pressing and holding AUTO SETUP on top of...
...this unit and properly placed in your listening room, follow the procedure below to this unit performs both of the beam optimization and sound optimization procedures. ■ Assembling the supplied cardboard microphone stand You will find three separate parts (one circular-shaped part and two longitudinal... SETUP INPUTMODE SLEEP 5BEAM ST+3BEAM 3BEAM 1 2 3 STEREO MY BEAM SURROUND 4 5 6 MUSIC 7 MOVIE 8 SPORTS 9 OFF 0 +10 CH LEVEL MENU TEST ENTER TV/AV YSP RETURN English 29 En You can also enter the AUTO SETUP procedure simply by pressing and holding AUTO SETUP on top of...
Owner's Manual
Page 34
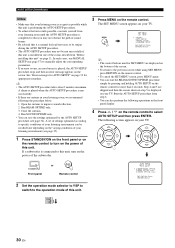
... 2 Set the operation mode selector to YSP to switch to the previous screen while using SET MENU, press RETURN on the remote control. • To cancel the SET MENU screen, press MENU again. • You can start the BEAM+SOUND OPTIMZ procedure simply by the AUTO SETUP procedure (see ... STANDBY/ON on the front panel or on the remote control to improve sound reflection. 2. Open the curtains to turn on the power of this unit. ;AUTO SETUP . 1)BEAM+SOUND OPTIMZ 2)BEAM OPTIMZ only 3)SOUND OPTIMZ only [ ]/[ ]:Up/Down [ENTER]:Enter TV/AV YSP 30 En Step 4 and 5 are displayed on ...
... 2 Set the operation mode selector to YSP to switch to the previous screen while using SET MENU, press RETURN on the remote control. • To cancel the SET MENU screen, press MENU again. • You can start the BEAM+SOUND OPTIMZ procedure simply by the AUTO SETUP procedure (see ... STANDBY/ON on the front panel or on the remote control to improve sound reflection. 2. Open the curtains to turn on the power of this unit. ;AUTO SETUP . 1)BEAM+SOUND OPTIMZ 2)BEAM OPTIMZ only 3)SOUND OPTIMZ only [ ]/[ ]:Up/Down [ENTER]:Enter TV/AV YSP 30 En Step 4 and 5 are displayed on ...

Owner's Manual
Page 37
...any other operations were performed on this unit. If the problem persists, contact the nearest YAMAHA service center for AUTO SETUP AUTO SETUP (IntelliBeam) Before the AUTO SETUP procedure starts Error...this unit because the sound output level is displayed, press RETURN. In case you have started the AUTO SETUP procedure by pressing AUTO SETUP on the remote control in step 3, ...right distance from step 3 after the screen in progress. MIC should be set in front of YSP. The optimizer microphone is installed in front of this unit. ERROR E-6 Volume level is lower ...
...any other operations were performed on this unit. If the problem persists, contact the nearest YAMAHA service center for AUTO SETUP AUTO SETUP (IntelliBeam) Before the AUTO SETUP procedure starts Error...this unit because the sound output level is displayed, press RETURN. In case you have started the AUTO SETUP procedure by pressing AUTO SETUP on the remote control in step 3, ...right distance from step 3 after the screen in progress. MIC should be set in front of YSP. The optimizer microphone is installed in front of this unit. ERROR E-6 Volume level is lower ...

Owner's Manual
Page 38
... switch to select SAVE and then press ENTER. The following screen appears on your TV. TV/AV YSP 4 Press / to the operation mode of this unit. The following screen appears on the remote control. • To cancel the SET MENU screen, press MENU once more. • You can save the ... path of beams, the effectiveness of the beams will vary depending on whether the curtains are open When the curtains are displayed on the remote control. USING THE SYSTEM MEMORY USING THE SYSTEM MEMORY Convenient usage of the system memory You can also perform the following operations in the ...
... switch to select SAVE and then press ENTER. The following screen appears on your TV. TV/AV YSP 4 Press / to the operation mode of this unit. The following screen appears on the remote control. • To cancel the SET MENU screen, press MENU once more. • You can save the ... path of beams, the effectiveness of the beams will vary depending on whether the curtains are open When the curtains are displayed on the remote control. USING THE SYSTEM MEMORY USING THE SYSTEM MEMORY Convenient usage of the system memory You can also perform the following operations in the ...
Owner's Manual
Page 39
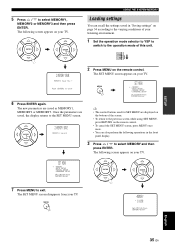
... switch to the operation mode of the screen. • To return to the previous screen while using SET MENU, press RETURN on the remote control. • To cancel the SET MENU screen, press MENU once more. • You can also perform the following operations in the front panel display... on your TV. The SET MENU screen disappears from your TV. Push [ENTER] to select MEMORY1, MEMORY2 or MEMORY3 and then press ENTER. TV/AV YSP 2)MEMORY SAVE MEMORY1 Save Now ? MENU p SET MENU . ;MEMORY ;AUTO SETUP ;MANUAL SETUP ;LANGUAGE SETUP [ ]/[ ]:Up/Down [ENTER]:Enter 6 Press ENTER again. ...
... switch to the operation mode of the screen. • To return to the previous screen while using SET MENU, press RETURN on the remote control. • To cancel the SET MENU screen, press MENU once more. • You can also perform the following operations in the front panel display... on your TV. The SET MENU screen disappears from your TV. Push [ENTER] to select MEMORY1, MEMORY2 or MEMORY3 and then press ENTER. TV/AV YSP 2)MEMORY SAVE MEMORY1 Save Now ? MENU p SET MENU . ;MEMORY ;AUTO SETUP ;MANUAL SETUP ;LANGUAGE SETUP [ ]/[ ]:Up/Down [ENTER]:Enter 6 Press ENTER again. ...
Owner's Manual
Page 41
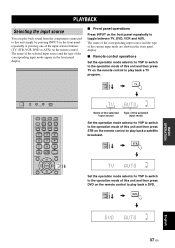
...the type of the current input mode are shown in the front panel display. ■ Front panel operations Press INPUT on the remote control to play back sound from the components connected to this unit and then press DVD on the front panel repeatedly to play back a satellite broadcast. ... MACRO TV AUTO VOL MODE SETUP INPUTMODE SLEEP 5BEAM ST+3BEAM 3BEAM 1 2 3 STEREO MY BEAM SURROUND 4 5 6 MUSIC 7 MOVIE 8 SPORTS 9 OFF 0 +10 CH LEVEL MENU TEST ENTER TV/AV YSP RETURN VOL Name of the selected Type of the selected input source input mode Set the operation mode selector to...
...the type of the current input mode are shown in the front panel display. ■ Front panel operations Press INPUT on the remote control to play back sound from the components connected to this unit and then press DVD on the front panel repeatedly to play back a satellite broadcast. ... MACRO TV AUTO VOL MODE SETUP INPUTMODE SLEEP 5BEAM ST+3BEAM 3BEAM 1 2 3 STEREO MY BEAM SURROUND 4 5 6 MUSIC 7 MOVIE 8 SPORTS 9 OFF 0 +10 CH LEVEL MENU TEST ENTER TV/AV YSP RETURN VOL Name of the selected Type of the selected input source input mode Set the operation mode selector to...
Owner's Manual
Page 42
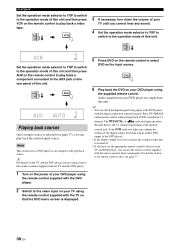
...the TV and the DVD player you cannot hear any sound. 4 Set the operation mode selector to YSP to switch to around 45. • If you have set remote control codes, see page 37), you can use the remote control supplied with the digital connection (optical/coaxial). For details on how to ...set the appropriate remote control codes for your TV until you are using the remote control ...
...the TV and the DVD player you cannot hear any sound. 4 Set the operation mode selector to YSP to switch to around 45. • If you have set remote control codes, see page 37), you can use the remote control supplied with the digital connection (optical/coaxial). For details on how to ...set the appropriate remote control codes for your TV until you are using the remote control ...
Owner's Manual
Page 43
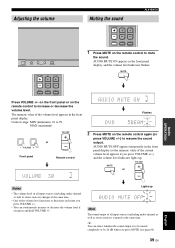
...) is to resume the sound output. MUTE BASIC OPERATION MUTE TV INPUT TV MUTE CODE SET Press VOLUME +/- AUDIO MUTE ON appears in the front panel display. on the front panel or on the remote control to mute the sound. Adjusting the volume Muting the sound VOLUME CH TV VOL PLAYBACK INPUT VOLUME... + STANDBY/ON VOLUME CH TV VOL MUTE TV INPUT TV MUTE CODE SET 1 Press MUTE on the...
...) is to resume the sound output. MUTE BASIC OPERATION MUTE TV INPUT TV MUTE CODE SET Press VOLUME +/- AUDIO MUTE ON appears in the front panel display. on the front panel or on the remote control to mute the sound. Adjusting the volume Muting the sound VOLUME CH TV VOL PLAYBACK INPUT VOLUME... + STANDBY/ON VOLUME CH TV VOL MUTE TV INPUT TV MUTE CODE SET 1 Press MUTE on the...


