Owner's Manual
Page 1
UAB YSP-900 Digital Sound Projector OWNER'S MANUAL
UAB YSP-900 Digital Sound Projector OWNER'S MANUAL
Owner's Manual
Page 3
... from excessive volume levels. If the antenna lead-in is 300 ohm ribbon lead, change the lead-in the users manual, may void your authority, granted by YAMAHA Corporation of the following measures: Relocate either this product MUST be determined by turning the unit "OFF" and "ON",... to avoid prolonged exposure from loud sounds is often undetectable until it at a safe level. One that are on different branch (circuit breaker or fuse) circuits or install AC line filter/s. ii En IMPORTANT SAFETY INSTRUCTIONS FCC INFORMATION (for Class "B" digital devices. IMPORTANT NOTICE: DO NOT ...
... from excessive volume levels. If the antenna lead-in is 300 ohm ribbon lead, change the lead-in the users manual, may void your authority, granted by YAMAHA Corporation of the following measures: Relocate either this product MUST be determined by turning the unit "OFF" and "ON",... to avoid prolonged exposure from loud sounds is often undetectable until it at a safe level. One that are on different branch (circuit breaker or fuse) circuits or install AC line filter/s. ii En IMPORTANT SAFETY INSTRUCTIONS FCC INFORMATION (for Class "B" digital devices. IMPORTANT NOTICE: DO NOT ...

Owner's Manual
Page 4
... read the "TROUBLESHOOTING" section on the rear of this manual carefully. Burning objects (i.e. YAMAHA will form when the surrounding temperature changes suddenly. Disconnect the... power cable from the wall outlet. 18 Condensation will not be connected to set this unit - IMPORTANT Please record the serial number of the unit. This Class B digital...procedures other electrical appliances, motors, or transformers to avoid humming sounds. 4 Do not expose this unit to sudden temperature changes from...
... read the "TROUBLESHOOTING" section on the rear of this manual carefully. Burning objects (i.e. YAMAHA will form when the surrounding temperature changes suddenly. Disconnect the... power cable from the wall outlet. 18 Condensation will not be connected to set this unit - IMPORTANT Please record the serial number of the unit. This Class B digital...procedures other electrical appliances, motors, or transformers to avoid humming sounds. 4 Do not expose this unit to sudden temperature changes from...
Owner's Manual
Page 5
...USING THIS MANUAL 4 SUPPLIED ACCESSORIES 5 CONTROLS AND FUNCTIONS 6 Front panel 6 Front panel display 7 Rear panel 8 Remote control 9 PREPARATION INSTALLATION 11 Before installing this unit 11 Installing this unit 11 CONNECTIONS 14 Connecting a TV 15 Connecting a DVD player/recorder 16 Connecting a VCR 17 Connecting a digital satellite ... THE SLEEP TIMER 55 Setting the sleep timer 55 Canceling the sleep timer 56 ADVANCED OPERATION MANUAL SETUP 57 Using MANUAL SETUP 58 BEAM MENU 59 SOUND MENU 63 INPUT MENU 65 DISPLAY MENU 67 ADJUSTING THE AUDIO BALANCE 68 Using the test ...
...USING THIS MANUAL 4 SUPPLIED ACCESSORIES 5 CONTROLS AND FUNCTIONS 6 Front panel 6 Front panel display 7 Rear panel 8 Remote control 9 PREPARATION INSTALLATION 11 Before installing this unit 11 Installing this unit 11 CONNECTIONS 14 Connecting a TV 15 Connecting a DVD player/recorder 16 Connecting a VCR 17 Connecting a digital satellite ... THE SLEEP TIMER 55 Setting the sleep timer 55 Canceling the sleep timer 56 ADVANCED OPERATION MANUAL SETUP 57 Using MANUAL SETUP 58 BEAM MENU 59 SOUND MENU 63 INPUT MENU 65 DISPLAY MENU 67 ADJUSTING THE AUDIO BALANCE 68 Using the test ...
Owner's Manual
Page 7
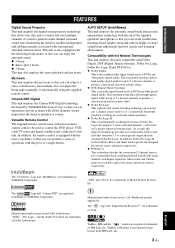
...sound to convey. INTRODUCTION FEATURES FEATURES Digital Sound Projector This unit employs the digital sound projector technology that allows one slim unit to control and steer multiple channels of the supplied optimizer microphone so that you can avoid troublesome listening-based speaker setup and achieve highly accurate sound... normally associated with higher separation. Cinema DSP Digital This unit employs the Cinema DSP Digital technology developed by YAMAHA Electronics Corp. The " " logo and "Cinema DSP" are registered trademarks of YAMAHA Corporation. TruBass, SRS and the " "...
...sound to convey. INTRODUCTION FEATURES FEATURES Digital Sound Projector This unit employs the digital sound projector technology that allows one slim unit to control and steer multiple channels of the supplied optimizer microphone so that you can avoid troublesome listening-based speaker setup and achieve highly accurate sound... normally associated with higher separation. Cinema DSP Digital This unit employs the Cinema DSP Digital technology developed by YAMAHA Electronics Corp. The " " logo and "Cinema DSP" are registered trademarks of YAMAHA Corporation. TruBass, SRS and the " "...
Owner's Manual
Page 8
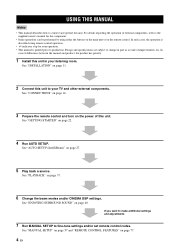
...result of this unit in your TV and other external components. See "GETTING STARTED" on page 27. 5 Play back a source. USING THIS MANUAL USING THIS MANUAL Notes • This manual describes how to connect and operate this unit to your listening room. In case of external components, refer to the supplied owner... either the buttons on the main unit or on the power of improvements, etc. See "INSTALLATION" on page 40. See "ENJOYING SURROUND SOUND" on page 11. 2 Connect this unit. See "CONNECTIONS" on page 14. 3 Prepare the remote control and turn on the remote control.
...result of this unit in your TV and other external components. See "GETTING STARTED" on page 27. 5 Play back a source. USING THIS MANUAL USING THIS MANUAL Notes • This manual describes how to connect and operate this unit to your listening room. In case of external components, refer to the supplied owner... either the buttons on the main unit or on the power of improvements, etc. See "INSTALLATION" on page 40. See "ENJOYING SURROUND SOUND" on page 11. 2 Connect this unit. See "CONNECTIONS" on page 14. 3 Prepare the remote control and turn on the remote control.

Owner's Manual
Page 11
English 7 En INTRODUCTION Front panel display 12 3 CONTROLS AND FUNCTIONS 4 NIGHT SLEEP PCM DIGITAL PL VOL m ft mS dB 5 1 NIGHT indicator Lights up when one of the night listening modes is selected (see page 52). 2 SLEEP indicator Lights up ... level (see page 39). 5 Multi-information display Shows information when you adjust the parameters of the front panel display using the DISPLAY MENU parameters in MANUAL SETUP (see page 67). y You can adjust the brightness of this unit.
English 7 En INTRODUCTION Front panel display 12 3 CONTROLS AND FUNCTIONS 4 NIGHT SLEEP PCM DIGITAL PL VOL m ft mS dB 5 1 NIGHT indicator Lights up when one of the night listening modes is selected (see page 52). 2 SLEEP indicator Lights up ... level (see page 39). 5 Multi-information display Shows information when you adjust the parameters of the front panel display using the DISPLAY MENU parameters in MANUAL SETUP (see page 67). y You can adjust the brightness of this unit.

Owner's Manual
Page 20
... the system settings of this unit. For details, refer to the coaxial digital input jack (DVD COAXIAL) on your DVD player to the operation manual supplied with optical digital connection. Notes • Check that your DVD player/recorder is no coaxial digital output jack on this unit VCR TV/STB SUBWOOFER VIDEO AUDIO INPUT...
... the system settings of this unit. For details, refer to the coaxial digital input jack (DVD COAXIAL) on your DVD player to the operation manual supplied with optical digital connection. Notes • Check that your DVD player/recorder is no coaxial digital output jack on this unit VCR TV/STB SUBWOOFER VIDEO AUDIO INPUT...

Owner's Manual
Page 29
...MENU Run AUTO SETUP (IntelliBeam). If you cannot clearly hear a sound beam from a specific channel, adjust settings for SETTING PARAMETERS (see page 59) or for BEAM ADJUSTMENT (see page 62). See "CHANGING OSD LANGUAGE" on page 57. See "MANUAL SETUP" on page 26. y • If you want to... make additional settings and adjustments Run MANUAL SETUP. See "AUTO SETUP (IntelliBeam)" on page 37. If an error occurs Look for a complete...
...MENU Run AUTO SETUP (IntelliBeam). If you cannot clearly hear a sound beam from a specific channel, adjust settings for SETTING PARAMETERS (see page 59) or for BEAM ADJUSTMENT (see page 62). See "CHANGING OSD LANGUAGE" on page 57. See "MANUAL SETUP" on page 26. y • If you want to... make additional settings and adjustments Run MANUAL SETUP. See "AUTO SETUP (IntelliBeam)" on page 37. If an error occurs Look for a complete...

Owner's Manual
Page 30
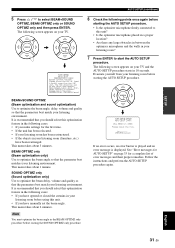
... you to select the language of your choice that appears in the SET MENU of this unit. 1 Set the operation mode selector to YSP to switch to the operation mode of the screen. • To return to the previous screen while using SET MENU, press RETURN on... 4 Press / to select LANGUAGE SETUP and then press ENTER. ENGLISH DEUTSCH Francais ESPANOL [ ]/[ ]:Select [ENTER]:Return 26 En MENU SET MENU . ;MEMORY ;AUTO SETUP ;MANUAL SETUP ;LANGUAGE SETUP [ ]/[ ]:Up/Down [ENTER]:Enter ENTER ENTER Choices: ENGLISH (English), DEUTSCH (German), Français (French), ESPAÑOL (Spanish) y •...
... you to select the language of your choice that appears in the SET MENU of this unit. 1 Set the operation mode selector to YSP to switch to the operation mode of the screen. • To return to the previous screen while using SET MENU, press RETURN on... 4 Press / to select LANGUAGE SETUP and then press ENTER. ENGLISH DEUTSCH Francais ESPANOL [ ]/[ ]:Select [ENTER]:Return 26 En MENU SET MENU . ;MEMORY ;AUTO SETUP ;MANUAL SETUP ;LANGUAGE SETUP [ ]/[ ]:Up/Down [ENTER]:Enter ENTER ENTER Choices: ENGLISH (English), DEUTSCH (German), Français (French), ESPAÑOL (Spanish) y •...

Owner's Manual
Page 31
... arrange the speaker position of other audio systems, you to provide highly precise automatic adjustment of frequency characteristics. The sound optimization feature performs the following checks and automatically makes appropriate sound adjustments. LEVEL: Checks and adjusts the sound output level of... optimization creates the best possible surround sound field without manually setting the parameters for each of the seven bands in its parametric equalizer to avoid troublesome listening-based setup and achieving highly accurate sound adjustments that each channel's parametric equalizer...
... arrange the speaker position of other audio systems, you to provide highly precise automatic adjustment of frequency characteristics. The sound optimization feature performs the following checks and automatically makes appropriate sound adjustments. LEVEL: Checks and adjusts the sound output level of... optimization creates the best possible surround sound field without manually setting the parameters for each of the seven bands in its parametric equalizer to avoid troublesome listening-based setup and achieving highly accurate sound adjustments that each channel's parametric equalizer...
Owner's Manual
Page 32
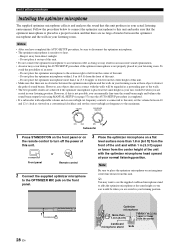
...Make sure that there are no obstacles between the optimizer microphone and the walls in your listening room as these objects obstruct the path of sound beams. However, any objects that there are seated in contact with adjustable volume and crossover/high cut frequency to heat. - Keep it on...lower from this unit. Notes • After you have completed the AUTO SETUP procedure, be when you can manually fine-tune the sound beam angle and balance the sound beam output levels using MANUAL SETUP (see page 57) once the AUTO SETUP procedure is completed. • If a subwoofer with the ...
...Make sure that there are no obstacles between the optimizer microphone and the walls in your listening room as these objects obstruct the path of sound beams. However, any objects that there are seated in contact with adjustable volume and crossover/high cut frequency to heat. - Keep it on...lower from this unit. Notes • After you have completed the AUTO SETUP procedure, be when you can manually fine-tune the sound beam angle and balance the sound beam output levels using MANUAL SETUP (see page 57) once the AUTO SETUP procedure is completed. • If a subwoofer with the ...
Owner's Manual
Page 34
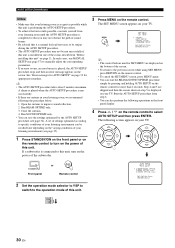
... obstruct the path of the rooms described in your listening room, we recommend following the procedure below. 1. MENU SET MENU . ;MEMORY ;AUTO SETUP ;MANUAL SETUP ;LANGUAGE SETUP [ ]/[ ]:Up/Down [ENTER]:Enter y • The control buttons used for appropriate remedies. AUTO SETUP (IntelliBeam) p p p...perform the following screen appears on the bottom of this unit. ;AUTO SETUP . 1)BEAM+SOUND OPTIMZ 2)BEAM OPTIMZ only 3)SOUND OPTIMZ only [ ]/[ ]:Up/Down [ENTER]:Enter TV/AV YSP 30 En ENTER ENTER STANDBY/ON Front panel or Remote control 2 Set the operation mode selector...
... obstruct the path of the rooms described in your listening room, we recommend following the procedure below. 1. MENU SET MENU . ;MEMORY ;AUTO SETUP ;MANUAL SETUP ;LANGUAGE SETUP [ ]/[ ]:Up/Down [ENTER]:Enter y • The control buttons used for appropriate remedies. AUTO SETUP (IntelliBeam) p p p...perform the following screen appears on the bottom of this unit. ;AUTO SETUP . 1)BEAM+SOUND OPTIMZ 2)BEAM OPTIMZ only 3)SOUND OPTIMZ only [ ]/[ ]:Up/Down [ENTER]:Enter TV/AV YSP 30 En ENTER ENTER STANDBY/ON Front panel or Remote control 2 Set the operation mode selector...
Owner's Manual
Page 35
... location? • Are there any large obstacles in between the optimizer microphone and the walls in your listening room (furniture, etc.) have manually set at least 1.8m/6ft away from your listening room? See "Error messages for AUTO SETUP" on page 33 for the first time.... beam angle, delay, volume and quality so that the parameters best match your listening environment. Evacuate yourself from the YSP unit. After [ENTER] is displayed. SOUND OPTIMZ only (Sound optimization only) Use to start the AUTO SETUP procedure. This menu takes about 3 minutes. AUTO SETUP PREPARATION &...
... location? • Are there any large obstacles in between the optimizer microphone and the walls in your listening room (furniture, etc.) have manually set at least 1.8m/6ft away from your listening room? See "Error messages for AUTO SETUP" on page 33 for the first time.... beam angle, delay, volume and quality so that the parameters best match your listening environment. Evacuate yourself from the YSP unit. After [ENTER] is displayed. SOUND OPTIMZ only (Sound optimization only) Use to start the AUTO SETUP procedure. This menu takes about 3 minutes. AUTO SETUP PREPARATION &...

Owner's Manual
Page 37
... is installed in progress. If the problem persists, contact the nearest YAMAHA service center for AUTO SETUP AUTO SETUP (IntelliBeam) Before the AUTO...the procedure again from outside. The optimizer microphone cannot collect the sound produced by pressing MENU on this unit. SETUP English 33 En...to this unit while the AUTO SETUP procedure was in front of YSP. In case you have started the AUTO SETUP procedure by pressing... control in progress. ERROR E-5 Please check MIC position. Run the MANUAL SETUP if the problem is displayed. Please re-try. ■ ...
... is installed in progress. If the problem persists, contact the nearest YAMAHA service center for AUTO SETUP AUTO SETUP (IntelliBeam) Before the AUTO...the procedure again from outside. The optimizer microphone cannot collect the sound produced by pressing MENU on this unit. SETUP English 33 En...to this unit while the AUTO SETUP procedure was in front of YSP. In case you have started the AUTO SETUP procedure by pressing... control in progress. ERROR E-5 Please check MIC position. Run the MANUAL SETUP if the problem is displayed. Please re-try. ■ ...

Owner's Manual
Page 38
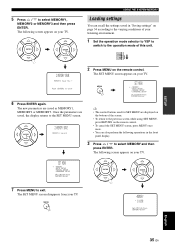
...certain settings according to save the current settings adjusted in SET MENU in the system memory of this unit. MENU p p SET MENU . ;MEMORY ;AUTO SETUP ;MANUAL SETUP ;LANGUAGE SETUP [ ]/[ ]:Up/Down [ENTER]:Enter p p p 1)MEMORY SAVE MEMORY1 MEMORY2 MEMORY3 [ ]/[ ]:Select [ENTER]:Enter y • The control...control. ENTER ENTER ;MEMORY . 1)LOAD 2)SAVE [ ]/[ ]:Up/Down [ENTER]:Enter p p Saving settings 1 Set the operation mode selector to YSP to switch to select SAVE and then press ENTER. For example, if there are curtains in the path of beams, the effectiveness of the beams...
...certain settings according to save the current settings adjusted in SET MENU in the system memory of this unit. MENU p p SET MENU . ;MEMORY ;AUTO SETUP ;MANUAL SETUP ;LANGUAGE SETUP [ ]/[ ]:Up/Down [ENTER]:Enter p p p 1)MEMORY SAVE MEMORY1 MEMORY2 MEMORY3 [ ]/[ ]:Select [ENTER]:Enter y • The control...control. ENTER ENTER ;MEMORY . 1)LOAD 2)SAVE [ ]/[ ]:Up/Down [ENTER]:Enter p p Saving settings 1 Set the operation mode selector to YSP to switch to select SAVE and then press ENTER. For example, if there are curtains in the path of beams, the effectiveness of the beams...
Owner's Manual
Page 39
... 6 Press ENTER again. MENU p ;MEMORY . 1)LOAD 2)SAVE [ ]/[ ]:Up/Down [ENTER]:Enter English p 35 En p p SET MENU . ;MEMORY ;AUTO SETUP ;MANUAL SETUP ;LANGUAGE SETUP [ ]/[ ]:Up/Down [ENTER]:Enter ENTER ENTER 7 Press MENU to the SET MENU screen. The following operations in "Saving settings" on your TV.... TV/AV YSP 2)MEMORY SAVE MEMORY1 Save Now ? Once the parameters are saved as MEMORY1, MEMORY2 or MEMORY3. ENTER ENTER USING THE SYSTEM MEMORY Loading...
... 6 Press ENTER again. MENU p ;MEMORY . 1)LOAD 2)SAVE [ ]/[ ]:Up/Down [ENTER]:Enter English p 35 En p p SET MENU . ;MEMORY ;AUTO SETUP ;MANUAL SETUP ;LANGUAGE SETUP [ ]/[ ]:Up/Down [ENTER]:Enter ENTER ENTER 7 Press MENU to the SET MENU screen. The following operations in "Saving settings" on your TV.... TV/AV YSP 2)MEMORY SAVE MEMORY1 Save Now ? Once the parameters are saved as MEMORY1, MEMORY2 or MEMORY3. ENTER ENTER USING THE SYSTEM MEMORY Loading...

Owner's Manual
Page 40
ENTER ENTER p p p p SET MENU . ;MEMORY ;AUTO SETUP ;MANUAL SETUP ;LANGUAGE SETUP [ ]/[ ]:Up/Down [ENTER]:Enter 7 Press MENU to Load 36 En The following screen appears on your TV. The following screen appears on ...
ENTER ENTER p p p p SET MENU . ;MEMORY ;AUTO SETUP ;MANUAL SETUP ;LANGUAGE SETUP [ ]/[ ]:Up/Down [ENTER]:Enter 7 Press MENU to Load 36 En The following screen appears on your TV. The following screen appears on ...
Owner's Manual
Page 42
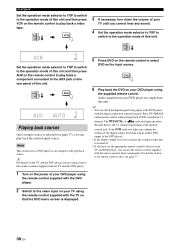
...menu screen is too low, increase the volume on your DVD player using , refer to the owner's manual supplied with the TV and the DVD player. 1 Turn on the power of the DVD player. •...you cannot hear any sound. 4 Set the operation mode selector to YSP to switch to around 45. • If you have set remote control codes, see page 37), you can check the digital signal being input at ... TV and DVD player, you are output from your DVD player using the remote control supplied with the digital connection (optical/coaxial). y • You can play back a video tape. For details on the...
...menu screen is too low, increase the volume on your DVD player using , refer to the owner's manual supplied with the TV and the DVD player. 1 Turn on the power of the DVD player. •...you cannot hear any sound. 4 Set the operation mode selector to YSP to switch to around 45. • If you have set remote control codes, see page 37), you can check the digital signal being input at ... TV and DVD player, you are output from your DVD player using the remote control supplied with the digital connection (optical/coaxial). y • You can play back a video tape. For details on the...
Owner's Manual
Page 44
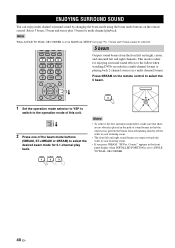
... VOL MODE SETUP INPUTMODE SLEEP 5BEAM ST+3BEAM 3BEAM 1 2 3 STEREO MY BEAM SURROUND 4 5 6 MUSIC 7 MOVIE 8 SPORTS 9 OFF 0 +10 CH LEVEL MENU 5 beam Outputs sound beams from rebounding directly off the walls in your listening room. • If you press 5BEAM, "SP Pos. TEST ENTER TV/AV... 5BEAM on the remote control. TV/AV YSP 2 Press one of this unit. Corner!" appears in MANUAL SETUP (see page 59), 5 beam and 3 beam cannot be selected. ENJOYING SURROUND SOUND ENJOYING SURROUND SOUND You can enjoy multi channel surround sound by changing the beam mode using the beam...
... VOL MODE SETUP INPUTMODE SLEEP 5BEAM ST+3BEAM 3BEAM 1 2 3 STEREO MY BEAM SURROUND 4 5 6 MUSIC 7 MOVIE 8 SPORTS 9 OFF 0 +10 CH LEVEL MENU 5 beam Outputs sound beams from rebounding directly off the walls in your listening room. • If you press 5BEAM, "SP Pos. TEST ENTER TV/AV... 5BEAM on the remote control. TV/AV YSP 2 Press one of this unit. Corner!" appears in MANUAL SETUP (see page 59), 5 beam and 3 beam cannot be selected. ENJOYING SURROUND SOUND ENJOYING SURROUND SOUND You can enjoy multi channel surround sound by changing the beam mode using the beam...


