
Owner's Manual
Page 3
...Compliance with these corrective measures do not produce satisfactory results, please contact the local retailer authorized to distribute this product MUST be connected to the grounding system of the building, as radiators, heat registers, stoves, or other electronic devices. Utilize power outlets ...use attachments/accessories specified by the manufacturer. 12 Use only with the cart, stand, tripod, bracket, or table specified by Yamaha Corporation of the following measures: Relocate either this apparatus near any ventilation openings. Note to CATV system installer: This reminder is...
...Compliance with these corrective measures do not produce satisfactory results, please contact the local retailer authorized to distribute this product MUST be connected to the grounding system of the building, as radiators, heat registers, stoves, or other electronic devices. Utilize power outlets ...use attachments/accessories specified by the manufacturer. 12 Use only with the cart, stand, tripod, bracket, or table specified by Yamaha Corporation of the following measures: Relocate either this apparatus near any ventilation openings. Note to CATV system installer: This reminder is...

Owner's Manual
Page 4
...use this unit with a humidifier) to prevent condensation inside this unit rises, it may be exposed to liquid dripping or splashing. Contact qualified Yamaha service personnel when any damage resulting from a wall outlet or the unit during a lightning storm. 14 Do not attempt to modify or fix...carefully. Retain this unit. - Caution: Read this before operating your local main voltage BEFORE plugging into the AC wall outlet. Keep it is connected to read this unit, and/or personal injury. - away from earphones and headphones can be reached easily. 17 Be sure to the AC ...
...use this unit with a humidifier) to prevent condensation inside this unit rises, it may be exposed to liquid dripping or splashing. Contact qualified Yamaha service personnel when any damage resulting from a wall outlet or the unit during a lightning storm. 14 Do not attempt to modify or fix...carefully. Retain this unit. - Caution: Read this before operating your local main voltage BEFORE plugging into the AC wall outlet. Keep it is connected to read this unit, and/or personal injury. - away from earphones and headphones can be reached easily. 17 Be sure to the AC ...
Owner's Manual
Page 5
... Zone2 61 Controlling other components 16 Connecting a multi-format player or an external decoder 18 Connecting an external amplifier 18 Using REMOTE IN/OUT jacks 19 Connecting a Yamaha iPod universal dock or Bluetooth™ wireless audio receiver 19 Connecting a camcorder or portable audio player ... 19 Connecting the FM and AM antennas 20 Connecting the power cable 20 Turning...
... Zone2 61 Controlling other components 16 Connecting a multi-format player or an external decoder 18 Connecting an external amplifier 18 Using REMOTE IN/OUT jacks 19 Connecting a Yamaha iPod universal dock or Bluetooth™ wireless audio receiver 19 Connecting a camcorder or portable audio player ... 19 Connecting the FM and AM antennas 20 Connecting the power cable 20 Turning...
Owner's Manual
Page 6
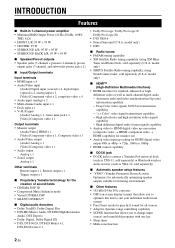
... • XM Satellite Radio tuning capability, using SiriusConnect tuner, sold separately) ■ Automatic speaker setup features • "YPAO" (Yamaha Parametric Room Acoustic Optimizer) for automatically optimizing speaker outputs suitable for listening environments ■ Other features • 192-kHz/24-bit D/A...8226; Adaptive dynamic range controlling capability • SCENE function that allows you to connect a Yamaha iPod universal dock (such as YDS-11, sold separately) or Bluetooth wireless audio receiver (such as multi-channel digital audio - Deep Color video signal (30/36 bit...
... • XM Satellite Radio tuning capability, using SiriusConnect tuner, sold separately) ■ Automatic speaker setup features • "YPAO" (Yamaha Parametric Room Acoustic Optimizer) for automatically optimizing speaker outputs suitable for listening environments ■ Other features • 192-kHz/24-bit D/A...8226; Adaptive dynamic range controlling capability • SCENE function that allows you to connect a Yamaha iPod universal dock (such as YDS-11, sold separately) or Bluetooth wireless audio receiver (such as multi-channel digital audio - Deep Color video signal (30/36 bit...

Owner's Manual
Page 8
...(see page 26). O PROGRAM selector Changes sound field programs (see page 26). B PHONES jack For connecting headphones (see page 27). M SCENE Switches between linked sets of a receiver set in Zone2, including input source switching, volume control and tuner operation, with the main amplifier or ...remote control after this key is on and off (see page 35). U AUDIO L/R (VIDEO AUX) jack For connecting the audio output cable of a...
...(see page 26). O PROGRAM selector Changes sound field programs (see page 26). B PHONES jack For connecting headphones (see page 27). M SCENE Switches between linked sets of a receiver set in Zone2, including input source switching, volume control and tuner operation, with the main amplifier or ...remote control after this key is on and off (see page 35). U AUDIO L/R (VIDEO AUX) jack For connecting the audio output cable of a...
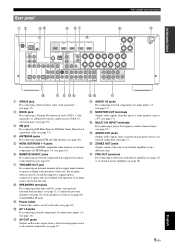
Owner's Manual
Page 9
.... b DOCK jack For connecting a Yamaha iPod universal dock (YDS-11, sold separately) or a Bluetooth wireless audio receiver (YBA-10, sold separately) (see page 19). c XM jack For connecting XM Mini-Tuner in this unit. f REMOTE IN/OUT jacks For connecting an external component that supports...SURROUND BACK/ BI-AMP CENTER OPTICAL ( TV ) AV 1 COAXIAL AV 2 COAXIAL (CD) AV 3 OPTICAL AV 4 AV 5 AV 6 AV OUT AUDIO1 AUDIO2 FRONT SURROUND SUR.BACK SUBWOOFER MULTI CH INPUT AUDIO OUT ZONE2 OUT FRONT SURROUND SUR. d ANTENNA jacks For connecting supplied FM and AM antennas (see page 16)....
.... b DOCK jack For connecting a Yamaha iPod universal dock (YDS-11, sold separately) or a Bluetooth wireless audio receiver (YBA-10, sold separately) (see page 19). c XM jack For connecting XM Mini-Tuner in this unit. f REMOTE IN/OUT jacks For connecting an external component that supports...SURROUND BACK/ BI-AMP CENTER OPTICAL ( TV ) AV 1 COAXIAL AV 2 COAXIAL (CD) AV 3 OPTICAL AV 4 AV 5 AV 6 AV OUT AUDIO1 AUDIO2 FRONT SURROUND SUR.BACK SUBWOOFER MULTI CH INPUT AUDIO OUT ZONE2 OUT FRONT SURROUND SUR. d ANTENNA jacks For connecting supplied FM and AM antennas (see page 16)....
Owner's Manual
Page 11
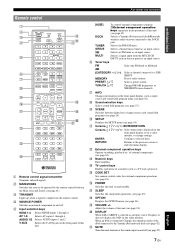
...1-4 Selects HDMI inputs 1 through 6. h Sound selection keys Selects sound field programs (see page 24). AV 1-6 Selects AV inputs 1 through 4. DOCK Selects a Yamaha iPod universal dock/Bluetooth wireless audio receiver connected to the previous screen or ends the menu display. XM Selects an XM tuner as an input source.... 45). l External component operation keys Operate recording, playback etc. s VOLUME +/- c TRANSMIT Lights up when a signal is connected: Changes the operation mode of this unit on the video monitor. o CODE SET Sets remote control codes for a XM/ ...
...1-4 Selects HDMI inputs 1 through 6. h Sound selection keys Selects sound field programs (see page 24). AV 1-6 Selects AV inputs 1 through 4. DOCK Selects a Yamaha iPod universal dock/Bluetooth wireless audio receiver connected to the previous screen or ends the menu display. XM Selects an XM tuner as an input source.... 45). l External component operation keys Operate recording, playback etc. s VOLUME +/- c TRANSMIT Lights up when a signal is connected: Changes the operation mode of this unit on the video monitor. o CODE SET Sets remote control codes for a XM/ ...

Owner's Manual
Page 12
... player, cables, and other components ☞P. 16 • Connecting a multi-format player or an external decoder ☞P. 18 • Connecting an external amplifier ☞P. 18 • Connecting a Yamaha iPod universal dock or Bluetooth wireless audio receiver ☞P. 19 • Connecting the FM and AM antennas ☞P. 20 • Connecting an XM Mini-Tuner Home Dock ☞P. 33...
... player, cables, and other components ☞P. 16 • Connecting a multi-format player or an external decoder ☞P. 18 • Connecting an external amplifier ☞P. 18 • Connecting a Yamaha iPod universal dock or Bluetooth wireless audio receiver ☞P. 19 • Connecting the FM and AM antennas ☞P. 20 • Connecting an XM Mini-Tuner Home Dock ☞P. 33...

Owner's Manual
Page 14
SL 60˚ SL 80˚ SBL SR SR SBR 30 cm (12 in Dolby Digital and DTS signals. Connections Placing speakers This unit supports up to the front left and right speakers (FL and FR) The front speakers output the front channel sounds (stereo ... speaker layout, surround back left and right channel sound signals are about 1/4 of the screen from each other, ideally at the same distance as the Yamaha Active Servo Processing Subwoofer System. Use a subwoofer with the front surfaces of the speakers are output from the single surround back speaker. Place it halfway...
SL 60˚ SL 80˚ SBL SR SR SBR 30 cm (12 in Dolby Digital and DTS signals. Connections Placing speakers This unit supports up to the front left and right speakers (FL and FR) The front speakers output the front channel sounds (stereo ... speaker layout, surround back left and right channel sound signals are about 1/4 of the screen from each other, ideally at the same distance as the Yamaha Active Servo Processing Subwoofer System. Use a subwoofer with the front surfaces of the speakers are output from the single surround back speaker. Place it halfway...

Owner's Manual
Page 15
... 1 SUBWOOFER 2 ADVANCED OPERATION ADDITIONAL INFORMATION APPENDIX English 11 En y • You can connect up to your speaker layout. When two subwoofers are connected, the same sound is output from them to the respective jacks as follows, according to ...two subwoofers. INTRODUCTION PREPARATION BASIC OPERATION Connections Connecting speakers When you connect speakers, connect them . ■ 6.1-channel ba c SPEAKERS gf EXTRA SP ZONE2/PRESENCE SINGLE Speakers a Front speaker L b Front speaker R c...
... 1 SUBWOOFER 2 ADVANCED OPERATION ADDITIONAL INFORMATION APPENDIX English 11 En y • You can connect up to your speaker layout. When two subwoofers are connected, the same sound is output from them to the respective jacks as follows, according to ...two subwoofers. INTRODUCTION PREPARATION BASIC OPERATION Connections Connecting speakers When you connect speakers, connect them . ■ 6.1-channel ba c SPEAKERS gf EXTRA SP ZONE2/PRESENCE SINGLE Speakers a Front speaker L b Front speaker R c...

Owner's Manual
Page 16
...PR PL DMI 3 HDMI 4 SPEAKERS EXTRA SP ZONE2/PRESENCE SINGLE FRONT CENTER SURROUND SURROUND BACK/ BI-AMP y • Although you can connect both surround back speakers and presence speakers to this unit, you cannot output sounds from those speakers at the same time. This unit automatically selects... speakers to output sounds according to the selected input source and sound field program. • You can connect Zone2 speakers with a richer and more spacial presence can adjust the vertical position of center sound such as a dialog (see page 54...
...PR PL DMI 3 HDMI 4 SPEAKERS EXTRA SP ZONE2/PRESENCE SINGLE FRONT CENTER SURROUND SURROUND BACK/ BI-AMP y • Although you can connect both surround back speakers and presence speakers to this unit, you cannot output sounds from those speakers at the same time. This unit automatically selects... speakers to output sounds according to the selected input source and sound field program. • You can connect Zone2 speakers with a richer and more spacial presence can adjust the vertical position of center sound such as a dialog (see page 54...

Owner's Manual
Page 17
...larger. If the circuit shorts out, "CHECK SP WIRES!" appears on the front panel display when this unit. Using bi-amplification connections You can connect speakers that connect a woofer with an impedance of the cables is a CRT, use the magnetically shielded speakers, place the speakers away from the end... speakers in ) 2 Loosen the knob, insert the twisted bare wires into the hole, and then tighten the knob. To connect the speakers via a biamp connection, connect them to disconnect the power cable. • Do not let the bare speaker wires touch each speaker cable and then twist bare...
...larger. If the circuit shorts out, "CHECK SP WIRES!" appears on the front panel display when this unit. Using bi-amplification connections You can connect speakers that connect a woofer with an impedance of the cables is a CRT, use the magnetically shielded speakers, place the speakers away from the end... speakers in ) 2 Loosen the knob, insert the twisted bare wires into the hole, and then tighten the knob. To connect the speakers via a biamp connection, connect them to disconnect the power cable. • Do not let the bare speaker wires touch each speaker cable and then twist bare...

Owner's Manual
Page 18
...HDMI HDMI COMPONENT VIDEO COMPONENT VIDEO PR PB Y VIDEO PR PB Y VIDEO Not converted Converted PB PB (blue) Y Y (green) 14 En Connect red plugs to red jacks (R) and white plugs to a digital video signal, and then outputs it . • If you use a commercially ...available 19-pin HDMI cable no longer than 5 meters (16 feet) with a component video output signal are connecting. ■ Audio jacks ■ Video/audio jacks Jack and cables Description Jack and cables Description AUDIO jacks (white) L R AUDIO (red) COAXIAL jacks...
...HDMI HDMI COMPONENT VIDEO COMPONENT VIDEO PR PB Y VIDEO PR PB Y VIDEO Not converted Converted PB PB (blue) Y Y (green) 14 En Connect red plugs to red jacks (R) and white plugs to a digital video signal, and then outputs it . • If you use a commercially ...available 19-pin HDMI cable no longer than 5 meters (16 feet) with a component video output signal are connecting. ■ Audio jacks ■ Video/audio jacks Jack and cables Description Jack and cables Description AUDIO jacks (white) L R AUDIO (red) COAXIAL jacks...
Owner's Manual
Page 19
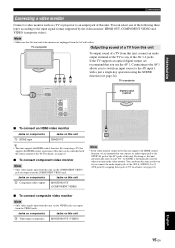
...b To output sound of a TV from this unit and video monitor are output from the COMPONENT VIDEO jack. Connecting to the AV 1 allows you use the AV 1. You can select one of the following three types according to the input signal format supported by assigning those ... using the SCENE function (see page 24). PR FM GND AM PB Y M O OPTICAL ( TV ) AV 1 COAXIAL AV 2 COAXIAL (CD) AV 3 OPTICAL AV 4 AV 5 AV 6 AV OUT AUDIO1 AUD Note • If the video monitor connected to this unit b Component video output MONITOR OUT (COMPONENT VIDEO) Digital output (optical) PR PB VIDEO Y ...
...b To output sound of a TV from this unit and video monitor are output from the COMPONENT VIDEO jack. Connecting to the AV 1 allows you use the AV 1. You can select one of the following three types according to the input signal format supported by assigning those ... using the SCENE function (see page 24). PR FM GND AM PB Y M O OPTICAL ( TV ) AV 1 COAXIAL AV 2 COAXIAL (CD) AV 3 OPTICAL AV 4 AV 5 AV 6 AV OUT AUDIO1 AUD Note • If the video monitor connected to this unit b Component video output MONITOR OUT (COMPONENT VIDEO) Digital output (optical) PR PB VIDEO Y ...
Owner's Manual
Page 20
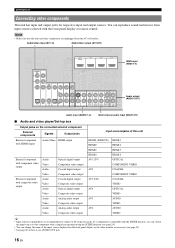
... respective input and output sources. FRONT TRIGGER OUT CENTER CE Audio output (AUDIO OUT) OPTICAL ( TV ) AV 1 COAXIAL AV 2 COAXIAL (CD) AV 3 OPTICAL AV 4 AV 5 AV 6 AV OUT AUDIO1 AUDIO2 FRONT SURROUND SUR.BACK SUBWOOFER MULTI CH INPUT AUDIO OUT ZONE2 OUT Audio input (AUDIO 1-2) Multi... output (AV OUT) SIRIUS DOCK XM HDMI OUT HDMI 1 (BD/DVD) HDMI 2 HDMI 3 HDMI 4 HDMI input (HDMI 1-4) COMPONENT VIDEO PR PB Y VIDEO ANTENNA FM GND AM MONITOR OUT COMPONENT VIDEO PR REMOTE IN UNBAL. Connections Connecting other components are recommended to connect to use...
... respective input and output sources. FRONT TRIGGER OUT CENTER CE Audio output (AUDIO OUT) OPTICAL ( TV ) AV 1 COAXIAL AV 2 COAXIAL (CD) AV 3 OPTICAL AV 4 AV 5 AV 6 AV OUT AUDIO1 AUDIO2 FRONT SURROUND SUR.BACK SUBWOOFER MULTI CH INPUT AUDIO OUT ZONE2 OUT Audio input (AUDIO 1-2) Multi... output (AV OUT) SIRIUS DOCK XM HDMI OUT HDMI 1 (BD/DVD) HDMI 2 HDMI 3 HDMI 4 HDMI input (HDMI 1-4) COMPONENT VIDEO PR PB Y VIDEO ANTENNA FM GND AM MONITOR OUT COMPONENT VIDEO PR REMOTE IN UNBAL. Connections Connecting other components are recommended to connect to use...

Owner's Manual
Page 21
... External component with optical digital output Optical digital output AV 1 (TV) AV 4 OPTICAL OPTICAL External component with coaxial digital output Coaxial digital output AV 2 AV 3 (CD) COAXIAL COAXIAL External component with analog audio output Analog audio output AV 5 AV 6 AUDIO AUDIO AUDIO 1 AUDIO AUDIO 2 AUDIO y • We recommend connecting the coaxial digital output terminal of the selected...
... External component with optical digital output Optical digital output AV 1 (TV) AV 4 OPTICAL OPTICAL External component with coaxial digital output Coaxial digital output AV 2 AV 3 (CD) COAXIAL COAXIAL External component with analog audio output Analog audio output AV 5 AV 6 AUDIO AUDIO AUDIO 1 AUDIO AUDIO 2 AUDIO y • We recommend connecting the coaxial digital output terminal of the selected...

Owner's Manual
Page 22
... the jacks of this unit, and set "Sur.B L/R SP" to "MULTI CH." FRONT SURROUND SUR. When two subwoofers are output from a component connected to change input sources, see page 24. For details on a video monitor (see page 55). When you can be displayed on how to "AV1-6"...jacks, set the input source of the PRE OUT terminals as a DVD player or SACD player, has multi-channel analog output capability, you only connect one external amplifier for "None" in amplifier. BACK and SUBWOOFER) to the SUR. Note • When a component is output from their corresponding ...
... the jacks of this unit, and set "Sur.B L/R SP" to "MULTI CH." FRONT SURROUND SUR. When two subwoofers are output from a component connected to change input sources, see page 24. For details on a video monitor (see page 55). When you can be displayed on how to "AV1-6"...jacks, set the input source of the PRE OUT terminals as a DVD player or SACD player, has multi-channel analog output capability, you only connect one external amplifier for "None" in amplifier. BACK and SUBWOOFER) to the SUR. Note • When a component is output from their corresponding ...

Owner's Manual
Page 23
... AUDIO PORTABLE VIDEO AUX Infrared signal receiver or Yamaha component Yamaha component (CD or DVD player, etc.) y • If your Yamaha component supports the SCENE link playback function, remote connection automatically starts playback when you can play an iPod or a Bluetooth component with the monaural analog mini cable as follows. Connecting a Yamaha iPod universal dock or Bluetooth...
... AUDIO PORTABLE VIDEO AUX Infrared signal receiver or Yamaha component Yamaha component (CD or DVD player, etc.) y • If your Yamaha component supports the SCENE link playback function, remote connection automatically starts playback when you can play an iPod or a Bluetooth component with the monaural analog mini cable as follows. Connecting a Yamaha iPod universal dock or Bluetooth...

Owner's Manual
Page 24
...8226; The unit needs a few seconds until ready to play back. • You can connect either wire to the AM terminal and the other to turn on . For more details, consult the nearest authorized Yamaha dealer or service center. • Always use the AM loop antenna even when the outdoor ...antenna is turned on this unit by pressing MSCENE (or iSCENE). • This unit consumes a small amount of electricity even during standby. Connecting the AM loop antenna The...
...8226; The unit needs a few seconds until ready to play back. • You can connect either wire to the AM terminal and the other to turn on . For more details, consult the nearest authorized Yamaha dealer or service center. • Always use the AM loop antenna even when the outdoor ...antenna is turned on this unit by pressing MSCENE (or iSCENE). • This unit consumes a small amount of electricity even during standby. Connecting the AM loop antenna The...
Owner's Manual
Page 25
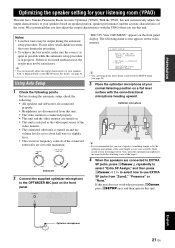
.... View OSD MENU" appears on a flat level surface with the YPAO when you use this unit. VOLUME CROSSOVER/ HIGH CUT MIN MAX MIN MAX Subwoofer 2 Connect the supplied optimizer microphone to use EXTRA SP jacks from the SETUP menu (see page 54. VIDEO AUDIO PORTABLE ADVANCED OPERATION ADDITIONAL INFORMATION APPENDIX English... kCursor, press jSETUP once and then operate this unit. INTRODUCTION PREPARATION BASIC OPERATION Optimizing the speaker setting for your listening room (YPAO) This unit has a Yamaha Parametric Room Acoustic Optimizer (YPAO).
.... View OSD MENU" appears on a flat level surface with the YPAO when you use this unit. VOLUME CROSSOVER/ HIGH CUT MIN MAX MIN MAX Subwoofer 2 Connect the supplied optimizer microphone to use EXTRA SP jacks from the SETUP menu (see page 54. VIDEO AUDIO PORTABLE ADVANCED OPERATION ADDITIONAL INFORMATION APPENDIX English... kCursor, press jSETUP once and then operate this unit. INTRODUCTION PREPARATION BASIC OPERATION Optimizing the speaker setting for your listening room (YPAO) This unit has a Yamaha Parametric Room Acoustic Optimizer (YPAO).


