Owners Manual
Page 2
CONTENTS INTRODUCTION Features and capabilities 4 Using the TV OSD to operate the unit 5 View or modify content for the current input source
CONTENTS INTRODUCTION Features and capabilities 4 Using the TV OSD to operate the unit 5 View or modify content for the current input source
Owners Manual
Page 3
...functionality that can be configured as needed (Advanced Setup menu 99 Displaying/Setting the Advanced Setup menu 99 Setting the impedance of speakers 99 Avoiding crossing remote control signals when using multiple Yamaha receivers 100 Resetting the SIRIUS Satellite Radio™ parental lock code ...100 Changing TV format 101 Removing HDMI video output up-scaling limits......... 101 Initializing various settings for this unit 101 Using the HDMI ...
...functionality that can be configured as needed (Advanced Setup menu 99 Displaying/Setting the Advanced Setup menu 99 Setting the impedance of speakers 99 Avoiding crossing remote control signals when using multiple Yamaha receivers 100 Resetting the SIRIUS Satellite Radio™ parental lock code ...100 Changing TV format 101 Removing HDMI video output up-scaling limits......... 101 Initializing various settings for this unit 101 Using the HDMI ...
Owners Manual
Page 4
High quality playback using bi-amplification connections 18 ■ Automatic settings for front panel jacks ...7 - Speaker layout...14 - Yamaha Parametric Room Acoustic Optimizer 33 ■ External component connection (max. 16 inputs) and playback - Protective cover for speaker acoustic parameters (YPAO - Speaker impedance configuration...18 - ... 3D video signal ■ 1-button input/sound program switching (SCENE function 41 ■ Speaker connections for each input source Subwoofer cable connection ...20 - Configuring the settings specific for 2-
High quality playback using bi-amplification connections 18 ■ Automatic settings for front panel jacks ...7 - Speaker layout...14 - Yamaha Parametric Room Acoustic Optimizer 33 ■ External component connection (max. 16 inputs) and playback - Protective cover for speaker acoustic parameters (YPAO - Speaker impedance configuration...18 - ... 3D video signal ■ 1-button input/sound program switching (SCENE function 41 ■ Speaker connections for each input source Subwoofer cable connection ...20 - Configuring the settings specific for 2-
Owners Manual
Page 5
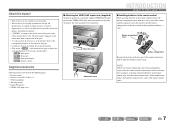
Select a sound program...48 View or modify content for selection 66 - Perform operations such as the Content window that simplifies operations. Using the TV OSD to enable visual guidance that displays the content of current input sources. ■ Select an input source, SCENE and sound program - The OSD mainly displays the ON SCREEN and OPTION menus, as well as searching for and registering stations/channels using the TV screen Perform operations such as play, stop and pause using the Utility ...56, 63 ■ Display the list of iPod music sources - Display the ...
Select a sound program...48 View or modify content for selection 66 - Perform operations such as the Content window that simplifies operations. Using the TV OSD to enable visual guidance that displays the content of current input sources. ■ Select an input source, SCENE and sound program - The OSD mainly displays the ON SCREEN and OPTION menus, as well as searching for and registering stations/channels using the TV screen Perform operations such as play, stop and pause using the Utility ...56, 63 ■ Display the list of iPod music sources - Display the ...
Owners Manual
Page 6
■ HDMI settings - Assign the audio input source for the TV
■ HDMI settings - Assign the audio input source for the TV
Owners Manual
Page 7
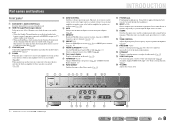
... the page describing the related information. • Click on the remote control. ac Battery compartment cover b Battery compartment Replace the batteries with new ones, and set the remote control codes. NOTE If there are remote control codes for more than 2 minutes, or leaving exhausted batteries in certain regions. • This manual...
... the page describing the related information. • Click on the remote control. ac Battery compartment cover b Battery compartment Replace the batteries with new ones, and set the remote control codes. NOTE If there are remote control codes for more than 2 minutes, or leaving exhausted batteries in certain regions. • This manual...
Owners Manual
Page 8
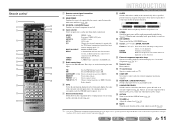
... SIRIUS input. This unit, or its remote control, can also be used to FM or AM (☞p. 54). J1 i FM/AM (CATEGORY l / h) Sets the FM/AM tuner band to select input sources or adjust volume for an external amplifier in another room or the built-in amplifier for...Switches this unit to an external amplifier located in another room, this unit (☞p. 68). b HDMI Through/iPod Charge indicator Lights up when the Yamaha iPod wireless receiver is connected to Pure Direct mode (☞p. 44). d ZONE2 When this unit is connected to this key switches that amplifier between...
... SIRIUS input. This unit, or its remote control, can also be used to FM or AM (☞p. 54). J1 i FM/AM (CATEGORY l / h) Sets the FM/AM tuner band to select input sources or adjust volume for an external amplifier in another room or the built-in amplifier for...Switches this unit to an external amplifier located in another room, this unit (☞p. 68). b HDMI Through/iPod Charge indicator Lights up when the Yamaha iPod wireless receiver is connected to Pure Direct mode (☞p. 44). d ZONE2 When this unit is connected to this key switches that amplifier between...
Owners Manual
Page 9
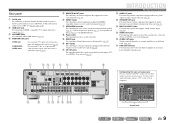
...29). For connecting TV that supports the trigger function to operate it (☞p. 23). Rear panel a DOCK jack For connecting an optional Yamaha iPod universal dock (such as the AV5-6 or AUDIO1-2 are selected (☞p. 31). j AV1-6 jacks For connecting to external components ...equipped with component video signals, using three cables to an external amplifier set in amplifier or an external power amplifier (☞p. 20, p. 30). a bc d e f g DOCK COMPONENT VIDEO SIRIUS PR PB Y VIDEO ...
...29). For connecting TV that supports the trigger function to operate it (☞p. 23). Rear panel a DOCK jack For connecting an optional Yamaha iPod universal dock (such as the AV5-6 or AUDIO1-2 are selected (☞p. 31). j AV1-6 jacks For connecting to external components ...equipped with component video signals, using three cables to an external amplifier set in amplifier or an external power amplifier (☞p. 20, p. 30). a bc d e f g DOCK COMPONENT VIDEO SIRIUS PR PB Y VIDEO ...
Owners Manual
Page 10
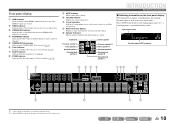
... Presence speaker R Front speaker R Surround speaker R Surround back speaker R Surround back speaker J1 INTRODUCTION Part names and functions ■ Switching information on menu items and settings.
... Presence speaker R Front speaker R Surround speaker R Surround back speaker R Surround back speaker J1 INTRODUCTION Part names and functions ■ Switching information on menu items and settings.
Owners Manual
Page 11
...displayed on and off (☞p. 40). INTRODUCTION Part names and functions h SLEEP Switches this unit or an external component (☞p. 96). o CODE SET Sets remote control codes for each input in standby mode, press this key repeatedly to AM. p RECEIVER A (RECEIVER Power) Switches this key glows orange.... J1 MULTI CH INPUT MULTI CH INPUT jacks DOCK A Yamaha iPod universal dock, iPod wireless receiver, or Bluetooth wireless audio receiver TUNER connected to operate external components (☞p. 97).
...displayed on and off (☞p. 40). INTRODUCTION Part names and functions h SLEEP Switches this unit or an external component (☞p. 96). o CODE SET Sets remote control codes for each input in standby mode, press this key repeatedly to AM. p RECEIVER A (RECEIVER Power) Switches this key glows orange.... J1 MULTI CH INPUT MULTI CH INPUT jacks DOCK A Yamaha iPod universal dock, iPod wireless receiver, or Bluetooth wireless audio receiver TUNER connected to operate external components (☞p. 97).
Owners Manual
Page 12
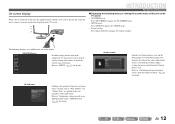
... this menu to display the Content window. Refer to "Confirming and operating input sources from the Content window" (☞p. 53) for this unit's settings via menus and options displayed on the TV screen • ON SCREEN menu Press ON SCREEN to display the ON SCREEN menu. • OPTION... menu Press OPTION to display the OPTION menu. • Content window Press Input selector to select desired settings, change their values, or check the current status of this unit regardless of the source from the Content browse view. Refer to specify and ...
... this menu to display the Content window. Refer to "Confirming and operating input sources from the Content window" (☞p. 53) for this unit's settings via menus and options displayed on the TV screen • ON SCREEN menu Press ON SCREEN to display the ON SCREEN menu. • OPTION... menu Press OPTION to display the OPTION menu. • Content window Press Input selector to select desired settings, change their values, or check the current status of this unit regardless of the source from the Content browse view. Refer to specify and ...

Owners Manual
Page 14
... for details on connecting speakers (☞p. 17). Use the "Power Amp Assign" function to easily apply the appropriate speaker settings to this unit according to the speaker configuration. Power Amp Assign 7ch Normal (Default) ■ Adding the presence speakers for... this layout can be activated at the default "Power Amp Assign" setting (☞p. 84). Speaker layout CONNECTIONS Connecting speakers ■ Enjoying the 7.1 channel audio source ■ 7.1-channel speaker layout (7 speakers + ...
... for details on connecting speakers (☞p. 17). Use the "Power Amp Assign" function to easily apply the appropriate speaker settings to this unit according to the speaker configuration. Power Amp Assign 7ch Normal (Default) ■ Adding the presence speakers for... this layout can be activated at the default "Power Amp Assign" setting (☞p. 84). Speaker layout CONNECTIONS Connecting speakers ■ Enjoying the 7.1 channel audio source ■ 7.1-channel speaker layout (7 speakers + ...
Owners Manual
Page 15
...speaker L Using the front speakers that support bi- Use the "Power Amp Assign" function to easily apply the appropriate speaker settings to this unit according to the speaker configuration (☞p. 84). This enables 7.1-channel sound without surround back speakers ■...) Front speaker R Front speaker L Subwoofer Surround speaker R Center speaker Surround speaker L This unit can easily apply the appropriate speaker settings to this unit according to the speaker configuration. ■ Enjoying the 7.1 channel audio source without surround back speakers. ■ Connections...
...speaker L Using the front speakers that support bi- Use the "Power Amp Assign" function to easily apply the appropriate speaker settings to this unit according to the speaker configuration (☞p. 84). This enables 7.1-channel sound without surround back speakers ■...) Front speaker R Front speaker L Subwoofer Surround speaker R Center speaker Surround speaker L This unit can easily apply the appropriate speaker settings to this unit according to the speaker configuration. ■ Enjoying the 7.1 channel audio source without surround back speakers. ■ Connections...

Owners Manual
Page 16
... Amp Assign" function which can also be output from the surround back speakers to the speakers in another room can easily apply the appropriate speaker settings to the speaker layout. When the built-in the second zone at the same time. J1 ■ Connections of this unit according to the speaker...
... Amp Assign" function which can also be output from the surround back speakers to the speakers in another room can easily apply the appropriate speaker settings to the speaker layout. When the built-in the second zone at the same time. J1 ■ Connections of this unit according to the speaker...
Owners Manual
Page 18
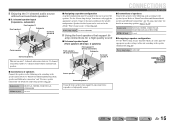
... damage. When connecting to 6 Ω speakers, carry out the following procedure to switch to activate connections. En 18 Configure the bi-amp settings to 6 Ω. TRIGGER OUT CENTER SPEAKERS HDMI 4 CENTER HDMI 5 SURROUND SURROUND BACK/BI-AMP SINGLE SINGLE CENTER OPTICAL AV 1 COAXIAL AV...Multi-zone audio system using the internal amplifier of speakers for 8 Ω speakers at all channels must be maintained at the factory setting. Connection to speakers that the brackets or cables are connected before connecting the speaker cables. • If connecting a bi-amp, ...
... damage. When connecting to 6 Ω speakers, carry out the following procedure to switch to activate connections. En 18 Configure the bi-amp settings to 6 Ω. TRIGGER OUT CENTER SPEAKERS HDMI 4 CENTER HDMI 5 SURROUND SURROUND BACK/BI-AMP SINGLE SINGLE CENTER OPTICAL AV 1 COAXIAL AV...Multi-zone audio system using the internal amplifier of speakers for 8 Ω speakers at all channels must be maintained at the factory setting. Connection to speakers that the brackets or cables are connected before connecting the speaker cables. • If connecting a bi-amp, ...

Owners Manual
Page 19
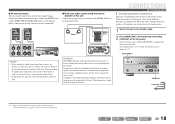
... banana plug Tighten the knob, and then insert the banana plug into the gap on the side of the terminal. is displayed on , when the settings you made has been configured. 3 2 FRONT 1 4 CONNECTIONS Connecting speakers 4 Tighten the terminal.
... banana plug Tighten the knob, and then insert the banana plug into the gap on the side of the terminal. is displayed on , when the settings you made has been configured. 3 2 FRONT 1 4 CONNECTIONS Connecting speakers 4 Tighten the terminal.

Owners Manual
Page 20
...tab to secure the wire. 1 Connect the subwoofer input jack to the SUBWOOFER 1 or 2 jack on using "Power Amp Assign" function. Crossover frequency (if available): Set to approximately half volume (or slightly less than half). Refer to "Power Amp Assign" (☞p. 84) for details on this unit is required to this... unit with an audio pin cable. 2 Set the subwoofer volume as follows. VOLUME CROSSOVER/ HIGH CUT MIN MAX MIN MAX Subwoofer examples NOTE After connection, applying this...
...tab to secure the wire. 1 Connect the subwoofer input jack to the SUBWOOFER 1 or 2 jack on using "Power Amp Assign" function. Crossover frequency (if available): Set to approximately half volume (or slightly less than half). Refer to "Power Amp Assign" (☞p. 84) for details on this unit is required to this... unit with an audio pin cable. 2 Set the subwoofer volume as follows. VOLUME CROSSOVER/ HIGH CUT MIN MAX MIN MAX Subwoofer examples NOTE After connection, applying this...
Owners Manual
Page 22
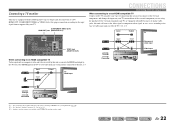
.../DVD) HDMI 1 HDM REMOTE IN OUT 75 PB VIDEO Y MONITOR OUT +12V 0.1A MAX. Just select HDMI input on your TV to "On" (☞p. 89). J 2 : Set "Analog to Analog Conversion" to match that you are equipped with the following three types of output jack for connection to the input signal format...
.../DVD) HDMI 1 HDM REMOTE IN OUT 75 PB VIDEO Y MONITOR OUT +12V 0.1A MAX. Just select HDMI input on your TV to "On" (☞p. 89). J 2 : Set "Analog to Analog Conversion" to match that you are equipped with the following three types of output jack for connection to the input signal format...
Owners Manual
Page 24
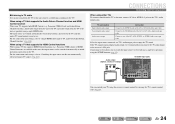
...audio output Optical digital audio output Coaxial digital audio output Analog stereo output Connection Connect to the TV's audio output jacks. For the connections and settings, refer to "Switching the input source on this unit automatically when listening to TV audio with a fiber-optic cable. If the TV supports...from the unit to the TV and audio output from the TV to the unit are possible using a single HDMI cable. For the connections and settings, refer to "Single HDMI cable input to TV audio" (☞p. 103). Select the input source connected via TV's audio output jack to ...
...audio output Optical digital audio output Coaxial digital audio output Analog stereo output Connection Connect to the TV's audio output jacks. For the connections and settings, refer to "Switching the input source on this unit automatically when listening to TV audio with a fiber-optic cable. If the TV supports...from the unit to the TV and audio output from the TV to the unit are possible using a single HDMI cable. For the connections and settings, refer to "Single HDMI cable input to TV audio" (☞p. 103). Select the input source connected via TV's audio output jack to ...
Owners Manual
Page 25
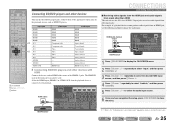
MAIN ZONE 2 CODE SET SOURCE RECEIVER HDMI 1 2 3 4 AUDIO 5 V-AUX 1 2 AV 1 2 3 4 5 6 MULTI DOCK TUNER SIRIUS CATEGORY FM AM INFO MEMORY [ A ] PRESET TUN./CH MOVIE SLEEP ENHANCER SUR. Connect them to ...
MAIN ZONE 2 CODE SET SOURCE RECEIVER HDMI 1 2 3 4 AUDIO 5 V-AUX 1 2 AV 1 2 3 4 5 6 MULTI DOCK TUNER SIRIUS CATEGORY FM AM INFO MEMORY [ A ] PRESET TUN./CH MOVIE SLEEP ENHANCER SUR. Connect them to ...

