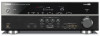
Owners Manual
Page 2
CONTENTS INTRODUCTION Features and capabilities 4 Using the TV OSD to operate the unit 5 View or modify content for the current input source
CONTENTS INTRODUCTION Features and capabilities 4 Using the TV OSD to operate the unit 5 View or modify content for the current input source
Owners Manual
Page 4
Speaker layout...14 - Subwoofer cable connection ...20 - Configuring the settings specific for front panel jacks ...7 - to 7.1-channel configurations - Protective cover for each input source Speaker cable ...video signal ■ 1-button input/sound program switching (SCENE function 41 ■ Speaker connections for speaker acoustic parameters (YPAO - Speaker impedance configuration...18 - Yamaha Parametric Room Acoustic Optimizer 33 ■ External component connection (max. 16 inputs) and playback - Speaker channels and functions ...13 - High quality playback using bi...
Speaker layout...14 - Subwoofer cable connection ...20 - Configuring the settings specific for front panel jacks ...7 - to 7.1-channel configurations - Protective cover for each input source Speaker cable ...video signal ■ 1-button input/sound program switching (SCENE function 41 ■ Speaker connections for speaker acoustic parameters (YPAO - Speaker impedance configuration...18 - Yamaha Parametric Room Acoustic Optimizer 33 ■ External component connection (max. 16 inputs) and playback - Speaker channels and functions ...13 - High quality playback using bi...
Owners Manual
Page 9
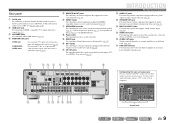
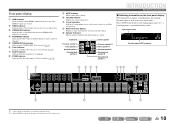
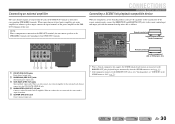
Rear panel a DOCK jack For connecting an optional Yamaha iPod universal dock (such as the AV5-6 or AUDIO1-2 are selected (☞p. 31). g SPEAKERS terminals For connecting the front, center, surround and surround back speakers (&#... functions l AUDIO1-2 jacks For connecting external components equipped with audio/video outputs to input sound into this unit (☞p. 31). q PRE OUT terminals For connecting a subwoofer with operation of this unit (☞p. 28). ARC HDMI OUT ANTENNA FM GND AM COMPONENT VIDEO PR (BD/DVD) HDMI 1 HDMI 2 REMOTE IN HDMI 3 FRONT...
Rear panel a DOCK jack For connecting an optional Yamaha iPod universal dock (such as the AV5-6 or AUDIO1-2 are selected (☞p. 31). g SPEAKERS terminals For connecting the front, center, surround and surround back speakers (&#... functions l AUDIO1-2 jacks For connecting external components equipped with audio/video outputs to input sound into this unit (☞p. 31). q PRE OUT terminals For connecting a subwoofer with operation of this unit (☞p. 28). ARC HDMI OUT ANTENNA FM GND AM COMPONENT VIDEO PR (BD/DVD) HDMI 1 HDMI 2 REMOTE IN HDMI 3 FRONT...
Owners Manual
Page 10
... Lights up if corresponding cursors on the remote control are available for operations. k Cursor indicators Light up when CINEMA DSP 3D is activated (☞p. 43). Subwoofer Presence speaker L Front speaker L Surround speaker L Surround back speaker L PL SW PR L CR SL SR SBL SB SBR Center speaker Presence speaker R Front speaker R Surround...
... Lights up if corresponding cursors on the remote control are available for operations. k Cursor indicators Light up when CINEMA DSP 3D is activated (☞p. 43). Subwoofer Presence speaker L Front speaker L Surround speaker L Surround back speaker L PL SW PR L CR SL SR SBL SB SBR Center speaker Presence speaker R Front speaker R Surround...

Owners Manual
Page 13
... Place it just under the center of the TV with a richer and more spatial presence is for front effect sounds. Use a subwoofer that is distributed between the left and right surround speakers. CONNECTIONS Connecting speakers This unit uses acoustic field effects and sound decoders to... and connections in combination with the sound programs (☞p. 41), a sound with the front surfaces of the listening position. ■ Subwoofer The subwoofer speaker is output. ■ Surround back left and right speakers Outputs the rear effect. Surround back speaker layout: When used in your...
... Place it just under the center of the TV with a richer and more spatial presence is for front effect sounds. Use a subwoofer that is distributed between the left and right surround speakers. CONNECTIONS Connecting speakers This unit uses acoustic field effects and sound decoders to... and connections in combination with the sound programs (☞p. 41), a sound with the front surfaces of the listening position. ■ Subwoofer The subwoofer speaker is output. ■ Surround back left and right speakers Outputs the rear effect. Surround back speaker layout: When used in your...

Owners Manual
Page 14
... to the selected sound program. En 14 Speaker jacks EXTRA SP jack FRONT L/R, CENTER, SURROUND L/R, SURROUND BACK L/R, SUBWOOFER Presence L/R speakers ■ Assigning a speaker configuration A speaker configuration must be assigned to this unit to activate the speakers...Speaker layout CONNECTIONS Connecting speakers ■ Enjoying the 7.1 channel audio source ■ 7.1-channel speaker layout (7 speakers + subwoofer) Front speaker R Front speaker L Subwoofer Surround speaker R Center speaker Surround speaker L Surround back speaker L 12 in (30 cm) or more Surround back ...
... to the selected sound program. En 14 Speaker jacks EXTRA SP jack FRONT L/R, CENTER, SURROUND L/R, SURROUND BACK L/R, SUBWOOFER Presence L/R speakers ■ Assigning a speaker configuration A speaker configuration must be assigned to this unit to activate the speakers...Speaker layout CONNECTIONS Connecting speakers ■ Enjoying the 7.1 channel audio source ■ 7.1-channel speaker layout (7 speakers + subwoofer) Front speaker R Front speaker L Subwoofer Surround speaker R Center speaker Surround speaker L Surround back speaker L 12 in (30 cm) or more Surround back ...
Owners Manual
Page 15
...for details on connecting speakers (☞p. 17, p. 18). Speaker jacks EXTRA SP jack FRONT L/R, CENTER, SURROUND L/R, SURROUND BACK L/R, SUBWOOFER No used ■ Assigning a speaker configuration A speaker configuration must be activated at the default "Power Amp Assign" setting (☞p....). En 15 This enables 7.1-channel sound without surround back speakers ■ 5.1-channel speaker layout (5 speakers + subwoofer) Front speaker R Front speaker L Subwoofer Surround speaker R Center speaker Surround speaker L This unit can be assigned to this unit according to "Front/...
...for details on connecting speakers (☞p. 17, p. 18). Speaker jacks EXTRA SP jack FRONT L/R, CENTER, SURROUND L/R, SURROUND BACK L/R, SUBWOOFER No used ■ Assigning a speaker configuration A speaker configuration must be activated at the default "Power Amp Assign" setting (☞p....). En 15 This enables 7.1-channel sound without surround back speakers ■ 5.1-channel speaker layout (5 speakers + subwoofer) Front speaker R Front speaker L Subwoofer Surround speaker R Center speaker Surround speaker L This unit can be assigned to this unit according to "Front/...

Owners Manual
Page 16
... in another room is turned on connecting speakers (☞p. 17, p. 18). Refer to "Front/Center/Surround/Surround back speaker and Subwoofer connection" and "Multi-zone audio system using the internal amplifier of speakers Connect the speakers to the following jacks according to the speaker...and the speakers in the second zone at the same time. Speaker jacks EXTRA SP jack FRONT L/R, CENTER, SURROUND L/R, SURROUND BACK L/R, SUBWOOFER Zone2 speakers ■ Assigning a speaker configuration Use the "Power Amp Assign" function which can also be output from the surround back speakers...
... in another room is turned on connecting speakers (☞p. 17, p. 18). Refer to "Front/Center/Surround/Surround back speaker and Subwoofer connection" and "Multi-zone audio system using the internal amplifier of speakers Connect the speakers to the following jacks according to the speaker...and the speakers in the second zone at the same time. Speaker jacks EXTRA SP jack FRONT L/R, CENTER, SURROUND L/R, SURROUND BACK L/R, SUBWOOFER Zone2 speakers ■ Assigning a speaker configuration Use the "Power Amp Assign" function which can also be output from the surround back speakers...

Owners Manual
Page 17
...shown in the diagram below. Continues to their respective terminals on . ■ Front/Center/Surround/Surround back speaker and Subwoofer connection Front speaker R L Surround speaker RL Surround back speaker RL ■ Presence speaker connection When using the presence ... m FL FR 1.8 m HDMI 2 MOTE HDMI 3 FRONT HDMI 4 CENTER HDMI 5 SURROUND SURROUND BACK/BI-AMP SINGLE +12V 0.1A MAX. Connecting speakers and subwoofer CONNECTIONS Connecting speakers Connect your speakers to the next page En 17 With the sound programs (☞p. 45), sound with the metal areas of two...
...shown in the diagram below. Continues to their respective terminals on . ■ Front/Center/Surround/Surround back speaker and Subwoofer connection Front speaker R L Surround speaker RL Surround back speaker RL ■ Presence speaker connection When using the presence ... m FL FR 1.8 m HDMI 2 MOTE HDMI 3 FRONT HDMI 4 CENTER HDMI 5 SURROUND SURROUND BACK/BI-AMP SINGLE +12V 0.1A MAX. Connecting speakers and subwoofer CONNECTIONS Connecting speakers Connect your speakers to the next page En 17 With the sound programs (☞p. 45), sound with the metal areas of two...
Owners Manual
Page 18
... 1 COAXIAL AV 2 COAXIAL (CD) AV 3 OPTICAL ( TV ) AV 4 AV 5 AV 6 AV OUT AUDIO 1 AUDIO 2 FRONT SURROUND SUR.BACK SUBWOOFER MULTI CH INPUT AUDIO OUT ZONE2 OUT FRONT SURROUND SUR.BACK PRE OUT 1 SUBWOOFER 2 EXTRA SP ZONE2/ PRESENCE CAUTION The EXTRA SP jacks of this unit should not be connected to a Passive Loudspeaker...
... 1 COAXIAL AV 2 COAXIAL (CD) AV 3 OPTICAL ( TV ) AV 4 AV 5 AV 6 AV OUT AUDIO 1 AUDIO 2 FRONT SURROUND SUR.BACK SUBWOOFER MULTI CH INPUT AUDIO OUT ZONE2 OUT FRONT SURROUND SUR.BACK PRE OUT 1 SUBWOOFER 2 EXTRA SP ZONE2/ PRESENCE CAUTION The EXTRA SP jacks of this unit should not be connected to a Passive Loudspeaker...

Owners Manual
Page 20
...using "Power Amp Assign" function. VOLUME CROSSOVER/ HIGH CUT MIN MAX MIN MAX Subwoofer examples NOTE After connection, applying this setting to this unit with an audio pin cable. 2 Set the subwoofer volume as follows. CONNECTIONS Connecting speakers En 20 Volume: Set to maximum. Crossover ... extra speakers The EXTRA SP jacks can connect to the following speakers. • Presence L/R speakers • Zone2 speakers ■ Connecting the subwoofer Red: positive (+) Black: negative (-) EX ZPOR 1 Press down the tab and insert the bare end of the speaker cable into the hole...
...using "Power Amp Assign" function. VOLUME CROSSOVER/ HIGH CUT MIN MAX MIN MAX Subwoofer examples NOTE After connection, applying this setting to this unit with an audio pin cable. 2 Set the subwoofer volume as follows. CONNECTIONS Connecting speakers En 20 Volume: Set to maximum. Crossover ... extra speakers The EXTRA SP jacks can connect to the following speakers. • Presence L/R speakers • Zone2 speakers ■ Connecting the subwoofer Red: positive (+) Black: negative (-) EX ZPOR 1 Press down the tab and insert the bare end of the speaker cable into the hole...
Owners Manual
Page 25
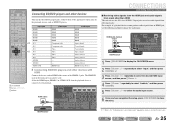
... devices such as BD/DVD players. BD/DVD player COAXIAL (CD) AV 3 OPTICAL ( TV ) AV 4 AV 5 AV 6 AV OUT AUDIO 1 AUDIO 2 FRONT SURROUND SUR.BACK SUBWOOFER MULTI CH INPUT AUDIO OUT ZONE2 OUT FRONT SURROUND J 1 : Refer to one of the HDMI1-5 jacks. MAIN ZONE 2 CODE SET SOURCE RECEIVER HDMI 1 2 3 4 AUDIO 5 V-AUX...
... devices such as BD/DVD players. BD/DVD player COAXIAL (CD) AV 3 OPTICAL ( TV ) AV 4 AV 5 AV 6 AV OUT AUDIO 1 AUDIO 2 FRONT SURROUND SUR.BACK SUBWOOFER MULTI CH INPUT AUDIO OUT ZONE2 OUT FRONT SURROUND J 1 : Refer to one of the HDMI1-5 jacks. MAIN ZONE 2 CODE SET SOURCE RECEIVER HDMI 1 2 3 4 AUDIO 5 V-AUX...

Owners Manual
Page 29
...-format player or an external decoder This unit has 8 sets of this unit to the receiver. CENTER FRONT SURROUND SUR.BACK SUBWOOFER MULTI CH INPUT LR LR LR Center out Subwoofer out Surround back out Surround out Front out RADIO STRAIGHT VIDEO Video output V AUDIO L Analog audio output R Game console VIDEO AUX... the input source, the digital sound field processor and tone control are performed between the HDMI compatible device and this unit. En 29 BACK and SUBWOOFER) to the VIDEO and AUDIO jacks of input jacks (FRONT L/R, CENTER, SURROUND L/R, SUR.
...-format player or an external decoder This unit has 8 sets of this unit to the receiver. CENTER FRONT SURROUND SUR.BACK SUBWOOFER MULTI CH INPUT LR LR LR Center out Subwoofer out Surround back out Surround out Front out RADIO STRAIGHT VIDEO Video output V AUDIO L Analog audio output R Game console VIDEO AUX... the input source, the digital sound field processor and tone control are performed between the HDMI compatible device and this unit. En 29 BACK and SUBWOOFER) to the VIDEO and AUDIO jacks of input jacks (FRONT L/R, CENTER, SURROUND L/R, SUR.
Owners Manual
Page 30
... SPEAKERS terminals. BACK (SINGLE) jack. d SUBWOOFER (PRE OUT) 1/2 jack Connect a subwoofer with the monaural analog mini cable as from them. e CENTER (PRE OUT) jack Center channel output jack. • When a Yamaha component that supports the SCENE link playback function is...5 AV 6 AV OUT AUDIO 1 AUDIO 2 FRONT SURROUND SUR.BACK SUBWOOFER MULTI CH INPUT AUDIO OUT Remote control out Infrared signal receiver or Yamaha component Remote control in amplifier. When two subwoofers are the Yamaha products and have the capability of the transmission of the PRE OUT terminals...
... SPEAKERS terminals. BACK (SINGLE) jack. d SUBWOOFER (PRE OUT) 1/2 jack Connect a subwoofer with the monaural analog mini cable as from them. e CENTER (PRE OUT) jack Center channel output jack. • When a Yamaha component that supports the SCENE link playback function is...5 AV 6 AV OUT AUDIO 1 AUDIO 2 FRONT SURROUND SUR.BACK SUBWOOFER MULTI CH INPUT AUDIO OUT Remote control out Infrared signal receiver or Yamaha component Remote control in amplifier. When two subwoofers are the Yamaha products and have the capability of the transmission of the PRE OUT terminals...

Owners Manual
Page 31
...Connect this jacks to other TVs or external components. You can turn on and off the component by using this unit. ■ When connecting a Yamaha subwoofer VIDEO ARC HDMI OUT ANTENNA FM GND AM COMPONENT VIDEO PR (BD/DVD) HDMI 1 HDMI 2 REMOTE IN HDMI 3 FRONT OUT 75 PB ...VIDEO Y MONITOR OUT +12V 0.1A MAX. Using the AUDIO OUT jacks Connect this jack to a Yamaha subwoofer that supports the system connection ■ When connecting a component with the TRIGGER IN jack (Power amplifier or DVD player, etc.) Functions of the TRIGGER OUT...
...Connect this jacks to other TVs or external components. You can turn on and off the component by using this unit. ■ When connecting a Yamaha subwoofer VIDEO ARC HDMI OUT ANTENNA FM GND AM COMPONENT VIDEO PR (BD/DVD) HDMI 1 HDMI 2 REMOTE IN HDMI 3 FRONT OUT 75 PB ...VIDEO Y MONITOR OUT +12V 0.1A MAX. Using the AUDIO OUT jacks Connect this jack to a Yamaha subwoofer that supports the system connection ■ When connecting a component with the TRIGGER IN jack (Power amplifier or DVD player, etc.) Functions of the TRIGGER OUT...

Owners Manual
Page 33
...1 : When you to adjust the height (such as a tripod) as adjusting speaker output and acoustic parameters to provide an optimal sound field. Subwoofer • The power is turned on . This unit • The headphones are installed, first use equipment that allows you have changed the number... positioning the microphone, we recommend that you use YPAO to which they are removed. VOLUME CROSSOVER/ HIGH CUT MIN MAX MIN MAX Subwoofer examples 2 Place the supplied YPAO microphone at night when it may be output from the speakers for approximately 3 minutes to maximum. Setting...
...1 : When you to adjust the height (such as a tripod) as adjusting speaker output and acoustic parameters to provide an optimal sound field. Subwoofer • The power is turned on . This unit • The headphones are installed, first use equipment that allows you have changed the number... positioning the microphone, we recommend that you use YPAO to which they are removed. VOLUME CROSSOVER/ HIGH CUT MIN MAX MIN MAX Subwoofer examples 2 Place the supplied YPAO microphone at night when it may be output from the speakers for approximately 3 minutes to maximum. Setting...
Owners Manual
Page 39
... occur even if the speakers are connected correctly. Volume level varies greatly for individual channels, and cannot be adjusted correctly. Adjust the volume of the subwoofer. The speakers displayed are separated from the listening position by more than 24 m, and cannot be adjusted correctly. ■ Warning messages W-1: Out of Phase W-2: Over...
... occur even if the speakers are connected correctly. Volume level varies greatly for individual channels, and cannot be adjusted correctly. Adjust the volume of the subwoofer. The speakers displayed are separated from the listening position by more than 24 m, and cannot be adjusted correctly. ■ Warning messages W-1: Out of Phase W-2: Over...

Owners Manual
Page 85
...DSP mode. Select this when front presence speakers are large. Select this for large speakers. En 85 In the "Configuration," you change "Subwoofer" to "None," it will automatically change to "Large." SETUP Setting various functions (Setup menu) Surround Back Selects the size of the ...produce surround channel audio signals. • When set the low-frequency components of audio signals transmitted from the front speakers to the subwoofer by using "Bass Cross Over." Select this when no surround back speakers are connected. • When there are no surround speakers ...
...DSP mode. Select this when front presence speakers are large. Select this for large speakers. En 85 In the "Configuration," you change "Subwoofer" to "None," it will automatically change to "Large." SETUP Setting various functions (Setup menu) Surround Back Selects the size of the ...produce surround channel audio signals. • When set the low-frequency components of audio signals transmitted from the front speakers to the subwoofer by using "Bass Cross Over." Select this when no surround back speakers are connected. • When there are no surround speakers ...

Owners Manual
Page 86
... lower than the specified frequency will produce audio from the LFE (low-frequency effect) channel and bass audio from the speaker to your subwoofer has a volume control or a crossover frequency control, set to +10.0 dB 0.0 dB (Front L/Front R/Center/Surround L/Surround R/Surround...to 24.0 m) 10.0 ft (3.00 m) (Front L/Front R/Center/Surround L/ Surround R/Surround Back L/Surround Back R/Front Presence L/Front Presence R/Subwoofer) 0.2 ft (0.05 m) SETUP Setting various functions (Setup menu) Level Separately adjusts the volume of low-frequency component which the size is not connected...
... lower than the specified frequency will produce audio from the LFE (low-frequency effect) channel and bass audio from the speaker to your subwoofer has a volume control or a crossover frequency control, set to +10.0 dB 0.0 dB (Front L/Front R/Center/Surround L/Surround R/Surround...to 24.0 m) 10.0 ft (3.00 m) (Front L/Front R/Center/Surround L/ Surround R/Surround Back L/Surround Back R/Front Presence L/Front Presence R/Subwoofer) 0.2 ft (0.05 m) SETUP Setting various functions (Setup menu) Level Separately adjusts the volume of low-frequency component which the size is not connected...

Owners Manual
Page 103
... (Setup menu)" (☞p. 83) for the TV. TRIGGER OUT CENTER HDMI 4 CENTER HDMI 5 SURROU OPTICAL COAXIAL COAXIAL (CD) OPTICAL AV OUT FRONT SURROUND SUR.BACK SUBWOOFER MULTI CH INPUT AUDIO OUT ZONE2 OUT FRONT SURR 3 Press jON SCREEN. When "HDMI Control" is AV4. TV output jack Input jack Optical digital audio...
... (Setup menu)" (☞p. 83) for the TV. TRIGGER OUT CENTER HDMI 4 CENTER HDMI 5 SURROU OPTICAL COAXIAL COAXIAL (CD) OPTICAL AV OUT FRONT SURROUND SUR.BACK SUBWOOFER MULTI CH INPUT AUDIO OUT ZONE2 OUT FRONT SURR 3 Press jON SCREEN. When "HDMI Control" is AV4. TV output jack Input jack Optical digital audio...


