
Owner's Manual
Page 3
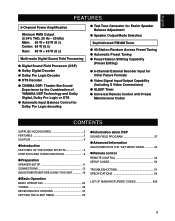
...Dolby Digital Decoder q Dolby Pro Logic Decoder q DTS Decoder q CINEMA DSP: Theater-like Sound Experience by the Combination of YAMAHA DSP Technology and Dolby Digital, Dolby Pro Logic or DTS q Automatic Input Balance Control for Dolby Pro Logic decoding q ...q 6-Channel External Decoder Input for Other Future Formats q Video Signal Input/Output Capability (Including S Video Connections) q SLEEP Timer q Universal Remote Control with Preset Manufacturer Codes CONTENTS SUPPLIED ACCESSORIES 2 FEATURES 3 CAUTION 4 q Introduction FEATURES OF THE SOUND EFFECTS 5 CONTROLS AND THEIR FUNCTIONS 8...
...Dolby Digital Decoder q Dolby Pro Logic Decoder q DTS Decoder q CINEMA DSP: Theater-like Sound Experience by the Combination of YAMAHA DSP Technology and Dolby Digital, Dolby Pro Logic or DTS q Automatic Input Balance Control for Dolby Pro Logic decoding q ...q 6-Channel External Decoder Input for Other Future Formats q Video Signal Input/Output Capability (Including S Video Connections) q SLEEP Timer q Universal Remote Control with Preset Manufacturer Codes CONTENTS SUPPLIED ACCESSORIES 2 FEATURES 3 CAUTION 4 q Introduction FEATURES OF THE SOUND EFFECTS 5 CONTROLS AND THEIR FUNCTIONS 8...
Owner's Manual
Page 8
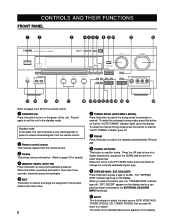
... unit is used to exchange the assigment of power to receive infrared-signals from the remote control. 2 Remote control sensor This receives signals from the remote control. 3 Display This shows various information. (Refer to page 10 for the remote control. 1 STANDBY/ON Press this button to switch the reception band between FM and AM...
... unit is used to exchange the assigment of power to receive infrared-signals from the remote control. 2 Remote control sensor This receives signals from the remote control. 3 Display This shows various information. (Refer to page 10 for the remote control. 1 STANDBY/ON Press this button to switch the reception band between FM and AM...
Owner's Manual
Page 10
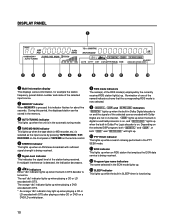
... lights up when playing a DVD encoded with DTS. * An orange "dts" indicator may light up when an FM stereo broadcast with DTS. Depending on the remote control. 5 STEREO indicator This lights up when playing a CD or LD encoded with Dolby Digital are not in DTS decoder is turned on. " " lights up...
... lights up when playing a DVD encoded with DTS. * An orange "dts" indicator may light up when an FM stereo broadcast with DTS. Depending on the remote control. 5 STEREO indicator This lights up when playing a CD or LD encoded with Dolby Digital are not in DTS decoder is turned on. " " lights up...
Owner's Manual
Page 12
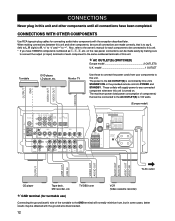
... player, LD player, etc. These outlets will normally minimize hum, but in this unit and other components, be sure all connections have YAMAHA components numbered as !, #, $, etc. CONNECTIONS WITH OTHER COMPONENTS Use RCA-type pin plug cables for connecting audio/video components with the ground ...of components) that is to say L (left) to L, R (right) to R, "+" to "+" and "-" to this unit's STANDBY/ON or the provided remote control's POWER and STANDBY. on . AC OUTLET(S) (SWITCHED) Europe model 2 OUTLETS U.K. onnecting the ground (earth) wire of this unit is turned on the rear...
... player, LD player, etc. These outlets will normally minimize hum, but in this unit and other components, be sure all connections have YAMAHA components numbered as !, #, $, etc. CONNECTIONS WITH OTHER COMPONENTS Use RCA-type pin plug cables for connecting audio/video components with the ground ...of components) that is to say L (left) to L, R (right) to R, "+" to "+" and "-" to this unit's STANDBY/ON or the provided remote control's POWER and STANDBY. on . AC OUTLET(S) (SWITCHED) Europe model 2 OUTLETS U.K. onnecting the ground (earth) wire of this unit is turned on the rear...
Owner's Manual
Page 20
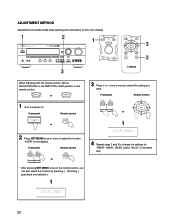
... while watching the information on this unit's display. 1 2 1 3 2 3 When adjusting with the remote control, set the SELECTOR DIAL to select the function "CNTR" on the display. Front panel Remote control or 2 Press SET MENU once or more to select the setting you can also select the function... "BASS" and/or "M.LVL" in the same way. 20 or 1 Turn the power on the remote control. Front panel Remote control or * After pressing SET MENU once on the remote control, you want. Front panel Remote control or 3 Press + or - once or more to the AMP/TUN or DSP position on ....
... while watching the information on this unit's display. 1 2 1 3 2 3 When adjusting with the remote control, set the SELECTOR DIAL to select the function "CNTR" on the display. Front panel Remote control or 2 Press SET MENU once or more to select the setting you can also select the function... "BASS" and/or "M.LVL" in the same way. 20 or 1 Turn the power on the remote control. Front panel Remote control or * After pressing SET MENU once on the remote control, you want. Front panel Remote control or 3 Press + or - once or more to the AMP/TUN or DSP position on ....
Owner's Manual
Page 21
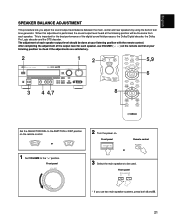
...processor, the Dolby Digital decoder, the Dolby Pro Logic decoder and the DTS decoder. Front panel 2 Turn the power on the remote control. Front panel Remote control or 3 Select the main speakers to the " " position. Front panel * If you adjust the sound output level balance ... will be the same from each speaker output level should be used. English SPEAKER BALANCE ADJUSTMENT This procedure lets you use VOLUME ( ) on the remote control at your listening position to check if the adjustments are satisfactory. 2 12 5,9 6 3 4 4,7 8 Set the SELECTOR DIAL to the...
...processor, the Dolby Digital decoder, the Dolby Pro Logic decoder and the DTS decoder. Front panel 2 Turn the power on the remote control. Front panel Remote control or 3 Select the main speakers to the " " position. Front panel * If you adjust the sound output level balance ... will be the same from each speaker output level should be used. English SPEAKER BALANCE ADJUSTMENT This procedure lets you use VOLUME ( ) on the remote control at your listening position to check if the adjustments are satisfactory. 2 12 5,9 6 3 4 4,7 8 Set the SELECTOR DIAL to the...
Owner's Manual
Page 22
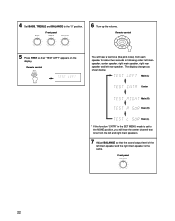
Remote control You will hear the center channel test tone from each speaker for about two seconds in the SET MENU mode is the same. Front ... Main (R) Rear (R) Rear (L) * If the function "CNTR" in following order: left main speaker, center speaker, right main speaker, right rear speaker and left rear speaker. Remote control 5 Press TEST so that the sound output level of the left main speaker and the right main speaker is set to the "0" position. 4 Set...
Remote control You will hear the center channel test tone from each speaker for about two seconds in the SET MENU mode is the same. Front ... Main (R) Rear (R) Rear (L) * If the function "CNTR" in following order: left main speaker, center speaker, right main speaker, right rear speaker and left rear speaker. Remote control 5 Press TEST so that the sound output level of the left main speaker and the right main speaker is set to the "0" position. 4 Set...

Owner's Manual
Page 23
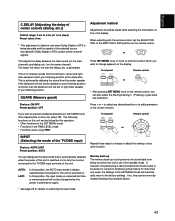
... Once you have completed these adjustments, you can only adjust the overall sound level of your audio system by using VOLUME (or VOLUME ( ) on the remote control). • If you may decrease the main speaker output level by setting "M.LVL" to "-10 dB". 9 When the adjustment is sounding even if... tone. Adjust the level. * Pressing raises and lowers the level. * While adjusting, the test tone is automati- Press TIME/LEVEL once or more . Remote control * You cannot adjust the delay time while the test tone is finished, press TEST again to the NONE position, the sound output level of...
... Once you have completed these adjustments, you can only adjust the overall sound level of your audio system by using VOLUME (or VOLUME ( ) on the remote control). • If you may decrease the main speaker output level by setting "M.LVL" to "-10 dB". 9 When the adjustment is sounding even if... tone. Adjust the level. * Pressing raises and lowers the level. * While adjusting, the test tone is automati- Press TIME/LEVEL once or more . Remote control * You cannot adjust the delay time while the test tone is finished, press TEST again to the NONE position, the sound output level of...
Owner's Manual
Page 24
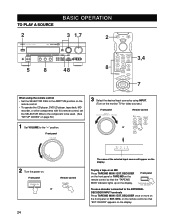
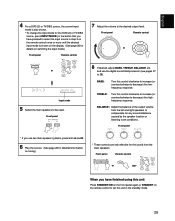
...EXT. DECODER once or more on the display. Front panel 3 Select the desired input source by using the remote control • Set the SELECTOR DIAL to the AMP/TUN position on the remote control. • To operate the CD player, DVD/LD player, tape deck, MD recorder, or other ... OPERATION 3 1,7 2 5 8 48 3,4 8 7 When using INPUT. (Turn on the monitor TV for video sources.) Front panel Remote control or 2 Turn the power on. Front panel To use a decoder connected to the " " position. on the remote control so that the "TAPE/MD MON" indicator lights up on the front panel or EXT.
...EXT. DECODER once or more on the display. Front panel 3 Select the desired input source by using the remote control • Set the SELECTOR DIAL to the AMP/TUN position on the remote control. • To operate the CD player, DVD/LD player, tape deck, MD recorder, or other ... OPERATION 3 1,7 2 5 8 48 3,4 8 7 When using INPUT. (Turn on the monitor TV for video sources.) Front panel Remote control or 2 Turn the power on. Front panel To use a decoder connected to the " " position. on the remote control so that the "TAPE/MD MON" indicator lights up on the front panel or EXT.
Owner's Manual
Page 25
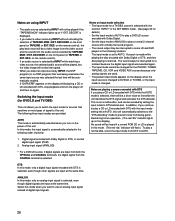
... control clockwise to increase (or counterclockwise to decrease) the highfrequency response. Front panel Remote control or When you use the digital sound field processor (see pages 37 to be...unit Press STANDBY/ON on the front panel again or STANDBY on the remote control to set this unit in step 3 on the remote control) once or more until the desired input mode is shown on... the display. (See page 26 for details on switching the input mode.) Front panel Remote control 7 Adjust the volume to compensate for any sound imbalance caused by the speaker location or listening room...
... control clockwise to increase (or counterclockwise to decrease) the highfrequency response. Front panel Remote control or When you use the digital sound field processor (see pages 37 to be...unit Press STANDBY/ON on the front panel again or STANDBY on the remote control to set this unit in step 3 on the remote control) once or more until the desired input mode is shown on... the display. (See page 26 for details on switching the input mode.) Front panel Remote control 7 Adjust the volume to compensate for any sound imbalance caused by the speaker location or listening room...
Owner's Manual
Page 26
...with Dolby Digital or DTS, or normal digital input signal (PCM) 2. A search is played in the following three input modes are provided. on the remote control), the play a normal disk, return the input mode from DTS to this unit. Digital signal encoded with Dolby Digital or DTS, and then ...will be avoided by INPUT, the DSP program (or no DSP program) that send two or more types of digital input signals. 26 on the remote control). • If an audio source is interrupted for a moment because the digital input signal was selected the last time will not be interrupted....
...with Dolby Digital or DTS, or normal digital input signal (PCM) 2. A search is played in the following three input modes are provided. on the remote control), the play a normal disk, return the input mode from DTS to this unit. Digital signal encoded with Dolby Digital or DTS, and then ...will be avoided by INPUT, the DSP program (or no DSP program) that send two or more types of digital input signals. 26 on the remote control). • If an audio source is interrupted for a moment because the digital input signal was selected the last time will not be interrupted....
Owner's Manual
Page 27
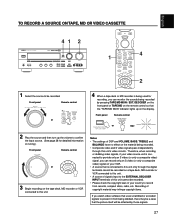
... will be recorded. • Please check the copyright laws in your VCR. • A source that is being used for detailed information on tuning.) Front panel Remote control or 3 Begin recording on the display. English TO RECORD A SOURCE ON TAPE, MD OR VIDEO CASSETTE 41 2 4 1 2 1 Select the source to ...material may be a case that uses scrambled or encoded signals to this unit cannot be affected by pressing TAPE/MD MON / EXT. Front panel Remote control or 2 Play the source and then turn up on the tape deck, MD recorder or VCR connected to prevent it from records, compact...
... will be recorded. • Please check the copyright laws in your VCR. • A source that is being used for detailed information on tuning.) Front panel Remote control or 3 Begin recording on the display. English TO RECORD A SOURCE ON TAPE, MD OR VIDEO CASSETTE 41 2 4 1 2 1 Select the source to ...material may be a case that uses scrambled or encoded signals to this unit cannot be affected by pressing TAPE/MD MON / EXT. Front panel Remote control or 2 Play the source and then turn up on the tape deck, MD recorder or VCR connected to prevent it from records, compact...

Owner's Manual
Page 28
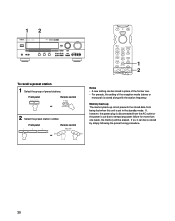
... signal from the station is also shown on the display. Notes • If you must tune in manually to the AMP/TUN position on the remote control and select TUNER as the input source. 1 Select the reception band (FM or AM) and confirm it on the display.
... signal from the station is also shown on the display. Notes • If you must tune in manually to the AMP/TUN position on the remote control and select TUNER as the input source. 1 Select the reception band (FM or AM) and confirm it on the display.
Owner's Manual
Page 30
... outlet or the power is cut due to temporary power failure for more than one . • For presets, the setting of preset stations. Front panel Remote control or 1 2 Notes • A new setting can be stored in the standby mode. 12 To recall a preset station 1 Select the group of the reception mode... plug is disconnected from being lost when this unit is set in place of the former one week, the memory will be erased. Front panel Remote control or 2 Select the preset station number.
... outlet or the power is cut due to temporary power failure for more than one . • For presets, the setting of preset stations. Front panel Remote control or 1 2 Notes • A new setting can be stored in the standby mode. 12 To recall a preset station 1 Select the group of the reception mode... plug is disconnected from being lost when this unit is set in place of the former one week, the memory will be erased. Front panel Remote control or 2 Select the preset station number.

Owner's Manual
Page 36
Remote control The SLEEP time is useful. To set the SLEEP timer for your TV, set the SELECTOR DIAL to the TV position. • The components ... as follows: (Minutes) 120 90 60 30 To cancel the selected SLEEP time Remote control Press SLEEP once or more so that "SLEEP OFF" appears on the remote control) or by setting the unit in the standby mode with the remote control. Flashes Each time you are going to sleep while enjoying a broadcast...
Remote control The SLEEP time is useful. To set the SLEEP timer for your TV, set the SELECTOR DIAL to the TV position. • The components ... as follows: (Minutes) 120 90 60 30 To cancel the selected SLEEP time Remote control Press SLEEP once or more so that "SLEEP OFF" appears on the remote control) or by setting the unit in the standby mode with the remote control. Flashes Each time you are going to sleep while enjoying a broadcast...
Owner's Manual
Page 39
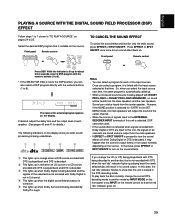
... the indicator is lit up for details.) The following indicators on the remote control so that this unit, the signals of all channels are mixed ...sound processing is turned on the source. Press EFFECT or EFCT ON/OFF once more to 25. Front panel Remote control or Notes • You can only be used. • If the sound effect is canceled when signals...SOUND EFFECT To cancel the sound effect and monitor only the main sound, press EFFECT or EFCT ON/OFF. Front panel Remote control or Press DSP. The name of the selected source encoded with the numeric buttons (1 to 8). * If the ...
... the indicator is lit up for details.) The following indicators on the remote control so that this unit, the signals of all channels are mixed ...sound processing is turned on the source. Press EFFECT or EFCT ON/OFF once more to 25. Front panel Remote control or Notes • You can only be used. • If the sound effect is canceled when signals...SOUND EFFECT To cancel the sound effect and monitor only the main sound, press EFFECT or EFCT ON/OFF. Front panel Remote control or Press DSP. The name of the selected source encoded with the numeric buttons (1 to 8). * If the ...
Owner's Manual
Page 40
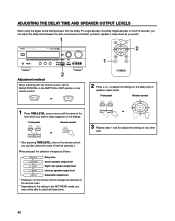
... 1 Press TIME/LEVEL once or more until the name of any other item. 40 Front panel Remote control or * After pressing TIME/LEVEL once on the remote control, you may not be able to select all these items. or 3 Repeat steps 1 and 2 to adjust the settings for the delay time or speaker... output levels. ADJUSTING THE DELAY TIME AND SPEAKER OUTPUT LEVELS When using the digital sound field processor with the remote control, set the SELECTOR DIAL to adjust appears on the display. to adjust the settings of the item which you want to the AMP/TUN...
... 1 Press TIME/LEVEL once or more until the name of any other item. 40 Front panel Remote control or * After pressing TIME/LEVEL once on the remote control, you may not be able to select all these items. or 3 Repeat steps 1 and 2 to adjust the settings for the delay time or speaker... output levels. ADJUSTING THE DELAY TIME AND SPEAKER OUTPUT LEVELS When using the digital sound field processor with the remote control, set the SELECTOR DIAL to adjust appears on the display. to adjust the settings of the item which you want to the AMP/TUN...
Owner's Manual
Page 43
... unit is always selected when the power for more than the distance from being decoded and the signals of the selected source encoded with the remote control, set in the standby mode. If you wish to prevent accidental alterations to SET MENU and other function. This is switched on this...this operation: • Other functions in the SET MENU mode • Functions in the TIME/LEVEL mode • Functions when using TEST Front panel Remote control or INPUT (Selecting the mode of the SET MENU mode will not be made while watching the information on again. In this unit is...
... unit is always selected when the power for more than the distance from being decoded and the signals of the selected source encoded with the remote control, set in the standby mode. If you wish to prevent accidental alterations to SET MENU and other function. This is switched on this...this operation: • Other functions in the SET MENU mode • Functions in the TIME/LEVEL mode • Functions when using TEST Front panel Remote control or INPUT (Selecting the mode of the SET MENU mode will not be made while watching the information on again. In this unit is...
Owner's Manual
Page 44
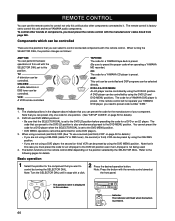
... components. Refer to preset the proper code when operating a YAMAHA MD recorder.) CD: The code for a DVD or an LD player. DVD/LD & DVD MENU: An LD player can be controlled. The remote control is pressed. 44 Note: Turn the SELECTOR DIAL until it . Components which can be controlled ... This unit can be controlled and DSP programs can be preset by the SELECTOR DIAL. The button functions on the remote control differ depending on page 50 for a YAMAHA DVD player is preset. REMOTE CONTROL You can use a second (and third) VCR" on the position selected by using the CBL/DBS position....
... components. Refer to preset the proper code when operating a YAMAHA MD recorder.) CD: The code for a DVD or an LD player. DVD/LD & DVD MENU: An LD player can be controlled. The remote control is pressed. 44 Note: Turn the SELECTOR DIAL until it . Components which can be controlled ... This unit can be controlled and DSP programs can be preset by the SELECTOR DIAL. The button functions on the remote control differ depending on page 50 for a YAMAHA DVD player is preset. REMOTE CONTROL You can use a second (and third) VCR" on the position selected by using the CBL/DBS position....
Owner's Manual
Page 46
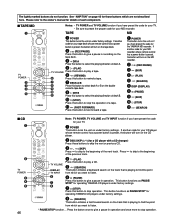
... 5 Notes: • TV POWER and TV VOLUME function if you have preset the code for the YAMAHA MD recorder. q (FAST FORWARD) Press this button to preset the proper code for your MD recorder whose remote control has a power button is preset, the button will turn on the tape deck. 2 (REC/... that is playing to listen. * PAUSE/STOP function ... See "AMP/TUN" on page 45 for those buttons which you have preset the code for operating YAMAHA CD players under factory settings. TAPE MD 1 POWER This button turns the unit on the MD recorder. 2 (REC/PAUSE) 3 (SKIP) 4 (PLAY) 5 (SEARCH) 6 ...
... 5 Notes: • TV POWER and TV VOLUME function if you have preset the code for the YAMAHA MD recorder. q (FAST FORWARD) Press this button to preset the proper code for your MD recorder whose remote control has a power button is preset, the button will turn on the tape deck. 2 (REC/... that is playing to listen. * PAUSE/STOP function ... See "AMP/TUN" on page 45 for those buttons which you have preset the code for operating YAMAHA CD players under factory settings. TAPE MD 1 POWER This button turns the unit on the MD recorder. 2 (REC/PAUSE) 3 (SKIP) 4 (PLAY) 5 (SEARCH) 6 ...


