
Owner's Manual
Page 1
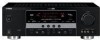
U RX-V563 AV Receiver OWNER'S MANUAL
U RX-V563 AV Receiver OWNER'S MANUAL
Owner's Manual
Page 3
... GROUNDING ELECTRODE SYSTEM (NEC ART 250. Adjust only those products distributed by the FCC, to use this product in this manual, meets FCC requirements. IMPORTANT SAFETY INSTRUCTIONS 24 Outdoor Antenna Grounding - Article 810 of the National Electrical Code, ANSI/NFPA... service technician has used according to the instructions found in the users manual, may void your authority, granted by Yamaha Corporation of interference, which can not locate the appropriate retailer, please contact Yamaha Electronics Corp., U.S.A. 6660 Orangethorpe Ave., Buena Park, CA 90620....
... GROUNDING ELECTRODE SYSTEM (NEC ART 250. Adjust only those products distributed by the FCC, to use this product in this manual, meets FCC requirements. IMPORTANT SAFETY INSTRUCTIONS 24 Outdoor Antenna Grounding - Article 810 of the National Electrical Code, ANSI/NFPA... service technician has used according to the instructions found in the users manual, may void your authority, granted by Yamaha Corporation of interference, which can not locate the appropriate retailer, please contact Yamaha Electronics Corp., U.S.A. 6660 Orangethorpe Ave., Buena Park, CA 90620....
Owner's Manual
Page 4
... et pousser jusqu'au fond. It may cause damage and/or discoloration on the rear of this sound system in the space below. Contact qualified Yamaha service personnel when any reasons. 15 When not planning to use force on the rear panel of this unit. 3 Locate this unit must be ... least 30 cm on the top, 20 cm on the left and right, and 20 cm on common operating errors before concluding that this Owner's Manual in a environment with Canadian ICES-003. Using this unit, and/or personal injury. This unit is designed to this unit with chemical solvents; Cet ...
... et pousser jusqu'au fond. It may cause damage and/or discoloration on the rear of this sound system in the space below. Contact qualified Yamaha service personnel when any reasons. 15 When not planning to use force on the rear panel of this unit. 3 Locate this unit must be ... least 30 cm on the top, 20 cm on the left and right, and 20 cm on common operating errors before concluding that this Owner's Manual in a environment with Canadian ICES-003. Using this unit, and/or personal injury. This unit is designed to this unit with chemical solvents; Cet ...
Owner's Manual
Page 5
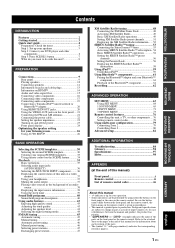
...Zone 2 79 Controlling Zone 2 80 Advanced setup 82 ADDITIONAL INFORMATION Troubleshooting 84 Glossary 94 Specifications 97 Index 98 APPENDIX (at the end of this manual for the information about each position of the parts. • The symbol "☞ " with this unit 8 PREPARATION Connections 9 Rear panel 9... on HDMI 14 Audio and video signal flow 15 Connecting video components 16 Connecting other components 17 Connecting audio components 19 Connecting a Yamaha iPod™ universal dock or Bluetooth™ adapter 20 Using REMOTE IN/OUT jacks 20 Using the VIDEO AUX jacks on the...
...Zone 2 79 Controlling Zone 2 80 Advanced setup 82 ADDITIONAL INFORMATION Troubleshooting 84 Glossary 94 Specifications 97 Index 98 APPENDIX (at the end of this manual for the information about each position of the parts. • The symbol "☞ " with this unit 8 PREPARATION Connections 9 Rear panel 9... on HDMI 14 Audio and video signal flow 15 Connecting video components 16 Connecting other components 17 Connecting audio components 19 Connecting a Yamaha iPod™ universal dock or Bluetooth™ adapter 20 Using REMOTE IN/OUT jacks 20 Using the VIDEO AUX jacks on the...
Owner's Manual
Page 11
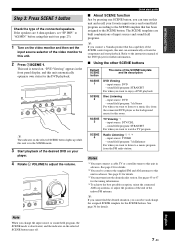
...speakers, set the input source selector of the SCENE template and its description DVD Viewing - sound field program: 7ch Enhancer For when you connect a Yamaha product that has been assigned to adjust the volume. See page 18 for further information. ■ Using the other SCENE buttons Default SCENE button ...SCENE 1 SCENE 2 SCENE 3 SCENE 4 The name of the video monitor to this unit is in advance. Refer to the instruction manual of the DVD player for details. *2 You need to connect the supplied FM and AM antennas to a music program from the connected DVD player ...
...speakers, set the input source selector of the SCENE template and its description DVD Viewing - sound field program: 7ch Enhancer For when you connect a Yamaha product that has been assigned to adjust the volume. See page 18 for further information. ■ Using the other SCENE buttons Default SCENE button ...SCENE 1 SCENE 2 SCENE 3 SCENE 4 The name of the video monitor to this unit is in advance. Refer to the instruction manual of the DVD player for details. *2 You need to connect the supplied FM and AM antennas to a music program from the connected DVD player ...

Owner's Manual
Page 12
...9632; Customizing the SCENE templates • Using various SCENE templates ☞ P. 30 • Creating your listening room (AUTO SETUP) ☞ P. 26 • Manually adjusting various parameters of this unit ☞ P. 63 • Setting the remote control ☞ P. 76 • Adjusting the advanced parameters ☞ P. 82 ...this unit to the standby mode. Press AMAIN ZONE ON/OFF on this unit ☞ P. 39 8 En What do you want to receive infrared signals from the standby mode, press AMAIN ZONE ON/OFF (or HPOWER). See page 23 for your original SCENE templates ☞ ...
...9632; Customizing the SCENE templates • Using various SCENE templates ☞ P. 30 • Creating your listening room (AUTO SETUP) ☞ P. 26 • Manually adjusting various parameters of this unit ☞ P. 63 • Setting the remote control ☞ P. 76 • Adjusting the advanced parameters ☞ P. 82 ...this unit to the standby mode. Press AMAIN ZONE ON/OFF on this unit ☞ P. 39 8 En What do you want to receive infrared signals from the standby mode, press AMAIN ZONE ON/OFF (or HPOWER). See page 23 for your original SCENE templates ☞ ...
Owner's Manual
Page 16
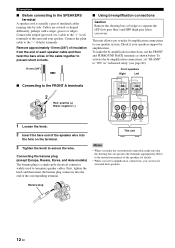
... use the FRONT and SURROUND BACK terminals as shown below. R FRONT A L SURROUND BACK/BI-AMP R L SINGLE This unit Notes • When you to the instruction manuals of this unit and your speakers support biamplification. Refer to make the bi-amplification connections, use surround back speakers. Connect the plain cable to "ON...
... use the FRONT and SURROUND BACK terminals as shown below. R FRONT A L SURROUND BACK/BI-AMP R L SINGLE This unit Notes • When you to the instruction manuals of this unit and your speakers support biamplification. Refer to make the bi-amplification connections, use surround back speakers. Connect the plain cable to "ON...

Owner's Manual
Page 24
..., set "SCENE IR" in XM PB SIRIUS DTV/CBL Y B DVR C DOCK ANTENNA AM GND SURROUND BAC R Yamaha iPod universal dock or Bluetooth adapter Infrared signal receiver or Yamaha component Yamaha component (CD or DVD player, etc.) y • If the components have the capability of the transmission of the remote control ...with the monaural analog mini cable as YBA-10, sold separately). DVD IN1 REMOTE IN OUT +12V 15mA MAX. Refer to the owner's manuals for details about the capability of the SCENE control signals of the components. • If the component connected to the remote control input ...
..., set "SCENE IR" in XM PB SIRIUS DTV/CBL Y B DVR C DOCK ANTENNA AM GND SURROUND BAC R Yamaha iPod universal dock or Bluetooth adapter Infrared signal receiver or Yamaha component Yamaha component (CD or DVD player, etc.) y • If the components have the capability of the transmission of the remote control ...with the monaural analog mini cable as YBA-10, sold separately). DVD IN1 REMOTE IN OUT +12V 15mA MAX. Refer to the owner's manuals for details about the capability of the SCENE control signals of the components. • If the component connected to the remote control input ...
Owner's Manual
Page 30
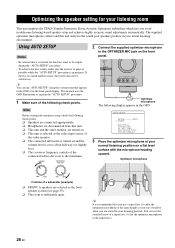
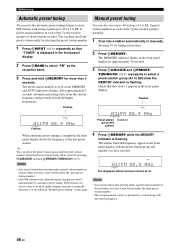
... turned on and the volume level is set to the OPTIMIZER MIC jack on a flat level surface with the microphone heading upward. This manual uses the OSD illustrations to be satisfactory. START Automatic Processing of the video monitor. ❏ The connected subwoofer is turned on . ❏.... Using AUTO SETUP Notes • Be advised that appears in the OSD or in your listening room This unit employs the YPAO (Yamaha Parametric Room Acoustic Optimizer) technology which lets you are disconnected from this unit analyzes the sound your listening position. OPTIMIZER MIC O/MAN'L ...
... turned on and the volume level is set to the OPTIMIZER MIC jack on a flat level surface with the microphone heading upward. This manual uses the OSD illustrations to be satisfactory. START Automatic Processing of the video monitor. ❏ The connected subwoofer is turned on . ❏.... Using AUTO SETUP Notes • Be advised that appears in the OSD or in your listening room This unit employs the YPAO (Yamaha Parametric Room Acoustic Optimizer) technology which lets you are disconnected from this unit analyzes the sound your listening position. OPTIMIZER MIC O/MAN'L ...

Owner's Manual
Page 32
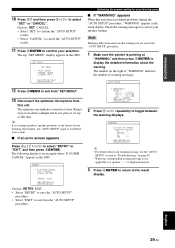
... follows. Results of your listening room The display changes as follows. p Optimizing the speaker setting for your speakers. 9 Press 8ENTER to return to manually adjust each parameter, run "MANUAL SETUP" (see page 29). START Automatic Processing of all item [ ]/[ ]:Up/Down [ENTER]:Start 7 Press 8k and 8ENTER to display the setup results...
... follows. Results of your listening room The display changes as follows. p Optimizing the speaker setting for your speakers. 9 Press 8ENTER to return to manually adjust each parameter, run "MANUAL SETUP" (see page 29). START Automatic Processing of all item [ ]/[ ]:Up/Down [ENTER]:Start 7 Press 8k and 8ENTER to display the setup results...
Owner's Manual
Page 33
... confirm the "AUTO SETUP" results. • Select "CANCEL" to cancel the "AUTO SETUP" results. 11 Press 8ENTER to heat. SET MENU TOP MENU . ;AUTO SETUP ;MANUAL SETUP .A;SIGNAL INFO [ ]/[ ]:Up/Down [ENTER]:Enter Optimizing the speaker setting for your listening room ■ If "WARNING" appears When this unit. Keep it on...
... confirm the "AUTO SETUP" results. • Select "CANCEL" to cancel the "AUTO SETUP" results. 11 Press 8ENTER to heat. SET MENU TOP MENU . ;AUTO SETUP ;MANUAL SETUP .A;SIGNAL INFO [ ]/[ ]:Up/Down [ENTER]:Enter Optimizing the speaker setting for your listening room ■ If "WARNING" appears When this unit. Keep it on...
Owner's Manual
Page 42
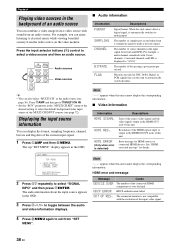
... corresponding information. ■ Video information Information HDMI SIGNAL HDMI RES. Flag data encoded in the OSD. OUT OF RES. SET MENU TOP MENU . ;AUTO SETUP ;MANUAL SETUP .A;SIGNAL INFO [ ]/[ ]:Up/Down [ENTER]:Enter 2 Press 8n repeatedly to automatically switch decoders. When this unit.
... corresponding information. ■ Video information Information HDMI SIGNAL HDMI RES. Flag data encoded in the OSD. OUT OF RES. SET MENU TOP MENU . ;AUTO SETUP ;MANUAL SETUP .A;SIGNAL INFO [ ]/[ ]:Up/Down [ENTER]:Enter 2 Press 8n repeatedly to automatically switch decoders. When this unit.
Owner's Manual
Page 49
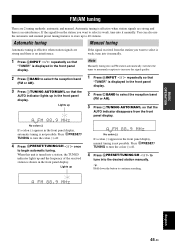
... the station you want to select is no interference. Note Manually tuning into a station, the TUNED indicator lights up and the frequency of the received station is weak, tune into it manually. Lights up to continue searching. BASIC OPERATION FM/AM TUNING FM/AM tuning There are strong ...and there is weak, tune into the desired station manually. You can also use the automatic and manual preset tuning features ...
... the station you want to select is no interference. Note Manually tuning into a station, the TUNED indicator lights up and the frequency of the received station is weak, tune into it manually. Lights up to continue searching. BASIC OPERATION FM/AM TUNING FM/AM tuning There are strong ...and there is weak, tune into the desired station manually. You can also use the automatic and manual preset tuning features ...
Owner's Manual
Page 50
...the preset station number. 1 Press RINPUT l / h repeatedly so that the colon (:) appears in each of the 5 preset station groups) manually. 1 Tune into it manually and store it as the reception band. 3 Press and hold HMEMORY for more than 3 seconds. After approximately 5 seconds, automatic presetting starts ... preset station groups) of the last preset station. You can select the preset station group and the preset station number where the first received station will be stored by automatic preset tuning. If the station you want to select "FM" as described in signal strength, tune ...
...the preset station number. 1 Press RINPUT l / h repeatedly so that the colon (:) appears in each of the 5 preset station groups) manually. 1 Tune into it manually and store it as the reception band. 3 Press and hold HMEMORY for more than 3 seconds. After approximately 5 seconds, automatic presetting starts ... preset station groups) of the last preset station. You can select the preset station group and the preset station number where the first received station will be stored by automatic preset tuning. If the station you want to select "FM" as described in signal strength, tune ...
Owner's Manual
Page 57
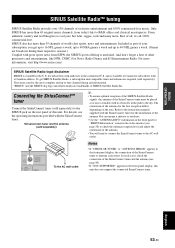
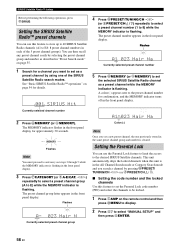
.... From authentic country and real bluegrass to R&B, oldies and classical masterpieces. Connecting the SiriusConnect™ tuner Connect the SiriusConnect tuner (sold separately) to the instruction manuals supplied with the SiriusConnect tuner for the installation of world-class sports, news and entertainment. Refer to the SIRIUS jack on the area. XM PB...
.... From authentic country and real bluegrass to R&B, oldies and classical masterpieces. Connecting the SiriusConnect™ tuner Connect the SiriusConnect tuner (sold separately) to the instruction manuals supplied with the SiriusConnect tuner for the installation of world-class sports, news and entertainment. Refer to the SIRIUS jack on the area. XM PB...
Owner's Manual
Page 60
... mode" on page 55. 1 Search for details. 001 SIRIUS Hit 4 Press GPRESET/TUNING/CH l / h (or 8PRESET/CH k / n) repeatedly to select a preset channel number (1 to select "MANUAL SETUP" and then press 8ENTER. 56 En Currently selected channel number 2 Press HMEMORY (or 9MEMORY). The preset channel group letter appears in the front panel...
... mode" on page 55. 1 Search for details. 001 SIRIUS Hit 4 Press GPRESET/TUNING/CH l / h (or 8PRESET/CH k / n) repeatedly to select a preset channel number (1 to select "MANUAL SETUP" and then press 8ENTER. 56 En Currently selected channel number 2 Press HMEMORY (or 9MEMORY). The preset channel group letter appears in the front panel...
Owner's Manual
Page 67
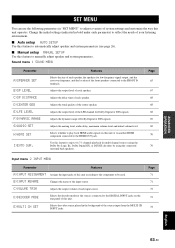
... your listening environment. ■ Auto setup AUTO SETUP Use this feature to automatically adjust speaker and system parameters (see page 26). ■ Manual setup MANUAL SETUP Use this feature to manually adjust speaker and system parameters. Page 71 71 72 72 72 ADVANCED OPERATION English 63 En Adjusts the tonal quality of Dolby...
... your listening environment. ■ Auto setup AUTO SETUP Use this feature to automatically adjust speaker and system parameters (see page 26). ■ Manual setup MANUAL SETUP Use this feature to manually adjust speaker and system parameters. Page 71 71 72 72 72 ADVANCED OPERATION English 63 En Adjusts the tonal quality of Dolby...
Owner's Manual
Page 68
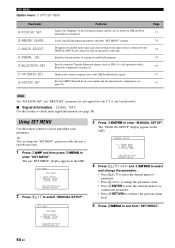
... the current reception level of sound field programs. Pair the connected Yamaha Bluetooth adapter (such as YBA-10, sold separately) with a Bluetooth component (see page 56). p p p p Using SET MENU Use the remote control to enter "MANUAL SETUP". SET MENU TOPAMENU ;AUTO SETUP .A;MANUAL SETUP ;SIGNAL INFO [ ]/[ ]:Up/Down [ENTER]:Enter p p 3 Press 8ENTER to...
... the current reception level of sound field programs. Pair the connected Yamaha Bluetooth adapter (such as YBA-10, sold separately) with a Bluetooth component (see page 56). p p p p Using SET MENU Use the remote control to enter "MANUAL SETUP". SET MENU TOPAMENU ;AUTO SETUP .A;MANUAL SETUP ;SIGNAL INFO [ ]/[ ]:Up/Down [ENTER]:Enter p p 3 Press 8ENTER to...
Owner's Manual
Page 69
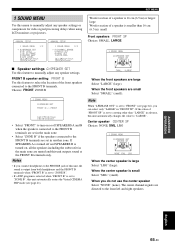
...not use the center speaker Select "NONE" (none). A)SPEAKER SET B)SP LEVEL C)SP DISTANCE D)CENTER GEQ E)LFE LEVEL [ ]/[ ]:Up/Down [ENTER]:Enter ;MANUAL SETUP 1 SOUND MENU 2/2 . If SPEAKERS A is set in the main zone are muted and this unit outputs sound at the FRONT B terminals only. When ...the front speakers are directed to the front left and right speakers. SET MENU 1 SOUND MENU Use this menu to manually adjust any speaker settings. SMALL >LARGE When the front speakers are set to "ZONE B", this feature to select the location of a speaker is...
...not use the center speaker Select "NONE" (none). A)SPEAKER SET B)SP LEVEL C)SP DISTANCE D)CENTER GEQ E)LFE LEVEL [ ]/[ ]:Up/Down [ENTER]:Enter ;MANUAL SETUP 1 SOUND MENU 2/2 . If SPEAKERS A is set in the main zone are muted and this unit outputs sound at the FRONT B terminals only. When ...the front speakers are directed to the front left and right speakers. SET MENU 1 SOUND MENU Use this menu to manually adjust any speaker settings. SMALL >LARGE When the front speakers are set to "ZONE B", this feature to select the location of a speaker is...
Owner's Manual
Page 71
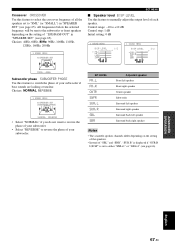
... LEVEL 1/2 -__________+ . FR.L FR.R CNTR SWFR 1 SOUND MENU B)SP LEVEL 2/2 -__________+ .SUR.L SUR.R SBL SBR FREQ;;;80Hz Subwoofer phase SUBWOOFER PHASE Use this feature to manually adjust the output level of each speaker. Choices: NORMAL, REVERSE 1 SOUND MENU A)SPEAKER SET SUBWOOFER PHASE >NORMAL REVERSE • Select "NORMAL" if you do not...
... LEVEL 1/2 -__________+ . FR.L FR.R CNTR SWFR 1 SOUND MENU B)SP LEVEL 2/2 -__________+ .SUR.L SUR.R SBL SBR FREQ;;;80Hz Subwoofer phase SUBWOOFER PHASE Use this feature to manually adjust the output level of each speaker. Choices: NORMAL, REVERSE 1 SOUND MENU A)SPEAKER SET SUBWOOFER PHASE >NORMAL REVERSE • Select "NORMAL" if you do not...


