Owners Manual
Page 2
... Playing back tunes from Bluetooth™ components....... 35 Connecting a Yamaha Bluetooth wireless audio receiver 35 Pairing Bluetooth™ components 35 Using Bluetooth™ components 36 SETUP Configuring the settings specific for each input source (Option menu 37 Option menu display... configured as needed (Advanced Setup menu 53 Displaying/Setting the Advanced Setup menu 53 Setting the impedance of speakers 53 Avoiding crossing remote control signals when using multiple Yamaha receivers 54 Initializing various settings for this unit 54 APPENDIX Troubleshooting 55 General 55...
... Playing back tunes from Bluetooth™ components....... 35 Connecting a Yamaha Bluetooth wireless audio receiver 35 Pairing Bluetooth™ components 35 Using Bluetooth™ components 36 SETUP Configuring the settings specific for each input source (Option menu 37 Option menu display... configured as needed (Advanced Setup menu 53 Displaying/Setting the Advanced Setup menu 53 Setting the impedance of speakers 53 Avoiding crossing remote control signals when using multiple Yamaha receivers 54 Initializing various settings for this unit 54 APPENDIX Troubleshooting 55 General 55...

Owners Manual
Page 3
... listening environment - Speaker layout...10 - Subwoofer cable connection ...12 ■ Acoustic parameter adjustment to 5.1-channel configurations - Speaker impedance configuration...10 - Setting for 2- Specifying the settings for each speaker 41 - Speaker distance settings ...42 - Sound quality control with the equalizer INTRODUCTION Features and capabilities ■ Built-in high-quality, high-power 5-channel amplifier ■...
... listening environment - Speaker layout...10 - Subwoofer cable connection ...12 ■ Acoustic parameter adjustment to 5.1-channel configurations - Speaker impedance configuration...10 - Setting for 2- Specifying the settings for each speaker 41 - Speaker distance settings ...42 - Sound quality control with the equalizer INTRODUCTION Features and capabilities ■ Built-in high-quality, high-power 5-channel amplifier ■...
Owners Manual
Page 4
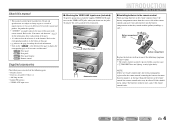
... operated within a narrow range. • bTRANSMIT does not light up, or only lights dimly. About this should occur, replace the batteries with new ones, and set the remote control codes. In case of differences between the manual and product, the product has priority. • "dHDMI1" (example) indicates the name of the...
... operated within a narrow range. • bTRANSMIT does not light up, or only lights dimly. About this should occur, replace the batteries with new ones, and set the remote control codes. In case of differences between the manual and product, the product has priority. • "dHDMI1" (example) indicates the name of the...
Owners Manual
Page 5
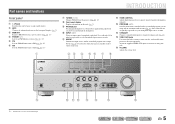
... the volume level. PHONES SILENT CINEMA i J 1 : Usable when you are using this jack. J1 d PRESET j / i Selects an FM/AM preset station (☞p. 32). J1 f AM Sets the FM/AM tuner band to cycle through the input sources in order. J1 a INTRODUCTION g TUNING jj / ii Changes FM/AM tuner frequencies (☞p. 30...
... the volume level. PHONES SILENT CINEMA i J 1 : Usable when you are using this jack. J1 d PRESET j / i Selects an FM/AM preset station (☞p. 32). J1 f AM Sets the FM/AM tuner band to cycle through the input sources in order. J1 a INTRODUCTION g TUNING jj / ii Changes FM/AM tuner frequencies (☞p. 30...
Owners Manual
Page 7
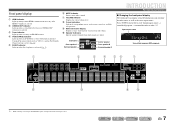
...effect that uses CINEMA DSP technology is active (☞p. 34). h Cursor indicators Light up if corresponding cursors on menu items and settings. i Multi information display Displays a range of information on the remote control are available for operations. J1 Input source name HDMI1 ...the current volume level. j Speaker indicators Indicate speaker terminals from which signals are selected. Press fINFO repeatedly to cycle through an optional Yamaha iPod universal dock (such as the active input source. En 7 b CINEMA DSP indicator Lights up when receiving an FM/AM ...
...effect that uses CINEMA DSP technology is active (☞p. 34). h Cursor indicators Light up if corresponding cursors on menu items and settings. i Multi information display Displays a range of information on the remote control are available for operations. J1 Input source name HDMI1 ...the current volume level. j Speaker indicators Indicate speaker terminals from which signals are selected. Press fINFO repeatedly to cycle through an optional Yamaha iPod universal dock (such as the active input source. En 7 b CINEMA DSP indicator Lights up when receiving an FM/AM ...

Owners Manual
Page 8
... activated. These keys are using the tuner input. Presets radio stations. for external component operations (☞p. 50, p. 54). n CODE SET Sets remote control codes for external components. Sleep 90min. r VOLUME +/- Adjusts the volume level (☞p. 25). s MUTE Turns the mute ...panel VIDEO AUX jacks [A]/[B] Changes the external component you wish to place itself in standby mode to playback. J1 DOCK A Yamaha iPod universal dock or Bluetooth wireless audio receiver connected to AM. INTRODUCTION Part names and functions i SETUP Displays a detailed Setup...
... activated. These keys are using the tuner input. Presets radio stations. for external component operations (☞p. 50, p. 54). n CODE SET Sets remote control codes for external components. Sleep 90min. r VOLUME +/- Adjusts the volume level (☞p. 25). s MUTE Turns the mute ...panel VIDEO AUX jacks [A]/[B] Changes the external component you wish to place itself in standby mode to playback. J1 DOCK A Yamaha iPod universal dock or Bluetooth wireless audio receiver connected to AM. INTRODUCTION Part names and functions i SETUP Displays a detailed Setup...
Owners Manual
Page 10
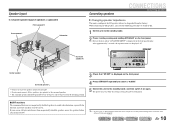
...the speakers farther away from the listening position. When connecting to 6Ω speakers, carry out the following procedure to switch to 6Ω. 1 Set this unit to the standby mode. 2 Press A while pressing and holding STRAIGHT on the Advanced Setup menu (☞p. 53). After approximately 3...section on "Extended functionality that can be placed between 60 degrees and 80 degrees from your TV. The power turns on, when the settings you use magnetically shielded speakers to the surround speakers. • The surround speakers should be configured as needed (Advanced Setup menu)" for...
...the speakers farther away from the listening position. When connecting to 6Ω speakers, carry out the following procedure to switch to 6Ω. 1 Set this unit to the standby mode. 2 Press A while pressing and holding STRAIGHT on the Advanced Setup menu (☞p. 53). After approximately 3...section on "Extended functionality that can be placed between 60 degrees and 80 degrees from your TV. The power turns on, when the settings you use magnetically shielded speakers to the surround speakers. • The surround speakers should be configured as needed (Advanced Setup menu)" for...
Owners Manual
Page 12
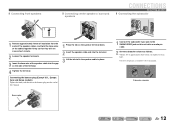
... the subwoofer input jack to approximately half volume (or slightly less than half). Volume: Set to the SUBWOOFER jack on this unit with an audio pin cable. 2 Set the subwoofer volume as follows. Crossover frequency (if available): Set to fix the speaker cable in place. VOLUME CROSSOVER/ HIGH CUT MIN MAX MIN MAX...
... the subwoofer input jack to approximately half volume (or slightly less than half). Volume: Set to the SUBWOOFER jack on this unit with an audio pin cable. 2 Set the subwoofer volume as follows. Crossover frequency (if available): Set to fix the speaker cable in place. VOLUME CROSSOVER/ HIGH CUT MIN MAX MIN MAX...
Owners Manual
Page 14
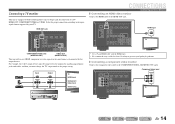
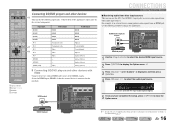
... input Component video input Video input • Use a 19-pin HDMI cable with the following three types of output jack for connection to the proper setting.
... input Component video input Video input • Use a 19-pin HDMI cable with the following three types of output jack for connection to the proper setting.
Owners Manual
Page 16
...input (HDMI1-4) that the external device is displayed, and then press jENTER. 4 Press jCursor D / E to one of the HDMI1-4 jacks. SOURCE 1 1 5 TRANSMIT CODE SET SLEEP RECEIVER HDMI 2 3 4 AV 2 3 4 AUDIO 1 2 V-AUX [ A ] [ B ] DOCK TUNER FM AM PRESET TUNING INFO MEMORY MOVIE ENHANCER SUR. ... 3 OPTICAL ( TV ) AV 4 AV 5 AV OUT AUDIO 1 AUDIO 2 AUDIO OUT J 1 : See the section on "Configuring the settings specific for each input source (Option menu)" for playback. Connect them to change the audio input. DECODE MUSIC STEREO STRAIGHT BD DVD SETUP SCENE TV...
...input (HDMI1-4) that the external device is displayed, and then press jENTER. 4 Press jCursor D / E to one of the HDMI1-4 jacks. SOURCE 1 1 5 TRANSMIT CODE SET SLEEP RECEIVER HDMI 2 3 4 AV 2 3 4 AUDIO 1 2 V-AUX [ A ] [ B ] DOCK TUNER FM AM PRESET TUNING INFO MEMORY MOVIE ENHANCER SUR. ... 3 OPTICAL ( TV ) AV 4 AV 5 AV OUT AUDIO 1 AUDIO 2 AUDIO OUT J 1 : See the section on "Configuring the settings specific for each input source (Option menu)" for playback. Connect them to change the audio input. DECODE MUSIC STEREO STRAIGHT BD DVD SETUP SCENE TV...
Owners Manual
Page 22
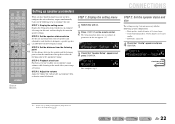
... ENTER VOLUME RETURN DISPLAY TOP MENU REC POP-UP MENU MUTE 1 2 3 4 5 6 7 8 9 INPUT MUTE 0 10 TV TV VOL TV CH ENT Setting up speaker parameters When you to designate a specific speaker i (or subwoofer) for low-frequency sound. STEP 4: Playback a test tone Playback a test tone to allow... you to configure sound volumes while listening to configure this unit, and then display the menu for this unit. STEP 1: Display the setting menu Display the Setup menu from each speaker and configure them so that "Speaker Setup" appears and press jENTER. Subwoofer;;Yes SW L...
... ENTER VOLUME RETURN DISPLAY TOP MENU REC POP-UP MENU MUTE 1 2 3 4 5 6 7 8 9 INPUT MUTE 0 10 TV TV VOL TV CH ENT Setting up speaker parameters When you to designate a specific speaker i (or subwoofer) for low-frequency sound. STEP 4: Playback a test tone Playback a test tone to allow... you to configure sound volumes while listening to configure this unit, and then display the menu for this unit. STEP 1: Display the setting menu Display the Setup menu from each speaker and configure them so that "Speaker Setup" appears and press jENTER. Subwoofer;;Yes SW L...

Owners Manual
Page 23
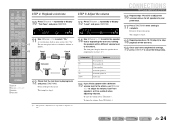
...speakers (On). LR Selects the size of the surround speakers. This completes step 2. This completes step 3. When you have completed the settings for one speaker, repeat the same procedure for all speakers to 24.0 m) When you do not have surround speakers connected. meters ...Crossover Audio with a frequency below this limit will be output from the listening point 7 Press jCursor C to the previous menu. CONNECTIONS Setting up speaker parameters 8 Press jCursor B / C to select the speaker (subwoofer) you can change the distance. DECODE MUSIC STEREO ...
...speakers (On). LR Selects the size of the surround speakers. This completes step 2. This completes step 3. When you have completed the settings for one speaker, repeat the same procedure for all speakers to 24.0 m) When you do not have surround speakers connected. meters ...Crossover Audio with a frequency below this limit will be output from the listening point 7 Press jCursor C to the previous menu. CONNECTIONS Setting up speaker parameters 8 Press jCursor B / C to select the speaker (subwoofer) you can change the distance. DECODE MUSIC STEREO ...
Owners Manual
Page 24
... speaker Surround speaker L Surround speaker R Subwoofer 15 If you find a speaker with a different volume level to close the Setup menu. SOURCE 1 1 5 TRANSMIT CODE SET SLEEP RECEIVER HDMI 2 3 4 AV 2 3 4 AUDIO 1 2 V-AUX [ A ] [ B ] DOCK TUNER FM AM PRESET TUNING INFO MEMORY MOVIE ENHANCER ... jCursor D. This completes step 4. STEP 5: Adjust the volume 13 Press jCursor B repeatedly to select "On." LEVEL VOL. J1 CONNECTIONS Setting up speaker parameters 16 Repeat steps 14 and 15 to adjust the volume balance for use jCursor D / E to the previous menu....
... speaker Surround speaker L Surround speaker R Subwoofer 15 If you find a speaker with a different volume level to close the Setup menu. SOURCE 1 1 5 TRANSMIT CODE SET SLEEP RECEIVER HDMI 2 3 4 AV 2 3 4 AUDIO 1 2 V-AUX [ A ] [ B ] DOCK TUNER FM AM PRESET TUNING INFO MEMORY MOVIE ENHANCER ... jCursor D. This completes step 4. STEP 5: Adjust the volume 13 Press jCursor B repeatedly to select "On." LEVEL VOL. J1 CONNECTIONS Setting up speaker parameters 16 Repeat steps 14 and 15 to adjust the volume balance for use jCursor D / E to the previous menu....

Owners Manual
Page 25
... again to mute the audio output. Adjusting high/low-frequency sound (Tone control) You can be set the balance extremely off, sounds may not match those frequency ranges. If you set separately. PLAYBACK SOURCE 1 1 5 TRANSMIT CODE SET SLEEP RECEIVER HDMI 2 3 4 AV 2 3 4 AUDIO 1 2 V-AUX [ A ] [ B ] DOCK TUNER FM AM... INFO MEMORY PRESET FM AM INPUT BD DVD SCENE TV CD TONE CONTROL PROGRAM RADIO STRAIGHT PROGRAM l / h The current setting is displayed for details on the front panel display as the source input, or select a radio station on the tuner...
... again to mute the audio output. Adjusting high/low-frequency sound (Tone control) You can be set the balance extremely off, sounds may not match those frequency ranges. If you set separately. PLAYBACK SOURCE 1 1 5 TRANSMIT CODE SET SLEEP RECEIVER HDMI 2 3 4 AV 2 3 4 AUDIO 1 2 V-AUX [ A ] [ B ] DOCK TUNER FM AM... INFO MEMORY PRESET FM AM INPUT BD DVD SCENE TV CD TONE CONTROL PROGRAM RADIO STRAIGHT PROGRAM l / h The current setting is displayed for details on the front panel display as the source input, or select a radio station on the tuner...
Owners Manual
Page 26
...8226; If the sampling frequency of sound decoders. Choose a sound field program that allows you to register. 3 Press the hSCENE key until "SET Complete" appears on the chip, and a range of an input source is also equipped with one key. DECODE repeatedly Switches Straight decoding mode ... to register. 2 Use the gSound selection keys to select the sound field program you change input sources and sound field programs with a Yamaha digital sound field processing (DSP) chip. When changing "SCENE," you are available for movies, music and other uses. DECODE MUSIC STEREO ...
...8226; If the sampling frequency of sound decoders. Choose a sound field program that allows you to register. 3 Press the hSCENE key until "SET Complete" appears on the chip, and a range of an input source is also equipped with one key. DECODE repeatedly Switches Straight decoding mode ... to register. 2 Use the gSound selection keys to select the sound field program you change input sources and sound field programs with a Yamaha digital sound field processing (DSP) chip. When changing "SCENE," you are available for movies, music and other uses. DECODE MUSIC STEREO ...
Owners Manual
Page 27
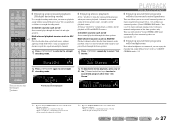
... selected. MOVIE Sci-Fi VOL. STEREO VOL. 2ch Stereo SW L R 2 To deactivate stereo playback, press any surround speakers (Virtual CINEMA DSP mode). SOURCE 1 1 5 TRANSMIT CODE SET SLEEP RECEIVER HDMI 2 3 4 AV 2 3 4 AUDIO 1 2 V-AUX [ A ] [ B ] DOCK TUNER FM AM PRESET TUNING INFO MEMORY MOVIE ENHANCER SUR.
... selected. MOVIE Sci-Fi VOL. STEREO VOL. 2ch Stereo SW L R 2 To deactivate stereo playback, press any surround speakers (Virtual CINEMA DSP mode). SOURCE 1 1 5 TRANSMIT CODE SET SLEEP RECEIVER HDMI 2 3 4 AV 2 3 4 AUDIO 1 2 V-AUX [ A ] [ B ] DOCK TUNER FM AM PRESET TUNING INFO MEMORY MOVIE ENHANCER SUR.
Owners Manual
Page 30
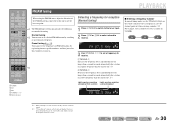
... 5 J 1 : When searching for tuning. J 2 : "Wrong Station!" FM 87.5 MHz SW L CR SL SR 3 Use eTUNING H / I to set a frequency to a desired FM/AM station by registering them to specific numbers, and later just select those numbers to tune in to receive. SOURCE 1 1 5 TRANSMIT... CODE SET SLEEP RECEIVER HDMI 2 3 4 AV 2 3 4 AUDIO 1 2 V-AUX [ A ] [ B ] DOCK TUNER FM AM PRESET TUNING INFO MEMORY MOVIE ...
... 5 J 1 : When searching for tuning. J 2 : "Wrong Station!" FM 87.5 MHz SW L CR SL SR 3 Use eTUNING H / I to set a frequency to a desired FM/AM station by registering them to specific numbers, and later just select those numbers to tune in to receive. SOURCE 1 1 5 TRANSMIT... CODE SET SLEEP RECEIVER HDMI 2 3 4 AV 2 3 4 AUDIO 1 2 V-AUX [ A ] [ B ] DOCK TUNER FM AM PRESET TUNING INFO MEMORY MOVIE ...
Owners Manual
Page 31
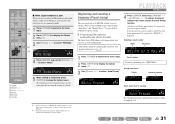
...C to start the Auto Preset function. Auto Preset will begin approximately 5 seconds after "READY" is displayed. J2 En 31 FM Mode:Mono 5 When setting is complete. J 1 : See the section on the Option menu (☞p. 37). PLAYBACK FM/AM tuning 4 Press jENTER, then press ePRESET F /..., you can register up to 40 automatically. Use one of presetting stations, "Auto Preset" and "Manual Preset." SOURCE 1 1 5 TRANSMIT CODE SET SLEEP RECEIVER HDMI 2 3 4 AV 2 3 4 AUDIO 1 2 ■ When signal reception is poor When you are two methods of these...
...C to start the Auto Preset function. Auto Preset will begin approximately 5 seconds after "READY" is displayed. J2 En 31 FM Mode:Mono 5 When setting is complete. J 1 : See the section on the Option menu (☞p. 37). PLAYBACK FM/AM tuning 4 Press jENTER, then press ePRESET F /..., you can register up to 40 automatically. Use one of presetting stations, "Auto Preset" and "Manual Preset." SOURCE 1 1 5 TRANSMIT CODE SET SLEEP RECEIVER HDMI 2 3 4 AV 2 3 4 AUDIO 1 2 ■ When signal reception is poor When you are two methods of these...
Owners Manual
Page 32
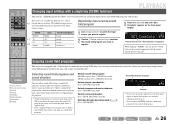
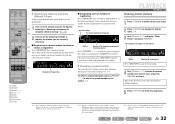
To cancel registration, press jRETURN or do not operate the remote control for details on "Configuring the settings specific for each input source (Option menu)" for about 30 seconds. ■ Recalling a preset station You can call preset... press jENTER to which no stations are registered will appear. SW L CR SL SR Blinks Empty, or the frequency registered most recently). SOURCE 1 1 5 TRANSMIT CODE SET SLEEP RECEIVER HDMI 2 3 4 AV 2 3 4 AUDIO 1 2 V-AUX [ A ] [ B ] DOCK TUNER FM AM PRESET TUNING INFO MEMORY MOVIE ENHANCER SUR. Press ePRESET F / G...
To cancel registration, press jRETURN or do not operate the remote control for details on "Configuring the settings specific for each input source (Option menu)" for about 30 seconds. ■ Recalling a preset station You can call preset... press jENTER to which no stations are registered will appear. SW L CR SL SR Blinks Empty, or the frequency registered most recently). SOURCE 1 1 5 TRANSMIT CODE SET SLEEP RECEIVER HDMI 2 3 4 AV 2 3 4 AUDIO 1 2 V-AUX [ A ] [ B ] DOCK TUNER FM AM PRESET TUNING INFO MEMORY MOVIE ENHANCER SUR. Press ePRESET F / G...
Owners Manual
Page 33
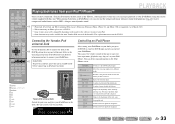
Connecting the Yamaha iPod universal dock Use the dedicated cable to connect the dock to DOCK input and you have selected. iPod connected SW L CR SL SR Controlling an iPod/iPhone After setting your iPod/iPhone in your iPod/iPhone. Searches forwards while held down. Skips to carry ... d DOCK j Cursor B / C / D / E j ENTER ks ke kp kw kf k b ka Playing back tunes from an iPod/iPhone, you have connected a Yamaha iPod universal dock (such as MP3 a sharper, more dynamic sound. When playing back from your iPod/iPhone using the remote control supplied with each press...
Connecting the Yamaha iPod universal dock Use the dedicated cable to connect the dock to DOCK input and you have selected. iPod connected SW L CR SL SR Controlling an iPod/iPhone After setting your iPod/iPhone in your iPod/iPhone. Searches forwards while held down. Skips to carry ... d DOCK j Cursor B / C / D / E j ENTER ks ke kp kw kf k b ka Playing back tunes from an iPod/iPhone, you have connected a Yamaha iPod universal dock (such as MP3 a sharper, more dynamic sound. When playing back from your iPod/iPhone using the remote control supplied with each press...


