Owners Manual
Page 2
... (Advanced Setup menu 53 Displaying/Setting the Advanced Setup menu 53 Setting the impedance of speakers 53 Avoiding crossing remote control signals when using multiple Yamaha receivers 54 Initializing various settings for this unit 54 APPENDIX Troubleshooting 55 General 55 HDMI 57 Tuner (FM/AM ...58 Remote control 59 iPod™/iPhone 59 Bluetooth 60 Glossary 61 Audio information 61 Sound field program information 61 ...
... (Advanced Setup menu 53 Displaying/Setting the Advanced Setup menu 53 Setting the impedance of speakers 53 Avoiding crossing remote control signals when using multiple Yamaha receivers 54 Initializing various settings for this unit 54 APPENDIX Troubleshooting 55 General 55 HDMI 57 Tuner (FM/AM ...58 Remote control 59 iPod™/iPhone 59 Bluetooth 60 Glossary 61 Audio information 61 Sound field program information 61 ...

Owners Manual
Page 3
to match your speakers and listening environment - Speaker layout...10 - Speaker distance settings ...42 - Volume control for each speaker...42 - Speaker channels and functions ...9 - Subwoofer cable connection ...12 ■ Acoustic parameter adjustment to 5.1-channel configurations - Specifying the settings for each speaker 41 - Speaker cable connection...10 - Speaker impedance configuration...10 - Sound quality control with the equalizer Setting for 2- INTRODUCTION Features and capabilities ■ Built-in high-quality, high-power 5-channel amplifier ■...
to match your speakers and listening environment - Speaker layout...10 - Speaker distance settings ...42 - Volume control for each speaker...42 - Speaker channels and functions ...9 - Subwoofer cable connection ...12 ■ Acoustic parameter adjustment to 5.1-channel configurations - Specifying the settings for each speaker 41 - Speaker cable connection...10 - Speaker impedance configuration...10 - Sound quality control with the equalizer Setting for 2- INTRODUCTION Features and capabilities ■ Built-in high-quality, high-power 5-channel amplifier ■...
Owners Manual
Page 4
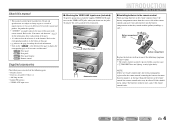
...printed prior to the "Part names and functions" (☞p. 5) for more than two minutes, or leaving exhausted batteries in the remote control, the remote control codes may be operated within a narrow range. • bTRANSMIT does not light up, or only lights dimly. NOTE ...bottom of it. Attach the cover PUSH Remove the cover INTRODUCTION Features and capabilities ■ Installing batteries in the remote control When inserting batteries in the remote control, remove the battery compartment cover from the reverse side of improvements, etc. Refer to production. About this ...
...printed prior to the "Part names and functions" (☞p. 5) for more than two minutes, or leaving exhausted batteries in the remote control, the remote control codes may be operated within a narrow range. • bTRANSMIT does not light up, or only lights dimly. NOTE ...bottom of it. Attach the cover PUSH Remove the cover INTRODUCTION Features and capabilities ■ Installing batteries in the remote control When inserting batteries in the remote control, remove the battery compartment cover from the reverse side of improvements, etc. Refer to production. About this ...
Owners Manual
Page 7
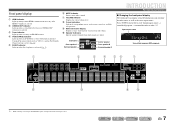
...field program (DSP program) a b c d ef g iPod CHARGE SLEEP STEREO TUNED VOL. Press fINFO repeatedly to cycle through an optional Yamaha iPod universal dock (such as the active input source. b CINEMA DSP indicator Lights up when a sound field effect that uses CINEMA DSP technology...sound field program → surround decoder in order. Front panel display a HDMI indicator Lights up during normal HDMI communication when any of information on the remote control are output. MUTE SW L CR SL SR h i h j J 1 : While selecting a tuner input, the FM/AM frequency is ...
...field program (DSP program) a b c d ef g iPod CHARGE SLEEP STEREO TUNED VOL. Press fINFO repeatedly to cycle through an optional Yamaha iPod universal dock (such as the active input source. b CINEMA DSP indicator Lights up when a sound field effect that uses CINEMA DSP technology...sound field program → surround decoder in order. Front panel display a HDMI indicator Lights up during normal HDMI communication when any of information on the remote control are output. MUTE SW L CR SL SR h i h j J 1 : While selecting a tuner input, the FM/AM frequency is ...

Owners Manual
Page 8
... components. Press this unit (☞p. 40). The front panel display indicator lights up when a signal is activated. Sleep 90min. Adjusts the volume level (☞p. 25). Remote control a b c d e f g h i j k l m SOURCE 1 1 5 TRANSMIT CODE SET SLEEP RECEIVER HDMI 2 3 4 AV 2 3 4 AUDIO 1 2 V-AUX [ A ] [ B ] DOCK TUNER... input source to the previous screen when setting menus are using the tuner input. En 8 J1 DOCK A Yamaha iPod universal dock or Bluetooth wireless audio receiver connected to AM. b TRANSMIT Lights up when the sleep timer ...
... components. Press this unit (☞p. 40). The front panel display indicator lights up when a signal is activated. Sleep 90min. Adjusts the volume level (☞p. 25). Remote control a b c d e f g h i j k l m SOURCE 1 1 5 TRANSMIT CODE SET SLEEP RECEIVER HDMI 2 3 4 AV 2 3 4 AUDIO 1 2 V-AUX [ A ] [ B ] DOCK TUNER... input source to the previous screen when setting menus are using the tuner input. En 8 J1 DOCK A Yamaha iPod universal dock or Bluetooth wireless audio receiver connected to AM. b TRANSMIT Lights up when the sleep timer ...
Owners Manual
Page 15
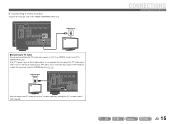
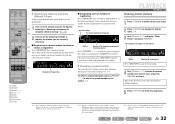
... the SCENE function (☞p. 26). Connecting to AV4 allows you connect the TV audio output to AV4 with just a single key operation using the receiver's remote control by entering the TV's remote control code (☞p. 50).
... the SCENE function (☞p. 26). Connecting to AV4 allows you connect the TV audio output to AV4 with just a single key operation using the receiver's remote control by entering the TV's remote control code (☞p. 50).
Owners Manual
Page 22
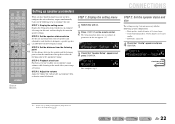
... and connection status of speakers and subwoofers, and whether to configure all settings for this unit, and then display the menu for details on the remote control. STEP 1: Display the setting menu 1 Switch this unit so that the sound is 16 cm or smaller - J1 SETUP VOL. SW L CR SL SR...
... and connection status of speakers and subwoofers, and whether to configure all settings for this unit, and then display the menu for details on the remote control. STEP 1: Display the setting menu 1 Switch this unit so that the sound is 16 cm or smaller - J1 SETUP VOL. SW L CR SL SR...
Owners Manual
Page 26
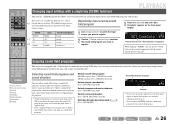
.... DECODE g STRAIGHT h SCENE This unit is displayed. SW L CR SL SR Program • You can adjust sound field elements (sound field parameters) for that the remote control operates (☞p. 50). TOP MENU REC POP-UP MENU MUTE Enjoying sound field programs 1 2 3 4 5 6 7 8 9 INPUT MUTE 0 10 TV TV VOL TV CH ENT d Input... of the program. • Sound field programs are stored for movies, music and other uses. When you change input sources and sound field programs with a Yamaha digital sound field processing (DSP) chip.
.... DECODE g STRAIGHT h SCENE This unit is displayed. SW L CR SL SR Program • You can adjust sound field elements (sound field parameters) for that the remote control operates (☞p. 50). TOP MENU REC POP-UP MENU MUTE Enjoying sound field programs 1 2 3 4 5 6 7 8 9 INPUT MUTE 0 10 TV TV VOL TV CH ENT d Input... of the program. • Sound field programs are stored for movies, music and other uses. When you change input sources and sound field programs with a Yamaha digital sound field processing (DSP) chip.
Owners Manual
Page 30
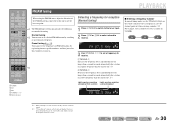
VOL. MHz SW L CR SL SR PLAYBACK ■ Entering a frequency number In normal tuning mode, use the lNumeric keys on the remote control to a desired FM/AM station by registering them to specific numbers, and later just select those numbers to tune in to enter a frequency. Leave ...
VOL. MHz SW L CR SL SR PLAYBACK ■ Entering a frequency number In normal tuning mode, use the lNumeric keys on the remote control to a desired FM/AM station by registering them to specific numbers, and later just select those numbers to tune in to enter a frequency. Leave ...
Owners Manual
Page 32
... want to clear, and press jENTER to display "Manual Preset" on the front panel display. To cancel registration, press jRETURN or do not operate the remote control for details on "Configuring the settings specific for each input source (Option menu)" for about 30 seconds. ■ Recalling a preset station You can call...
... want to clear, and press jENTER to display "Manual Preset" on the front panel display. To cancel registration, press jRETURN or do not operate the remote control for details on "Configuring the settings specific for each input source (Option menu)" for about 30 seconds. ■ Recalling a preset station You can call...
Owners Manual
Page 33
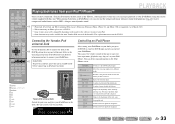
...(playback, stop, skip etc) on the rear panel of your iPod/iPhone. You can operate your iPod/iPhone using the remote control supplied with each press. Stops playback. This explanation focuses on the iPod/ iPhone screen. Enters the selected menu. Searches .... DOCK VOL. dDOCK jCursor B / C jCursor D / E jENTER k w k f k b k a k s k e k p Switches to different fields. The unit is now ready for some Yamaha iPod universal dock models. Skips to the operating instructions of your iPod/iPhone in your iPod/iPhone. Refer to the beginning of the currently playing...
...(playback, stop, skip etc) on the rear panel of your iPod/iPhone. You can operate your iPod/iPhone using the remote control supplied with each press. Stops playback. This explanation focuses on the iPod/ iPhone screen. Enters the selected menu. Searches .... DOCK VOL. dDOCK jCursor B / C jCursor D / E jENTER k w k f k b k a k s k e k p Switches to different fields. The unit is now ready for some Yamaha iPod universal dock models. Skips to the operating instructions of your iPod/iPhone in your iPod/iPhone. Refer to the beginning of the currently playing...

Owners Manual
Page 37
...DISPLAY TOP MENU REC POP-UP MENU MUTE j Option menu OPTION Volume Trim VOL. The displayed Option menu items differ depending on the remote control to select the Option menu you can set differ depending on the menu items. • You can adjust this occurs, reselect the... MEMORY MOVIE ENHANCER SUR. For details, read the following menu items are displayed. For a few seconds after closing the Option menu, the remote control keys may automatically close the Option menu, press qOPTION. ■ Adjusting volume between input sources by correcting volume differences in each type ...
...DISPLAY TOP MENU REC POP-UP MENU MUTE j Option menu OPTION Volume Trim VOL. The displayed Option menu items differ depending on the remote control to select the Option menu you can set differ depending on the menu items. • You can adjust this occurs, reselect the... MEMORY MOVIE ENHANCER SUR. For details, read the following menu items are displayed. For a few seconds after closing the Option menu, the remote control keys may automatically close the Option menu, press qOPTION. ■ Adjusting volume between input sources by correcting volume differences in each type ...
Owners Manual
Page 40
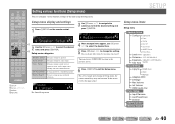
...settings against accidental alteration. If this unit using the Setup menu. HDMI VOL. Setup menu display and settings 1 Press iSETUP on the remote control. SW Audio;;;;;;Amp L CR SL SR 4 When multiple items appear, use jRETURN to return to the previous screen. 6 Press...this occurs, reselect the input source. j Setup menu categories Speaker Setup Sound Setup Func. For a few seconds after closing the Setup menu, the remote control keys may not function. Sets parameters for audio output. You can also use jCursor B / C to select the desired item. 5 Press ...
...settings against accidental alteration. If this unit using the Setup menu. HDMI VOL. Setup menu display and settings 1 Press iSETUP on the remote control. SW Audio;;;;;;Amp L CR SL SR 4 When multiple items appear, use jRETURN to return to the previous screen. 6 Press...this occurs, reselect the input source. j Setup menu categories Speaker Setup Sound Setup Func. For a few seconds after closing the Setup menu, the remote control keys may not function. Sets parameters for audio output. You can also use jCursor B / C to select the desired item. 5 Press ...
Owners Manual
Page 47
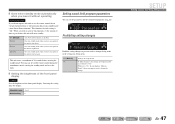
...9632; Goes enter standby mode automatically when you leave it without operating AutoPowerDown If you do not operate this unit or use the remote control for an extended period of time to pass before entering the standby mode. Goes into standby mode, when you have not operated...Guard!" Goes into standby mode (Auto Power Down function). This unit starts a countdown of the front panel display. Pressing any key of the remote control during the countdown cancels entering the standby mode and reset the timer. ■ Setting the brightness of the front panel display Dimmer Sets the...
...9632; Goes enter standby mode automatically when you leave it without operating AutoPowerDown If you do not operate this unit or use the remote control for an extended period of time to pass before entering the standby mode. Goes into standby mode, when you have not operated...Guard!" Goes into standby mode (Auto Power Down function). This unit starts a countdown of the front panel display. Pressing any key of the remote control during the countdown cancels entering the standby mode and reset the timer. ■ Setting the brightness of the front panel display Dimmer Sets the...
Owners Manual
Page 50
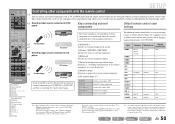
...or qOPTION and then try operating the remote control again. Yamaha 5095 - - - - - - - - - - - - To register a remote control code for a device other components with the remote control c You can be convenient to operate this unit. Set these keys to remote control codes if you are available only... codes for each input source. Individual setting allows you have corresponding control keys. CD player DOCK Tuner Manufacturer Remote control code Yamaha 2064 - - - - - - - - - - For example, it may be set for TVs in the CD-ROM. lNumeric keys Functions...
...or qOPTION and then try operating the remote control again. Yamaha 5095 - - - - - - - - - - - - To register a remote control code for a device other components with the remote control c You can be convenient to operate this unit. Set these keys to remote control codes if you are available only... codes for each input source. Individual setting allows you have corresponding control keys. CD player DOCK Tuner Manufacturer Remote control code Yamaha 2064 - - - - - - - - - - For example, it may be set for TVs in the CD-ROM. lNumeric keys Functions...
Owners Manual
Page 51
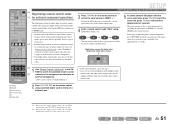
... from the category or manufacturer of the following section describes how to register remote control code using an example of the registration of the remote control codes of a Yamaha BD player connected to search the available remote control m codes from the category or manufacturer of a unit. d HDMI2... mA (mTV control keys) in step 4. l 1 Use "Remote Control Code Search" in step 3 and hold it for a Yamaha BD player. To reset, repeat from step 2 with the remote control 3 Press dHDMI2 on the remote control using lNumeric keys. Settings will blink twice. 5 To switch...
... from the category or manufacturer of the following section describes how to register remote control code using an example of the registration of the remote control codes of a Yamaha BD player connected to search the available remote control m codes from the category or manufacturer of a unit. d HDMI2... mA (mTV control keys) in step 4. l 1 Use "Remote Control Code Search" in step 3 and hold it for a Yamaha BD player. To reset, repeat from step 2 with the remote control 3 Press dHDMI2 on the remote control using lNumeric keys. Settings will blink twice. 5 To switch...
Owners Manual
Page 52
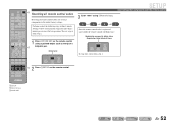
...UP MENU MUTE 1 2 3 4 5 6 7 8 9 INPUT MUTE 0 10 TV TV VOL TV CH ENT n Resetting all remote control codes Resetting all remote control codes for external components to the initial factory settings. Registration successful: blinks twice Registration failed: blinks 6 times TRANSMIT CODE SET SOURCE ...SLEEP HDMI RECEIVER If setup fails, repeat from step 2. 1 Press nCODE SET on the remote control. 3 Enter "9981" using a pointed object such as the tip of the following steps within 1 minute. Settings will blink twice...
...UP MENU MUTE 1 2 3 4 5 6 7 8 9 INPUT MUTE 0 10 TV TV VOL TV CH ENT n Resetting all remote control codes Resetting all remote control codes for external components to the initial factory settings. Registration successful: blinks twice Registration failed: blinks 6 times TRANSMIT CODE SET SOURCE ...SLEEP HDMI RECEIVER If setup fails, repeat from step 2. 1 Press nCODE SET on the remote control. 3 Enter "9981" using a pointed object such as the tip of the following steps within 1 minute. Settings will blink twice...
Owners Manual
Page 53
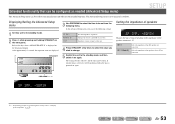
... settings depending on again. En 53 Release the keys when "ADVANCED SETUP" is powered on the impedance of speakers. Changes the remote control ID of speaker impedance settings, refer to be set the following settings. A STRAIGHT PHONES SILENT CINEMA INFO MEMORY PRESET FM ... / h SP IMP. -8 MIN J 1 : For detailed procedures of a receiver. Extended functionality that can be configured as follows. SP IMP. REMOTE ID INIT Sets the impedance of the speakers connected. The Advanced Setup menu can be operated as needed (Advanced Setup menu) SETUP The Advanced Setup...
... settings depending on again. En 53 Release the keys when "ADVANCED SETUP" is powered on the impedance of speakers. Changes the remote control ID of speaker impedance settings, refer to be set the following settings. A STRAIGHT PHONES SILENT CINEMA INFO MEMORY PRESET FM ... / h SP IMP. -8 MIN J 1 : For detailed procedures of a receiver. Extended functionality that can be configured as follows. SP IMP. REMOTE ID INIT Sets the impedance of the speakers connected. The Advanced Setup menu can be operated as needed (Advanced Setup menu) SETUP The Advanced Setup...

Owners Manual
Page 54
... for this unit INIT- To switch to default factory settings. Initializes various settings stored in this unit to ID2: Enter "5020" using multiple Yamaha receivers REMOTE ID -ID1 The remote control of the following . Registration successful: blinks twice Registration failed: blinks 6 times SOURCE TRANSMIT SLEEP HDMI CODE SET RECEIVER • If setup fails...
... for this unit INIT- To switch to default factory settings. Initializes various settings stored in this unit to ID2: Enter "5020" using multiple Yamaha receivers REMOTE ID -ID1 The remote control of the following . Registration successful: blinks twice Registration failed: blinks 6 times SOURCE TRANSMIT SLEEP HDMI CODE SET RECEIVER • If setup fails...
Owners Manual
Page 55
... was shorted. The power cable is displayed.) The protection circuitry has been activated because this unit was turned on . Please contact authorized Yamaha dealer or service center to request repair. The sleep timer has turned off the Turn on . Make sure that the speaker impedance settings...and play the source again. - Disconnect the power cable from the AC wall outlet, wait about 30 seconds and then plug it in the remote control Replace all speaker cables between this unit does not function properly. The batteries in again. Cause If you are not - Setup" &#...
... was shorted. The power cable is displayed.) The protection circuitry has been activated because this unit was turned on . Please contact authorized Yamaha dealer or service center to request repair. The sleep timer has turned off the Turn on . Make sure that the speaker impedance settings...and play the source again. - Disconnect the power cable from the AC wall outlet, wait about 30 seconds and then plug it in the remote control Replace all speaker cables between this unit does not function properly. The batteries in again. Cause If you are not - Setup" &#...


