
Owner's Manual
Page 5
... panel 13 PREPARATION CONNECTIONS 14 Before connecting speakers 14 Connecting speakers 15 Using bi-wire and bi-AMP connections 19 Information on cables and jacks used for connections 20 Connecting HDMI components 23 Connecting video components 24 Connecting audio components 27 Connecting the antennas 29 Connecting the power cable ...Exchanging preset stations 51 XM® SATELLITE RADIO TUNING 52 What is XM Satellite Radio 52 XM Satellite Radio connections 52 XM Satellite Radio controls and functions 53 Activating XM Satellite Radio 54 Selecting the XM Satellite Radio mode 55...
... panel 13 PREPARATION CONNECTIONS 14 Before connecting speakers 14 Connecting speakers 15 Using bi-wire and bi-AMP connections 19 Information on cables and jacks used for connections 20 Connecting HDMI components 23 Connecting video components 24 Connecting audio components 27 Connecting the antennas 29 Connecting the power cable ...Exchanging preset stations 51 XM® SATELLITE RADIO TUNING 52 What is XM Satellite Radio 52 XM Satellite Radio connections 52 XM Satellite Radio controls and functions 53 Activating XM Satellite Radio 54 Selecting the XM Satellite Radio mode 55...

Owner's Manual
Page 10
...with the INPUT selector (or the input selector buttons on the remote control). 6 A/B/C/D/E Selects one of audio input jack between AUTO, HDMI, COAX/OPT and ANALOG when one component is connected to two or more input jacks on this unit only or sets it outward to the band indication in the front... of the 5 preset station groups (A to E) when TUNER is selected as the input source (see page 43). 5 MULTI CH INPUT Selects the input source connected to the standby mode. Selects the tuning frequency when TUNER is selected as the input source and the colon (:) is not displayed in the front...
...with the INPUT selector (or the input selector buttons on the remote control). 6 A/B/C/D/E Selects one of audio input jack between AUTO, HDMI, COAX/OPT and ANALOG when one component is connected to two or more input jacks on this unit only or sets it outward to the band indication in the front... of the 5 preset station groups (A to E) when TUNER is selected as the input source (see page 43). 5 MULTI CH INPUT Selects the input source connected to the standby mode. Selects the tuning frequency when TUNER is selected as the input source and the colon (:) is not displayed in the front...

Owner's Manual
Page 13
...CH IN Selects MULTI CH INPUT when using an external decoder, etc. H AMP/SOURCE/TV Selects the component you can control independently of front speakers connected to the SPEAKERS A and/or B terminals on the rear panel each time the corresponding button is pressed. I MUTE Mutes the sound. When STRAIGHT is ... to the ON position. D SLEEP Sets the sleep timer. y To set the remote control codes for the type of audio input jack between AUTO, HDMI, COAX/OPT and ANALOG when one assigned to DTV takes priority and gets operated when AMP/ SOURCE/TV is set of the input source selected...
...CH IN Selects MULTI CH INPUT when using an external decoder, etc. H AMP/SOURCE/TV Selects the component you can control independently of front speakers connected to the SPEAKERS A and/or B terminals on the rear panel each time the corresponding button is pressed. I MUTE Mutes the sound. When STRAIGHT is ... to the ON position. D SLEEP Sets the sleep timer. y To set the remote control codes for the type of audio input jack between AUTO, HDMI, COAX/OPT and ANALOG when one assigned to DTV takes priority and gets operated when AMP/ SOURCE/TV is set of the input source selected...

Owner's Manual
Page 15
...surround DSP sound field Right surround DSP sound field Surround/surround back DSP sound field G HiFi DSP indicator Lights up when headphones are connected. J Multi-information display Shows the name of this unit operate, the respective indicator lights up. 5 Input source indicators Light up when... of front speakers selected. Turns off when no HDMI component is assigned to the either HDMI IN 1 or HDMI IN 2 jack or when no HDMI component is recognized by this unit (see page 38). I DSD indicator Lights up when headphones are connected and a sound field program is selected (see page...
...surround DSP sound field Right surround DSP sound field Surround/surround back DSP sound field G HiFi DSP indicator Lights up when headphones are connected. J Multi-information display Shows the name of this unit operate, the respective indicator lights up. 5 Input source indicators Light up when... of front speakers selected. Turns off when no HDMI component is assigned to the either HDMI IN 1 or HDMI IN 2 jack or when no HDMI component is recognized by this unit (see page 38). I DSD indicator Lights up when headphones are connected and a sound field program is selected (see page...

Owner's Manual
Page 17
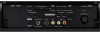
...OUTPUT SINGLE (SB) SUBWOOFER CENTER MULTI CH INPUT R L SURROUND BACK/PRESENCE TUNER GND AM ANT SPEAKERS - A HDMI IN/OUT connectors See page 108 for details. Consult you dealer for connection information. G Speaker terminals See page 15 for details. B- CENTER + - + AC IN SURROUND/ZONE 2(3) - ... This is a control expansion terminal for factory use (see page 16). 7 Antenna terminals See page 29 for connection information. E PRE OUT jacks See page 28 for connection information. 8 AC OUTLETS Use to supply power to your other A/V components (see page 30). 9 AC IN...
...OUTPUT SINGLE (SB) SUBWOOFER CENTER MULTI CH INPUT R L SURROUND BACK/PRESENCE TUNER GND AM ANT SPEAKERS - A HDMI IN/OUT connectors See page 108 for details. Consult you dealer for connection information. G Speaker terminals See page 15 for details. B- CENTER + - + AC IN SURROUND/ZONE 2(3) - ... This is a control expansion terminal for factory use (see page 16). 7 Antenna terminals See page 29 for connection information. E PRE OUT jacks See page 28 for connection information. 8 AC OUTLETS Use to supply power to your other A/V components (see page 30). 9 AC IN...

Owner's Manual
Page 24
... Do not connect this unit. Connect red plugs to the right jacks and white plugs to the left analog cables L right analog cables R For digital signals optical cables O coaxial cables C For video signals video cables V S-video cables S For HDMI signals ■ Analog jacks You can use the ...digital jacks to input PCM, Dolby Digital and DTS bitstreams. When you connect components to both the COAXIAL and OPTICAL jacks, priority is given to the main ...
... Do not connect this unit. Connect red plugs to the right jacks and white plugs to the left analog cables L right analog cables R For digital signals optical cables O coaxial cables C For video signals video cables V S-video cables S For HDMI signals ■ Analog jacks You can use the ...digital jacks to input PCM, Dolby Digital and DTS bitstreams. When you connect components to both the COAXIAL and OPTICAL jacks, priority is given to the main ...

Owner's Manual
Page 25
... AUDIO Through Digital output Analog output DIGITAL AUDIO (OPTICAL) jacks For digital audio signals transmitted via digital optical cables. HDMI jacks For HDMI digital audio signals. PREPARATION CONNECTIONS ■ Audio jacks This unit has four types of audio jacks on your other components. Output OUT (REC) ...Digital audio Analog audio Notes • The audio signals input at the HDMI IN 1 or HDMI IN 2 jack are output at the DIGITAL...
... AUDIO Through Digital output Analog output DIGITAL AUDIO (OPTICAL) jacks For digital audio signals transmitted via digital optical cables. HDMI jacks For HDMI digital audio signals. PREPARATION CONNECTIONS ■ Audio jacks This unit has four types of audio jacks on your other components. Output OUT (REC) ...Digital audio Analog audio Notes • The audio signals input at the HDMI IN 1 or HDMI IN 2 jack are output at the DIGITAL...

Owner's Manual
Page 26
... signals, separated into luminance (Y) and color (C) video signals to achieve high-quality color reproduction. ■ Video signal flow for MONITOR OUT HDMI Input COMPONENT VIDEO S VIDEO COMPONENT VIDEO jacks For component signals, separated into luminance (Y) and color difference (PB, PR) to provide the... VIDEO or VIDEO jacks cannot be output at the COMPONENT VIDEO jacks have the top priority. 1. When V CONV. Connection depends on your monitor. S VIDEO 3. CONNECTIONS ■ Video jacks This unit has four types of input jacks on the availability of video jacks (composite, component,...
... signals, separated into luminance (Y) and color (C) video signals to achieve high-quality color reproduction. ■ Video signal flow for MONITOR OUT HDMI Input COMPONENT VIDEO S VIDEO COMPONENT VIDEO jacks For component signals, separated into luminance (Y) and color difference (PB, PR) to provide the... VIDEO or VIDEO jacks cannot be output at the COMPONENT VIDEO jacks have the top priority. 1. When V CONV. Connection depends on your monitor. S VIDEO 3. CONNECTIONS ■ Video jacks This unit has four types of input jacks on the availability of video jacks (composite, component,...
Owner's Manual
Page 27
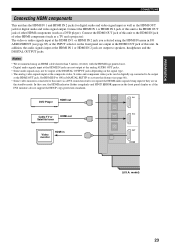
... signals input at the HDMI OUT jack. IN 1 HDMI out DVD Player Cable TV or Satellite tuner HDMI out Video monitor HDMI in the standby mode. PREPARATION CONNECTIONS Connecting HDMI components This unit has the HDMI IN 1 and HDMI IN 2 jacks for digital audio and video signal output. Connect the HDMI OUT jack of this case, the HDMI indicator flashes irregularly and...
... signals input at the HDMI OUT jack. IN 1 HDMI out DVD Player Cable TV or Satellite tuner HDMI out Video monitor HDMI in the standby mode. PREPARATION CONNECTIONS Connecting HDMI components This unit has the HDMI IN 1 and HDMI IN 2 jacks for digital audio and video signal output. Connect the HDMI OUT jack of this case, the HDMI indicator flashes irregularly and...

Owner's Manual
Page 28
... VIDEO Y PB PR DVD OPTICAL VIDEO S VIDEO VIDEO AUDIO R L DVD DVD IN 1 MONITOR OUT Video monitor Video in HDMI in case you make an HDMI connection, you can make both audio and video connections using a single HDMI cable. 24 model) Note Check the availability of jacks on your DVD player and select one type of...
... VIDEO Y PB PR DVD OPTICAL VIDEO S VIDEO VIDEO AUDIO R L DVD DVD IN 1 MONITOR OUT Video monitor Video in HDMI in case you make an HDMI connection, you can make both audio and video connections using a single HDMI cable. 24 model) Note Check the availability of jacks on your DVD player and select one type of...
Owner's Manual
Page 29
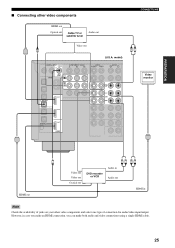
... 2 RL Video monitor OUT DIGITAL OUTPUT HDMI HDMI out C RL RL Video out Video out Coaxial out DVD recorder or VCR Audio in Audio out HDMI in case you make an HDMI connection, you can make both audio and video connections using a single HDMI cable. 25 However, in Note Check ...the availability of connection for audio/video input/output. PREPARATION ■ Connecting other video components and select one ...
... 2 RL Video monitor OUT DIGITAL OUTPUT HDMI HDMI out C RL RL Video out Video out Coaxial out DVD recorder or VCR Audio in Audio out HDMI in case you make an HDMI connection, you can make both audio and video connections using a single HDMI cable. 25 However, in Note Check ...the availability of connection for audio/video input/output. PREPARATION ■ Connecting other video components and select one ...

Owner's Manual
Page 45
... Select MIN for minimum compression. • Select MID for standard compression. • Select MAX for all video functions including video conversions - HDMI digital video up in effectiveness depending on the input source and the surround sound settings being used . 1 Set AMP/SOURCE/TV to the standby...remote control repeatedly to use the night listening modes if PURE DIRECT or MULTI CH INPUT are being used or if headphones are connected even though the NIGHT indicator lights up and the front panel display automatically goes out. BASIC OPERATION ■ Using PURE DIRECT ...
... Select MIN for minimum compression. • Select MID for standard compression. • Select MAX for all video functions including video conversions - HDMI digital video up in effectiveness depending on the input source and the surround sound settings being used . 1 Set AMP/SOURCE/TV to the standby...remote control repeatedly to use the night listening modes if PURE DIRECT or MULTI CH INPUT are being used or if headphones are connected even though the NIGHT indicator lights up and the front panel display automatically goes out. BASIC OPERATION ■ Using PURE DIRECT ...

Owner's Manual
Page 47
...available as the input source. - If MULTI CH INPUT is ineffective even if SUR. L/R SP is output. 43 Use if HDMI signals are connected to classical music while enjoying beautiful scenery from the front panel display. If headphones are also being input. Note Virtual CINEMA DSP... is selected as an input mode if HDMI IN 1 and HDMI IN 2 jacks are assigned. BASIC OPERATION 2 Press STRAIGHT (EFFECT) on ...
...available as the input source. - If MULTI CH INPUT is ineffective even if SUR. L/R SP is output. 43 Use if HDMI signals are connected to classical music while enjoying beautiful scenery from the front panel display. If headphones are also being input. Note Virtual CINEMA DSP... is selected as an input mode if HDMI IN 1 and HDMI IN 2 jacks are assigned. BASIC OPERATION 2 Press STRAIGHT (EFFECT) on ...

Owner's Manual
Page 48
...signal, it automatically switches to select INFORMATION and then press ENTER. appears. Analog Resolution Resolution of the analog signals input or output at the HDMI IN/OUT jacks of this unit is unable to detect the sampling frequency "?" Audio information FORMAT Signal format display. When the unit is displayed...Type Type of the HDMI signals input or output at the video component jacks of the current input signal. 1 Set AMP/SOURCE/TV to AMP and then press SET MENU on the remote control again to perform DTS decoding even if you make a digital connection between the audio and...
...signal, it automatically switches to select INFORMATION and then press ENTER. appears. Analog Resolution Resolution of the analog signals input or output at the HDMI IN/OUT jacks of this unit is unable to detect the sampling frequency "?" Audio information FORMAT Signal format display. When the unit is displayed...Type Type of the HDMI signals input or output at the video component jacks of the current input signal. 1 Set AMP/SOURCE/TV to AMP and then press SET MENU on the remote control again to perform DTS decoding even if you make a digital connection between the audio and...

Owner's Manual
Page 49
... the DIGITAL AUDIO (OPTICAL) jacks depending on the type of this unit and all connected components. Recording of copyrighted material may infringe copyright laws. • Some HDMI audio signals input at the HDMI IN 1 or HDMI IN 2 jack of this unit. model) MAIN ZONE ON/OFF MASTER ON OFF... PHONES VIDEO/AUX TONE STRAIGHT CONTROL EFFECT PROGRAM PURE DIRECT VOLUME 2 1 Turn on the recording component. Therefore, if your source component is connected to provide only digital or analog signals, you can record only an S-video or only a composite video signal to your country to provide ...
... the DIGITAL AUDIO (OPTICAL) jacks depending on the type of this unit and all connected components. Recording of copyrighted material may infringe copyright laws. • Some HDMI audio signals input at the HDMI IN 1 or HDMI IN 2 jack of this unit. model) MAIN ZONE ON/OFF MASTER ON OFF... PHONES VIDEO/AUX TONE STRAIGHT CONTROL EFFECT PROGRAM PURE DIRECT VOLUME 2 1 Turn on the recording component. Therefore, if your source component is connected to provide only digital or analog signals, you can record only an S-video or only a composite video signal to your country to provide ...
Owner's Manual
Page 56
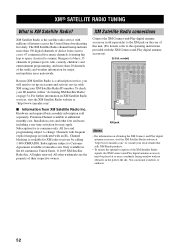
...digital antenna accessory). (U.S.A. Because XM Satellite Radio is XM Satellite Radio? Channel blocking is consumer only. XM Satellite Radio connections Connect the XM Connect-and-Play digital antenna accessory (sold separately. and more than 20 channels of their respective owners. model) DIGITAL INPUT COAXIAL...SAT DTV CBL/SAT RS-232C IN 1 MONITOR OUT MD/TAPE IN 2 CD-R OUT DIGITAL OUTPUT XM HDMI XM jack Notes • For information on obtaining the XM Connect-and-Play digital antenna accessory, visit the XM Satellite Radio website at "http://www.xmradio.com" or consult...
...digital antenna accessory). (U.S.A. Because XM Satellite Radio is XM Satellite Radio? Channel blocking is consumer only. XM Satellite Radio connections Connect the XM Connect-and-Play digital antenna accessory (sold separately. and more than 20 channels of their respective owners. model) DIGITAL INPUT COAXIAL...SAT DTV CBL/SAT RS-232C IN 1 MONITOR OUT MD/TAPE IN 2 CD-R OUT DIGITAL OUTPUT XM HDMI XM jack Notes • For information on obtaining the XM Connect-and-Play digital antenna accessory, visit the XM Satellite Radio website at "http://www.xmradio.com" or consult...

Owner's Manual
Page 79
...D)AUDIO SET Adjusts the overall audio settings for this unit. Item Features Page A)EQUALIZER Adjusts the tonal quality of this unit. 82 E)HDMI SET Adjusts the HDMI support audio. 82 3 INPUT MENU Use to be used. Item A)I/O ASSIGNMENT B)INPUT RENAME C)VOLUME TRIM D)DECODER MODE E)MULTI CH ...(see page 32). Adjusts the output volume of the signals input into the center, subwoofer and surround channels when a source component is connected to make further adjustments, but we recommend running AUTO SETUP first. Adjusts the direction of each speaker. Adjusts the THX settings. Most ...
...D)AUDIO SET Adjusts the overall audio settings for this unit. Item Features Page A)EQUALIZER Adjusts the tonal quality of this unit. 82 E)HDMI SET Adjusts the HDMI support audio. 82 3 INPUT MENU Use to be used. Item A)I/O ASSIGNMENT B)INPUT RENAME C)VOLUME TRIM D)DECODER MODE E)MULTI CH ...(see page 32). Adjusts the output volume of the signals input into the center, subwoofer and surround channels when a source component is connected to make further adjustments, but we recommend running AUTO SETUP first. Adjusts the direction of each speaker. Adjusts the THX settings. Most ...

Owner's Manual
Page 86
...jack of this unit. 82 This setting is decoding Dolby Digital and DTS signals. D)AUDIO SET . Choices: RX-V1600, OTHER • Select RX-V1600 to play back HDMI audio signals on another HDMI component connected to the HDMI OUT jack on the rear panel of this unit. SPEAKER;;;;;;0dB HEADPHONE;;;;0dB [ ]/[ ]:Up/Down []:Adjust... video image. Headphone HP Select to adjust the dynamic range of headphones. • Select MIN if you regularly listen at the HDMI IN jacks of this unit are only added to certain scenes. E)HDMI SET SUPPORT AUDIO: RX-V1600 []:Adjust p p C)DYNAMIC RANGE .
...jack of this unit. 82 This setting is decoding Dolby Digital and DTS signals. D)AUDIO SET . Choices: RX-V1600, OTHER • Select RX-V1600 to play back HDMI audio signals on another HDMI component connected to the HDMI OUT jack on the rear panel of this unit. SPEAKER;;;;;;0dB HEADPHONE;;;;0dB [ ]/[ ]:Up/Down []:Adjust... video image. Headphone HP Select to adjust the dynamic range of headphones. • Select MIN if you regularly listen at the HDMI IN jacks of this unit are only added to certain scenes. E)HDMI SET SUPPORT AUDIO: RX-V1600 []:Adjust p p C)DYNAMIC RANGE .

Owner's Manual
Page 87
..., PHONO, DVD, DTV, CBL/SAT, VCR1, DVR/VCR2, V-AUX OPTICAL OUT . (8);;;;;MD/TAPE (MD/TAPE) (9);;;;; CD-R ( CD-R ) HDMI input HDMI IN Choices: DVD, DTV, CBL/SAT, VCR1, DVR/VCR2, V-AUX HDMI IN . CD ( CD ) (2);;;;; p p 3 INPUT MENU 1/2 . E)MULTI CH SET [ ]/[ ]:Up/Down [ENTER]:Enter Optical input OPTICAL ... CMPNT-V INPUT Choices: DVD, DTV, CBL/SAT, VCR1, DVR/VCR2, V-AUX CMPNT-V INPUT . [A];;;;; Once the inputs have been reassigned, you connect a component to both the COAXIAL and OPTICAL jacks, priority is given to the input signals from the COAXIAL jack. 83 DVD ( DVD ) (3);;;;;DVR...
..., PHONO, DVD, DTV, CBL/SAT, VCR1, DVR/VCR2, V-AUX OPTICAL OUT . (8);;;;;MD/TAPE (MD/TAPE) (9);;;;; CD-R ( CD-R ) HDMI input HDMI IN Choices: DVD, DTV, CBL/SAT, VCR1, DVR/VCR2, V-AUX HDMI IN . CD ( CD ) (2);;;;; p p 3 INPUT MENU 1/2 . E)MULTI CH SET [ ]/[ ]:Up/Down [ENTER]:Enter Optical input OPTICAL ... CMPNT-V INPUT Choices: DVD, DTV, CBL/SAT, VCR1, DVR/VCR2, V-AUX CMPNT-V INPUT . [A];;;;; Once the inputs have been reassigned, you connect a component to both the COAXIAL and OPTICAL jacks, priority is given to the input signals from the COAXIAL jack. 83 DVD ( DVD ) (3);;;;;DVR...

Owner's Manual
Page 113
...DVD dB VOLUME SP A A.SEL: HDMI L R 3 Start playback on the rear panel of this unit so that the audio and video signals input via HDMI connection can be simultaneously played back. Use the HDMI I/P parameter in the front panel ...display, see page 83). ■ Converting analog video signals to HDMI This unit is selected as the input mode. HDMI Setting the HDMI parameters Basic HDMI operations ■ Assigning HDMI components You can assign an HDMI component to the HDMI IN 1 or HDMI...
...DVD dB VOLUME SP A A.SEL: HDMI L R 3 Start playback on the rear panel of this unit so that the audio and video signals input via HDMI connection can be simultaneously played back. Use the HDMI I/P parameter in the front panel ...display, see page 83). ■ Converting analog video signals to HDMI This unit is selected as the input mode. HDMI Setting the HDMI parameters Basic HDMI operations ■ Assigning HDMI components You can assign an HDMI component to the HDMI IN 1 or HDMI...


