
Owner's Manual
Page 3
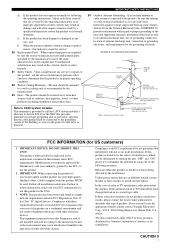
... product does not operate normally by the manufacturer or have the same characteristics as the original part. The unit should be determined by turning the unit "OFF" and "ON", please try to coaxial type cable. Article 810 of other controls may result in to eliminate ...an outside antenna or cable system is being affected by using one of interference, which can not locate the appropriate retailer, please contact Yamaha Electronics Corp., U.S.A. 6660 Orangethorpe Ave, Buena Park, CA 90620. Cable/s supplied with the requirements listed in harmful interference with FCC ...
... product does not operate normally by the manufacturer or have the same characteristics as the original part. The unit should be determined by turning the unit "OFF" and "ON", please try to coaxial type cable. Article 810 of other controls may result in to eliminate ...an outside antenna or cable system is being affected by using one of interference, which can not locate the appropriate retailer, please contact Yamaha Electronics Corp., U.S.A. 6660 Orangethorpe Ave, Buena Park, CA 90620. Cable/s supplied with the requirements listed in harmful interference with FCC ...
Owner's Manual
Page 4
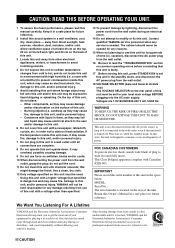
...(i.e. do not pull the cord. 11 Do not clean this sound system in a environment with a higher voltage than specified is turned off. YAMAHA will not be held responsible for future reference. 2 Install this unit with chemical solvents; FOR CANADIAN CUSTOMERS To prevent electric shock, ...plugging into the AC main supply. This unit is not disconnected from excessive volume levels. We Want You Listening For A Lifetime YAMAHA and the Electronic Industries Association's Consumer Electronics Group want you to liquid dripping or splashing. CAUTION: READ THIS BEFORE OPERATING YOUR ...
...(i.e. do not pull the cord. 11 Do not clean this sound system in a environment with a higher voltage than specified is turned off. YAMAHA will not be held responsible for future reference. 2 Install this unit with chemical solvents; FOR CANADIAN CUSTOMERS To prevent electric shock, ...plugging into the AC main supply. This unit is not disconnected from excessive volume levels. We Want You Listening For A Lifetime YAMAHA and the Electronic Industries Association's Consumer Electronics Group want you to liquid dripping or splashing. CAUTION: READ THIS BEFORE OPERATING YOUR ...
Owner's Manual
Page 5
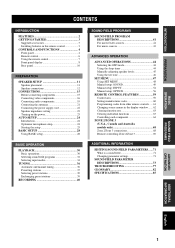
... connecting components 15 Connecting video components 16 Connecting audio components 19 Connecting the antennas 21 Connecting the power supply cord 22 Speaker impedance setting 23 Turning on the power 23 AUTO SETUP 24 Introduction 24 Optimizer microphone setup 24 Starting the setup 25 BASIC SETUP 28 Using BASIC setup 28 BASIC...
... connecting components 15 Connecting video components 16 Connecting audio components 19 Connecting the antennas 21 Connecting the power supply cord 22 Speaker impedance setting 23 Turning on the power 23 AUTO SETUP 24 Introduction 24 Optimizer microphone setup 24 Starting the setup 25 BASIC SETUP 28 Using BASIC setup 28 BASIC...
Owner's Manual
Page 8
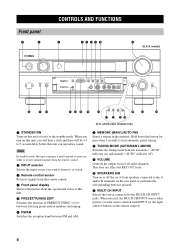
... 5-second delay before this unit or sets it to the MULTI CH INPUT jacks. This does not affect the REC OUT level. 0 SPEAKERS A/B Turn on this unit, you turn on or off ). 9 VOLUME Controls the output level of front speakers connected to the A and/or B terminals on the rear panel at each... source connected to the standby mode. CONTROLS AND FUNCTIONS CONTROLS AND FUNCTIONS Front panel 1 2 3 45 67 8 STANDBY /ON INPUT 9 (U.S.A. and Europe models only) 1 STANDBY/ON Turns on the remote control). 4
... 5-second delay before this unit or sets it to the MULTI CH INPUT jacks. This does not affect the REC OUT level. 0 SPEAKERS A/B Turn on this unit, you turn on or off ). 9 VOLUME Controls the output level of front speakers connected to the A and/or B terminals on the rear panel at each... source connected to the standby mode. CONTROLS AND FUNCTIONS CONTROLS AND FUNCTIONS Front panel 1 2 3 45 67 8 STANDBY /ON INPUT 9 (U.S.A. and Europe models only) 1 STANDBY/ON Turns on the remote control). 4
Owner's Manual
Page 10
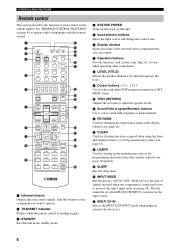
... received when one component is selected as play, stop, skip, etc. C CLEAR Used for changing the input source name in the standby mode. 4 SYSTEM POWER Turns on the remote control. CONTROLS AND FUNCTIONS Remote control This section describes the function of each control on the power of this unit. 5 Input selector...
... received when one component is selected as play, stop, skip, etc. C CLEAR Used for changing the input source name in the standby mode. 4 SYSTEM POWER Turns on the remote control. CONTROLS AND FUNCTIONS Remote control This section describes the function of each control on the power of this unit. 5 Input selector...
Owner's Manual
Page 11
...in the following types of the component selected by the input selector button. M SET MENU (MENU) Selects the SET MENU mode. The MUTE indicator turns on when the MUTE function is selected, input signals (2-channel or multi-channel) are output directly from their respective speakers without effect processing. high ... EX/ES Switches between 5.1 or 6.1/7.1 channel playback of the input component selected with the input selector buttons. high humidity such as near a bath - I AV POWER Turns on . N ON SCREEN (DISPLAY) Selects the on-screen display (OSD) mode for your video monitor.
...in the following types of the component selected by the input selector button. M SET MENU (MENU) Selects the SET MENU mode. The MUTE indicator turns on when the MUTE function is selected, input signals (2-channel or multi-channel) are output directly from their respective speakers without effect processing. high ... EX/ES Switches between 5.1 or 6.1/7.1 channel playback of the input component selected with the input selector buttons. high humidity such as near a bath - I AV POWER Turns on . N ON SCREEN (DISPLAY) Selects the on-screen display (OSD) mode for your video monitor.
Owner's Manual
Page 15
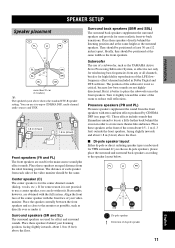
... (FR and FL) The front speakers are used for more theater-like ambience. You can be positioned at the same height as the YAMAHA Active Servo Processing Subwoofer System, is better to the speaker layout below. Align the front face of your listening position, facing slightly inwards,...layout above the floor. Ideally, they should be positioned at the front of the subwoofer is not practical to reduce wall reflections. Turn it slightly toward the center of di-pole speaker English 11 If for THX surround. Place these speakers behind the screen in Dolby...
... (FR and FL) The front speakers are used for more theater-like ambience. You can be positioned at the same height as the YAMAHA Active Servo Processing Subwoofer System, is better to the speaker layout below. Align the front face of your listening position, facing slightly inwards,...layout above the floor. Ideally, they should be positioned at the front of the subwoofer is not practical to reduce wall reflections. Turn it slightly toward the center of di-pole speaker English 11 If for THX surround. Place these speakers behind the screen in Dolby...
Owner's Manual
Page 17
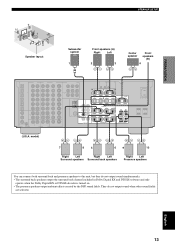
... surround back channel included in Dolby Digital EX and DTS ES software and only operate when the Dolby Digital EX or DTS ES decoder is turned on. • The presence speakers output ambient effects created by the DSP sound fields. model) R+ -A - +L FRONT+ -B - + CENTER - + R+ SUB WOOFER + R PRE OUT SURROUND...
... surround back channel included in Dolby Digital EX and DTS ES software and only operate when the Dolby Digital EX or DTS ES decoder is turned on. • The presence speakers output ambient effects created by the DSP sound fields. model) R+ -A - +L FRONT+ -B - + CENTER - + R+ SUB WOOFER + R PRE OUT SURROUND...
Owner's Manual
Page 21
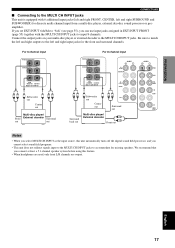
... output. If you set EXT.INPUT 6ch/8ch to "8ch" (see page 55), you connect at least a 5.1-channel speaker system before using this unit automatically turns off the digital sound field processor, and you cannot select sound field programs. • This unit does not redirect signals input to the MULTI CH...
... output. If you set EXT.INPUT 6ch/8ch to "8ch" (see page 55), you connect at least a 5.1-channel speaker system before using this unit automatically turns off the digital sound field processor, and you cannot select sound field programs. • This unit does not redirect signals input to the MULTI CH...
Owner's Manual
Page 24
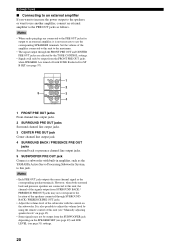
... with built-in amplifier, such as the corresponding speaker terminals. Notes • Each PRE OUT jack outputs the same channel signal as the YAMAHA Active Servo Processing Subwoofer System, to this jack. However, when both surround back and presence speakers are connected to this unit, the channel ... adjusting speaker levels" on the subwoofer. Set the volume of the subwoofer with ZONE B selected for output to an external amplifier, it is turned off with the control on page 45). • Some signals may not correspond to the location of the speakers connected through the FRONT PRE...
... with built-in amplifier, such as the corresponding speaker terminals. Notes • Each PRE OUT jack outputs the same channel signal as the YAMAHA Active Servo Processing Subwoofer System, to this jack. However, when both surround back and presence speakers are connected to this unit, the channel ... adjusting speaker levels" on the subwoofer. Set the volume of the subwoofer with ZONE B selected for output to an external amplifier, it is turned off with the control on page 45). • Some signals may not correspond to the location of the speakers connected through the FRONT PRE...
Owner's Manual
Page 26
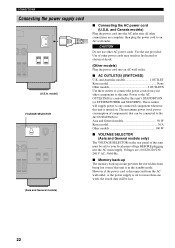
... the AC power cord (U.S.A. CAUTION Do not use other components to an AC wall outlet. These outlets will be lost even if this unit is turned on the rear panel of components) that can be set for more than one provided. Voltages are complete, then plug the power cord to this...
... the AC power cord (U.S.A. CAUTION Do not use other components to an AC wall outlet. These outlets will be lost even if this unit is turned on the rear panel of components) that can be set for more than one provided. Voltages are complete, then plug the power cord to this...
Owner's Manual
Page 27
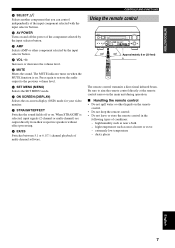
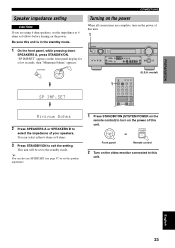
... POWER on the remote control) to exit the setting. English 23 y You can select either 6 ohms or 8 ohms. 3 Press STANDBY/ON to turn on the power of this unit is in the standby mode. 1 On the front panel, while pressing down SPEAKERS A, press STANDBY/ON. STANDBY /ON... SYSTEM POWER or Front panel Remote control 2 Turn on the video monitor connected to 6 ohms as follows before turning on the power. This unit will be set the impedance to this unit. PREPARATION CONNECTIONS Speaker impedance setting CAUTION If...
... POWER on the remote control) to exit the setting. English 23 y You can select either 6 ohms or 8 ohms. 3 Press STANDBY/ON to turn on the power of this unit is in the standby mode. 1 On the front panel, while pressing down SPEAKERS A, press STANDBY/ON. STANDBY /ON... SYSTEM POWER or Front panel Remote control 2 Turn on the video monitor connected to 6 ohms as follows before turning on the power. This unit will be set the impedance to this unit. PREPARATION CONNECTIONS Speaker impedance setting CAUTION If...
Owner's Manual
Page 31
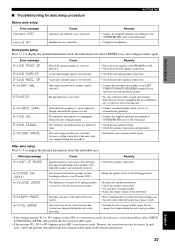
... result may appear depending on the subwoofer if the subwoofer has a phase switch. In such cases, correct the problem, select CHECK in quiet environment. • Turn off noisy electric equipment like air conditioners (etc.) or move it away from this unit. • Connect surround speakers when you select the opposite phase...
... result may appear depending on the subwoofer if the subwoofer has a phase switch. In such cases, correct the problem, select CHECK in quiet environment. • Turn off noisy electric equipment like air conditioners (etc.) or move it away from this unit. • Connect surround speakers when you select the opposite phase...

Owner's Manual
Page 34
... T O A CD TUNER PHONO VOLUME LR Selected input source Input mode 5 Start playback or select a broadcast station on or off. Each press turns the respective speakers on the source component. Use PROGRAM (or press AMP to select the AMP mode, then press one of the sound field program... 6 7 1 Press STANDBY/ON (SYSTEM POWER on the power. STANDBY /ON SYSTEM POWER or Front panel Remote control 2 Turn on the video monitor connected to turn on the remote control) to this unit detects Dolby Digital signals, the following display appears for a few seconds. SPEAKERS A...
... T O A CD TUNER PHONO VOLUME LR Selected input source Input mode 5 Start playback or select a broadcast station on or off. Each press turns the respective speakers on the source component. Use PROGRAM (or press AMP to select the AMP mode, then press one of the sound field program... 6 7 1 Press STANDBY/ON (SYSTEM POWER on the power. STANDBY /ON SYSTEM POWER or Front panel Remote control 2 Turn on the video monitor connected to turn on the remote control) to this unit detects Dolby Digital signals, the following display appears for a few seconds. SPEAKERS A...
Owner's Manual
Page 35
... CH INPUT to the right or left /right and center channels. Use the input selector buttons to select BYPASS. Select TREBLE, then rotate PROGRAM to turn off , you listen with normal stereo reproduction.) Note This unit will not be played. Notes • If you increase or decrease the high-frequency or...
... CH INPUT to the right or left /right and center channels. Use the input selector buttons to select BYPASS. Select TREBLE, then rotate PROGRAM to turn off , you listen with normal stereo reproduction.) Note This unit will not be played. Notes • If you increase or decrease the high-frequency or...

Owner's Manual
Page 37
... +10 EX/ES ENTER CHP/INDEX Remote control Direct Stereo Notes • To avoid unexpected noise, do not have a signal (flag) which this unit is turned off . The NIGHT indicator in effectiveness depending on the remote control. DTS Neo:6 Cinema DTS processing for music software. PRO LOGIC IIx Music * Dolby Pro...
... +10 EX/ES ENTER CHP/INDEX Remote control Direct Stereo Notes • To avoid unexpected noise, do not have a signal (flag) which this unit is turned off . The NIGHT indicator in effectiveness depending on the remote control. DTS Neo:6 Cinema DTS processing for music software. PRO LOGIC IIx Music * Dolby Pro...

Owner's Manual
Page 38
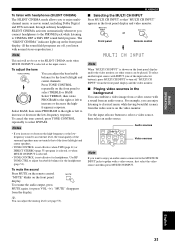
... of input jacks. When headphones are decoded straight into the appropriate channels without surround speakers. Multi-channel sources are connected. When MULTI CH INPUT is turned on . ■ Virtual CINEMA DSP Virtual CINEMA DSP allows you to "NONE" (see page 54). 34 PROGRAM or Front panel STEREO 1 HALL... switches to use. 1 Select the input source. In most cases, use a subwoofer with a variety of input signals you want to turn the sound effect back on (see page 49) in DTS. INPUT MODE or Front panel TRANSMIT RE-NAME CLEAR LEARN SYSTEM POWER STANDBY SLEEP...
... of input jacks. When headphones are decoded straight into the appropriate channels without surround speakers. Multi-channel sources are connected. When MULTI CH INPUT is turned on . ■ Virtual CINEMA DSP Virtual CINEMA DSP allows you to "NONE" (see page 54). 34 PROGRAM or Front panel STEREO 1 HALL... switches to use. 1 Select the input source. In most cases, use a subwoofer with a variety of input signals you want to turn the sound effect back on (see page 49) in DTS. INPUT MODE or Front panel TRANSMIT RE-NAME CLEAR LEARN SYSTEM POWER STANDBY SLEEP...
Owner's Manual
Page 40
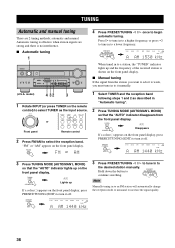
... tuning". 2 Press TUNING MODE (AUTO/MAN'L MONO) so that the "AUTO" indicator lights up on the front panel display, press PRESET/TUNING (EDIT) to turn it off . 3 Press PRESET/TUNING l / h to tune in to it off . FM/AM or 1 Select TUNER and the reception band following steps 1...control 2 Press FM/AM to a lower frequency. "FM" or "AM" appears on the front panel display, press PRESET/TUNING (EDIT) to turn it manually. (U.S.A. Hold down the button to PRESET/ TUNING continue searching. TUNING TUNING Automatic and manual tuning There are strong and there is no ...
... tuning". 2 Press TUNING MODE (AUTO/MAN'L MONO) so that the "AUTO" indicator lights up on the front panel display, press PRESET/TUNING (EDIT) to turn it off . 3 Press PRESET/TUNING l / h to tune in to it off . FM/AM or 1 Select TUNER and the reception band following steps 1...control 2 Press FM/AM to a lower frequency. "FM" or "AM" appears on the front panel display, press PRESET/TUNING (EDIT) to turn it manually. (U.S.A. Hold down the button to PRESET/ TUNING continue searching. TUNING TUNING Automatic and manual tuning There are strong and there is no ...
Owner's Manual
Page 41
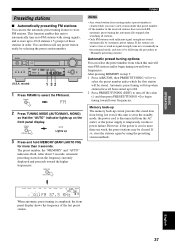
... will stop when stations have all stations. • Only FM stations with strong signals, and to store up to E8. 2 Press PRESET/TUNING (EDIT) to turn off the colon (:) and then press PRESET/TUNING l to FM stations with sufficient signal strength are stored automatically by automatic preset tuning. MEMORY MAN'L/AUTO...
... will stop when stations have all stations. • Only FM stations with strong signals, and to store up to E8. 2 Press PRESET/TUNING (EDIT) to turn off the colon (:) and then press PRESET/TUNING l to FM stations with sufficient signal strength are stored automatically by automatic preset tuning. MEMORY MAN'L/AUTO...

Owner's Manual
Page 44
... recording DTS software The DTS signal is set in the standby mode, you cannot record between other operations are performed from the recording components. model) 1 1 Turn on VCR 1 OUT.) • Check the copyright laws in noise being dubbed, the picture itself may infringe copyright laws. Therefore, if you playback a video source...
... recording DTS software The DTS signal is set in the standby mode, you cannot record between other operations are performed from the recording components. model) 1 1 Turn on VCR 1 OUT.) • Check the copyright laws in noise being dubbed, the picture itself may infringe copyright laws. Therefore, if you playback a video source...


