
Setup Guide
Page 1
... ■ Digital optical cable or stereo pin cable (x 1) (unnecessary if your TV supports ARC) http://download.yamaha.com/ Cables necessary for U.S.A. ■ YPAO microphone Insert into the remote control in the correct polarity (+/-). ■ Power cable ■ AM antenna ■ CD-ROM (Owner's ...depending on this unit. AV Receiver 1 Preparations Accessories Check that the following accessories are supplied with this product. ■ Remote control ■ Batteries (AAA, R03, UM-4) (x 2) Easy Setup Guide English for connections You need to separately prepare the following...
... ■ Digital optical cable or stereo pin cable (x 1) (unnecessary if your TV supports ARC) http://download.yamaha.com/ Cables necessary for U.S.A. ■ YPAO microphone Insert into the remote control in the correct polarity (+/-). ■ Power cable ■ AM antenna ■ CD-ROM (Owner's ...depending on this unit. AV Receiver 1 Preparations Accessories Check that the following accessories are supplied with this product. ■ Remote control ■ Batteries (AAA, R03, UM-4) (x 2) Easy Setup Guide English for connections You need to separately prepare the following...
Setup Guide
Page 5
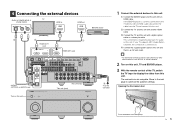
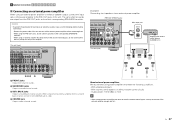
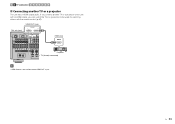
...; FM GND AM 5 OPTICAL SINGLE O AUDIO1 (OPTICAL or AUDIO) jack This unit (rear) This unit (front) NATURAL SOUND AV RECEIVER RX-A1010 Turn on this connection is currently connected to the TV directly with another HDMI cable. c Connect the TV and this unit. This connection is... A AV 2 B AUDIO 1 AUDIO 2 AUDIO 3 AUDIO 4 (2 TV) (3 CD) COMPONENT VIDEO PB PR Y AV 3 PB C PR MONITOR OUT/ZONE OUT Y PB PR REMOTE IN OUT AV 4 D MULTI CH INPUT CENTER ZONE OUT PRE OUT (SINGLE) 1 2 TRIGGER OUT 1 2 +12V 0.1A MAX. 4 Connecting the external devices Audio out (digital optical...
...; FM GND AM 5 OPTICAL SINGLE O AUDIO1 (OPTICAL or AUDIO) jack This unit (rear) This unit (front) NATURAL SOUND AV RECEIVER RX-A1010 Turn on this connection is currently connected to the TV directly with another HDMI cable. c Connect the TV and this unit. This connection is... A AV 2 B AUDIO 1 AUDIO 2 AUDIO 3 AUDIO 4 (2 TV) (3 CD) COMPONENT VIDEO PB PR Y AV 3 PB C PR MONITOR OUT/ZONE OUT Y PB PR REMOTE IN OUT AV 4 D MULTI CH INPUT CENTER ZONE OUT PRE OUT (SINGLE) 1 2 TRIGGER OUT 1 2 +12V 0.1A MAX. 4 Connecting the external devices Audio out (digital optical...
Owners Manual
Page 2
...you can do with this unit 6 Part names and functions 8 Front panel 8 Front display (indicators 10 Rear panel 11 Remote control 12 SETUP General setup procedure 14 1 Connecting speakers 15 Basic speaker configuration 16 Advanced speaker configuration 21 Input/output jacks and... Connecting video/audio recording devices 41 Connecting a device with analog multi-channel output 41 Connecting a device compatible with SCENE link playback (remote connection 42 Connecting a device compatible with the trigger function 42 7 Connecting the power cable 43 8 Selecting an on-screen menu language...
...you can do with this unit 6 Part names and functions 8 Front panel 8 Front display (indicators 10 Rear panel 11 Remote control 12 SETUP General setup procedure 14 1 Connecting speakers 15 Basic speaker configuration 16 Advanced speaker configuration 21 Input/output jacks and... Connecting video/audio recording devices 41 Connecting a device with analog multi-channel output 41 Connecting a device compatible with SCENE link playback (remote connection 42 Connecting a device compatible with the trigger function 42 7 Connecting the power cable 43 8 Selecting an on-screen menu language...
Owners Manual
Page 3
... 119 ADVANCED SETUP menu items 120 Changing the speaker impedance setting (SPEAKER IMP 120 Turning on/off the remote control sensor (REMOTE SENSOR 120 Selecting the remote control ID (REMOTE CON AMP 120 Changing the frequency step setting (TUNER FRQ STEP 121 Switching the video signal type (TV...firmware (FIRM UPDATE 122 Checking the firmware version (VERSION 122 Controlling external devices with the remote control 123 Setting remote control codes 123 Programming from other remote controls (learning 125 Editing device names 126 Operating multiple functions at once (macro 127 Resetting...
... 119 ADVANCED SETUP menu items 120 Changing the speaker impedance setting (SPEAKER IMP 120 Turning on/off the remote control sensor (REMOTE SENSOR 120 Selecting the remote control ID (REMOTE CON AMP 120 Changing the frequency step setting (TUNER FRQ STEP 121 Switching the video signal type (TV...firmware (FIRM UPDATE 122 Checking the firmware version (VERSION 122 Controlling external devices with the remote control 123 Setting remote control codes 123 Programming from other remote controls (learning 125 Editing device names 126 Operating multiple functions at once (macro 127 Resetting...
Owners Manual
Page 4
APPENDIX Frequently asked questions 133 Troubleshooting 134 Power and system 134 Audio 135 Video 136 FM/AM radio 137 USB and network 137 Remote control 138 Error indications on the front display 139 Glossary 140 Audio information 140 Video information 142 Video signal flow 143 Information on HDMI 144 HDMI Control 144 HDMI signal compatibility 145 Reference diagram (rear panel 146 Trademarks 147 Specifications 148 En 4
APPENDIX Frequently asked questions 133 Troubleshooting 134 Power and system 134 Audio 135 Video 136 FM/AM radio 137 USB and network 137 Remote control 138 Error indications on the front display 139 Glossary 140 Audio information 140 Video information 142 Video signal flow 143 Information on HDMI 144 HDMI Control 144 HDMI signal compatibility 145 Reference diagram (rear panel 146 Trademarks 147 Specifications 148 En 4

Owners Manual
Page 5
... "iPod" and "iPhone" as a result of differences between the manual and product, the product has priority. • This manual mainly explains operations using the supplied remote control. • This manual describes both "iPod" and "iPhone" unless the explanation describes exceptions. •" " indicates the cautions concerning operations or setup of the unit...
... "iPod" and "iPhone" as a result of differences between the manual and product, the product has priority. • This manual mainly explains operations using the supplied remote control. • This manual describes both "iPod" and "iPhone" unless the explanation describes exceptions. •" " indicates the cautions concerning operations or setup of the unit...
Owners Manual
Page 6
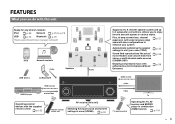
...Operating external devices with this unit Selecting the input source and favorite settings at once (SCENE) p.53 HDMI Control Audio Video TV TV remote control Operating the TV, AV receiver and BD/DVD player in various styles. FEATURES What you to 2 subwoofer connections. Allows you ...can do with the supplied remote control p.123 AV receiver (this unit) Remote control of this unit Ready for any kind of contents iPod p.65 Network p.75 to p.78 USB p.72 Bluetooth p....
...Operating external devices with this unit Selecting the input source and favorite settings at once (SCENE) p.53 HDMI Control Audio Video TV TV remote control Operating the TV, AV receiver and BD/DVD player in various styles. FEATURES What you to 2 subwoofer connections. Allows you ...can do with the supplied remote control p.123 AV receiver (this unit) Remote control of this unit Ready for any kind of contents iPod p.65 Network p.75 to p.78 USB p.72 Bluetooth p....

Owners Manual
Page 8
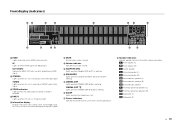
...press the bottom of the following conditions. - The network standby function is connected (p.66) 3 Front display Displays information (p.10). 4 Remote control sensor Receives remote control signals (p.5). 5 PURE DIRECT Enables/disables Pure Direct (p.59). 6 INPUT Selects an input source. 7 7 Front panel door For ... is in standby mode under any of the door to open it. Part names and functions Front panel 1 2 NATURAL SOUND AV RECEIVER RX-A2010 MAIN ZONE 3 4 INPUT ON SCREEN OPTION TONE/BALANCE STRAIGHT 1 RETURN ENTER DISPLAY USB PROGRAM PHONES ZONE 2 SCENE 2 3 INFO...
...press the bottom of the following conditions. - The network standby function is connected (p.66) 3 Front display Displays information (p.10). 4 Remote control sensor Receives remote control signals (p.5). 5 PURE DIRECT Enables/disables Pure Direct (p.59). 6 INPUT Selects an input source. 7 7 Front panel door For ... is in standby mode under any of the door to open it. Part names and functions Front panel 1 2 NATURAL SOUND AV RECEIVER RX-A2010 MAIN ZONE 3 4 INPUT ON SCREEN OPTION TONE/BALANCE STRAIGHT 1 RETURN ENTER DISPLAY USB PROGRAM PHONES ZONE 2 SCENE 2 3 INFO...
Owners Manual
Page 10
... speaker Front/rear presence speakers (L) Front/rear presence speakers (R) Subwoofer (1) Subwoofer (2) En 10 TUNED Lights up when this unit is working. B Cursor indicators Indicate the remote control cursor keys currently operational. OUT1/OUT2 Indicate the HDMI OUT jacks currently outputting an HDMI signal. 2 STEREO Lights up when this unit is receiving...
... speaker Front/rear presence speakers (L) Front/rear presence speakers (R) Subwoofer (1) Subwoofer (2) En 10 TUNED Lights up when this unit is working. B Cursor indicators Indicate the remote control cursor keys currently operational. OUT1/OUT2 Indicate the HDMI OUT jacks currently outputting an HDMI signal. 2 STEREO Lights up when this unit is receiving...

Owners Manual
Page 11
...937; SINGLE SPEAKER IMPEDANCE EF G HI J K 1 PHONO jacks For connecting a turntable (p.37). 2 DOCK jack For connecting an optional Yamaha products such as iPod dock (p.66), iPod wireless system (p.66), and Bluetooth receiver (p.70). 3 AV1~4 jacks For connecting video/audio playback...NETWORK jack For connecting to the network (p.40). 5 AV OUT jacks For outputting video/audio to output video signals (p.33). A REMOTE 1~2 (IN/OUT) jacks For connecting a Yamaha product compatible with component video to input audio signals (p.41). RS-232C R 1 COAXIAL 2 COAXIAL 3 OPTICAL 4 OPTICAL 5 ...
...937; SINGLE SPEAKER IMPEDANCE EF G HI J K 1 PHONO jacks For connecting a turntable (p.37). 2 DOCK jack For connecting an optional Yamaha products such as iPod dock (p.66), iPod wireless system (p.66), and Bluetooth receiver (p.70). 3 AV1~4 jacks For connecting video/audio playback...NETWORK jack For connecting to the network (p.40). 5 AV OUT jacks For outputting video/audio to output video signals (p.33). A REMOTE 1~2 (IN/OUT) jacks For connecting a Yamaha product compatible with component video to input audio signals (p.41). RS-232C R 1 COAXIAL 2 COAXIAL 3 OPTICAL 4 OPTICAL 5 ...
Owners Manual
Page 12
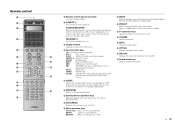
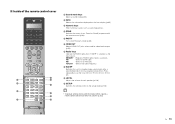
... operation keys Operate playback and menu display etc. F DISPLAY Displays the status information on the TV. 9 Menu operation keys Cursor keys Select a menu or a parameter. Remote control 1 2 3 4 5 SOURCE RECEIVER AV 1 2 3 5 6 7 AUDIO 1 2 3 PHONO MULTI USB DOCK TUNER [ A ] SCENE 1 2 3 4 V-AUX 4 NET [ B ] 4 6 7 8 9 0...PRESET INPUT MUTE CLASSICAL MOVIE TV TV VOL LIVE CLUB STEREO TV CH ENTERTAIN STRAIGHT PURE DIRECT C D E F G 1 Remote control signal transmitter Transmits infrared signals. 2 SOURCE Turns on/off (standby) this unit or external device) to play back....
... operation keys Operate playback and menu display etc. F DISPLAY Displays the status information on the TV. 9 Menu operation keys Cursor keys Select a menu or a parameter. Remote control 1 2 3 4 5 SOURCE RECEIVER AV 1 2 3 5 6 7 AUDIO 1 2 3 PHONO MULTI USB DOCK TUNER [ A ] SCENE 1 2 3 4 V-AUX 4 NET [ B ] 4 6 7 8 9 0...PRESET INPUT MUTE CLASSICAL MOVIE TV TV VOL LIVE CLUB STEREO TV CH ENTERTAIN STRAIGHT PURE DIRECT C D E F G 1 Remote control signal transmitter Transmits infrared signals. 2 SOURCE Turns on/off (standby) this unit or external device) to play back....
Owners Manual
Page 13
... Turns on the front display (p.89). P LEVEL Adjusts the volume of the remote control cover SOURCE RECEIVER H I INFO Selects the information displayed on /off ). FM Switches to operate with the remote control, register a remote control code for video/audio output (p.52). E ENHANCER PARTY HDMI OUT INFO MEMORY..../CH Selects the radio frequency. Press repeatedly to the setup mode (p.123) • To operate external devices with the remote control (p.84). Q SETUP Switches the remote control to set the time (120 min, 90 min, 60 min, 30 min, off the party mode (p.85).
... Turns on the front display (p.89). P LEVEL Adjusts the volume of the remote control cover SOURCE RECEIVER H I INFO Selects the information displayed on /off ). FM Switches to operate with the remote control, register a remote control code for video/audio output (p.52). E ENHANCER PARTY HDMI OUT INFO MEMORY..../CH Selects the radio frequency. Press repeatedly to the setup mode (p.123) • To operate external devices with the remote control (p.84). Q SETUP Switches the remote control to set the time (120 min, 90 min, 60 min, 30 min, off the party mode (p.85).
Owners Manual
Page 27
... (rear) 2 AV 1 (1 BD/DVD) AV 2 AV 3 HDMI AV 4 AV 5 AV 6 AV 7 COMPONENT VIDEO PB PR Y AV 3 PB C PR MONITOR OUT/ZONE OUT Y PB PR REMOTE 1 2 IN OUT IN OUT TRIGGER OUT 1 AV 4 D O 4 MULTI CH INPUT CENTER ZONE OUT PRE OUT (SINGLE) (FRONT) 1 2 +12V 0.1A MAX. PR L 2 3 FRONT SURROUND ...Connecting front speakers via an external power amplifier PRE OUT (FRONT) jacks MI AV 4 AV 5 AV 6 AV 7 RS-232C MONITOR OUT/ZONE OUT PB PR REMOTE 1 2 IN OUT IN OUT PRE OUT (SINGLE) (FRONT) 1 TRIGGER OUT 1 2 +12V 0.1A MAX. Remove the power cable of this unit. BACK ...
... (rear) 2 AV 1 (1 BD/DVD) AV 2 AV 3 HDMI AV 4 AV 5 AV 6 AV 7 COMPONENT VIDEO PB PR Y AV 3 PB C PR MONITOR OUT/ZONE OUT Y PB PR REMOTE 1 2 IN OUT IN OUT TRIGGER OUT 1 AV 4 D O 4 MULTI CH INPUT CENTER ZONE OUT PRE OUT (SINGLE) (FRONT) 1 2 +12V 0.1A MAX. PR L 2 3 FRONT SURROUND ...Connecting front speakers via an external power amplifier PRE OUT (FRONT) jacks MI AV 4 AV 5 AV 6 AV 7 RS-232C MONITOR OUT/ZONE OUT PB PR REMOTE 1 2 IN OUT IN OUT PRE OUT (SINGLE) (FRONT) 1 TRIGGER OUT 1 2 +12V 0.1A MAX. Remove the power cable of this unit. BACK ...
Owners Manual
Page 29
..., any videos input to this unit can be output to the TV. If you connect a TV that supports HDMI Control to this unit with TV remote control operations. For details, see "Video signal flow" (p.143). • You can connect another TV or a projector by using the HDMI OUT 2 jack (p.34). This...
..., any videos input to this unit can be output to the TV. If you connect a TV that supports HDMI Control to this unit with TV remote control operations. For details, see "Video signal flow" (p.143). • You can connect another TV or a projector by using the HDMI OUT 2 jack (p.34). This...

Owners Manual
Page 30
... keys ( / ) to select "HDMI". • If HDMI Control does not work properly, try turning off the TV or adjusting the TV volume with the TV remote control. 1 2 TV connection 3 4 5 6 7 8 9 ❑ Necessary settings To use HDMI Control and ARC, you select a TV program with the TV... remote control, the input source of this unit will be automatically switched to "AUDIO1" and the TV audio will be heard, check that "ARC" (p.111) in ...
... keys ( / ) to select "HDMI". • If HDMI Control does not work properly, try turning off the TV or adjusting the TV volume with the TV remote control. 1 2 TV connection 3 4 5 6 7 8 9 ❑ Necessary settings To use HDMI Control and ARC, you select a TV program with the TV... remote control, the input source of this unit will be automatically switched to "AUDIO1" and the TV audio will be heard, check that "ARC" (p.111) in ...
Owners Manual
Page 32
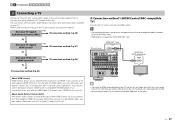
... the TV and then turn on this unit and playback devices and then turn off the TV or adjusting the TV volume with the TV remote control, the input source of the TV. c Turn on the main power of this unit will be automatically switched to "AUDIO1" and the TV audio... by pressing AUDIO1 or SCENE(TV), the TV audio will be output to the TV no matter how you select a TV program with the TV remote control. This unit (rear) HDMI OUT 1 jack HDMI OUT 1 2 ARC HDMI DOCK NETWORK HDMI OUT 1 ARC 2 AV 1 (1 AV 1 (1 BD/DVD) AV 2 PHONO GND L R AV 3 AV...
... the TV and then turn on this unit and playback devices and then turn off the TV or adjusting the TV volume with the TV remote control, the input source of the TV. c Turn on the main power of this unit will be automatically switched to "AUDIO1" and the TV audio... by pressing AUDIO1 or SCENE(TV), the TV audio will be output to the TV no matter how you select a TV program with the TV remote control. This unit (rear) HDMI OUT 1 jack HDMI OUT 1 2 ARC HDMI DOCK NETWORK HDMI OUT 1 ARC 2 AV 1 (1 AV 1 (1 BD/DVD) AV 2 PHONO GND L R AV 3 AV...
Owners Manual
Page 34
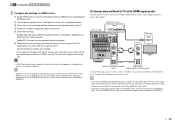
... Control is not available on the HDMI OUT 2 jack. If you can switch the TVs (or projector) to be used for watching videos with the remote control (p.52). 1 2 TV connection 3 4 5 6 7 8 9 ■ Connecting another TV or a projector to this unit with an HDMI cable, you connect another TV or a projector This unit...
... Control is not available on the HDMI OUT 2 jack. If you can switch the TVs (or projector) to be used for watching videos with the remote control (p.52). 1 2 TV connection 3 4 5 6 7 8 9 ■ Connecting another TV or a projector to this unit with an HDMI cable, you connect another TV or a projector This unit...
Owners Manual
Page 35
... (AV1~7) jacks 2 AV 1 (1 BD/DVD) AV 2 AV 3 HDMI AV 4 AV 5 AV 6 AV 7 COMPONENT VIDEO PB PR Y AV 3 PB C PR MONITOR OUT/ZONE OUT Y PB PR REMOTE 1 2 IN OUT IN OUT TRIGG OUT 1 AV 4 D MULTI CH INPUT CENTER ZONE OUT PRE OUT (SINGLE) (FRONT) 1 2 +12V 0.1A 2 FRONT SURROUND SUR. Connecting an iPod...
... (AV1~7) jacks 2 AV 1 (1 BD/DVD) AV 2 AV 3 HDMI AV 4 AV 5 AV 6 AV 7 COMPONENT VIDEO PB PR Y AV 3 PB C PR MONITOR OUT/ZONE OUT Y PB PR REMOTE 1 2 IN OUT IN OUT TRIGG OUT 1 AV 4 D MULTI CH INPUT CENTER ZONE OUT PRE OUT (SINGLE) (FRONT) 1 2 +12V 0.1A 2 FRONT SURROUND SUR. Connecting an iPod...

Owners Manual
Page 39
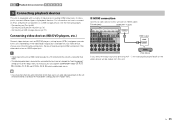
... MONITOR OUT/ ZONE OUT Y AV 1 A AV 2 B AUDIO 1 AUDIO 2 AUDIO 3 AUDIO 4 (2 TV) (3 CD) COMPONENT VIDEO PB PR Y AV 3 PB C PR MONITOR OUT/ZONE OUT Y PB PR REMOTE 1 2 IN OUT IN OUT AV 4 D MULTI CH INPUT CENTER ZONE OUT PRE OUT (SINGLE) (FRONT) 1 R 1 COAXIAL 2 COAXIAL 3 OPTICAL 4 OPTICAL 5 OPTICAL 6 COAXIAL 2 FRONT R SURROUND L SURROUND SUR...
... MONITOR OUT/ ZONE OUT Y AV 1 A AV 2 B AUDIO 1 AUDIO 2 AUDIO 3 AUDIO 4 (2 TV) (3 CD) COMPONENT VIDEO PB PR Y AV 3 PB C PR MONITOR OUT/ZONE OUT Y PB PR REMOTE 1 2 IN OUT IN OUT AV 4 D MULTI CH INPUT CENTER ZONE OUT PRE OUT (SINGLE) (FRONT) 1 R 1 COAXIAL 2 COAXIAL 3 OPTICAL 4 OPTICAL 5 OPTICAL 6 COAXIAL 2 FRONT R SURROUND L SURROUND SUR...

Owners Manual
Page 42
...53) by connecting the external device to one of the REMOTE (OUT) jacks with a scene selection (p.53). 1 2 3 4 5 6 Other connections 7 8 9 Connecting a device compatible with SCENE link playback (remote connection) If you have a Yamaha subwoofer that supports a system connection or a device with operations...3/R.PRESENCE R EXTRA SP2 L CENTER R FRONT L ZONE 2 BI-AMP R NGLE SPEAKER IMPEDANCE Remote input REMOTE IN Yamaha product (DVD player, etc.) • If you connect a Yamaha product compatible with SCENE link playback to operate devices in the main zone from Zone2 (p.83). ...
...53) by connecting the external device to one of the REMOTE (OUT) jacks with a scene selection (p.53). 1 2 3 4 5 6 Other connections 7 8 9 Connecting a device compatible with SCENE link playback (remote connection) If you have a Yamaha subwoofer that supports a system connection or a device with operations...3/R.PRESENCE R EXTRA SP2 L CENTER R FRONT L ZONE 2 BI-AMP R NGLE SPEAKER IMPEDANCE Remote input REMOTE IN Yamaha product (DVD player, etc.) • If you connect a Yamaha product compatible with SCENE link playback to operate devices in the main zone from Zone2 (p.83). ...


