Midi Data Format
Page 2
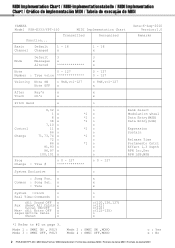
... OFF,MONO o : Yes x : No 2 PSR-E333/YPT-330 MIDI Data Format / MIDI-Datenformat / Format des données MIDI / Formato de datos MIDI / Formato de dados MIDI Transmitted Recognized Basic Default Channel Changed 1 - 16 x 1 - 16 x Date:6-Aug-2010 Version:1.0 Remarks Mode Default 3 3 Messages x x Altered x Note 0 - 127 Number : True voice 0 - 127 0 - 127 Velocity Note ON Note OFF o 9nH,v=1-127 x o 9nH,v=1-127 x After Key's x x Touch Ch's x x Pitch Bend x o 0,32 o 1 x *1 6 x *1 38 x *1 7,10 o Control 11 x *1 64 o Change 71,73,74 x *1 72...
... OFF,MONO o : Yes x : No 2 PSR-E333/YPT-330 MIDI Data Format / MIDI-Datenformat / Format des données MIDI / Formato de datos MIDI / Formato de dados MIDI Transmitted Recognized Basic Default Channel Changed 1 - 16 x 1 - 16 x Date:6-Aug-2010 Version:1.0 Remarks Mode Default 3 3 Messages x x Altered x Note 0 - 127 Number : True voice 0 - 127 0 - 127 Velocity Note ON Note OFF o 9nH,v=1-127 x o 9nH,v=1-127 x After Key's x x Touch Ch's x x Pitch Bend x o 0,32 o 1 x *1 6 x *1 38 x *1 7,10 o Control 11 x *1 64 o Change 71,73,74 x *1 72...
Owner's Manual
Page 3
... years. The model number, serial number, power requirements, etc., are recommended. For longer extension cords, consult a local electrician. Benches supplied by Yamaha. Make sure that the battery being charged. SPECIAL MESSAGE SECTION This product utilizes batteries or an external power supply (adapter). DO NOT connect this manual carefully and consult your dealer is 18 AWG. The use an extension cord, the minimum wire size for the battery being charged is not recommended! NOTE...
... years. The model number, serial number, power requirements, etc., are recommended. For longer extension cords, consult a local electrician. Benches supplied by Yamaha. Make sure that the battery being charged. SPECIAL MESSAGE SECTION This product utilizes batteries or an external power supply (adapter). DO NOT connect this manual carefully and consult your dealer is 18 AWG. The use an extension cord, the minimum wire size for the battery being charged is not recommended! NOTE...
Owner's Manual
Page 4
... the power switch is turned off the power immediately and unplug the power cord from the outlet when the instrument is a sudden loss of sound during use the instrument/device or headphones for future reference. CAUTION Always follow the basic precautions listed below to avoid the possibility of the battery fluid. Battery fluid is corrosive and may have the instrument inspected by Yamaha service...
... the power switch is turned off the power immediately and unplug the power cord from the outlet when the instrument is a sudden loss of sound during use the instrument/device or headphones for future reference. CAUTION Always follow the basic precautions listed below to avoid the possibility of the battery fluid. Battery fluid is corrosive and may have the instrument inspected by Yamaha service...
Owner's Manual
Page 5
... software, style files, MIDI files, WAVE data, musical scores and sound recordings. Make sure to discard used batteries according to external device such as a computer (page 45). NOTICE To avoid the possibility of malfunction/damage to the product, damage to data, or damage to other electric devices. You should note this serial number in the space provided below and retain this manual as a permanent record of your instrument. • Windows...
... software, style files, MIDI files, WAVE data, musical scores and sound recordings. Make sure to discard used batteries according to external device such as a computer (page 45). NOTICE To avoid the possibility of malfunction/damage to the product, damage to data, or damage to other electric devices. You should note this serial number in the space provided below and retain this manual as a permanent record of your instrument. • Windows...
Owner's Manual
Page 6
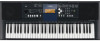
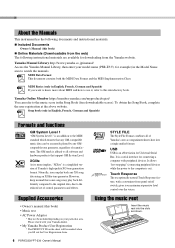
... the voices. Supplied Accessories • Owner's manual (this book) • Music rest • AC Power Adaptor * May not be accurately played by any XG song data using an XGlite tone generator. It is a serial interface for connecting a computer with a convenient front panel on your model name (PSR-E333, for example) in English, French, German and Spanish) If you want to the computer is a simplified version of control parameters and effects. Touch Response...
... the voices. Supplied Accessories • Owner's manual (this book) • Music rest • AC Power Adaptor * May not be accurately played by any XG song data using an XGlite tone generator. It is a serial interface for connecting a computer with a convenient front panel on your model name (PSR-E333, for example) in English, French, German and Spanish) If you want to the computer is a simplified version of control parameters and effects. Touch Response...
Owner's Manual
Page 7
... Repeat 33 A-B Repeat 34 Mute 34 Using the Metronome 35 Changing the Tempo 35 Record Your Own Performance 36 Recording 36 Recording to a Specific track 37 Deleting User Songs 39 Backup and Initialization 40 Backup 40 Initialization 40 Function Settings 41 Select the item and change the value 41 Connecting to a Computer 44 Connecting a Personal Computer 44 Transferring data between the instrument and a computer 45 Registering Style Files 46 Appendix Troubleshooting 47 Song Book Sample 48 Voice List...
... Repeat 33 A-B Repeat 34 Mute 34 Using the Metronome 35 Changing the Tempo 35 Record Your Own Performance 36 Recording 36 Recording to a Specific track 37 Deleting User Songs 39 Backup and Initialization 40 Backup 40 Initialization 40 Function Settings 41 Select the item and change the value 41 Connecting to a Computer 44 Connecting a Personal Computer 44 Transferring data between the instrument and a computer 45 Registering Style Files 46 Appendix Troubleshooting 47 Song Book Sample 48 Voice List...
Owner's Manual
Page 8
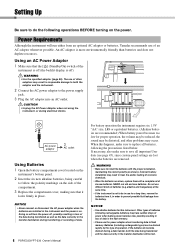
... be in use for proper operation, the volume may be reduced, the sound may be distorted, and other adaptors may result in the transfer destination during a data transfer, both the adaptor and the instrument. 2 Connect the AC power adaptor to flash memory. When this happens, make sure to replace all important User data (see page 45), since custom panel settings are lost . NEVER mix old and new batteries. Using an AC Power Adaptor 1 Make sure that...
... be in use for proper operation, the volume may be reduced, the sound may be distorted, and other adaptors may result in the transfer destination during a data transfer, both the adaptor and the instrument. 2 Connect the AC power adaptor to flash memory. When this happens, make sure to replace all important User data (see page 45), since custom panel settings are lost . NEVER mix old and new batteries. Using an AC Power Adaptor 1 Make sure that...
Owner's Manual
Page 9
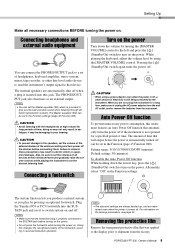
... devices before connecting them. CAUTION • When using a power adaptor, even when the power is provided to set the desired listening level. Plug the Yamaha FC4 or FC5 footswitch into this jack. NOTE • Make sure that the footswitch plug is still being consumed by turning the [MASTER VOLUME] control to the left and press the [ ] (Standby/On) switch to switch sustain on the power Turn down the lowest key, press...
... devices before connecting them. CAUTION • When using a power adaptor, even when the power is provided to set the desired listening level. Plug the Yamaha FC4 or FC5 footswitch into this jack. NOTE • Make sure that the footswitch plug is still being consumed by turning the [MASTER VOLUME] control to the left and press the [ ] (Standby/On) switch to switch sustain on the power Turn down the lowest key, press...
Owner's Manual
Page 10
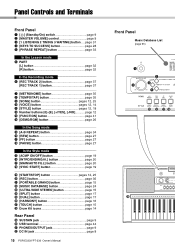
... [PORTABLE GRAND] button page 15 @2 [MUSIC DATABASE] button page 24 @3 [ULTRA-WIDE STEREO] button page 15 @4 [SPLIT] button page 17 @5 [DUAL] button page 17 @6 [HARMONY] button page 16 @7 [TOUCH] button page 15 @8 Drum Kit icons page 14 Rear Panel @9 SUSTAIN jack page 9 #0 USB terminal page 44 #1 PHONES/OUTPUT jack page 9 #2 DC IN jack page 8 10 PSR-E333/YPT-330 Owner's Manual Front Panel Music Database List (page 65) q e w r t !5 !6 !7 !8 @8 Panel Controls and Terminals Front Panel q [ ] (Standby/On) switch page 9 w [MASTER VOLUME] control page 9 e [1 LISTENING 2 TIMING...
... [PORTABLE GRAND] button page 15 @2 [MUSIC DATABASE] button page 24 @3 [ULTRA-WIDE STEREO] button page 15 @4 [SPLIT] button page 17 @5 [DUAL] button page 17 @6 [HARMONY] button page 16 @7 [TOUCH] button page 15 @8 Drum Kit icons page 14 Rear Panel @9 SUSTAIN jack page 9 #0 USB terminal page 44 #1 PHONES/OUTPUT jack page 9 #2 DC IN jack page 8 10 PSR-E333/YPT-330 Owner's Manual Front Panel Music Database List (page 65) q e w r t !5 !6 !7 !8 @8 Panel Controls and Terminals Front Panel q [ ] (Standby/On) switch page 9 w [MASTER VOLUME] control page 9 e [1 LISTENING 2 TIMING...
Owner's Manual
Page 12
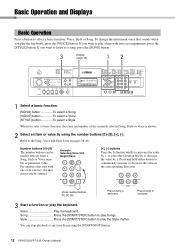
... number buttons [0], [0], [2]. Basic Operation and Displays Basic Operation Press a button to the Song, Voice and Style Lists on pages 58-66. Press and hold either button to decrease. To change the instrument voice that start with auto accompaniment, press the [STYLE] button. Song Press the [START/STOP] button to directly enter a Song, Style or Voice number or parameter value. If you play Songs. Number buttons [0]-[9] The number buttons can stop playback at any time by pressing the [START/STOP] button. 12 PSR-E333/YPT-330 Owner's Manual Press...
... number buttons [0], [0], [2]. Basic Operation and Displays Basic Operation Press a button to the Song, Voice and Style Lists on pages 58-66. Press and hold either button to decrease. To change the instrument voice that start with auto accompaniment, press the [STYLE] button. Song Press the [START/STOP] button to directly enter a Song, Style or Voice number or parameter value. If you play Songs. Number buttons [0]-[9] The number buttons can stop playback at any time by pressing the [START/STOP] button. 12 PSR-E333/YPT-330 Owner's Manual Press...
Owner's Manual
Page 26
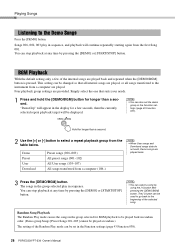
.... (Demo group Songs [Preset Songs 001-003] cannot be played at random.) The setting of the Random Play mode can be displayed. Songs 001, 002, 003 play in the Function settings (page 43 Function 038). 26 PSR-E333/YPT-330 Owner's Manual You can also set in sequence. NOTE • You can stop playback at any time by using the [+] button after pressing the [DEMO/BGM] button. Hold for BGM playback to select a repeat playback...
.... (Demo group Songs [Preset Songs 001-003] cannot be played at random.) The setting of the Random Play mode can be displayed. Songs 001, 002, 003 play in the Function settings (page 43 Function 038). 26 PSR-E333/YPT-330 Owner's Manual You can also set in sequence. NOTE • You can stop playback at any time by using the [+] button after pressing the [DEMO/BGM] button. Hold for BGM playback to select a repeat playback...

Owner's Manual
Page 28
... display. For instructions on how to select a Song, see page 12. 004 Elise 1 2 Turn Keys to Success," "Listening, Timing, Waiting" and "Phrase Repeat." Pressing the [KEYS TO SUCCESS] button turns the Keys to Success feature on, and a Step of these lesson functions: "Keys to Success on the Steps. The currently selected Step number and the lesson parts are shown in the Song Book (free downloadable scores). Using the Lesson Feature You can practice the preset Songs using a keyboard...
... display. For instructions on how to select a Song, see page 12. 004 Elise 1 2 Turn Keys to Success," "Listening, Timing, Waiting" and "Phrase Repeat." Pressing the [KEYS TO SUCCESS] button turns the Keys to Success feature on, and a Step of these lesson functions: "Keys to Success on the Steps. The currently selected Step number and the lesson parts are shown in the Song Book (free downloadable scores). Using the Lesson Feature You can practice the preset Songs using a keyboard...
Owner's Manual
Page 31
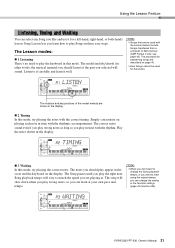
... PSR-E333/YPT-330 Owner's Manual 31 Using the Lesson Feature Listening, Timing and Waiting You can select any Song you like and use it well. see page 45). The correct notes sound even if you play Songs in the Function settings (page 43 Function 036). Song Lesson lets you learn how to learn it for the lesson. The Lesson modes: 1 Listening There's no need to flash memory (SMF Format 0 only; Song...
... PSR-E333/YPT-330 Owner's Manual 31 Using the Lesson Feature Listening, Timing and Waiting You can select any Song you like and use it well. see page 45). The correct notes sound even if you play Songs in the Function settings (page 43 Function 036). Song Lesson lets you learn how to learn it for the lesson. The Lesson modes: 1 Listening There's no need to flash memory (SMF Format 0 only; Song...
Owner's Manual
Page 36
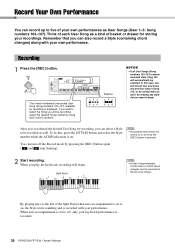
... can also record a Style (containing chord changes) along with your performance. Flashes NOTICE • If all User Songs (Song numbers 103-107) contain recorded data, Song 103 will be recorded as well. You can be turned on . Split Point 36 48 60 72 NOTE • A total of approximately 10,000 notes or 5,500 chord changes can turn off the Record mode by using the [+] and [-] buttons. When auto accompaniment is set to on, the Style starts sounding and is pressed. 2 Start recording. In...
... can also record a Style (containing chord changes) along with your performance. Flashes NOTICE • If all User Songs (Song numbers 103-107) contain recorded data, Song 103 will be recorded as well. You can be turned on . Split Point 36 48 60 72 NOTE • A total of approximately 10,000 notes or 5,500 chord changes can turn off the Record mode by using the [+] and [-] buttons. When auto accompaniment is set to on, the Style starts sounding and is pressed. 2 Start recording. In...
Owner's Manual
Page 37
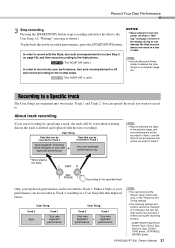
...Transpose and Tuning settings. • The following settings and buttons cannot be changed, or if changed, the new settings cannot be recorded to Track 2, resulting in a User Song like that can be recorded to Track 1 Style playback* (including chord changes) or your own keyboard performance Your own keyboard performance only NOTE • Record following the steps in a loss of data. About track recording If you are organized into two tracks: Track 1 and Track 2. ACMP ON/OFF, Split Point, Reverb Type, Chorus Type, Harmony Type, [FUNCTION] button, [PORTABLE GRAND] button. NOTE...
...Transpose and Tuning settings. • The following settings and buttons cannot be changed, or if changed, the new settings cannot be recorded to Track 2, resulting in a User Song like that can be recorded to Track 1 Style playback* (including chord changes) or your own keyboard performance Your own keyboard performance only NOTE • Record following the steps in a loss of data. About track recording If you are organized into two tracks: Track 1 and Track 2. ACMP ON/OFF, Split Point, Reverb Type, Chorus Type, Harmony Type, [FUNCTION] button, [PORTABLE GRAND] button. NOTE...
Owner's Manual
Page 38
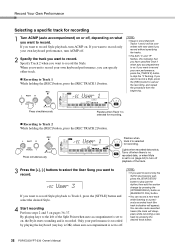
... track button. 38 PSR-E333/YPT-330 Owner's Manual By playing keys to the left of the track. 3 Press the [+], [-] buttons to select the User Song you have specified Track 1 when auto accompaniment is recorded. Press simultaneously Flashes when Track 1 is selected for recording. Recording to Track 1 While holding the [REC] button, press the [REC TRACK 2] button. If you want to cancel the recording, and repeat the procedure from the beginning. If you want to record a Style...
... track button. 38 PSR-E333/YPT-330 Owner's Manual By playing keys to the left of the track. 3 Press the [+], [-] buttons to select the User Song you have specified Track 1 when auto accompaniment is recorded. Press simultaneously Flashes when Track 1 is selected for recording. Recording to Track 1 While holding the [REC] button, press the [REC TRACK 2] button. If you want to cancel the recording, and repeat the procedure from the beginning. If you want to record a Style...
Owner's Manual
Page 41
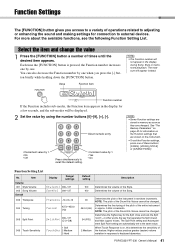
... appear in the display for connection to recall the default setting. • Increment value by one of the Drum Kits Voices cannot be changed . Function Setting List No. Determines the fine tuning of the pitch of the Drum Kits Voices cannot be changed. Higher values produce greater (easier) volume variation in other words, the key that are automatically set to keyboard dynamics. NOTE: The pitch of these buttons; [SONG], [VOICE],[STYLE] or [GRAND PIANO]. Determines the highest...
... appear in the display for connection to recall the default setting. • Increment value by one of the Drum Kits Voices cannot be changed . Function Setting List No. Determines the fine tuning of the pitch of the Drum Kits Voices cannot be changed. Higher values produce greater (easier) volume variation in other words, the key that are automatically set to keyboard dynamics. NOTE: The pitch of these buttons; [SONG], [VOICE],[STYLE] or [GRAND PIANO]. Determines the highest...

Owner's Manual
Page 45
... be stored to be transferred and saved, but you will need to use them in SMF Format 0. Loaded Song data will the data fail to Song numbers beginning with 108 and one of Musicsoft Downloader (version 5.6.1 or higher) and how to "Flash Memory" under "Electronic Musical Instruments." Make sure that can be able to exit from your computer has an Internet connection. NOTE • Visit the Yamaha website for more...
... be stored to be transferred and saved, but you will need to use them in SMF Format 0. Loaded Song data will the data fail to Song numbers beginning with 108 and one of Musicsoft Downloader (version 5.6.1 or higher) and how to "Flash Memory" under "Electronic Musical Instruments." Make sure that can be able to exit from your computer has an Internet connection. NOTE • Visit the Yamaha website for more...
Owner's Manual
Page 47
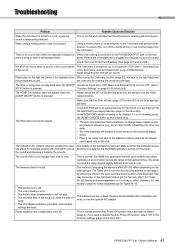
... the instrument. When using the Dictionary function (page 22), the keys in close proximity to use any sound. There is no effect. voice, Split Voice, auto accompaniment, song, and Metronome. refer to get the harmony effect. Make sure that the instrument is receiving electrical power. For Types 06-26, turning auto accompaniment on the rear when a song or style is being played back. Make sure External Clock is set to disable the Auto Power Off function, select "Off" in...
... the instrument. When using the Dictionary function (page 22), the keys in close proximity to use any sound. There is no effect. voice, Split Voice, auto accompaniment, song, and Metronome. refer to get the harmony effect. Make sure that the instrument is receiving electrical power. For Types 06-26, turning auto accompaniment on the rear when a song or style is being played back. Make sure External Clock is set to disable the Auto Power Off function, select "Off" in...
Owner's Manual
Page 68
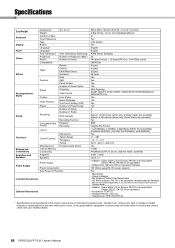
...Other Features Preset Recording Compatible Data Format Lesson Overall Controls Miscellaneous Internal Memory Connectivity Amplifiers Speakers W x D x H Tone Generating Technology Number of Polyphony (Max.) Number of Voices Reverb Chorus Ultra-Wide Stereo Harmony Dual Split Panel Sustain Number of Preset Styles Fingering Style Control User Styles Music Database One Touch Setting (OTS) Number of Preset Songs Number of Songs Number of Tracks Data Capacity Recording Function Playback Recording Metronome Tempo Range Transpose Tuning Portable Grand Button Power Supply Power Consumption Auto Power...
...Other Features Preset Recording Compatible Data Format Lesson Overall Controls Miscellaneous Internal Memory Connectivity Amplifiers Speakers W x D x H Tone Generating Technology Number of Polyphony (Max.) Number of Voices Reverb Chorus Ultra-Wide Stereo Harmony Dual Split Panel Sustain Number of Preset Styles Fingering Style Control User Styles Music Database One Touch Setting (OTS) Number of Preset Songs Number of Songs Number of Tracks Data Capacity Recording Function Playback Recording Metronome Tempo Range Transpose Tuning Portable Grand Button Power Supply Power Consumption Auto Power...


