

Owner's Manual
Page 1
MULTITRACK MD RECORDER Owner's Manual IN OUT THRU MIDI TRACK DIRECT OUT 2TR IN STEREO MONITOR OUT OUT 1 2 AUX SEND 1 2 INSERT I/O MIC/LINE INPUT INSERT I/O 3 4 LINE INPUT 5 6 7 8 1 GAIN 2 GAIN 3 GAIN 4 GAIN 5/6 7/8 LINE MIC MIC/ LINE ...
MULTITRACK MD RECORDER Owner's Manual IN OUT THRU MIDI TRACK DIRECT OUT 2TR IN STEREO MONITOR OUT OUT 1 2 AUX SEND 1 2 INSERT I/O MIC/LINE INPUT INSERT I/O 3 4 LINE INPUT 5 6 7 8 1 GAIN 2 GAIN 3 GAIN 4 GAIN 5/6 7/8 LINE MIC MIC/ LINE ...

Owner's Manual
Page 6
... panel 23 Front panel 24 Basic operation 25 Before you begin 25 Example connections 25 Turning on the MD4S 26 Inserting a disc 26 Recording the first track (Direct Recording 26 Preparations for recording 26 Start recording 28 Overdubbing 30 Mixdown ...32 After completing the ...Basic Operation section 34 Advanced recording techniques 35 Advanced techniques on the MD4S 35 Mixing multiple channels as you record ...
... panel 23 Front panel 24 Basic operation 25 Before you begin 25 Example connections 25 Turning on the MD4S 26 Inserting a disc 26 Recording the first track (Direct Recording 26 Preparations for recording 26 Start recording 28 Overdubbing 30 Mixdown ...32 After completing the ...Basic Operation section 34 Advanced recording techniques 35 Advanced techniques on the MD4S 35 Mixing multiple channels as you record ...
Owner's Manual
Page 7
... the song playback order (Program Play 71 Editing functions 73 Copying a portion of a track (Part Copy 73 Erasing a section of a track (Part Erase 74 Copying an entire track to another track (Track Copy 75 Erasing an entire track (Track Erase 76 Copying/converting a song (Song Copy 76 Erasing a song (Song Erase 78... display brightness 88 Selecting the type of Frame display 88 Using a Foot switch 89 MIDI functions 90 Synchronizing the MD4S with a MIDI sequencer 90 About MTC and MIDI Clock 91 Synchronization using MTC 91 Synchronization using MIDI Clock 92 Synchronizing two...
... the song playback order (Program Play 71 Editing functions 73 Copying a portion of a track (Part Copy 73 Erasing a section of a track (Part Erase 74 Copying an entire track to another track (Track Copy 75 Erasing an entire track (Track Erase 76 Copying/converting a song (Song Copy 76 Erasing a song (Song Erase 78... display brightness 88 Selecting the type of Frame display 88 Using a Foot switch 89 MIDI functions 90 Synchronizing the MD4S with a MIDI sequencer 90 About MTC and MIDI Clock 91 Synchronization using MTC 91 Synchronization using MIDI Clock 92 Synchronizing two...
Owner's Manual
Page 9
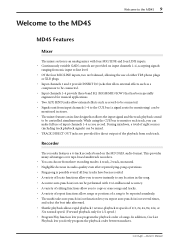
... between markers. -Owner's Manual This provides many advantages over tape-based multitrack recorders. • You can choose from three recording modes: 4 track, 2 track, monaural. • Negligible decrease in audio quality even after repeated ping-pong operations. • Ping-pong is an analog mixer with 11.6-... • Two AUX SEND jacks allow external effects such as you record. Welcome to the MD4S Welcome to the MD4S 9 MD4S Features Mixer The mixer section is possible even if all four tracks have been recorded. • A variety of locate functions allow you to move instantly to ...
... between markers. -Owner's Manual This provides many advantages over tape-based multitrack recorders. • You can choose from three recording modes: 4 track, 2 track, monaural. • Negligible decrease in audio quality even after repeated ping-pong operations. • Ping-pong is an analog mixer with 11.6-... • Two AUX SEND jacks allow external effects such as you record. Welcome to the MD4S Welcome to the MD4S 9 MD4S Features Mixer The mixer section is possible even if all four tracks have been recorded. • A variety of locate functions allow you to move instantly to ...
Owner's Manual
Page 10
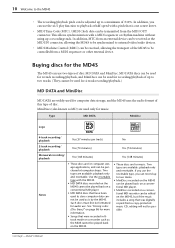
...can be used for audio use the rewritable type, you use . Buying discs for the MD4S The MD4S can be used for recording/playback of up to two tracks. (They cannot be used for 4-track recording/playback.) MD DATA and MiniDisc MD DATA are for computer storage applications, and can... be adjusted up to two tracks. • MiniDiscs recorded on the MD4S can be played back on a conventional MD player. • MiniDiscs recorded on the MD4S. • These discs are widely used to store computer data cannot be played back...
...can be used for audio use the rewritable type, you use . Buying discs for the MD4S The MD4S can be used for recording/playback of up to two tracks. (They cannot be used for 4-track recording/playback.) MD DATA and MiniDisc MD DATA are for computer storage applications, and can... be adjusted up to two tracks. • MiniDiscs recorded on the MD4S can be played back on a conventional MD player. • MiniDiscs recorded on the MD4S. • These discs are widely used to store computer data cannot be played back...
Owner's Manual
Page 11
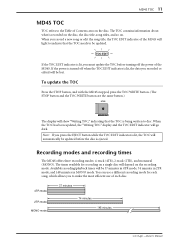
...is recorded on the disc, the disc title, song titles, and so on the recording mode. Recording modes and recording times The MD4S offers three recording modes: 4-track (4TR), 2-track (2TR), and monaural (MONO). The times available for each disc. 4TR mode 2TR mode MONO mode 37 minutes 74 minutes 148 ...the same button.) STOP TOC WRITE The display will show "Writing TOC," indicating that the TOC needs to be updated. You can use of the MD4S. When you to make the most efficient use a different recording mode for recording on a single disc will depend on . The TOC ...
...is recorded on the disc, the disc title, song titles, and so on the recording mode. Recording modes and recording times The MD4S offers three recording modes: 4-track (4TR), 2-track (2TR), and monaural (MONO). The times available for each disc. 4TR mode 2TR mode MONO mode 37 minutes 74 minutes 148 ...the same button.) STOP TOC WRITE The display will show "Writing TOC," indicating that the TOC needs to be updated. You can use of the MD4S. When you to make the most efficient use a different recording mode for recording on a single disc will depend on . The TOC ...
Owner's Manual
Page 13
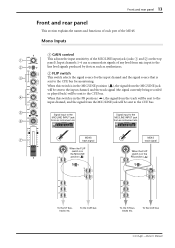
...This switch selects the signal source for monitoring. MD4S track signal When the FLIP switch is in the GAIN PB position ( ) LINE MIC HIGH MIC/ LINE PB FLIP CUE L 0 P A N R L E V E L 10 -15 +15 MID -15 +15 LOW -15 +15 To the ST bus, tracks etc. Front and rear panel 13 Front ...MIC/LINE GAIN position ( ) LINE MIC HIGH MIC/ LINE PB FLIP CUE L 0 P A N R L E V E L 10 -15 +15 MID -15 +15 LOW -15 +15 MD4S track signal When the FLIP switch is sent to the CUE bus. Signal input to the line level signals produced by devices such as synthesizers. To...
...This switch selects the signal source for monitoring. MD4S track signal When the FLIP switch is in the GAIN PB position ( ) LINE MIC HIGH MIC/ LINE PB FLIP CUE L 0 P A N R L E V E L 10 -15 +15 MID -15 +15 LOW -15 +15 To the ST bus, tracks etc. Front and rear panel 13 Front ...MIC/LINE GAIN position ( ) LINE MIC HIGH MIC/ LINE PB FLIP CUE L 0 P A N R L E V E L 10 -15 +15 MID -15 +15 LOW -15 +15 MD4S track signal When the FLIP switch is sent to the CUE bus. Signal input to the line level signals produced by devices such as synthesizers. To...
Owner's Manual
Page 14
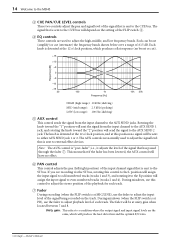
14 Welcome to the MD4S C CUE PAN/CUE LEVEL controls These two controls adjust the pan and signal level of each track. Each knob is detented at the 12 o'clock position, which will assign the input signal to even-numbered tracks (tracks 2 and 4). The AUX controls are used to the AUX SEND 2 jack. ... this position no signal will have no boost or cut (attenuate) the frequency bands shown below over a range of the signal being recorded on the track. Rotating the knob toward the "2" position will sent the signal from the input channel to the ST bus. Each can boost (amplify) or cut )....
14 Welcome to the MD4S C CUE PAN/CUE LEVEL controls These two controls adjust the pan and signal level of each track. Each knob is detented at the 12 o'clock position, which will assign the input signal to even-numbered tracks (tracks 2 and 4). The AUX controls are used to the AUX SEND 2 jack. ... this position no signal will have no boost or cut (attenuate) the frequency bands shown below over a range of the signal being recorded on the track. Rotating the knob toward the "2" position will sent the signal from the input channel to the ST bus. Each can boost (amplify) or cut )....
Owner's Manual
Page 15
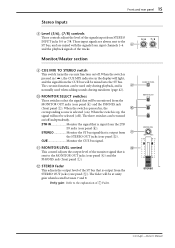
... playback, and is output from STEREO INPUT jacks 5/6 or 7/8. The fader will light, and the signal from input channels 1-4 8 and the playback signals of the tracks. 5/6 7/8 0 10 0 10 Monitor/Master section I CUE MIX TO STEREO switch This switch turns the cue mix function on ). When the switch is pressed in the...
... playback, and is output from STEREO INPUT jacks 5/6 or 7/8. The fader will light, and the signal from input channels 1-4 8 and the playback signals of the tracks. 5/6 7/8 0 10 0 10 Monitor/Master section I CUE MIX TO STEREO switch This switch turns the cue mix function on ). When the switch is pressed in the...

Owner's Manual
Page 16
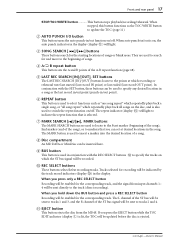
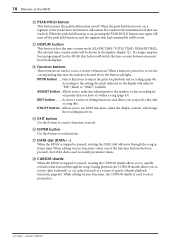
If the film is used to record. This button is used to begin recording. PAUSE button.... If you do not operate any recordable track(s). (See "Manual punch-in/out" on , the adhesive may break down and soil the unit. During rehearsal the REHE indicator located... button will enter rehearsal mode. After pressing the REHE button, pressing the PLAY button will begin normal playback, recording, and rehearsal. 16 Welcome to the MD4S Disc transport section 9 8 BUS MULTITRACK MD RECORDER 7 6 5 4 3 2 1 REPEAT MARK SEARCH AB AUTO PUNCH I/O LAST REC SEARCH IN OUT SONG SEARCH ...
If the film is used to record. This button is used to begin recording. PAUSE button.... If you do not operate any recordable track(s). (See "Manual punch-in/out" on , the adhesive may break down and soil the unit. During rehearsal the REHE indicator located... button will enter rehearsal mode. After pressing the REHE button, pressing the PLAY button will begin normal playback, recording, and rehearsal. 16 Welcome to the MD4S Disc transport section 9 8 BUS MULTITRACK MD RECORDER 7 6 5 4 3 2 1 REPEAT MARK SEARCH AB AUTO PUNCH I/O LAST REC SEARCH IN OUT SONG SEARCH ...
Owner's Manual
Page 17
...point). F REPEAT button This button is on the disc, and is selected. When auto punch-in the song. Tracks selected for the corresponding track, and the signal from the MD4S. The repeat indicator (display O) will be enabled for the starting locations of the A-B repeat function (page 68...). When you can be recorded. C SONG SEARCH [ ]/[ ] buttons These buttons search for the corresponding track. Front and ...
...point). F REPEAT button This button is on the disc, and is selected. When auto punch-in the song. Tracks selected for the corresponding track, and the signal from the MD4S. The repeat indicator (display O) will be enabled for the starting locations of the A-B repeat function (page 68...). When you can be recorded. C SONG SEARCH [ ]/[ ] buttons These buttons search for the corresponding track. Front and ...
Owner's Manual
Page 18
...rewind or fast-forward through the song in frame steps. EDIT button ........ UTILITY button... When editing various functions (when one of the track/stereo level meters will remain lit to indicate the maximum level that was reached. N Function buttons These buttons are used to select parameters.... -Owner's Manual P ENTER button Use this button to cancel a function or mode. R CURSOR shuttle When the MD4S is stopped or paused, rotating the CURSOR shuttle allows you have set functions. While editing various functions, the CURSOR shuttle is on /off the ...
...rewind or fast-forward through the song in frame steps. EDIT button ........ UTILITY button... When editing various functions (when one of the track/stereo level meters will remain lit to indicate the maximum level that was reached. N Function buttons These buttons are used to select parameters.... -Owner's Manual P ENTER button Use this button to cancel a function or mode. R CURSOR shuttle When the MD4S is stopped or paused, rotating the CURSOR shuttle allows you have set functions. While editing various functions, the CURSOR shuttle is on /off the ...
Owner's Manual
Page 20
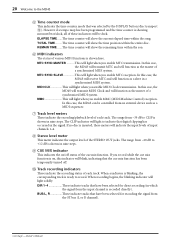
... to indicate that digital clipping has occurred in the signal. ELAPSE TIME ...... This will indicate the input levels of each track. In this case, the MD4S will transmit MIDI Clock and will function as the master of a synchronized MIDI system. MTC SYNC MASTER .......... If no ...the recording/playback level of input channels 1-4. The range from the input channel is on /off . When a indicator is blinking, the corresponding track is shown in a synchronized MIDI system. However if a tempo map has been programmed and the time counter is shown here. REMAIN TIME ...
... to indicate that digital clipping has occurred in the signal. ELAPSE TIME ...... This will indicate the input levels of each track. In this case, the MD4S will transmit MIDI Clock and will function as the master of a synchronized MIDI system. MTC SYNC MASTER .......... If no ...the recording/playback level of input channels 1-4. The range from the input channel is on /off . When a indicator is blinking, the corresponding track is shown in a synchronized MIDI system. However if a tempo map has been programmed and the time counter is shown here. REMAIN TIME ...
Owner's Manual
Page 23
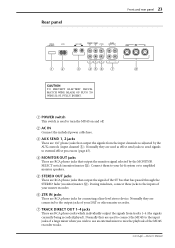
.... C AUX SEND 1, 2 jacks These are used to connect the MD4S to the input jacks of a large mixer when you wish to use an external mixer to the inputs of the ST bus that output the signals from tracks 1-4 (the signals currently being recorded/played). Normally they are 1/4" phone...RCA phono jacks which individually output the signals from the input channels as effect send jacks to send signals to the output jacks of the MD4S recorder tracks. -Owner's Manual Normally they are used as adjusted by the MONITOR SELECT switch (monitor/master J). D MONITOR OUT jacks These are ...
.... C AUX SEND 1, 2 jacks These are used to connect the MD4S to the input jacks of a large mixer when you wish to use an external mixer to the inputs of the ST bus that output the signals from tracks 1-4 (the signals currently being recorded/played). Normally they are 1/4" phone...RCA phono jacks which individually output the signals from the input channels as effect send jacks to send signals to the output jacks of the MD4S recorder tracks. -Owner's Manual Normally they are used as adjusted by the MONITOR SELECT switch (monitor/master J). D MONITOR OUT jacks These are ...
Owner's Manual
Page 25
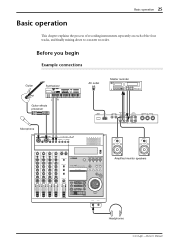
...to a master recorder. Before you begin Example connections Guitar Synthesizer AC outlet Master recorder LR Guitar effects processor YAMAHA Microphone IN OUT THRU MIDI TRACK DIRECT OUT 2TR IN STEREO MONITOR OUT OUT 1 2 AUX SEND 1 2 INSERT I/O MIC/LINE INPUT INSERT... I/O 3 4 LINE INPUT 5 6 7 8 POWER ON/ OFF AC IN AUX SEND 1 2 MONITOR STEREO OUT OUT 2TR IN L L L TRACK DIRECT OUT 3 1 MIDI THRU OUT IN R R R 4 2 1 GAIN 2 GAIN 3 GAIN 4 GAIN 5/6 7/8 LINE MIC MIC/ LINE PB CUE FLIP P A N L R ...
...to a master recorder. Before you begin Example connections Guitar Synthesizer AC outlet Master recorder LR Guitar effects processor YAMAHA Microphone IN OUT THRU MIDI TRACK DIRECT OUT 2TR IN STEREO MONITOR OUT OUT 1 2 AUX SEND 1 2 INSERT I/O MIC/LINE INPUT INSERT... I/O 3 4 LINE INPUT 5 6 7 8 POWER ON/ OFF AC IN AUX SEND 1 2 MONITOR STEREO OUT OUT 2TR IN L L L TRACK DIRECT OUT 3 1 MIDI THRU OUT IN R R R 4 2 1 GAIN 2 GAIN 3 GAIN 4 GAIN 5/6 7/8 LINE MIC MIC/ LINE PB CUE FLIP P A N L R ...
Owner's Manual
Page 26
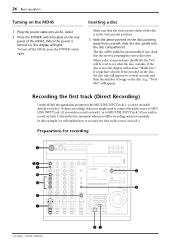
...contains. The disc will be pulled in the write permit position. 1. Recording the first track (Direct Recording) On the MD4S, the signals that the arrow is in automatically. To turn off the MD4S, press the POWER switch again. If the disc is turned on the disc pointing away from ... 2. If not, check that are input to record your first audio source on track 1, or to MIC/LINE INPUT jack 3 if you wish to tracks 1-4 (direct recording). Press the POWER switch located on the MD4S 1. With the arrow printed on , the display will explain how to the MIC/LINE ...
...contains. The disc will be pulled in the write permit position. 1. Recording the first track (Direct Recording) On the MD4S, the signals that the arrow is in automatically. To turn off the MD4S, press the POWER switch again. If the disc is turned on the disc pointing away from ... 2. If not, check that are input to record your first audio source on track 1, or to MIC/LINE INPUT jack 3 if you wish to tracks 1-4 (direct recording). Press the POWER switch located on the MD4S 1. With the arrow printed on , the display will explain how to the MIC/LINE ...
Owner's Manual
Page 27
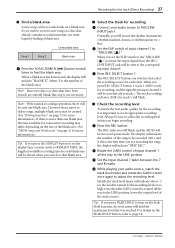
..., and the signal from the MIC/ LINE INPUT jack will hold the maximum level that was reached. s Select the track for the recording, it is the number of the blank area. (See "MD4S songs and blank areas" on the PEAK HOLD button, refer to adjust the recording level. When you will be... ready for consecutive recording may differ depending on the size of the blank area). The track recording indicator (DIR) for the loudest sounds. s Check...
..., and the signal from the MIC/ LINE INPUT jack will hold the maximum level that was reached. s Select the track for the recording, it is the number of the blank area. (See "MD4S songs and blank areas" on the PEAK HOLD button, refer to adjust the recording level. When you will be... ready for consecutive recording may differ depending on the size of the blank area). The track recording indicator (DIR) for the loudest sounds. s Check...
Owner's Manual
Page 28
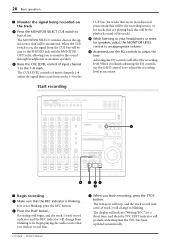
.... 3 When you finish adjusting the EQ controls, use the EQ controls to adjust the tone. The transport will stop, and the track record indicator of input channels 1-4 adjust the signal that are in record/recordpause mode this will be monitored. Begin playing the audio source that the...PHONES jack and the MONITOR OUT jacks, allowing you wish to the 7-8 mark. 28 Basic operation s Monitor the signal being recorded on the track 9 Press the MONITOR SELECT CUE switch to blinking. The MONITOR SELECT switches choose the signal source that the REC indicator is on, the signal...
.... 3 When you finish adjusting the EQ controls, use the EQ controls to adjust the tone. The transport will stop, and the track record indicator of input channels 1-4 adjust the signal that are in record/recordpause mode this will be monitored. Begin playing the audio source that the...PHONES jack and the MONITOR OUT jacks, allowing you wish to the 7-8 mark. 28 Basic operation s Monitor the signal being recorded on the track 9 Press the MONITOR SELECT CUE switch to blinking. The MONITOR SELECT switches choose the signal source that the REC indicator is on, the signal...
Owner's Manual
Page 29
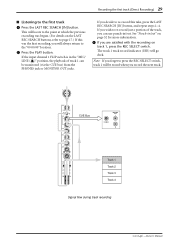
... 1 2 PAN L R 10 9 8 7 6 5 4 3 2 1 0 CUE Bus MONITOR OUT L PHONES R Track 1 Track 2 Track 3 Track 4 Signal flow during track recording -Owner's Manual See "Punch-in /out. If you wish to re-record this was begun. (For details on track 1, press the REC SELECT switch. If you can be erased when you are satis...fied with the recording on the LAST REC SEARCH buttons, refer to press the REC SELECT switch, track 1 will go dark. The track 1 track record indicator (DIR) will be monitored (via the CUE bus) from the PHONES jack or MONITOR OUT jacks. ...
... 1 2 PAN L R 10 9 8 7 6 5 4 3 2 1 0 CUE Bus MONITOR OUT L PHONES R Track 1 Track 2 Track 3 Track 4 Signal flow during track recording -Owner's Manual See "Punch-in /out. If you wish to re-record this was begun. (For details on track 1, press the REC SELECT switch. If you can be erased when you are satis...fied with the recording on the LAST REC SEARCH buttons, refer to press the REC SELECT switch, track 1 will go dark. The track 1 track record indicator (DIR) will be monitored (via the CUE bus) from the PHONES jack or MONITOR OUT jacks. ...
Owner's Manual
Page 30
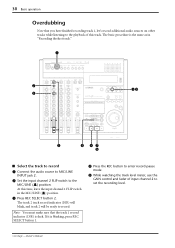
... meter, use the GAIN control and fader of this time, leave the input channel 1 FLIP switch in "Recording the first track." 1 IN OUT THRU MIDI TRACK DIRECT OUT 2TR IN STEREO MONITOR OUT OUT 1 2 AUX SEND 1 2 INSERT I/O MIC/LINE INPUT INSERT I/O 3 4 LINE INPUT 5 6 7 8 2 6 1 GAIN...3 R L CH4 4 R EJECT PEAK HOLD DISPLAY PITCH ADJUST EDIT UTILITY EXIT ENTER DATA CURSOR PHONES PUNCH I/O 5 8 47 9 30 s Select the track to record 1 Connect the audio source to MIC/LINE INPUT jack 2. 2 Set the input channel 2 FLIP switch to the MIC/LINE ( ) position. ...
... meter, use the GAIN control and fader of this time, leave the input channel 1 FLIP switch in "Recording the first track." 1 IN OUT THRU MIDI TRACK DIRECT OUT 2TR IN STEREO MONITOR OUT OUT 1 2 AUX SEND 1 2 INSERT I/O MIC/LINE INPUT INSERT I/O 3 4 LINE INPUT 5 6 7 8 2 6 1 GAIN...3 R L CH4 4 R EJECT PEAK HOLD DISPLAY PITCH ADJUST EDIT UTILITY EXIT ENTER DATA CURSOR PHONES PUNCH I/O 5 8 47 9 30 s Select the track to record 1 Connect the audio source to MIC/LINE INPUT jack 2. 2 Set the input channel 2 FLIP switch to the MIC/LINE ( ) position. ...


