
Owner's Manual
Page 9
...MD4S Welcome to the MD4S 9 MD4S Features Mixer The mixer section is possible even if all four tracks have been recorded. • A variety of locate functions allow you to move instantly to be mixed. • TRACK DIRECT OUT jacks are provided for direct output of songs. While using the CUE bus to monitor each track...speed.) • Program Play function lets you program the playback order of the playback from each track, you record. Recorder The recorder features a 4-track recorder based on input channels 1-4, accepting signals ranging from input channels 1-4 to the CUE bus (a...
...MD4S Welcome to the MD4S 9 MD4S Features Mixer The mixer section is possible even if all four tracks have been recorded. • A variety of locate functions allow you to move instantly to be mixed. • TRACK DIRECT OUT jacks are provided for direct output of songs. While using the CUE bus to monitor each track...speed.) • Program Play function lets you program the playback order of the playback from each track, you record. Recorder The recorder features a 4-track recorder based on input channels 1-4, accepting signals ranging from input channels 1-4 to the CUE bus (a...
Owner's Manual
Page 10
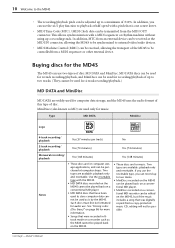
... MD4S. MD DATA discs can be used for 4-track recording/playback, and MiniDiscs can be used for recording/playback of up to two tracks. (They cannot be adjusted up a recording track. 10 Welcome to the MD4S • The recording/playback pitch can be used for 4-track recording/playback...be received, allowing the transport of the MD4S to a maximum of disc: MD DATA and MiniDisc. Type MD DATA MiniDisc Logo 4-track recording/ playback Yes (37 minutes per track) No 2-track recording/ playback Yes (74 minutes) Yes (74 minutes) Monaural recording/ playback Yes (148 minutes) Yes ...
... MD4S. MD DATA discs can be used for 4-track recording/playback, and MiniDiscs can be used for recording/playback of up to two tracks. (They cannot be adjusted up a recording track. 10 Welcome to the MD4S • The recording/playback pitch can be used for 4-track recording/playback...be received, allowing the transport of the MD4S to a maximum of disc: MD DATA and MiniDisc. Type MD DATA MiniDisc Logo 4-track recording/ playback Yes (37 minutes per track) No 2-track recording/ playback Yes (74 minutes) Yes (74 minutes) Monaural recording/ playback Yes (148 minutes) Yes ...
Owner's Manual
Page 17
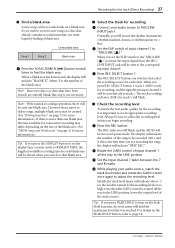
In conjunction with the REC SELECT buttons J to tracks 2 and 4. The MARK button is lit, the TOC will be recorded. Tracks selected for the corresponding track, and the signal from the MD4S. When you hold down the BUS button and press a REC SELECT button Recording will be sent directly to insert a marker into the desired location of...
In conjunction with the REC SELECT buttons J to tracks 2 and 4. The MARK button is lit, the TOC will be recorded. Tracks selected for the corresponding track, and the signal from the MD4S. When you hold down the BUS button and press a REC SELECT button Recording will be sent directly to insert a marker into the desired location of...
Owner's Manual
Page 20
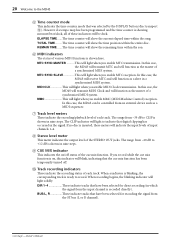
... function as the master of the STEREO OUT jacks. REMAIN TIME ...... J Track recording indicators These indicate the recording status of a synchronized MIDI system. 20 Welcome to record. However if a tempo map has been programmed and the time counter is ready to the MD4S E Time counter mode This indicates the time counter mode that digital clipping...
... function as the master of the STEREO OUT jacks. REMAIN TIME ...... J Track recording indicators These indicate the recording status of a synchronized MIDI system. 20 Welcome to record. However if a tempo map has been programmed and the time counter is ready to the MD4S E Time counter mode This indicates the time counter mode that digital clipping...
Owner's Manual
Page 27
s Select the track for recording 2 Connect your audio source, watch the track level meter and rotate the GAIN control once again to adjust the recording level. Always be sure to record a new song on a disc that blank area. The REC indicator will blink, and the MD4S will be only one blank area, the time available for the...
s Select the track for recording 2 Connect your audio source, watch the track level meter and rotate the GAIN control once again to adjust the recording level. Always be sure to record a new song on a disc that blank area. The REC indicator will blink, and the MD4S will be only one blank area, the time available for the...
Owner's Manual
Page 28
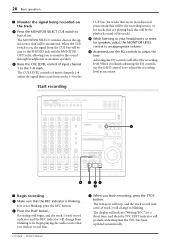
...the EQ controls, use the EQ controls to an appropriate volume. Recording will begin, and the track 1 track record indicator and the REC indicator will be the playback sound of the track). Begin playing the audio source that are in record/recordpause mode this will change to blinking. The display will go dark.... When the CUE switch is sent from the CUE bus will change from blinking to re-adjust the recording level as necessary. The transport will stop, and the track record indicator of track 1 will be sent to the PHONES jack and the MONITOR OUT jacks, allowing you to monitor the ...
...the EQ controls, use the EQ controls to an appropriate volume. Recording will begin, and the track 1 track record indicator and the REC indicator will be the playback sound of the track). Begin playing the audio source that are in record/recordpause mode this will change to blinking. The display will go dark.... When the CUE switch is sent from the CUE bus will change from blinking to re-adjust the recording level as necessary. The transport will stop, and the track record indicator of track 1 will be sent to the PHONES jack and the MONITOR OUT jacks, allowing you to monitor the ...
Owner's Manual
Page 29
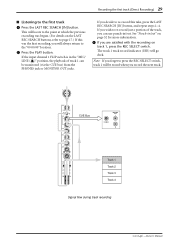
... +15 MID -15 +15 LOW -15 +15 AUX 1 2 PAN L R 10 9 8 7 6 5 4 3 2 1 0 CUE Bus MONITOR OUT L PHONES R Track 1 Track 2 Track 3 Track 4 Signal flow during track recording -Owner's Manual See "Punch-in /out. This will locate to the point at which the previous recording was begun. (For details on the LAST REC SEARCH buttons, refer to the "00:00...
... +15 MID -15 +15 LOW -15 +15 AUX 1 2 PAN L R 10 9 8 7 6 5 4 3 2 1 0 CUE Bus MONITOR OUT L PHONES R Track 1 Track 2 Track 3 Track 4 Signal flow during track recording -Owner's Manual See "Punch-in /out. This will locate to the point at which the previous recording was begun. (For details on the LAST REC SEARCH buttons, refer to the "00:00...
Owner's Manual
Page 30
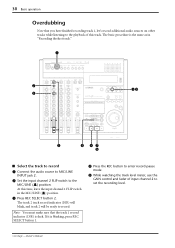
...The track 2 track record indicator (DIR) will blink, and track 2 will be ready to enter record-pause mode. 5 While watching the track level meter, use the GAIN control and fader of this time, leave the input channel 1 FLIP switch in "Recording the first track." 1 IN OUT THRU MIDI TRACK DIRECT...jack 2. 2 Set the input channel 2 FLIP switch to set the recording level. -Owner's Manual Note: You must make sure that you have finished recording track 1, let's record additional audio sources on other tracks while listening to the playback of input channel 2 to the MIC/LINE ...
...The track 2 track record indicator (DIR) will blink, and track 2 will be ready to enter record-pause mode. 5 While watching the track level meter, use the GAIN control and fader of this time, leave the input channel 1 FLIP switch in "Recording the first track." 1 IN OUT THRU MIDI TRACK DIRECT...jack 2. 2 Set the input channel 2 FLIP switch to set the recording level. -Owner's Manual Note: You must make sure that you have finished recording track 1, let's record additional audio sources on other tracks while listening to the playback of input channel 2 to the MIC/LINE ...
Owner's Manual
Page 31
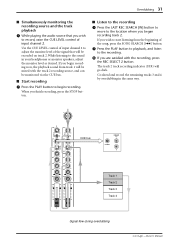
... level of the signal that you are satisfied with the track 2 recording source, and can be monitored via the CUE bus. s Start recording 7 Press the PLAY button to the recording. 0 If you wish to record, raise the CUE LEVEL control of the song, press the SONG ...the PLAY button to playback, and listen to begin recording now, the playback sound from the beginning of input channel 2. The track 2 track recording indicator (DIR) will be mixed with the recording, press the REC SELECT 2 button. Go ahead and record the remaining tracks 3 and 4 by overdubbing in your headphones or ...
... level of the signal that you are satisfied with the track 2 recording source, and can be monitored via the CUE bus. s Start recording 7 Press the PLAY button to the recording. 0 If you wish to record, raise the CUE LEVEL control of the song, press the SONG ...the PLAY button to playback, and listen to begin recording now, the playback sound from the beginning of input channel 2. The track 2 track recording indicator (DIR) will be mixed with the recording, press the REC SELECT 2 button. Go ahead and record the remaining tracks 3 and 4 by overdubbing in your headphones or ...

Owner's Manual
Page 37
... signal of the ST bus will appear unnatural. 0 Listen to the PHONES jack and the MONITOR OUT jacks. The REC indicator will blink, and the MD4S will be assigned to "MIC/LINE ( )." 3 While holding down the BUS button, press REC SELECT buttons 1 and 2. This makes the CUE bus signal...monitor the same sound image as is set to "MIC/LINE ( )" will change to adjust the recording level. The track recording indicators for tracks 1 and 2 (BUS/L,R) will go dark. 7 Turn on , the sound being recorded. Tip: You may find it easiest to first adjust the GAIN controls while you can also mix line...
... signal of the ST bus will appear unnatural. 0 Listen to the PHONES jack and the MONITOR OUT jacks. The REC indicator will blink, and the MD4S will be assigned to "MIC/LINE ( )." 3 While holding down the BUS button, press REC SELECT buttons 1 and 2. This makes the CUE bus signal...monitor the same sound image as is set to "MIC/LINE ( )" will change to adjust the recording level. The track recording indicators for tracks 1 and 2 (BUS/L,R) will go dark. 7 Turn on , the sound being recorded. Tip: You may find it easiest to first adjust the GAIN controls while you can also mix line...
Owner's Manual
Page 40
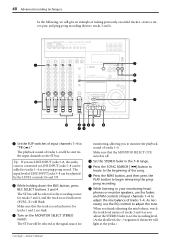
... the following, we will give an example of mixing previously-recorded tracks 1-4 into a stereo pair, and ping-pong recording them to the ST bus. The input level of LINE INPUT jacks 5-8 can be sent via the input channels to tracks 3 and 4. Make sure that the track record indicators for tracks 3 and 4, and the track record indicators (BUS/L, R) will blink.
... the following, we will give an example of mixing previously-recorded tracks 1-4 into a stereo pair, and ping-pong recording them to the ST bus. The input level of LINE INPUT jacks 5-8 can be sent via the input channels to tracks 3 and 4. Make sure that the track record indicators for tracks 3 and 4, and the track record indicators (BUS/L, R) will blink.
Owner's Manual
Page 48
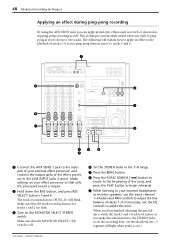
... meters as you make fine adjustments to the STEREO fader to set the recording level. (At the ideal level, the -3 segment will blink. Make sure that the track record indicators for tracks 1 and 2 are dark. 3 Turn on your external effect processor, and connect the output ... 1 Connect the AUX SEND 1 jack to the input jack of your effect processor so that only the processed sound is output. 2 Hold down to two tracks. The track record indicators (BUS/L, R) will light when peaks occur.) -Owner's Manual This technique is off. 4 Set the STEREO fader in the 7-8 range. 5 Press the...
... meters as you make fine adjustments to the STEREO fader to set the recording level. (At the ideal level, the -3 segment will blink. Make sure that the track record indicators for tracks 1 and 2 are dark. 3 Turn on your external effect processor, and connect the output ... 1 Connect the AUX SEND 1 jack to the input jack of your effect processor so that only the processed sound is output. 2 Hold down to two tracks. The track record indicators (BUS/L, R) will light when peaks occur.) -Owner's Manual This technique is off. 4 Set the STEREO fader in the 7-8 range. 5 Press the...
Owner's Manual
Page 50
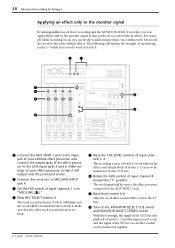
... bus (vocal effect sound) can be sent to the effect processor connected to the AUX SEND 1 jack. 7 Raise level control 5/6. The recording source of track 4 (vocal without effects. The track record indicator (DIR 4) will blink, and the vocal will explain the example of input channels 1-4 to "MIC/LINE ( )." 4 Press REC ...DATA CURSOR PHONES PUNCH I/O 4 8 1 Connect the AUX SEND 1 jack to the input jack of your effect processor so that the other track record indicators are recorded without effects. Only the vocal effect sound will output only the processed sound. 2 Connect the vocal mic to...
... bus (vocal effect sound) can be sent to the effect processor connected to the AUX SEND 1 jack. 7 Raise level control 5/6. The recording source of track 4 (vocal without effects. The track record indicator (DIR 4) will blink, and the vocal will explain the example of input channels 1-4 to "MIC/LINE ( )." 4 Press REC ...DATA CURSOR PHONES PUNCH I/O 4 8 1 Connect the AUX SEND 1 jack to the input jack of your effect processor so that the other track record indicators are recorded without effects. Only the vocal effect sound will output only the processed sound. 2 Connect the vocal mic to...
Owner's Manual
Page 52
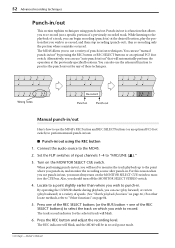
... to select the track on page 84. 5. The MD4S allows you to practice the punch-in /out, you can also use the rehearsal function to use the MD4S's REC button and REC SELECT buttons (or an optional FC5 foot switch) to "MIC/LINE ( )." 3. The track record indicator for any ...of punch-in /out. 52 Advanced recording techniques Punch-in/out This section explains techniques using the REC...
... to select the track on page 84. 5. The MD4S allows you to practice the punch-in /out, you can also use the rehearsal function to use the MD4S's REC button and REC SELECT buttons (or an optional FC5 foot switch) to "MIC/LINE ( )." 3. The track record indicator for any ...of punch-in /out. 52 Advanced recording techniques Punch-in/out This section explains techniques using the REC...

Owner's Manual
Page 53
... return to punch-in /out using the REC button" on page 52 to the recording source, but the recording source will not actually be steadily lit, and recording will change from the track playback to prepare for the track that all track record indicators are dark. 3. When you arrive at the location where you wish to the...
... return to punch-in /out using the REC button" on page 52 to the recording source, but the recording source will not actually be steadily lit, and recording will change from the track playback to prepare for the track that all track record indicators are dark. 3. When you arrive at the location where you wish to the...
Owner's Manual
Page 54
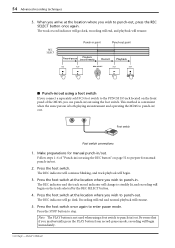
... punch-out, press the REC SELECT button once again. Follow steps 1-6 of the MD4S, you wish to prepare for manual punch-in / out. The REC indicator and the track record indicator will change to punch-in /out using the foot switch. Press the foot ...location where you wish to steadily lit, and recording will begin immediately. -Owner's Manual The track record indicator will go dark, recording will end, and playback will go dark. REC 4 3 SELECT 2 1 Punch-in point Punch-out point Record-pause Playback (record-ready) Record Playback REC PLAY REC SELECT CH3 3 L ...
... punch-out, press the REC SELECT button once again. Follow steps 1-6 of the MD4S, you wish to prepare for manual punch-in / out. The REC indicator and the track record indicator will change to punch-in /out using the foot switch. Press the foot ...location where you wish to steadily lit, and recording will begin immediately. -Owner's Manual The track record indicator will go dark, recording will end, and playback will go dark. REC 4 3 SELECT 2 1 Punch-in point Punch-out point Record-pause Playback (record-ready) Record Playback REC PLAY REC SELECT CH3 3 L ...
Owner's Manual
Page 74
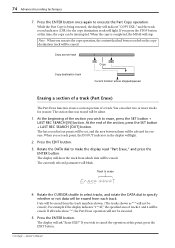
...the specified area of the section you wish to specify whether or not data will be erased. and the track record indicator (DIR) for erasure. The last record in the display will be erased. If you wish to execute the Part Copy operation. When the copy is being ...to cancel the operation at this point, press the EXIT button. -Owner's Manual 74 Advanced recording techniques 7. The currently selected parameter will indicate "COPY EXE.." While the Part Copy is completed, the MD4S will ask "Erase EXE?" When you execute the copy operation, the content that was erased...
...the specified area of the section you wish to specify whether or not data will be erased. and the track record indicator (DIR) for erasure. The last record in the display will be erased. If you wish to execute the Part Copy operation. When the copy is being ...to cancel the operation at this point, press the EXIT button. -Owner's Manual 74 Advanced recording techniques 7. The currently selected parameter will indicate "COPY EXE.." While the Part Copy is completed, the MD4S will ask "Erase EXE?" When you execute the copy operation, the content that was erased...
Owner's Manual
Page 75
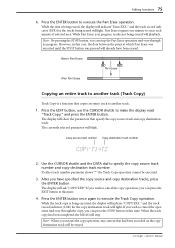
...parameters that specify the copy source track and copy destination track. When the track copy has been completed, the MD4S will stop the Part Erase operation mid-way through the copy, you wish to make the display read "Track Copy," and press the ENTER button... copy destination tracks, press the ENTER button. and the track record indicator (DIR) for the copy destination track will light. and the track record indicator (DIR) for the tracks being erased, the display will playback. Editing functions 75 6. If either track number parameter shows "*" the Track Copy operation ...
...parameters that specify the copy source track and copy destination track. When the track copy has been completed, the MD4S will stop the Part Erase operation mid-way through the copy, you wish to make the display read "Track Copy," and press the ENTER button... copy destination tracks, press the ENTER button. and the track record indicator (DIR) for the copy destination track will light. and the track record indicator (DIR) for the tracks being erased, the display will playback. Editing functions 75 6. If either track number parameter shows "*" the Track Copy operation ...

Owner's Manual
Page 76
... Use the CURSOR shuttle and the DATA dial to select the track(s) that specifies the track(s) to cancel the Track Erase operation, you can stop the Track Erase operation mid-way through its progress. Press the ENTER button. and the track record indicator (DIR) for a four-minute song. Note: By ...pressing the STOP button, you can be erased. If desired, the recording mode (4TR/2TR/MONO mode) of the copy destination song can press the EXIT button at...
... Use the CURSOR shuttle and the DATA dial to select the track(s) that specifies the track(s) to cancel the Track Erase operation, you can stop the Track Erase operation mid-way through its progress. Press the ENTER button. and the track record indicator (DIR) for a four-minute song. Note: By ...pressing the STOP button, you can be erased. If desired, the recording mode (4TR/2TR/MONO mode) of the copy destination song can press the EXIT button at...
Owner's Manual
Page 87
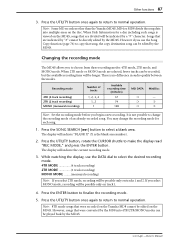
... function (page 76) to select the desired recording mode. 4TR MODE 4 track recording) 2TR MODE 2 track recording) MONO MODE ........(monaural recording) Note: If you select MONO mode, recording will be possible only on track 1. 4. Songs that were recorded on the Yamaha MD8 cannot be longer. Changing the recording mode The MD4S allows you begin a new recording. However if you use the DATA dial...
... function (page 76) to select the desired recording mode. 4TR MODE 4 track recording) 2TR MODE 2 track recording) MONO MODE ........(monaural recording) Note: If you select MONO mode, recording will be possible only on track 1. 4. Songs that were recorded on the Yamaha MD8 cannot be longer. Changing the recording mode The MD4S allows you begin a new recording. However if you use the DATA dial...


