

Dme-n Network Driver Installation Guide For Ls9
Page 12
... your security software appropriate? Refer to the LS9 Editor installation guide. • Is the computer network setup appropriately? For details on the network. The latest driver can be downloaded from your computer via Ethernet, the LS9 does not operate correctly. • Is the Ethernet cable connected correctly? For Windows Vista Click [Start] → [Control Panel] → [Windows Firewall] → [Change settings] → [General] tab. DME-N Network Driver Installation Guide for details...
... your security software appropriate? Refer to the LS9 Editor installation guide. • Is the computer network setup appropriately? For details on the network. The latest driver can be downloaded from your computer via Ethernet, the LS9 does not operate correctly. • Is the Ethernet cable connected correctly? For Windows Vista Click [Start] → [Control Panel] → [Windows Firewall] → [Change settings] → [General] tab. DME-N Network Driver Installation Guide for details...
Ls9 Editor Installation Guide
Page 3
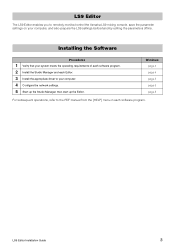
LS9 Editor Installation Guide 3 Windows page 4 page 4 page 5 page 6 page 8 For subsequent operations, refer to the PDF manual from the [HELP] menu in each Editor. 3 Install the appropriate driver to remotely monitor/control the Yamaha LS9 mixing console, save the parameter settings on your computer. 4 Configure the network settings. 5 Start up the Studio Manager, then start up the Editor. Installing the Software Procedures 1 Verify that your system meets the operating requirements of each software program. 2 Install the...
LS9 Editor Installation Guide 3 Windows page 4 page 4 page 5 page 6 page 8 For subsequent operations, refer to the PDF manual from the [HELP] menu in each Editor. 3 Install the appropriate driver to remotely monitor/control the Yamaha LS9 mixing console, save the parameter settings on your computer. 4 Configure the network settings. 5 Start up the Studio Manager, then start up the Editor. Installing the Software Procedures 1 Verify that your system meets the operating requirements of each software program. 2 Install the...
Ls9 Editor Owner's Manual
Page 5
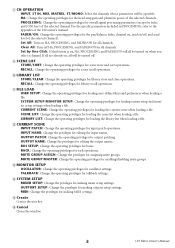
... input names. INPUT NAME: Change the privileges for scene recall operations. N SYSTEM SETUP MIXER SETUP: Change the privileges for the head amp gain and phantom power of the selected channel. P Cancel Closes the window. 5 LS9 Editor Owner's Manual RACK: Change the operating privileges for enabling/disabling mute groups. MUTE GROUP MASTER: Change the operating privileges for rack operations. H CH OPERATION INPUT, ST IN, MIX, MATRIX, ST/MONO: Select the channels whose parameters will be turned on , all be turned off HA, PROCESSING, and FADER/ON for fader and [ON] key...
... input names. INPUT NAME: Change the privileges for scene recall operations. N SYSTEM SETUP MIXER SETUP: Change the privileges for the head amp gain and phantom power of the selected channel. P Cancel Closes the window. 5 LS9 Editor Owner's Manual RACK: Change the operating privileges for enabling/disabling mute groups. MUTE GROUP MASTER: Change the operating privileges for rack operations. H CH OPERATION INPUT, ST IN, MIX, MATRIX, ST/MONO: Select the channels whose parameters will be turned on , all be turned off HA, PROCESSING, and FADER/ON for fader and [ON] key...

Owner's Manual
Page 6
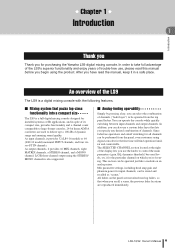
... window 77 Using the faders (SENDS ON FADER mode) .....78 7. Contents 1. Output channel operations 67 Signal flow for input channels 53 Specifying the channel name / icon 55 HA (head amp) settings 57 Sending the signal from an input channel to the STEREO/MONO bus......58 Sending the signal from USB memory ........110 Editing the title list 112 Linking scene recall with audio file playback ......113 6 LS9-16/32 Owner's Manual Operations in the SELECTED CHANNEL section 81 About the SELECTED CHANNEL section 81 About the SELECTED CH VIEW screen...
... window 77 Using the faders (SENDS ON FADER mode) .....78 7. Contents 1. Output channel operations 67 Signal flow for input channels 53 Specifying the channel name / icon 55 HA (head amp) settings 57 Sending the signal from an input channel to the STEREO/MONO bus......58 Sending the signal from USB memory ........110 Editing the title list 112 Linking scene recall with audio file playback ......113 6 LS9-16/32 Owner's Manual Operations in the SELECTED CHANNEL section 81 About the SELECTED CHANNEL section 81 About the SELECTED CH VIEW screen...

Owner's Manual
Page 7
...scene memories 129 Storing a scene 129 Recalling a scene 131 Using user-defined keys to operate the USB memory recorder 186 19. 11. MIDI 177 MIDI functionality on the LS9 177 Basic MIDI settings 178 Using program changes to recall scenes and library items 180 Using control changes to control parameters .....183 Using parameter changes to control parameters 185 Using MMC (MIDI Machine Control) to recall 132 Editing scene memories 134 Sorting and renaming scene memories 134 Scene memory editing 136 Copying/pasting a scene 136 Clearing a scene 137 Cutting a scene 138 Inserting...
...scene memories 129 Storing a scene 129 Recalling a scene 131 Using user-defined keys to operate the USB memory recorder 186 19. 11. MIDI 177 MIDI functionality on the LS9 177 Basic MIDI settings 178 Using program changes to recall scenes and library items 180 Using control changes to control parameters .....183 Using parameter changes to control parameters 185 Using MMC (MIDI Machine Control) to recall 132 Editing scene memories 134 Sorting and renaming scene memories 134 Scene memory editing 136 Copying/pasting a scene 136 Clearing a scene 137 Cutting a scene 138 Inserting...
Owner's Manual
Page 9
... output channels, it provides 32 (LS9-16 model) or 64 (LS9-32 model) monaural INPUT channels, and four stereo ST IN channels. You can be operated from the panel, even customers using the product. This section can be operated just like a module on /off switching for purchasing the Yamaha LS9 digital mixing console. Mix parameter settings, including head amp gain and phantom power for the first time will find operation familiar and comfortable. Since fader/cue operations and on an analog mixer...
... output channels, it provides 32 (LS9-16 model) or 64 (LS9-32 model) monaural INPUT channels, and four stereo ST IN channels. You can be operated from the panel, even customers using the product. This section can be operated just like a module on /off switching for purchasing the Yamaha LS9 digital mixing console. Mix parameter settings, including head amp gain and phantom power for the first time will find operation familiar and comfortable. Since fader/cue operations and on an analog mixer...
Owner's Manual
Page 57
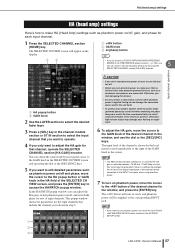
... popup window. LS9-16/32 Owner's Manual 57 HA (head amp) settings HA (head amp) settings Here's how to make sure that no devices other than phantom-powered devices, such as a condenser microphone, are connected. Keep in mind that noise may damage your speaker system, leave the power amps (powered speakers) turned off when switching the phantom power on or off , and switch the phase for each input channel. 1 Press the SELECTED CHANNEL section [HOME] key. The +48V button will...
... popup window. LS9-16/32 Owner's Manual 57 HA (head amp) settings HA (head amp) settings Here's how to make sure that no devices other than phantom-powered devices, such as a condenser microphone, are connected. Keep in mind that noise may damage your speaker system, leave the power amps (powered speakers) turned off when switching the phantom power on or off , and switch the phase for each input channel. 1 Press the SELECTED CHANNEL section [HOME] key. The +48V button will...

Owner's Manual
Page 60
... the master fader layer, and operate the [ON] key and fader of channel module 32. Sending the signal from an input channel to the STEREO/MONO bus For channels whose MODE button is set to LCR mode, the following button and knob are on/off switches for the signal sent from each channel to the STEREO bus and MONO bus. 9 If you want to use the STEREO bus, make sure that the [ON] key of the STEREO channel is turned on in the top panel STEREO MASTER...
... the master fader layer, and operate the [ON] key and fader of channel module 32. Sending the signal from an input channel to the STEREO/MONO bus For channels whose MODE button is set to LCR mode, the following button and knob are on/off switches for the signal sent from each channel to the STEREO bus and MONO bus. 9 If you want to use the STEREO bus, make sure that the [ON] key of the STEREO channel is turned on in the top panel STEREO MASTER...

Owner's Manual
Page 73
... the fader of the MONO channel to an appropriate position. Sending signals from MIX channels to the STEREO/MONO bus 9 If you selected a ST/MONO mode MIX channel or an LCR mode MIX channel in step 6. ● For a MIX channel set to ST/MONO mode 11 Use the ST button and MONO button in the TO STEREO/ MONO popup window as an on/off switch for the signal sent from the MIX channel to the STEREO bus and MONO bus. 12 Use the SELECTED CHANNEL section [PAN] encoder to adjust...
... the fader of the MONO channel to an appropriate position. Sending signals from MIX channels to the STEREO/MONO bus 9 If you selected a ST/MONO mode MIX channel or an LCR mode MIX channel in step 6. ● For a MIX channel set to ST/MONO mode 11 Use the ST button and MONO button in the TO STEREO/ MONO popup window as an on/off switch for the signal sent from the MIX channel to the STEREO bus and MONO bus. 12 Use the SELECTED CHANNEL section [PAN] encoder to adjust...

Owner's Manual
Page 89
... channel is linked with the fader on the top panel. Mute Safe settings can 7 select the channels to be assigned to access the MUTE GROUP screen. (For details on the MUTE GROUP screen → p. 121) LS9-16/32 Owner's Manual 89 This field includes the following items. 1 3 2 Operations in the SELECTED CHANNEL section 1 MUTE popup button This accesses the MUTE GROUP screen, where you move the cursor to the MUTE popup button and press the [ENTER] key...
... channel is linked with the fader on the top panel. Mute Safe settings can 7 select the channels to be assigned to access the MUTE GROUP screen. (For details on the MUTE GROUP screen → p. 121) LS9-16/32 Owner's Manual 89 This field includes the following items. 1 3 2 Operations in the SELECTED CHANNEL section 1 MUTE popup button This accesses the MUTE GROUP screen, where you move the cursor to the MUTE popup button and press the [ENTER] key...

Owner's Manual
Page 113
.... B No. (scene number) C TITLE (scene title) D Protect These respectively indicate the scene number, title, and protect status. USB memory recorder 10 LS9-16/32 Owner's Manual 113 E Song list This is shown in the TITLE LIST screen will change the file name after you move the cursor to automatically play when scene recall occurs. I SONG TITLE/FILE NAME buttons These buttons select the item that is the list of songs (audio fi...
.... B No. (scene number) C TITLE (scene title) D Protect These respectively indicate the scene number, title, and protect status. USB memory recorder 10 LS9-16/32 Owner's Manual 113 E Song list This is shown in the TITLE LIST screen will change the file name after you move the cursor to automatically play when scene recall occurs. I SONG TITLE/FILE NAME buttons These buttons select the item that is the list of songs (audio fi...

Owner's Manual
Page 124
... send-destination bus(es). 2 Use the buttons of the LINK PARAMETER field to "EQ and Dynamics" (→ p. 115). • If you have turned on the EQ button or DYNA 1/2 buttons, library recall operations will be linked. 124 LS9-16/32 Owner's Manual The table below lists the parameters you can be highlighted. HA button EQ button DYNA 1, 2 buttons MIX ON button MIX SEND button FADER button CH ON button Head amp settings EQ settings (including ATT/HPF) Dynamics 1 and 2 settings...
... send-destination bus(es). 2 Use the buttons of the LINK PARAMETER field to "EQ and Dynamics" (→ p. 115). • If you have turned on the EQ button or DYNA 1/2 buttons, library recall operations will be linked. 124 LS9-16/32 Owner's Manual The table below lists the parameters you can be highlighted. HA button EQ button DYNA 1, 2 buttons MIX ON button MIX SEND button FADER button CH ON button Head amp settings EQ settings (including ATT/HPF) Dynamics 1 and 2 settings...

Owner's Manual
Page 147
... OUT button MIX channels 1-16 output signals MATRIX buses 1-8 output signals STEREO L/R channel output signal MONO channel output signal 2TR IN DIGITAL jack input signal INPUT channels 15/16 {31/32} input signal USB memory recorder playback signal NOTE • You can select a maximum of an I/O card installed in a slot {1/2} HINT • If desired, you can specify output ports only for Dimmer and Monaural as the monitor source will always output the monitor signal, regardless of whether the OUTPUT button is on MONITOR ON MASTER FADER that you've assigned to a user...
... OUT button MIX channels 1-16 output signals MATRIX buses 1-8 output signals STEREO L/R channel output signal MONO channel output signal 2TR IN DIGITAL jack input signal INPUT channels 15/16 {31/32} input signal USB memory recorder playback signal NOTE • You can select a maximum of an I/O card installed in a slot {1/2} HINT • If desired, you can specify output ports only for Dimmer and Monaural as the monitor source will always output the monitor signal, regardless of whether the OUTPUT button is on MONITOR ON MASTER FADER that you've assigned to a user...

Owner's Manual
Page 175
... to the owner's manual of actual connections, refer to control the external head amp (subsequently called "external HA") from the LS9. NOTE • When installing an MY16-ES64 or similar EtherSound interface card in an LS9-32, be mounted. The EXTERNAL HA PORT SELECT popup window will appear. B ID / Model name / +48V master This displays information for that supports the external head amp (Yamaha AD8HR) remote protocol is mounted, its settings (gain setting, phantom power on...
... to the owner's manual of actual connections, refer to control the external head amp (subsequently called "external HA") from the LS9. NOTE • When installing an MY16-ES64 or similar EtherSound interface card in an LS9-32, be mounted. The EXTERNAL HA PORT SELECT popup window will appear. B ID / Model name / +48V master This displays information for that supports the external head amp (Yamaha AD8HR) remote protocol is mounted, its settings (gain setting, phantom power on...

Owner's Manual
Page 176
.../PATCH popup window. 1 1 Rack select buttons These switch the rack that is displayed in a scene. 1 Input port popup button 9 Press the input port popup button, and select the input port assigned to the REMOTE connector, the on/off status of the external HA. 176 LS9-16/32 Owner's Manual of the scene (However, master phantom on/off, HPF on/off, and cutoff frequency settings are saved as the LS9's own HA. D GAIN knobs These...
.../PATCH popup window. 1 1 Rack select buttons These switch the rack that is displayed in a scene. 1 Input port popup button 9 Press the input port popup button, and select the input port assigned to the REMOTE connector, the on/off status of the external HA. 176 LS9-16/32 Owner's Manual of the scene (However, master phantom on/off, HPF on/off, and cutoff frequency settings are saved as the LS9's own HA. D GAIN knobs These...
Owner's Manual
Page 207
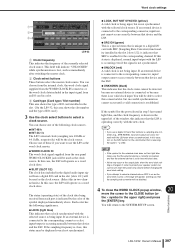
... output jacks when the word clock setting is changed. The status (operating state) of the symbol displayed immediately above. HINT • If you want to use a digital I /O card.} 3 Use the clock select buttons to select this case, turn light blue, make sure that the external device is correctly connected, and that a clock synchronized with SRC (Sampling Rate Converter) functionality installed in the upper left of the currently selected clock source. Other functions LS9-16/32 Owner's Manual...
... output jacks when the word clock setting is changed. The status (operating state) of the symbol displayed immediately above. HINT • If you want to use a digital I /O card.} 3 Use the clock select buttons to select this case, turn light blue, make sure that the external device is correctly connected, and that a clock synchronized with SRC (Sampling Rate Converter) functionality installed in the upper left of the currently selected clock source. Other functions LS9-16/32 Owner's Manual...

Owner's Manual
Page 214
... VARI PRE FADER, input channels whose SIGNAL TYPE = STEREO and BUS TYPE = VARI, the PAN LINK button is displayed in this if you want to use the MIX bus as an external effect send or as a foldback output. If the bus is set to PRE, the signal will be sent from immediately after the pan/balance. 5 As desired, turn the buttons of the input channel will function as STEREO (main parameters linked for the two MATRIX channels) or MONO × 2 (used as...
... VARI PRE FADER, input channels whose SIGNAL TYPE = STEREO and BUS TYPE = VARI, the PAN LINK button is displayed in this if you want to use the MIX bus as an external effect send or as a foldback output. If the bus is set to PRE, the signal will be sent from immediately after the pan/balance. 5 As desired, turn the buttons of the input channel will function as STEREO (main parameters linked for the two MATRIX channels) or MONO × 2 (used as...

Owner's Manual
Page 268
... store a scene memory or library. Failed to recall a library of the copy buffer. EFFECT CUE: Turned Off. File Access is low. File Error [xx]! Illegal MAC Address! KEY IN CUE was aborted. The number of the JPN button was cancelled because time is Protected! MIDI: Data Overrun! No response from External HA. The password has been changed to your Yamaha dealer. Operation of songs that it is being input to Max. 8 Sources! Scene #xxx...
... store a scene memory or library. Failed to recall a library of the copy buffer. EFFECT CUE: Turned Off. File Access is low. File Error [xx]! Illegal MAC Address! KEY IN CUE was aborted. The number of the JPN button was cancelled because time is Protected! MIDI: Data Overrun! No response from External HA. The password has been changed to your Yamaha dealer. Operation of songs that it is being input to Max. 8 Sources! Scene #xxx...

Owner's Manual
Page 270
... external head amp set to ducking? (→ p. 117) Operating a fader does not control the level as the insert out? (→ p. 101) The volume of a specific channel is heard from an externally connected recorder or other device ❍ Is the word clock set correctly? (→ p. 206) ❍ Could the input signal be unsynchronized? ❍ Could oscillator or talkback be set to 1.0? (→ p. 58) Sound is not output ❍ Is the optional I /O card installed...
... external head amp set to ducking? (→ p. 117) Operating a fader does not control the level as the insert out? (→ p. 101) The volume of a specific channel is heard from an externally connected recorder or other device ❍ Is the word clock set correctly? (→ p. 206) ❍ Could the input signal be unsynchronized? ❍ Could oscillator or talkback be set to 1.0? (→ p. 58) Sound is not output ❍ Is the optional I /O card installed...

Owner's Manual
Page 284
... 129 [SCENE MEMORY] key 19 SCENE PLAYBACK LINK screen 113 SELECTED CH VIEW screen 31, 82 Selected channel 30 SELECTED CHANNEL section 21, 81 Adjusting send levels 84 Assigning to mute group 89 Basic operations 29 Direct output settings 88 Dynamics settings 87 HA settings 85 HPF/EQ settings 87 Insert settings 88 Output patching 86 Pan/balance 86 Recall Safe settings 88 Sending signal to MIX bus 62 Turning a channel on/off 89 [SELECTED SEND] encoder 21 SEND field 82 SENDS ON FADER mode 65, 78 [SETUP] key 19...
... 129 [SCENE MEMORY] key 19 SCENE PLAYBACK LINK screen 113 SELECTED CH VIEW screen 31, 82 Selected channel 30 SELECTED CHANNEL section 21, 81 Adjusting send levels 84 Assigning to mute group 89 Basic operations 29 Direct output settings 88 Dynamics settings 87 HA settings 85 HPF/EQ settings 87 Insert settings 88 Output patching 86 Pan/balance 86 Recall Safe settings 88 Sending signal to MIX bus 62 Turning a channel on/off 89 [SELECTED SEND] encoder 21 SEND field 82 SENDS ON FADER mode 65, 78 [SETUP] key 19...


