
Ls9 Editor Installation Guide
Page 9
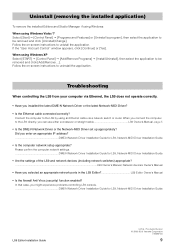
...the application. In that case, you might experience problems controlling LS9 console DME-N Network Driver Installation Guide for LS9, Network-MIDI Driver Installation Guide • Are the settings of the LS9 and network devices (including network switches) appropriate? ...LS9 Owner's Manual, Network device... confirm the computer network settings DME-N Network Driver Installation Guide for LS9, Network-MIDI Driver Installation Guide LS9 Editor Installation Guide U.R.G., Pro Audio Division © 2006-2010 Yamaha Corporation 010MW-C0 9 Did you enter an appropriate IP address DME...
...the application. In that case, you might experience problems controlling LS9 console DME-N Network Driver Installation Guide for LS9, Network-MIDI Driver Installation Guide • Are the settings of the LS9 and network devices (including network switches) appropriate? ...LS9 Owner's Manual, Network device... confirm the computer network settings DME-N Network Driver Installation Guide for LS9, Network-MIDI Driver Installation Guide LS9 Editor Installation Guide U.R.G., Pro Audio Division © 2006-2010 Yamaha Corporation 010MW-C0 9 Did you enter an appropriate IP address DME...

Ls9 Editor Owner's Manual
Page 46
... to the Store or Recall operation. Only library items with an indication of "1" can be recalled to DYNAMICS 2. M INTERNAL DATA This area shows the LS9's scene memory contents. The items displayed are the same as in the library. L RACK No. (Rack selection) (Effect/GEQ page only) Select which...that channel. The list includes the following items. G No. (Number) This column indicates the number of each item in the FILE list (6). In the case of dynamics, there is also an indication of the dynamics processor(s) of this channel into which neither "1" or "2" is indicated by an "R" in this...
... to the Store or Recall operation. Only library items with an indication of "1" can be recalled to DYNAMICS 2. M INTERNAL DATA This area shows the LS9's scene memory contents. The items displayed are the same as in the library. L RACK No. (Rack selection) (Effect/GEQ page only) Select which...that channel. The list includes the following items. G No. (Number) This column indicates the number of each item in the FILE list (6). In the case of dynamics, there is also an indication of the dynamics processor(s) of this channel into which neither "1" or "2" is indicated by an "R" in this...

Ls9 Editor Owner's Manual
Page 67
... memories. C CLOSE (Close a file) Closes the currently-open scene library file on a drive of your computer. 67 LS9 Editor Owner's Manual Scene window Here you can re-save all scenes to a file after editing, recall just a desired scene, or copy a desired scene ...;le. To switch pages, click the tabs shown in the upper part of your computer. In this case, you can manage scene memories, and make various settings related to the scene memory of the LS9 itself. 1 6 234 5 A File name Indicates the file name of the currently-open scene library. E SAVE AS...
... memories. C CLOSE (Close a file) Closes the currently-open scene library file on a drive of your computer. 67 LS9 Editor Owner's Manual Scene window Here you can re-save all scenes to a file after editing, recall just a desired scene, or copy a desired scene ...;le. To switch pages, click the tabs shown in the upper part of your computer. In this case, you can manage scene memories, and make various settings related to the scene memory of the LS9 itself. 1 6 234 5 A File name Indicates the file name of the currently-open scene library. E SAVE AS...
Owner's Manual
Page 2
...IMPORTANT. If you can be connected to the terminal which is found to be regulated due to products distributed by YAMAHA CORPORATION OF AMERICA. (mercury) 2 LS9-16/32 Owner's Manual The wire which is 300 ohm ribbon lead, change the lead-in FCC Regulations, Part 15 for...different branch (circuit breaker or fuse) circuits or install AC line filter/s. IMPORTANT NOTICE: DO NOT MODIFY THIS UNIT! In the case of other electronic devices. Perchlorate Material-special handling may not correspond with the letter N or coloured BLACK. FCC INFORMATION (U.S.A.) 1. Operation ...
...IMPORTANT. If you can be connected to the terminal which is found to be regulated due to products distributed by YAMAHA CORPORATION OF AMERICA. (mercury) 2 LS9-16/32 Owner's Manual The wire which is 300 ohm ribbon lead, change the lead-in FCC Regulations, Part 15 for...different branch (circuit breaker or fuse) circuits or install AC line filter/s. IMPORTANT NOTICE: DO NOT MODIFY THIS UNIT! In the case of other electronic devices. Perchlorate Material-special handling may not correspond with the letter N or coloured BLACK. FCC INFORMATION (U.S.A.) 1. Operation ...

Owner's Manual
Page 5
...hot (+), and pin 3: cold (-). Improper grounding can cause permanent hearing loss. Then have qualified Yamaha service personnel replace the backup battery. However, if the backup battery fully discharges, this can result in any ...foreign objects (paper, plastic, metal, etc.) into the mains. Consult qualifi ed Yamaha service personnel about replacing defective components. (5)-4 2/2 LS9-16/32 Owner's Manual 5 Handling caution • When turning on the AC power in use ...on the device (vents, etc.) If this case, immediately save the data to avoid speaker damage.
...hot (+), and pin 3: cold (-). Improper grounding can cause permanent hearing loss. Then have qualified Yamaha service personnel replace the backup battery. However, if the backup battery fully discharges, this can result in any ...foreign objects (paper, plastic, metal, etc.) into the mains. Consult qualifi ed Yamaha service personnel about replacing defective components. (5)-4 2/2 LS9-16/32 Owner's Manual 5 Handling caution • When turning on the AC power in use ...on the device (vents, etc.) If this case, immediately save the data to avoid speaker damage.

Owner's Manual
Page 20
In this case, the LED of the key corresponding to the currently selected bus will blink, and the LED of the...all cue monitoring that you can view the level of the STEREO channel or cue monitor. 1 20 LS9-16/32 Owner's Manual 2 3 1 Stereo meter This is a 32-segment LED meter that will light. In SENDS ON FADER mode, these keys select a MIX bus or...select the screen that is on , this section you want to the currently selected channel will light (or blink, in the case of any channel is a MIX/STEREO/MONO channel, the MATRIX channel) whose send level will be dark and cannot be ...
In this case, the LED of the key corresponding to the currently selected bus will blink, and the LED of the...all cue monitoring that you can view the level of the STEREO channel or cue monitor. 1 20 LS9-16/32 Owner's Manual 2 3 1 Stereo meter This is a 32-segment LED meter that will light. In SENDS ON FADER mode, these keys select a MIX bus or...select the screen that is on , this section you want to the currently selected channel will light (or blink, in the case of any channel is a MIX/STEREO/MONO channel, the MATRIX channel) whose send level will be dark and cannot be ...

Owner's Manual
Page 21
...• Switches to low pass filter if you can operate the most important mix parameters for the currently selected input channel or output channel. LS9-16/32 Owner's Manual 21 B [PAN] encoder ● When an INPUT/ST IN channel is selected ● When a MIX channel is selected The encoder...GAIN] encoder These encoders adjust the Q, frequency, and gain of which channel is selected The encoder will adjust the threshold of the controllers in the case of LCR mode) of channel that chan- NOTE • In SENDS ON FADER mode, this section will not do anything . The function of...
...• Switches to low pass filter if you can operate the most important mix parameters for the currently selected input channel or output channel. LS9-16/32 Owner's Manual 21 B [PAN] encoder ● When an INPUT/ST IN channel is selected ● When a MIX channel is selected The encoder...GAIN] encoder These encoders adjust the Q, frequency, and gain of which channel is selected The encoder will adjust the threshold of the controllers in the case of LCR mode) of channel that chan- NOTE • In SENDS ON FADER mode, this section will not do anything . The function of...

Owner's Manual
Page 27
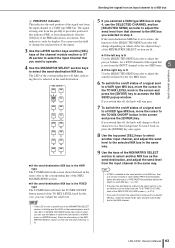
... blink if the display is showing any screen other than the SELECTED CH VIEW screen, or if SENDS ON FADER mode is active. LS9-16 LS9-32 • The channel level function will be assigned to steadily lit), and then proceed with operations. The [HOME] key will be ...controlled ("fader layers") so that you switch between combinations of channels to switch the combination of the selected channel. In such cases, you 'll perform ...
... blink if the display is showing any screen other than the SELECTED CH VIEW screen, or if SENDS ON FADER mode is active. LS9-16 LS9-32 • The channel level function will be assigned to steadily lit), and then proceed with operations. The [HOME] key will be ...controlled ("fader layers") so that you switch between combinations of channels to switch the combination of the selected channel. In such cases, you 'll perform ...

Owner's Manual
Page 36
...or effect type used, etc.). HINT • If you want to recall. B RECALL button This button recalls the settings selected in the list. In some cases, the data selected as the recall-source cannot be recalled by dynamics 1 or 2. 4 Move the cursor to the list, and select the recall-source ...the cursor to the selected channel in the constant display area of popup window or screen that is indicated by the corresponding dynamics processor. 36 LS9-16/32 Owner's Manual Using the tool buttons In the SELECTED CH VIEW screen, move the cursor to the knob corresponding to EQ or dynamics 1/2, or...
...or effect type used, etc.). HINT • If you want to recall. B RECALL button This button recalls the settings selected in the list. In some cases, the data selected as the recall-source cannot be recalled by dynamics 1 or 2. 4 Move the cursor to the list, and select the recall-source ...the cursor to the selected channel in the constant display area of popup window or screen that is indicated by the corresponding dynamics processor. 36 LS9-16/32 Owner's Manual Using the tool buttons In the SELECTED CH VIEW screen, move the cursor to the knob corresponding to EQ or dynamics 1/2, or...
Owner's Manual
Page 46
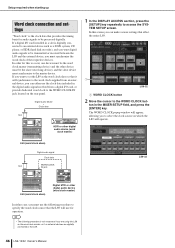
In order for this screen you can either case, you must be processed digitally. LS9 (word clock slave) Digital audio signal Clock data Slot WORDCLOCK IN jack LS9-32 LS9 (word clock slave) Digital MTR or other digital audio device (word clock master) In either use the clock data included in the digital...'s Manual Setup required when starting up Word clock connection and settings "Word clock" is the clock data that affect the entire LS9. 1 LS9-32 1 WORD CLOCK button 2 Move the cursor to the WORD CLOCK button in a slot is digitally connected to an external device such as ...
In order for this screen you can either case, you must be processed digitally. LS9 (word clock slave) Digital audio signal Clock data Slot WORDCLOCK IN jack LS9-32 LS9 (word clock slave) Digital MTR or other digital audio device (word clock master) In either use the clock data included in the digital...'s Manual Setup required when starting up Word clock connection and settings "Word clock" is the clock data that affect the entire LS9. 1 LS9-32 1 WORD CLOCK button 2 Move the cursor to the WORD CLOCK button in a slot is digitally connected to an external device such as ...
Owner's Manual
Page 47
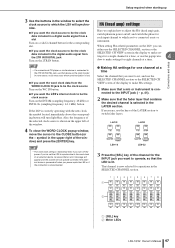
... the channel that an error message will appear and the system will turn off when you power-cycle the LS9 or if the connection is selected in the LAYER section. In some cases, noise may occur when synchronization is powered-off the power. Setup required when starting up 3 Use the buttons... jack to be the clock source Turn on /off, and switch the phase for operations in the SELECTED CHANNEL section. 1 2 1 [SEL] key B Meter LEDs LS9-16/32 Owner's Manual 47 Also, the frequency of the display to make HA settings. 1 Make sure that contains the desired channel is disconnected.
... the channel that an error message will appear and the system will turn off when you power-cycle the LS9 or if the connection is selected in the LAYER section. In some cases, noise may occur when synchronization is powered-off the power. Setup required when starting up 3 Use the buttons... jack to be the clock source Turn on /off, and switch the phase for operations in the SELECTED CHANNEL section. 1 2 1 [SEL] key B Meter LEDs LS9-16/32 Owner's Manual 47 Also, the frequency of the display to make HA settings. 1 Make sure that contains the desired channel is disconnected.

Owner's Manual
Page 48
... to its [SEL] key. NOTE • The PAD will be assigned to the faders. 1 5 Use either case, the level of that is a difference between -14 dB and -13 dB. Keep in mind that noise may ...set to POST ON (immediately after the [ON] key) (→ p. 155). The [HOME] key restores the LS9's panel to adjust the HA gain of the external device connected to the INPUT connector when using phantom power. 6...DATA ENTRY section to move the cursor to the GAIN knob in the same way. 1 GAIN knob 48 LS9-16/32 Owner's Manual When you do so, the GAIN knob in the SELECTED CH VIEW screen will move even...
... to its [SEL] key. NOTE • The PAD will be assigned to the faders. 1 5 Use either case, the level of that is a difference between -14 dB and -13 dB. Keep in mind that noise may ...set to POST ON (immediately after the [ON] key) (→ p. 155). The [HOME] key restores the LS9's panel to adjust the HA gain of the external device connected to the INPUT connector when using phantom power. 6...DATA ENTRY section to move the cursor to the GAIN knob in the same way. 1 GAIN knob 48 LS9-16/32 Owner's Manual When you do so, the GAIN knob in the SELECTED CH VIEW screen will move even...

Owner's Manual
Page 60
... MONO (C) bus, in the TO STEREO/MONO popup window to adjust the proportion between the LS9-16 and LS9-32. ● For the LS9-16 Assign the MONO channel to the custom fader layer, press the LAYER [CUSTOM FADER] ... the [ON] key and fader of the corresponding channel module. ● For the LS9-32 Press the LAYER [MASTER] key to access the master fader layer, and operate the [ON] key and fader...appropriate position. You can be sent from that input channel to the STEREO bus or MONO bus. In this case, the TO ST PAN knob will be switched on/off in a single operation. 13 Use the CSR ...
... MONO (C) bus, in the TO STEREO/MONO popup window to adjust the proportion between the LS9-16 and LS9-32. ● For the LS9-16 Assign the MONO channel to the custom fader layer, press the LAYER [CUSTOM FADER] ... the [ON] key and fader of the corresponding channel module. ● For the LS9-32 Press the LAYER [MASTER] key to access the master fader layer, and operate the [ON] key and fader...appropriate position. You can be sent from that input channel to the STEREO bus or MONO bus. In this case, the TO ST PAN knob will be switched on/off in a single operation. 13 Use the CSR ...

Owner's Manual
Page 61
... in the following illustration. Signal sent to the MONO (C) bus Signal sent to the STEREO (L) bus Signal sent to the MONO (C) bus. In this case, the [PAN] encoder will operate as a conventional BALANCE knob, and no signal is sent to the STEREO (R) bus L C R PAN knob Signal level ...Signal level LS9-16/32 Owner's Manual 61 Signal level Signal level Sending the signal from an input channel to the STEREO/MONO bus Signal sent to the STEREO (L) bus ...
... in the following illustration. Signal sent to the MONO (C) bus Signal sent to the STEREO (L) bus Signal sent to the MONO (C) bus. In this case, the [PAN] encoder will operate as a conventional BALANCE knob, and no signal is sent to the STEREO (R) bus L C R PAN knob Signal level ...Signal level LS9-16/32 Owner's Manual 61 Signal level Signal level Sending the signal from an input channel to the STEREO/MONO bus Signal sent to the STEREO (L) bus ...
Owner's Manual
Page 63
... characters on which of the two adjacent keys of the MIX/MATRIX SELECT section are lit, the LS9 is in SENDS ON FADER mode (the mode in step 4. The LED of the corresponding key will.... 4 Use the MIX/MATRIX SELECT section keys to select the send-destination MIX bus. If you switch this case, you can be linked with the TO ST PAN/TO ST BAL knob of the SELECTED CH VIEW screen ...position if this indicates PRE, or from the input channel to a VARI type MIX bus. Input channel operations LS9-16/32 Owner's Manual 63 This indicator is only for each MIX bus (→ p. 213). • If desired...
... characters on which of the two adjacent keys of the MIX/MATRIX SELECT section are lit, the LS9 is in SENDS ON FADER mode (the mode in step 4. The LED of the corresponding key will.... 4 Use the MIX/MATRIX SELECT section keys to select the send-destination MIX bus. If you switch this case, you can be linked with the TO ST PAN/TO ST BAL knob of the SELECTED CH VIEW screen ...position if this indicates PRE, or from the input channel to a VARI type MIX bus. Input channel operations LS9-16/32 Owner's Manual 63 This indicator is only for each MIX bus (→ p. 213). • If desired...

Owner's Manual
Page 73
...Use the CSR knob in the TO STEREO/MONO popup window to adjust the proportion between the LS9-16 and LS9-32. ● For the LS9-16 Assign the MONO channel to the custom fader layer, press the LAYER [CUSTOM] key...fader to an appropriate position. If the CSR knob is sent to the MONO (C) bus. In this case, the TO ST PAN knob will operate as on/off switch for the signal sent from the MIX... switches for the signal sent from the MIX channel to the STEREO bus and MONO bus. In this case, the [PAN] encoder will operate as shown in the following steps will differ depending on whether you ...
...Use the CSR knob in the TO STEREO/MONO popup window to adjust the proportion between the LS9-16 and LS9-32. ● For the LS9-16 Assign the MONO channel to the custom fader layer, press the LAYER [CUSTOM] key...fader to an appropriate position. If the CSR knob is sent to the MONO (C) bus. In this case, the TO ST PAN knob will operate as on/off switch for the signal sent from the MIX... switches for the signal sent from the MIX channel to the STEREO bus and MONO bus. In this case, the [PAN] encoder will operate as shown in the following steps will differ depending on whether you ...

Owner's Manual
Page 83
...to edit the parameters of the selected channel. 1 2 Operations in the SELECTED CHANNEL section 1 Channel number B Channel name HINT • In the case of the parameters for a specific channel. 1 Press the SELECTED CHANNEL section [HOME] key. Operations in the SELECTED CHANNEL section Operations in ... SELECTED CHANNEL section. 2 Use the LAYER section to select the desired fader layer. 3 Press a [SEL] key in the screen. LS9-16/32 Owner's Manual 83 The number and name of the currently selected channel is currently selected by pressing any one of the SELECTED CHANNEL section....
...to edit the parameters of the selected channel. 1 2 Operations in the SELECTED CHANNEL section 1 Channel number B Channel name HINT • In the case of the parameters for a specific channel. 1 Press the SELECTED CHANNEL section [HOME] key. Operations in the SELECTED CHANNEL section Operations in ... SELECTED CHANNEL section. 2 Use the LAYER section to select the desired fader layer. 3 Press a [SEL] key in the screen. LS9-16/32 Owner's Manual 83 The number and name of the currently selected channel is currently selected by pressing any one of the SELECTED CHANNEL section....

Owner's Manual
Page 93
In this case, the channel module will operate as follows. • The fader and [ON] ... channel in the LAYER section. The following channels can be selected in the channel module select field • INPUT channels 1-32 {1-64} • ST IN channels 1-4 • STEREO channel • MONO channels • MIX channels 1-16 • MATRIX...] key in the channel module select field, the L/R channels will be assigned together. duced. Custom fader layer LS9-16/32 Owner's Manual 93 B ST IN channel select field Select the channels that will be assigned to the top panel...
In this case, the channel module will operate as follows. • The fader and [ON] ... channel in the LAYER section. The following channels can be selected in the channel module select field • INPUT channels 1-32 {1-64} • ST IN channels 1-4 • STEREO channel • MONO channels • MIX channels 1-16 • MATRIX...] key in the channel module select field, the L/R channels will be assigned together. duced. Custom fader layer LS9-16/32 Owner's Manual 93 B ST IN channel select field Select the channels that will be assigned to the top panel...

Owner's Manual
Page 98
...setting, move the cursor to this knob and use the dial or the [DEC]/[INC] keys. LS9-32 1 Category tab This selects the type of channel that is assigned to the output port. 98 LS9-16/32 Owner's Manual If PATCH is shown immediately below the knob, using the units selected in the .... You can adjust the value in 1.0 dB steps in the OUTPUT PORT popup window will be output directly from the corresponding output port. In this case, the channel select button in a range of attenuation/boost for the output port. Changing the output patching F Delay time setting knob This knob sets...
...setting, move the cursor to this knob and use the dial or the [DEC]/[INC] keys. LS9-32 1 Category tab This selects the type of channel that is assigned to the output port. 98 LS9-16/32 Owner's Manual If PATCH is shown immediately below the knob, using the units selected in the .... You can adjust the value in 1.0 dB steps in the OUTPUT PORT popup window will be output directly from the corresponding output port. In this case, the channel select button in a range of attenuation/boost for the output port. Changing the output patching F Delay time setting knob This knob sets...

Owner's Manual
Page 109
...the screen, and press the [ENTER] key. In either of the screen to perform record/play/stop recording, move the cursor to this later. LS9-16/32 Owner's Manual 109 Recording to USB memory 6 Move the cursor to the REC button (●) at the bottom of each button to a userdefi... will be fast-forwarded. During recording, the REC (●) button and the PLAY/ PAUSE ( ) button will use the transport at the bottom of the above cases, operating this button, and press and hold the [ENTER] key for the recorder. 12 3 4 5 Each button has the following function. 1 REW ( ) button ● ...
...the screen, and press the [ENTER] key. In either of the screen to perform record/play/stop recording, move the cursor to this later. LS9-16/32 Owner's Manual 109 Recording to USB memory 6 Move the cursor to the REC button (●) at the bottom of each button to a userdefi... will be fast-forwarded. During recording, the REC (●) button and the PLAY/ PAUSE ( ) button will use the transport at the bottom of the above cases, operating this button, and press and hold the [ENTER] key for the recorder. 12 3 4 5 Each button has the following function. 1 REW ( ) button ● ...