Owner's Manual
Page 5
INTRODUCTION PREPARATION BASIC OPERATION CONTENTS INTRODUCTION FEATURES 2 GETTING STARTED 3 Supplied accessories 3 Installing batteries in the remote control 3 CONTROLS AND FUNCTIONS 4 Front panel 4 Remote control 6 Front panel display 8 Rear panel 9 PREPARATION CONNECTIONS 10 Placing speakers 10 Connecting speakers ...52 Using SET MENU 53 SOUND MENU 53 INPUT MENU 55 OPTION MENU 56 REMOTE CONTROL FEATURES 57 Controlling this unit, a TV, or other components.... 57 Setting remote control codes 59 ADDITIONAL INFORMATION TROUBLESHOOTING 60 RESETTING THE SYSTEM 65 GLOSSARY 66 ...
INTRODUCTION PREPARATION BASIC OPERATION CONTENTS INTRODUCTION FEATURES 2 GETTING STARTED 3 Supplied accessories 3 Installing batteries in the remote control 3 CONTROLS AND FUNCTIONS 4 Front panel 4 Remote control 6 Front panel display 8 Rear panel 9 PREPARATION CONNECTIONS 10 Placing speakers 10 Connecting speakers ...52 Using SET MENU 53 SOUND MENU 53 INPUT MENU 55 OPTION MENU 56 REMOTE CONTROL FEATURES 57 Controlling this unit, a TV, or other components.... 57 Setting remote control codes 59 ADDITIONAL INFORMATION TROUBLESHOOTING 60 RESETTING THE SYSTEM 65 GLOSSARY 66 ...
Owner's Manual
Page 6
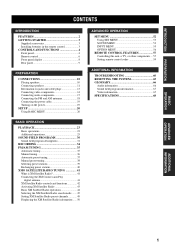
... models] (0.9% THD, 1 kHz, 6 Ω) Front: 100 W + 100 W Center: 100 W Surround: 100 W + 100 W Decoders and DSP circuits ◆ Proprietary YAMAHA technology for your individual audiovisual system ◆ Component video input/output capability (3 COMPONENT VIDEO INs and 1 MONITOR OUT) ◆ Optical and coaxial digital audio signal... jacks ◆ Sleep timer ◆ Night listening mode ◆ Remote control with preset remote control codes • y indicates a tip for the creation of XM Satellite Radio Inc. 2 In case the button...
... models] (0.9% THD, 1 kHz, 6 Ω) Front: 100 W + 100 W Center: 100 W Surround: 100 W + 100 W Decoders and DSP circuits ◆ Proprietary YAMAHA technology for your individual audiovisual system ◆ Component video input/output capability (3 COMPONENT VIDEO INs and 1 MONITOR OUT) ◆ Optical and coaxial digital audio signal... jacks ◆ Sleep timer ◆ Night listening mode ◆ Remote control with preset remote control codes • y indicates a tip for the creation of XM Satellite Radio Inc. 2 In case the button...
Owner's Manual
Page 7
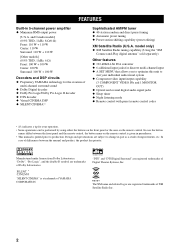
... code and program any acquired functions that you received all of the batteries if you notice a decrease in the operation range of the remote control. • Do not use an old battery together with a new one. • Do not use different types of the memory may have ... PRESET/CH SET MENU MENU SRCH MODE + A-E/CAT. When the memory is without batteries for more than 2 minutes, or if exhausted batteries remain in the remote control 2 1 3 1 Press the part and slide the battery compartment cover off. 2 Insert the two supplied batteries (AA, R06, UM-3) according to the polarity markings ...
... code and program any acquired functions that you received all of the batteries if you notice a decrease in the operation range of the remote control. • Do not use an old battery together with a new one. • Do not use different types of the memory may have ... PRESET/CH SET MENU MENU SRCH MODE + A-E/CAT. When the memory is without batteries for more than 2 minutes, or if exhausted batteries remain in the remote control 2 1 3 1 Press the part and slide the battery compartment cover off. 2 Insert the two supplied batteries (AA, R06, UM-3) according to the polarity markings ...
Owner's Manual
Page 8
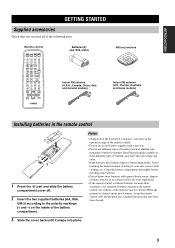
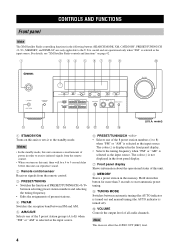
...details, see "XM Satellite Radio controls and functions" on this unit consumes a small amount of power in order to receive infrared-signals from the remote control. 3 PRESET/TUNING • Switches the function of PRESET/TUNING/CH l / h between selecting preset station numbers and selecting the tuning ...the front panel display. 7 Front panel display Shows information about the operational status of this unit can reproduce sound. 2 Remote control sensor Receives signals from the remote control. • When you turn on ) and manual tuning (the AUTO indicator is turned off). 0 VOLUME Controls...
...details, see "XM Satellite Radio controls and functions" on this unit consumes a small amount of power in order to receive infrared-signals from the remote control. 3 PRESET/TUNING • Switches the function of PRESET/TUNING/CH l / h between selecting preset station numbers and selecting the tuning ...the front panel display. 7 Front panel display Shows information about the operational status of this unit can reproduce sound. 2 Remote control sensor Receives signals from the remote control. • When you turn on ) and manual tuning (the AUTO indicator is turned off). 0 VOLUME Controls...
Owner's Manual
Page 9
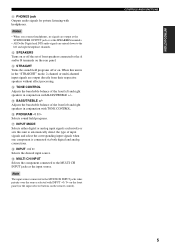
... takes priority over the source selected with BASS/TREBLE +/-. Adjusts the bass/treble balance of front speakers connected to the A and/or B terminals on the remote control). F PROGRAM l / h Selects sound field programs. G INPUT MODE Selects either digital or analog input signals exclusively or sets this unit is connected via both digital...
... takes priority over the source selected with BASS/TREBLE +/-. Adjusts the bass/treble balance of front speakers connected to the A and/or B terminals on the remote control). F PROGRAM l / h Selects sound field programs. G INPUT MODE Selects either digital or analog input signals exclusively or sets this unit is connected via both digital...
Owner's Manual
Page 10
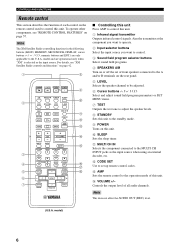
...model and are only applicable to control. 3 Sound field program selector buttons Select sound field programs. 4 SPEAKERS A/B Turn on or off the set up remote control codes. F G LEVEL SET MENU 5 TITLE MENU H BAND SRCH MODE 6 - Aim the transmitter at the component you want to operate. 2 ...Input selector buttons Select the input source you want to the U.S.A. model) 6 CONTROLS AND FUNCTIONS Remote control This section describes the function of each control on the remote control used to the standby mode. 9 POWER Turns on this unit. 0 SLEEP Sets the sleep timer. ...
...model and are only applicable to control. 3 Sound field program selector buttons Select sound field programs. 4 SPEAKERS A/B Turn on or off the set up remote control codes. F G LEVEL SET MENU 5 TITLE MENU H BAND SRCH MODE 6 - Aim the transmitter at the component you want to operate. 2 ...Input selector buttons Select the input source you want to the U.S.A. model) 6 CONTROLS AND FUNCTIONS Remote control This section describes the function of each control on the remote control used to the standby mode. 9 POWER Turns on this unit. 0 SLEEP Sets the sleep timer. ...
Owner's Manual
Page 11
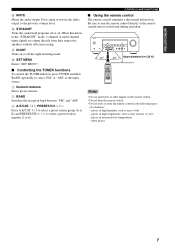
... Approximately 6 m (20 ft) Notes • Do not spill water or other liquids on the remote control. • Do not drop the remote control. • Do not leave or store the remote control in the "STRAIGHT" mode, 2-channel or multi-channel input signals are output directly from their ...Enters "SET MENU". ■ Controlling the TUNER functions To control the TUNER function, press TUNER and then BAND repeatedly to aim the remote control directly at the remote control sensor on . INTRODUCTION E MUTE Mutes the audio output. places of high humidity, such as near a bath - places of...
... Approximately 6 m (20 ft) Notes • Do not spill water or other liquids on the remote control. • Do not drop the remote control. • Do not leave or store the remote control in the "STRAIGHT" mode, 2-channel or multi-channel input signals are output directly from their ...Enters "SET MENU". ■ Controlling the TUNER functions To control the TUNER function, press TUNER and then BAND repeatedly to aim the remote control directly at the remote control sensor on . INTRODUCTION E MUTE Mutes the audio output. places of high humidity, such as near a bath - places of...

Owner's Manual
Page 18
... sure to connect your video source components in V Video monitor 14 To enjoy the surround sound, use the sound field program selector buttons on the remote control (see page 16). ■ Connecting a DVD recorder/VCR Connect the audio signal input jacks of your video component to the VCR AUDIO OUT jacks...
... sure to connect your video source components in V Video monitor 14 To enjoy the surround sound, use the sound field program selector buttons on the remote control (see page 16). ■ Connecting a DVD recorder/VCR Connect the audio signal input jacks of your video component to the VCR AUDIO OUT jacks...
Owner's Manual
Page 23
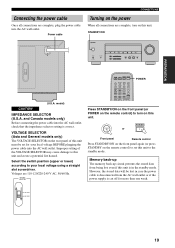
...V-AUX REC DISC SKIP TV ++ AUDIO MULTI CH IN CODE SET AMP + POWER Press STANDBY/ON on the front panel (or POWER on the remote control) to the standby mode. STANDBY/ON IMPEDANCE SELECTOR STANDBY /ON PHONES SILENT CINEMA SPEAKERS A/B/OFF PRESET/TUNING SEARCH MODE EDIT FM/AM XM ...if the power supply is correct. model) CAUTION IMPEDANCE SELECTOR (U.S.A. STANDBY /ON POWER or Front panel Remote control Press STANDBY/ON on the front panel again (or press STANDBY on the remote control) to your local voltage BEFORE plugging the power cable into the AC wall outlet, check that...
...V-AUX REC DISC SKIP TV ++ AUDIO MULTI CH IN CODE SET AMP + POWER Press STANDBY/ON on the front panel (or POWER on the remote control) to the standby mode. STANDBY/ON IMPEDANCE SELECTOR STANDBY /ON PHONES SILENT CINEMA SPEAKERS A/B/OFF PRESET/TUNING SEARCH MODE EDIT FM/AM XM ...if the power supply is correct. model) CAUTION IMPEDANCE SELECTOR (U.S.A. STANDBY /ON POWER or Front panel Remote control Press STANDBY/ON on the front panel again (or press STANDBY on the remote control) to your local voltage BEFORE plugging the power cable into the AC wall outlet, check that...

Owner's Manual
Page 24
.... • Select "NONE" if you disconnect your speakers. Note Before you begin: • Press SPEAKERS on the front panel repeatedly (or press SPEAKERS A/B on the remote control) to select the front speakers you want to use. • Make sure you do not have installed your headphones from this unit manually using...
.... • Select "NONE" if you disconnect your speakers. Note Before you begin: • Press SPEAKERS on the front panel repeatedly (or press SPEAKERS A/B on the remote control) to select the front speakers you want to use. • Make sure you do not have installed your headphones from this unit manually using...
Owner's Manual
Page 27
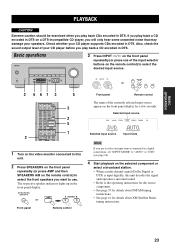
...) is input digitally, this unit. 2 Press SPEAKERS on the front panel repeatedly (or press AMP and then SPEAKERS A/B on the remote control) to the operating instructions for the source component. • See page 35 for details about FM/AM tuning instructions. •...2 3 4 STANDARD 5 5CH STEREO 6 7 8 A SPEAKERS B 9 0 NIGHT STRAIGHT +10 ENT. SPEAKERS A/B/OFF or AMP A SPEAKERS B 9 0 Front panel Remote control Front panel Remote control The name of the currently selected input source appears in DTS. Also, check the sound output level of the input selector buttons on...
...) is input digitally, this unit. 2 Press SPEAKERS on the front panel repeatedly (or press AMP and then SPEAKERS A/B on the remote control) to the operating instructions for the source component. • See page 35 for details about FM/AM tuning instructions. •...2 3 4 STANDARD 5 5CH STEREO 6 7 8 A SPEAKERS B 9 0 NIGHT STRAIGHT +10 ENT. SPEAKERS A/B/OFF or AMP A SPEAKERS B 9 0 Front panel Remote control Front panel Remote control The name of the currently selected input source appears in DTS. Also, check the sound output level of the input selector buttons on...
Owner's Manual
Page 28
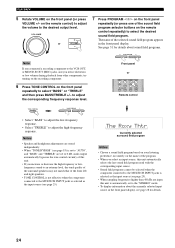
... (see page 28 for details about the currently selected input source in the front panel display. VOLUME + or VOLUME - 7 Press PROGRAM l / h on the remote control repeatedly) to select the desired sound field program. Front panel or 2CH STEREO 1 MUSIC ENTERTAIN MOVIE 2 3 4 STANDARD 5 5CH STEREO 6 7 8 A ... the selected sound field program appears in the front panel display, see page 25). on the front panel (or press VOLUME +/- Remote control TONE CONTROL BASS/TREBLE • Select "BASS" to adjust the low-frequency response. • Select "TREBLE" to adjust ...
... (see page 28 for details about the currently selected input source in the front panel display. VOLUME + or VOLUME - 7 Press PROGRAM l / h on the remote control repeatedly) to select the desired sound field program. Front panel or 2CH STEREO 1 MUSIC ENTERTAIN MOVIE 2 3 4 STANDARD 5 5CH STEREO 6 7 8 A ... the selected sound field program appears in the front panel display, see page 25). on the front panel (or press VOLUME +/- Remote control TONE CONTROL BASS/TREBLE • Select "BASS" to adjust the low-frequency response. • Select "TREBLE" to adjust ...
Owner's Manual
Page 29
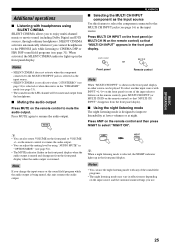
... listening to select "NIGHT ON". Notes • SILENT CINEMA does not activate when the component connected to mute the audio output. on the remote control and then press NIGHT to CINEMA DSP or HiFi DSP sound field programs (see page 31) is selected or when this unit resumes the...mode The night listening mode is designed to improve listenability at lower volumes or at night. MULTI CH INPUT Front panel MULTI CH IN or Remote control Note When "MULTI CH INPUT" is shown in the front panel display. SILENT CINEMA activates automatically whenever you change the input source ...
... listening to select "NIGHT ON". Notes • SILENT CINEMA does not activate when the component connected to mute the audio output. on the remote control and then press NIGHT to CINEMA DSP or HiFi DSP sound field programs (see page 31) is selected or when this unit resumes the...mode The night listening mode is designed to improve listenability at lower volumes or at night. MULTI CH INPUT Front panel MULTI CH IN or Remote control Note When "MULTI CH INPUT" is shown in the front panel display. SILENT CINEMA activates automatically whenever you change the input source ...

Owner's Manual
Page 30
...front left speaker output level. • Select "SWFR" to adjust the subwoofer output level. Selects only analog signals. y Once you press LEVEL on the remote control, you make in "SETUP". 26 If no DTS signals are input, no sound is output. Do the following order: 1) Digital signals 2) Analog.... - PRESET/CH The control range is from +10 dB to -10 dB for the front speakers and subwoofer. INPUT 2 Press INPUT MODE on the remote control to a music source. Currently selected input sources 2 Press j / i on the front panel repeatedly to -20 dB for the center and surround ...
...front left speaker output level. • Select "SWFR" to adjust the subwoofer output level. Selects only analog signals. y Once you press LEVEL on the remote control, you make in "SETUP". 26 If no DTS signals are input, no sound is output. Do the following order: 1) Digital signals 2) Analog.... - PRESET/CH The control range is from +10 dB to -10 dB for the front speakers and subwoofer. INPUT 2 Press INPUT MODE on the remote control to a music source. Currently selected input sources 2 Press j / i on the front panel repeatedly to -20 dB for the center and surround ...

Owner's Manual
Page 31
... so that the volume from each speaker is also possible when playing sources input at the MULTI CH INPUT jacks. 1 Press AMP on the remote control and then press TEST. This is identical when heard from your listening position. ENTER + A-E/CAT. PRESET/CH • Select "TEST LEFT..."TEST SUBWOOFER" to adjust the speaker output level. - In this case, adjust the speaker levels while listening to the source. 3 Press j / i on the remote control when you make in response to any changes you have completed your liking. The unit will also change. • If you select "SETUP" (see...
... so that the volume from each speaker is also possible when playing sources input at the MULTI CH INPUT jacks. 1 Press AMP on the remote control and then press TEST. This is identical when heard from your listening position. ENTER + A-E/CAT. PRESET/CH • Select "TEST LEFT..."TEST SUBWOOFER" to adjust the speaker output level. - In this case, adjust the speaker levels while listening to the source. 3 Press j / i on the remote control when you make in response to any changes you have completed your liking. The unit will also change. • If you select "SETUP" (see...

Owner's Manual
Page 32
...signal, it automatically switches to display the following information about the input source. - To turn back the sound field program on the remote control and then press STRAIGHT to select "STRAIGHT". y When you are displaying information about the input source, this unit detects any ...undecodable digital signal. CHANNEL Number of the input selector buttons on the remote control to select the desired input source. 2 Press AMP on , press STRAIGHT again. 28 PLAYBACK ■ Displaying information about the ...
...signal, it automatically switches to display the following information about the input source. - To turn back the sound field program on the remote control and then press STRAIGHT to select "STRAIGHT". y When you are displaying information about the input source, this unit detects any ...undecodable digital signal. CHANNEL Number of the input selector buttons on the remote control to select the desired input source. 2 Press AMP on , press STRAIGHT again. 28 PLAYBACK ■ Displaying information about the ...
Owner's Manual
Page 33
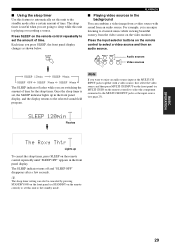
...timer is playing or recording a source. SLEEP SLEEP 120min Flashes SLEEP The Roxy Thtr Lights up in the front panel display. Press SLEEP on the remote control to select a video source and then an audio source. SLEEP CD MD/CD-R TUNER DVD DTV/CBL VCR V-AUX Audio sources Video sources ... flashes while you want to enjoy an audio source input at the MULTI CH INPUT jacks together with sound from the video source on the remote control) to select the component connected to the standby mode after a few seconds. BASIC OPERATION ■ Using the sleep timer Use this feature to ...
...timer is playing or recording a source. SLEEP SLEEP 120min Flashes SLEEP The Roxy Thtr Lights up in the front panel display. Press SLEEP on the remote control to select a video source and then an audio source. SLEEP CD MD/CD-R TUNER DVD DTV/CBL VCR V-AUX Audio sources Video sources ... flashes while you want to enjoy an audio source input at the MULTI CH INPUT jacks together with sound from the video source on the remote control) to select the component connected to the standby mode after a few seconds. BASIC OPERATION ■ Using the sleep timer Use this feature to ...

Owner's Manual
Page 34
SOUND FIELD PROGRAMS SOUND FIELD PROGRAMS This unit is equipped with a YAMAHA digital sound field processing (DSP) chip containing several sound field programs which you can use to...INPUT MODE l INPUT h MULTI CH INPUT VOLUME PROGRAM l / h AMP TV ++ VOL CH -- + VOLUME - Press AMP on the remote control and then press one of precise digital decoders that allow you select an input source, this unit is also equipped with a variety of... cannot be selected when the component connected to the "STEREO" mode. ■ Front panel operations ■ Remote control operations (U.S.A.
SOUND FIELD PROGRAMS SOUND FIELD PROGRAMS This unit is equipped with a YAMAHA digital sound field processing (DSP) chip containing several sound field programs which you can use to...INPUT MODE l INPUT h MULTI CH INPUT VOLUME PROGRAM l / h AMP TV ++ VOL CH -- + VOLUME - Press AMP on the remote control and then press one of precise digital decoders that allow you select an input source, this unit is also equipped with a variety of... cannot be selected when the component connected to the "STEREO" mode. ■ Front panel operations ■ Remote control operations (U.S.A.

Owner's Manual
Page 35
... Thtr Game ENTERTAIN TV Sports MOVIE Movie Spacious Movie Dramatic STANDARD STANDARD HiFi DSP processing. CINEMA DSP processing. Sound field program descriptions SOUND FIELD PROGRAMS Remote control button Program 2CH STEREO 2CH STEREO Features Downmixes multi-channel sources to enable this unit are recreations of real-world acoustic environments made from...
... Thtr Game ENTERTAIN TV Sports MOVIE Movie Spacious Movie Dramatic STANDARD STANDARD HiFi DSP processing. CINEMA DSP processing. Sound field program descriptions SOUND FIELD PROGRAMS Remote control button Program 2CH STEREO 2CH STEREO Features Downmixes multi-channel sources to enable this unit are recreations of real-world acoustic environments made from...

Owner's Manual
Page 36
... panel display. 2 Press j / i to change the initial settings, you are playing and your listening room. 1 While listening to a source, press AMP on the remote control and then press u / d to "ON" (see page 56). 32 ENTER + A-E/CAT. AMP STANDARD 5 ■ Editing sound fields parameters You can select ...for movie sources PLII Music Dolby Pro Logic II processing for music sources y You can also select a decoder by pressing j / i on the remote control while the decoder type is displayed in "OPTION MENU" is set to select the parameters. ENTER + A-E/CAT. PRESET/CH Note You cannot ...
... panel display. 2 Press j / i to change the initial settings, you are playing and your listening room. 1 While listening to a source, press AMP on the remote control and then press u / d to "ON" (see page 56). 32 ENTER + A-E/CAT. AMP STANDARD 5 ■ Editing sound fields parameters You can select ...for movie sources PLII Music Dolby Pro Logic II processing for music sources y You can also select a decoder by pressing j / i on the remote control while the decoder type is displayed in "OPTION MENU" is set to select the parameters. ENTER + A-E/CAT. PRESET/CH Note You cannot ...


