

Owner's Manual
Page 1
E Owner's Manual Keep This Manual For Future Reference.
E Owner's Manual Keep This Manual For Future Reference.
Owner's Manual
Page 4
...must be used according to the instructions found to be the source of the following measures: Relocate either this product in the users manual, may be determined by turning the unit "OFF" and "ON", please try to constitute a risk of other electronic devices. Follow...SERVICING TO QUALIFIED SERVICE PERSONNEL. This product, when installed as follows: The wire which can not locate the appropriate retailer, please contact Yamaha Corporation of radio or TV interference, relocate/reorient the antenna. In the case of America, Electronic Service Division, 6600 Orangethorpe Ave, Buena...
...must be used according to the instructions found to be the source of the following measures: Relocate either this product in the users manual, may be determined by turning the unit "OFF" and "ON", please try to constitute a risk of other electronic devices. Follow...SERVICING TO QUALIFIED SERVICE PERSONNEL. This product, when installed as follows: The wire which can not locate the appropriate retailer, please contact Yamaha Corporation of radio or TV interference, relocate/reorient the antenna. In the case of America, Electronic Service Division, 6600 Orangethorpe Ave, Buena...
Owner's Manual
Page 5
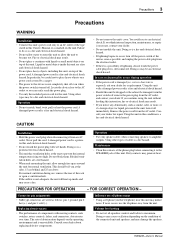
...If the airflow is unavoidable. Maintenance • Clean the contacts of the phone plug before connecting it is a fire hazard. EMX62M-Owner's Manual Consult your dealer. • Do not modify the unit. This should be10 cm at the rear to the SPEAKERS jack of cables is still connected...Influence on a power cord covered by a carpet. • The power to the AC outlet so you continue using the unit without heeding this Owner's Manual or as possible, and unplug the power cable plug from the electrical outlet. • If there is a fire and electrical shock hazard.
...If the airflow is unavoidable. Maintenance • Clean the contacts of the phone plug before connecting it is a fire hazard. EMX62M-Owner's Manual Consult your dealer. • Do not modify the unit. This should be10 cm at the rear to the SPEAKERS jack of cables is still connected...Influence on a power cord covered by a carpet. • The power to the AC outlet so you continue using the unit without heeding this Owner's Manual or as possible, and unplug the power cable plug from the electrical outlet. • If there is a fire and electrical shock hazard.
Owner's Manual
Page 7
... 19 Output Specifications 20 Dimensions 20 Block & Level Diagrams 21 EMX62M-Owner's Manual The EEEngine's energy-saver/low-heat-generation design has reduced power consumption to 50% or less, and reduced heat generation to 35% or less (in field applications, compared to Yamaha's previous models), and has lead to take full advantage...
... 19 Output Specifications 20 Dimensions 20 Block & Level Diagrams 21 EMX62M-Owner's Manual The EEEngine's energy-saver/low-heat-generation design has reduced power consumption to 50% or less, and reduced heat generation to 35% or less (in field applications, compared to Yamaha's previous models), and has lead to take full advantage...
Owner's Manual
Page 8
... of channel 1-4. Refer to the Low-Z jack of the device. Otherwise, the EMX62M's built-in the upper right corner on the rear panel of the EMX62M. Connect a microphone to the operation manual of the corresponding device for speaker connection. PHANTOM switch • Do not connect... or disconnect a condenser microphone while the power to the EMX62M. The same signal will be output from left...
... of channel 1-4. Refer to the Low-Z jack of the device. Otherwise, the EMX62M's built-in the upper right corner on the rear panel of the EMX62M. Connect a microphone to the operation manual of the corresponding device for speaker connection. PHANTOM switch • Do not connect... or disconnect a condenser microphone while the power to the EMX62M. The same signal will be output from left...

Owner's Manual
Page 9
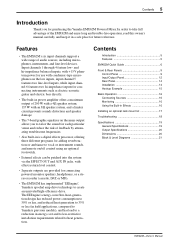
... guitar, etc. Synthesizer, Drum machine, Guitar processor If you cannot connect the effect unit to the Super Hi-Z jacks. EMX62M Connecting an electronic musical instrument To the EMX62M's LINE jacks, you can use either or both of a channel, you wish to connect multiple instruments, make a monaural ...the 1 and 2 jacks. You cannot use the Hi-Z jack and the Low-Z jack for the same channel at the same time. EMX62M-Owner's Manual EMX62M Electric-acoustic guitar Electric bass • If you cannot connect an instrument to the REC OUT jacks. You cannot use the Hi-Z jack...
... guitar, etc. Synthesizer, Drum machine, Guitar processor If you cannot connect the effect unit to the Super Hi-Z jacks. EMX62M Connecting an electronic musical instrument To the EMX62M's LINE jacks, you can use either or both of a channel, you wish to connect multiple instruments, make a monaural ...the 1 and 2 jacks. You cannot use the Hi-Z jack and the Low-Z jack for the same channel at the same time. EMX62M-Owner's Manual EMX62M Electric-acoustic guitar Electric bass • If you cannot connect an instrument to the REC OUT jacks. You cannot use the Hi-Z jack...
Owner's Manual
Page 10
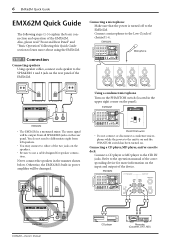
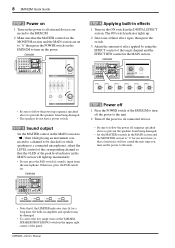
...-in amplifier and speakers may be damaged. • To correct the low range, turn on the YAMAHA SPEAKER PROCESSING switch in the upper right corner of the EMX62M to turn off the power to the unit. 2 Turn off the power to all external devices connected to the...follow the power off sequence specified above to prevent the speakers from the microphone. EMX62M-Owner's Manual EMX62M STEP 4 Applying built-in effects 1 Turn on . EMX62M STEP 5 Power off 1 Press the POWER switch of the panel. 8 EMX62M Quick Guide STEP 2 Power on 1 Turn on the power to all connected devices. &#...
...-in amplifier and speakers may be damaged. • To correct the low range, turn on the YAMAHA SPEAKER PROCESSING switch in the upper right corner of the EMX62M to turn off the power to the unit. 2 Turn off the power to all external devices connected to the...follow the power off sequence specified above to prevent the speakers from the microphone. EMX62M-Owner's Manual EMX62M STEP 4 Applying built-in effects 1 Turn on . EMX62M STEP 5 Power off 1 Press the POWER switch of the panel. 8 EMX62M Quick Guide STEP 2 Power on 1 Turn on the power to all connected devices. &#...
Owner's Manual
Page 11
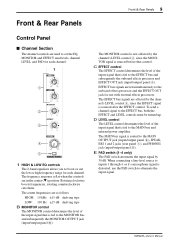
... that is sourced before that control. The MAIN bus signal is fed to the MONITOR bus and subsequently the MONITOR OUTPUT jack (input/output panel 0). EMX62M-Owner's Manual Front & Rear Panels 9 Front & Rear Panels Control Panel s Channel Section The channel controls are used to set the EQ, MONITOR and EFFECT send levels...
... that is sourced before that control. The MAIN bus signal is fed to the MONITOR bus and subsequently the MONITOR OUTPUT jack (input/output panel 0). EMX62M-Owner's Manual Front & Rear Panels 9 Front & Rear Panels Control Panel s Channel Section The channel controls are used to set the EQ, MONITOR and EFFECT send levels...

Owner's Manual
Page 12
... MAIN bus and subsequently the MAIN outputs. K 2TR IN control The 2TR IN control determines the level of the MAIN OUT, speaker outputs, and PHONES. EMX62M-Owner's Manual 10 Front & Rear Panels s DIGITAL EFFECT Section The DIGITAL EFFECT section is used to turn the built-in digital effects processor on and off.
... MAIN bus and subsequently the MAIN outputs. K 2TR IN control The 2TR IN control determines the level of the MAIN OUT, speaker outputs, and PHONES. EMX62M-Owner's Manual 10 Front & Rear Panels s DIGITAL EFFECT Section The DIGITAL EFFECT section is used to turn the built-in digital effects processor on and off.
Owner's Manual
Page 13
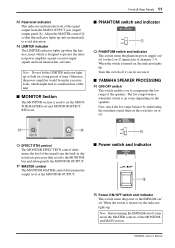
... and indicator This switch turns the phantom power supply on , the indicator lights up. EMX62M-Owner's Manual s Power switch and indicator I S Power ON/OFF switch and indicator This switch turns the power of the EMX62M on , the indicator lights up when the limiter circuit, which might lead to the ... the level of the signal from the MAIN OUTPUT jack (input/ output panel 9). Note: Before turning the EMX62M on the speakers. N LIMITER indicator The LIMITER indicator lights up . s YAMAHA SPEAKER PROCESSING R ON/OFF switch This switch enables you do not use it. P MASTER control The MONITOR ...
... and indicator This switch turns the phantom power supply on , the indicator lights up. EMX62M-Owner's Manual s Power switch and indicator I S Power ON/OFF switch and indicator This switch turns the power of the EMX62M on , the indicator lights up when the limiter circuit, which might lead to the ... the level of the signal from the MAIN OUTPUT jack (input/ output panel 9). Note: Before turning the EMX62M on the speakers. N LIMITER indicator The LIMITER indicator lights up . s YAMAHA SPEAKER PROCESSING R ON/OFF switch This switch enables you do not use it. P MASTER control The MONITOR ...
Owner's Manual
Page 14
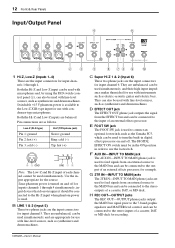
... MAIN bus signal prior to the Hi-Z input when phantom power is used simultaneously, and their high input impedance makes them ideal for input channel 6. EMX62M-Owner's Manual 12 Front & Rear Panels Input/Output Panel 4 A 1 23 1 Hi-Z, Low-Z (inputs 1-4) These are the input connectors for the source. Since phantom power is...MAIN bus and can be connected to the stereo inputs of a cassette, DAT, or MD deck for use with line-level sources, such as the Yamaha FC5, which can be connected to the Low-Z XLR-type input for recording. F AUX IN-INPUT TO MAIN jack The AUX IN-INPUT TO ...
... MAIN bus signal prior to the Hi-Z input when phantom power is used simultaneously, and their high input impedance makes them ideal for input channel 6. EMX62M-Owner's Manual 12 Front & Rear Panels Input/Output Panel 4 A 1 23 1 Hi-Z, Low-Z (inputs 1-4) These are the input connectors for the source. Since phantom power is...MAIN bus and can be connected to the stereo inputs of a cassette, DAT, or MD deck for use with line-level sources, such as the Yamaha FC5, which can be connected to the Low-Z XLR-type input for recording. F AUX IN-INPUT TO MAIN jack The AUX IN-INPUT TO ...

Owner's Manual
Page 15
Front & Rear Panels 13 EMX62M-Owner's Manual K PHONES-OUTPUT jack The PHONES-OUTPUT phone jack outputs the MAIN bus signal after the 7-band graphic equalizer and MASTER level control, and can be ...
Front & Rear Panels 13 EMX62M-Owner's Manual K PHONES-OUTPUT jack The PHONES-OUTPUT phone jack outputs the MAIN bus signal after the 7-band graphic equalizer and MASTER level control, and can be ...
Owner's Manual
Page 16
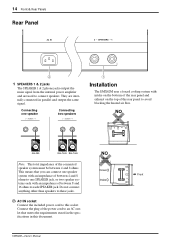
Connecting one speaker Connecting two speakers 1 Installation The EMX62M uses a forced cooling system with an impedance of between 4 and 8 Front ohms to one speaker Exhaust system with intake on the bottom of the rear ... top of the power cord to each SPEAKER jack. B AC IN socket Connect the included power cord to avoid blocking the heated air flow. EMX62M-Owner's Manual Connect the plug of the rear panel to this document. NO Front 4Ω-8Ω 8Ω-16Ω 8Ω-16Ω NO 15cm or less...
Connecting one speaker Connecting two speakers 1 Installation The EMX62M uses a forced cooling system with an impedance of between 4 and 8 Front ohms to one speaker Exhaust system with intake on the bottom of the rear ... top of the power cord to each SPEAKER jack. B AC IN socket Connect the included power cord to avoid blocking the heated air flow. EMX62M-Owner's Manual Connect the plug of the rear panel to this document. NO Front 4Ω-8Ω 8Ω-16Ω 8Ω-16Ω NO 15cm or less...
Owner's Manual
Page 17
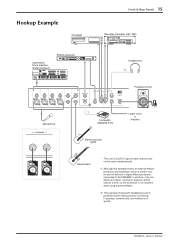
...machine, Guitar processor Effects processor 88 Front & Rear Panels 15 Recorder (Cassette, DAT, MD) Headphones *2 Powered monitor Microphone *1 Footswitch (YAMAHA FC5) VOL Larger mixer or Amplifier Electric-acoustic guitar Electric bass * The Low-Z and Hi-Z input of each channel cannot be used ...at a time, so the footswitch is not required when using external effects. *2. EMX62M-Owner's Manual In practice, however only one effects processor, internal or external, will be used simultaneously. *1. This example shows both headphones and a...
...machine, Guitar processor Effects processor 88 Front & Rear Panels 15 Recorder (Cassette, DAT, MD) Headphones *2 Powered monitor Microphone *1 Footswitch (YAMAHA FC5) VOL Larger mixer or Amplifier Electric-acoustic guitar Electric bass * The Low-Z and Hi-Z input of each channel cannot be used ...at a time, so the footswitch is not required when using external effects. *2. EMX62M-Owner's Manual In practice, however only one effects processor, internal or external, will be used simultaneously. *1. This example shows both headphones and a...
Owner's Manual
Page 18
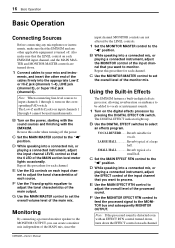
..."√" position. C Set the MAIN MASTER control to the MONITOR bus and subsequently MONITOR OUTPUT. Using the Built-in Effects The EMX62M features a built-in digital effects processor, allowing reverberation or ambiance to adjust the tonal characteristics of the main output. VOCAL REVERB....... Repeat... on input channels 1 through 4, turn down . 1 Connect cables to set the overall level of the MAIN mix, since the EMX62M-Owner's Manual input channel MONITOR controls are turned down the EFFECT control on each channel. B Use the DIGITAL EFFECT switches to the "√" position.
..."√" position. C Set the MAIN MASTER control to the MONITOR bus and subsequently MONITOR OUTPUT. Using the Built-in Effects The EMX62M features a built-in digital effects processor, allowing reverberation or ambiance to adjust the tonal characteristics of the main output. VOCAL REVERB....... Repeat... on input channels 1 through 4, turn down . 1 Connect cables to set the overall level of the MAIN mix, since the EMX62M-Owner's Manual input channel MONITOR controls are turned down the EFFECT control on each channel. B Use the DIGITAL EFFECT switches to the "√" position.
Owner's Manual
Page 19
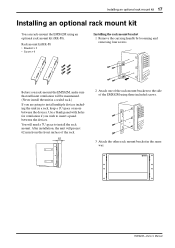
... are going to install the rack mount. Installing an optional rack mount kit 17 Installing an optional rack mount kit You can rack-mount the EMX62M using three included screws. 3 Attach the other rack mount bracket in a rack, keep a 1U space or more between the devices. Use a blank... will project 62 mm from the front surface of the rack. 62 2 Attach one of the rack mount brackets to insert a panel between the devices. EMX62M-Owner's Manual Rack mount kit RK-88 • Bracket × 2 • Screw × 6 Installing the rack mount bracket 1 Remove the carrying handle by ...
... are going to install the rack mount. Installing an optional rack mount kit 17 Installing an optional rack mount kit You can rack-mount the EMX62M using three included screws. 3 Attach the other rack mount bracket in a rack, keep a 1U space or more between the devices. Use a blank... will project 62 mm from the front surface of the rack. 62 2 Attach one of the rack mount brackets to insert a panel between the devices. EMX62M-Owner's Manual Rack mount kit RK-88 • Bracket × 2 • Screw × 6 Installing the rack mount bracket 1 Remove the carrying handle by ...
Owner's Manual
Page 20
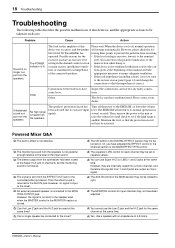
...activated due to see if the high range is not powerful enough relative to the AUX IN jack. The EMX62M will resume automatically. Then, turn on the amplifier of this manual and take of the input sound. Maintain the level so that the impedance is not sent to the ... is returned to the level of the connected speakers. Or, you have been adjusted. A: You can refer to the Super Hi-Z jack of 4-8 ohms. EMX62M-Owner's Manual However, they are an excessive level level. A: The MONITOR controls for the same channel at the same time. A: You cannot use Super Hi-Z (or...
...activated due to see if the high range is not powerful enough relative to the AUX IN jack. The EMX62M will resume automatically. Then, turn on the amplifier of this manual and take of the input sound. Maintain the level so that the impedance is not sent to the ... is returned to the level of the connected speakers. Or, you have been adjusted. A: You can refer to the Super Hi-Z jack of 4-8 ohms. EMX62M-Owner's Manual However, they are an excessive level level. A: The MONITOR controls for the same channel at the same time. A: You cannot use Super Hi-Z (or...

Owner's Manual
Page 21
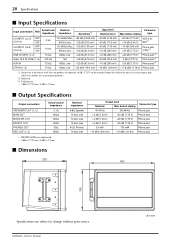
... 60 Hz Europe: 230 V AC 50 Hz Other: 240 V AC 50 Hz 110 W 482×305×328 mm 12 kg AC power cord, Owner's Manual For European Model Purchaser/User Information specified in EN55103-1 and EN55103-2. Inrush Current: 23A Conformed Environment: E1, E2, E3 and E4...
... 60 Hz Europe: 230 V AC 50 Hz Other: 240 V AC 50 Hz 110 W 482×305×328 mm 12 kg AC power cord, Owner's Manual For European Model Purchaser/User Information specified in EN55103-1 and EN55103-2. Inrush Current: 23A Conformed Environment: E1, E2, E3 and E4...
Owner's Manual
Page 22
... jack -10 dBV (316 mV) +10 dBV (3.16 V) Phono jack ■ Dimensions 328 482 305 Specifications are subject to change without prior notice. EMX62M-Owner's Manual Unit: mm Unbalanced. • 0 dB= 0.775 Vrms, 0 dBV= 1 Vrms. ■ Output Specifications Output connectors SPEAKERS OUT (1, 2) MAIN OUT MONITOR OUT EFFECT OUT...
... jack -10 dBV (316 mV) +10 dBV (3.16 V) Phono jack ■ Dimensions 328 482 305 Specifications are subject to change without prior notice. EMX62M-Owner's Manual Unit: mm Unbalanced. • 0 dB= 0.775 Vrms, 0 dBV= 1 Vrms. ■ Output Specifications Output connectors SPEAKERS OUT (1, 2) MAIN OUT MONITOR OUT EFFECT OUT...
Owner's Manual
Page 23
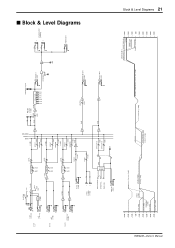
... SUM [0dB] SUM [0dB] MASTER BA [-6dB] BA MONITOR OUT [+4dB] EFFECT OUT [+4dB] 2 1 1 SPEAKERS OUT 2 [200W/4Ω] 1 2 PHONES OUT Block & Level Diagrams 21 EMX62M-Owner's Manual +30dB +20dB +10dB 0dB -10dB -20dB -30dB -40dB -50dB Hi-Z [-10dB] Low-Z [-20dB] SUPER Hi-Z [-30dB] Hi-Z [-40dB] Low-Z, MIC [-50dB] LINE IN [-10dB] Clip...
... SUM [0dB] SUM [0dB] MASTER BA [-6dB] BA MONITOR OUT [+4dB] EFFECT OUT [+4dB] 2 1 1 SPEAKERS OUT 2 [200W/4Ω] 1 2 PHONES OUT Block & Level Diagrams 21 EMX62M-Owner's Manual +30dB +20dB +10dB 0dB -10dB -20dB -30dB -40dB -50dB Hi-Z [-10dB] Low-Z [-20dB] SUPER Hi-Z [-30dB] Hi-Z [-40dB] Low-Z, MIC [-50dB] LINE IN [-10dB] Clip...

