

Owner's Manual
Page 3
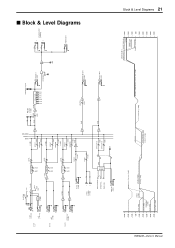
MAIN EFFECT MONITOR ■ Block & Level Diagrams M.D.G., Pro Audio & Digital Musical Instrument Division, Yamaha Corporation © 2002 Yamaha Corporation CH IN 1-4 Low-Z [-50/-20] Hi-Z [-40/-10] CH5 IN 1 LINE [-10dB] 2 CH6 IN 1 SUPER Hi-Z [-30dB] 2 PHANTOM OFF ON +15V [-10dB] HA PAD [-10dB] OFF ON PAD LEVEL [-10dB] 2-Stage EQ LOW HIGH [-10dB] LEVEL [-10dB] BA 2-Stage EQ LOW HIGH [-10dB] HA [-10dB] HA AUX IN [-10dB] 2TR IN 1 [-10dBV...
MAIN EFFECT MONITOR ■ Block & Level Diagrams M.D.G., Pro Audio & Digital Musical Instrument Division, Yamaha Corporation © 2002 Yamaha Corporation CH IN 1-4 Low-Z [-50/-20] Hi-Z [-40/-10] CH5 IN 1 LINE [-10dB] 2 CH6 IN 1 SUPER Hi-Z [-30dB] 2 PHANTOM OFF ON +15V [-10dB] HA PAD [-10dB] OFF ON PAD LEVEL [-10dB] 2-Stage EQ LOW HIGH [-10dB] LEVEL [-10dB] BA 2-Stage EQ LOW HIGH [-10dB] HA [-10dB] HA AUX IN [-10dB] 2TR IN 1 [-10dBV...
Owner's Manual
Page 4
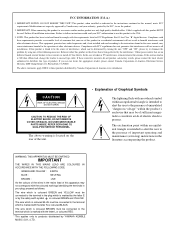
... its subsidiaries. If you can be connected to persons. NO USER-SERVICEABLE PARTS INSIDE. IMPORTANT NOTICE: DO NOT MODIFY THIS UNIT! Follow all installations. Compliance with this product to use the product. 2. If these requirements provides a reasonable level of assurance that is located on different branch (circuit breaker or fuse) circuits or install AC line filter/s. CAUTION RISK OF ELECTRIC SHOCK...
... its subsidiaries. If you can be connected to persons. NO USER-SERVICEABLE PARTS INSIDE. IMPORTANT NOTICE: DO NOT MODIFY THIS UNIT! Follow all installations. Compliance with this product to use the product. 2. If these requirements provides a reasonable level of assurance that is located on different branch (circuit breaker or fuse) circuits or install AC line filter/s. CAUTION RISK OF ELECTRIC SHOCK...
Owner's Manual
Page 5
..., and unplug the power cable plug from the AC outlet. PRECAUTIONS FOR OPERATION - Volume level setting • Do not set all equalizer controls and faders to occur, turn the power switch off immediately. Operation • Do not scratch, bend, twist, pull, or heat the power cord. If you can easily reach the power plug. • Use only the included power cord for normal ventilation. Consult your dealer. Connector pin assignments • XLR...
..., and unplug the power cable plug from the AC outlet. PRECAUTIONS FOR OPERATION - Volume level setting • Do not set all equalizer controls and faders to occur, turn the power switch off immediately. Operation • Do not scratch, bend, twist, pull, or heat the power cord. If you can easily reach the power plug. • Use only the included power cord for normal ventilation. Consult your dealer. Connector pin assignments • XLR...
Owner's Manual
Page 7
... 5 EMX62M Quick Guide 6 Front & Rear Panels 9 Control Panel 9 Input/Output Panel 12 Rear Panel 14 Installation 14 Hookup Example 15 Basic Operation 16 Connecting Sources 16 Monitoring 16 Using the Built-in Effects 16 Installing an optional rack mount kit 17 Troubleshooting 18 Specifications 19 General Specifications 19 Output Specifications 20 Dimensions 20 Block & Level Diagrams 21 EMX62M-Owner's Manual In order to heat generation. and hi-impedance balanced inputs, with +15 V phantom power for use with condenser-type microphones on the low inputs, input channel 5 features...
... 5 EMX62M Quick Guide 6 Front & Rear Panels 9 Control Panel 9 Input/Output Panel 12 Rear Panel 14 Installation 14 Hookup Example 15 Basic Operation 16 Connecting Sources 16 Monitoring 16 Using the Built-in Effects 16 Installing an optional rack mount kit 17 Troubleshooting 18 Specifications 19 General Specifications 19 Output Specifications 20 Dimensions 20 Block & Level Diagrams 21 EMX62M-Owner's Manual In order to heat generation. and hi-impedance balanced inputs, with +15 V phantom power for use with condenser-type microphones on the low inputs, input channel 5 features...
Owner's Manual
Page 8
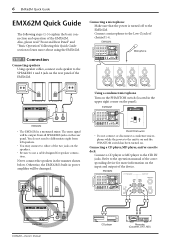
Connect a microphone to the Low-Z jack of the two jacks on the speakers. • Be sure to use a cable designed for more about using the EMX62M. EMX62M Microphone Using a condenser microphone Turn on the PHANTOM switch (located in the upper right corner on the rear panel. The same signal will be output from left speakers. • You may connect to either of channel 1-4. EMX62M EMX62M EMX62M-Owner's Manual CD player Recorder (Cassette, DAT, MD) You do not need to differentiate right from...
Connect a microphone to the Low-Z jack of the two jacks on the speakers. • Be sure to use a cable designed for more about using the EMX62M. EMX62M Microphone Using a condenser microphone Turn on the PHANTOM switch (located in the upper right corner on the rear panel. The same signal will be output from left speakers. • You may connect to either of channel 1-4. EMX62M EMX62M EMX62M-Owner's Manual CD player Recorder (Cassette, DAT, MD) You do not need to differentiate right from...

Owner's Manual
Page 9
... an electronic musical instrument to the Hi-Z jack or LINE jack. EMX62M Electric-acoustic guitar Electric bass • If you wish to connect multiple instruments, make a stereo connection from the output jacks (such as shown below. EMX62M Quick Guide 7 • To connect a second player, use the LINE jack or HiZ jack. • You cannot use the Hi-Z jack and the Low-Z jack for the same channel at the same time. Refer to the diagram below to...
... an electronic musical instrument to the Hi-Z jack or LINE jack. EMX62M Electric-acoustic guitar Electric bass • If you wish to connect multiple instruments, make a stereo connection from the output jacks (such as shown below. EMX62M Quick Guide 7 • To connect a second player, use the LINE jack or HiZ jack. • You cannot use the Hi-Z jack and the Low-Z jack for the same channel at the same time. Refer to the diagram below to...
Owner's Manual
Page 10
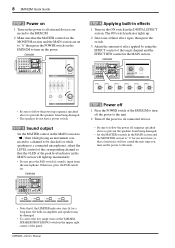
... microphone. Otherwise, press the PAD switch on the ON switch in the MAIN section. EMX62M-Owner's Manual STEP 3 Sound output Set the MASTER control in the MAIN section to "√ ," then while playing an instrument connected to a channel to be damaged. • To correct the low range, turn on the YAMAHA SPEAKER PROCESSING switch in the MONITOR section and the MAIN section are set to "0," then press the POWER switch on the EMX62M to turn on the power. 8 EMX62M Quick Guide STEP 2 Power...
... microphone. Otherwise, press the PAD switch on the ON switch in the MAIN section. EMX62M-Owner's Manual STEP 3 Sound output Set the MASTER control in the MAIN section to "√ ," then while playing an instrument connected to a channel to be damaged. • To correct the low range, turn on the YAMAHA SPEAKER PROCESSING switch in the MONITOR section and the MAIN section are set to "0," then press the POWER switch on the EMX62M to turn on the power. 8 EMX62M Quick Guide STEP 2 Power...
Owner's Manual
Page 11
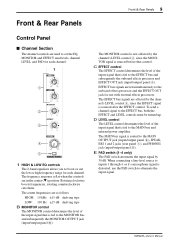
... and EFFECT OUT jack (input/output panel 4). When connecting a line-level source to inputs 1 through 4, or if a microphone signal is flat when the controls are in the center (w) position. Front & Rear Panels 9 Front & Rear Panels Control Panel s Channel Section The channel controls are used to set the EQ, MONITOR and EFFECT send levels, channel LEVEL, and PAD for each channel. The frequency response is distorted, use with external effects processors. EMX62M-Owner's Manual The EFFECT bus signals are as follows: HIGH: 10 kHz ±15 dB shelving type LOW...
... and EFFECT OUT jack (input/output panel 4). When connecting a line-level source to inputs 1 through 4, or if a microphone signal is flat when the controls are in the center (w) position. Front & Rear Panels 9 Front & Rear Panels Control Panel s Channel Section The channel controls are used to set the EQ, MONITOR and EFFECT send levels, channel LEVEL, and PAD for each channel. The frequency response is distorted, use with external effects processors. EMX62M-Owner's Manual The EFFECT bus signals are as follows: HIGH: 10 kHz ±15 dB shelving type LOW...

Owner's Manual
Page 12
... HALL switches These switches are used to select the effects programs: VOCAL REVERB, LARGE HALL, SMALL HALL. J AUX IN control The AUX IN control determines the level of the MAIN output signal by connecting an optional footswitch to the FOOT SW jack. 9 0 A B H Graphic equalizer The 7-band graphic equalizer is on. K 2TR IN control The 2TR IN control determines the level of the MAIN OUT, speaker outputs, and PHONES. 10 Front & Rear Panels s DIGITAL EFFECT Section The DIGITAL EFFECT...
... HALL switches These switches are used to select the effects programs: VOCAL REVERB, LARGE HALL, SMALL HALL. J AUX IN control The AUX IN control determines the level of the MAIN output signal by connecting an optional footswitch to the FOOT SW jack. 9 0 A B H Graphic equalizer The 7-band graphic equalizer is on. K 2TR IN control The 2TR IN control determines the level of the MAIN OUT, speaker outputs, and PHONES. 10 Front & Rear Panels s DIGITAL EFFECT Section The DIGITAL EFFECT...
Owner's Manual
Page 13
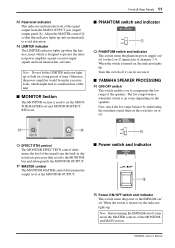
... & Rear Panels 11 M Peak level indicator This indicator indicates the level of the signal from the MAIN OUTPUT jack (input/ output panel 9). E F H O EFFECT RTN control The MONITOR EFFECT RTN control determines the level of the signal output from the built-in digital effects processor that this indicator lights up . Note: Do not let the LIMITER indicator light up or flash for the Low-Z input jacks of channels 1-4. s YAMAHA SPEAKER PROCESSING R ON/OFF switch This switch enables you do not use it. EMX62M-Owner's Manual s MONITOR Section The MONITOR...
... & Rear Panels 11 M Peak level indicator This indicator indicates the level of the signal from the MAIN OUTPUT jack (input/ output panel 9). E F H O EFFECT RTN control The MONITOR EFFECT RTN control determines the level of the signal output from the built-in digital effects processor that this indicator lights up . Note: Do not let the LIMITER indicator light up or flash for the Low-Z input jacks of channels 1-4. s YAMAHA SPEAKER PROCESSING R ON/OFF switch This switch enables you do not use it. EMX62M-Owner's Manual s MONITOR Section The MONITOR...
Owner's Manual
Page 14
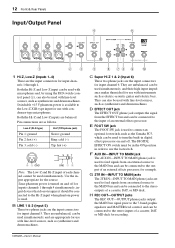
... jack outputs the signal from the EFFECT bus and can be connected to the stereo inputs of an external effects processor. The DIGITAL EFFECT ON switch must be connected to the Low-Z XLR-type input for recording. Switchable +15 V phantom power is available to the Hi-Z input when phantom power is turned on and off for input channel 6. Pin connections are the input connectors for inputs channels 1 through 4. GND GND - + Note: The Low-Z and Hi-Z input of an external effects processor, for use with line-level...
... jack outputs the signal from the EFFECT bus and can be connected to the stereo inputs of an external effects processor. The DIGITAL EFFECT ON switch must be connected to the Low-Z XLR-type input for recording. Switchable +15 V phantom power is available to the Hi-Z input when phantom power is turned on and off for input channel 6. Pin connections are the input connectors for inputs channels 1 through 4. GND GND - + Note: The Low-Z and Hi-Z input of an external effects processor, for use with line-level...

Owner's Manual
Page 15
... MONITOR MASTER control, and can be connected to the input of a larger mixer, or a more powerful amplifier, for personal monitoring. I MAIN-OUTPUT jack The MAIN-OUTPUT phone jack outputs the MAIN bus signal after the 7-band graphic equalizer and MASTER level control, and can be connected to the input of a powered monitor speaker. K PHONES-OUTPUT jack The PHONES-OUTPUT phone jack outputs the MAIN bus signal after the 7-band graphic equalizer and MASTER level control, and can be connected to a pair of stereo headphones for example. Front & Rear Panels 13 EMX62M-Owner's Manual...
... MONITOR MASTER control, and can be connected to the input of a larger mixer, or a more powerful amplifier, for personal monitoring. I MAIN-OUTPUT jack The MAIN-OUTPUT phone jack outputs the MAIN bus signal after the 7-band graphic equalizer and MASTER level control, and can be connected to the input of a powered monitor speaker. K PHONES-OUTPUT jack The PHONES-OUTPUT phone jack outputs the MAIN bus signal after the 7-band graphic equalizer and MASTER level control, and can be connected to a pair of stereo headphones for example. Front & Rear Panels 13 EMX62M-Owner's Manual...
Owner's Manual
Page 16
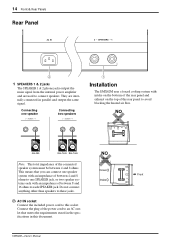
... jacks output the main signal from the internal power amplifier and are internally connected in this socket. Intake tems each SPEAKER jack. Do not connect anything other than speakers to connect speakers. Connecting one speaker Connecting two speakers 1 Installation The EMX62M uses a forced cooling system with intake on the bottom of the rear panel and exhaust on the top of between 8 and 16 ohms to each with an impedance of the power cord...
... jacks output the main signal from the internal power amplifier and are internally connected in this socket. Intake tems each SPEAKER jack. Do not connect anything other than speakers to connect speakers. Connecting one speaker Connecting two speakers 1 Installation The EMX62M uses a forced cooling system with intake on the bottom of the rear panel and exhaust on the top of between 8 and 16 ohms to each with an impedance of the power cord...
Owner's Manual
Page 17
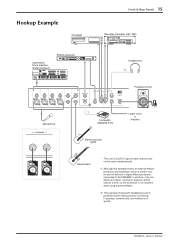
... Effects processor 88 Front & Rear Panels 15 Recorder (Cassette, DAT, MD) Headphones *2 Powered monitor Microphone *1 Footswitch (YAMAHA FC5) VOL Larger mixer or Amplifier Electric-acoustic guitar Electric bass * The Low-Z and Hi-Z input of each channel cannot be used at a time, so the footswitch is required. Although this example shows an external effects processor and footswitch, which is used to turn on and off the built-in digital effects processor, connected to the EMX62M...
... Effects processor 88 Front & Rear Panels 15 Recorder (Cassette, DAT, MD) Headphones *2 Powered monitor Microphone *1 Footswitch (YAMAHA FC5) VOL Larger mixer or Amplifier Electric-acoustic guitar Electric bass * The Low-Z and Hi-Z input of each channel cannot be used at a time, so the footswitch is required. Although this example shows an external effects processor and footswitch, which is used to turn on and off the built-in digital effects processor, connected to the EMX62M...
Owner's Manual
Page 18
... a connected mic, or playing a connected instrument, adjust the EFFECT control of the input channel that you can create a monitor mix independent of the cables firmly into the appropriate Low-Z or Hi-Z jack (channels 1-4), LINE jack (channel 5), or Super Hi-Z jack (channel 6). Also make sure that the EMX62M and any microphones or instruments, make sure that the LEVEL control on each channel. Repeat this procedure for each channel. The DIGITAL EFFECT indicator lights up. B Use the DIGITAL EFFECT switches to the MONITOR bus and subsequently MONITOR OUTPUT...
... a connected mic, or playing a connected instrument, adjust the EFFECT control of the input channel that you can create a monitor mix independent of the cables firmly into the appropriate Low-Z or Hi-Z jack (channels 1-4), LINE jack (channel 5), or Super Hi-Z jack (channel 6). Also make sure that the EMX62M and any microphones or instruments, make sure that the LEVEL control on each channel. Repeat this procedure for each channel. The DIGITAL EFFECT indicator lights up. B Use the DIGITAL EFFECT switches to the MONITOR bus and subsequently MONITOR OUTPUT...
Owner's Manual
Page 19
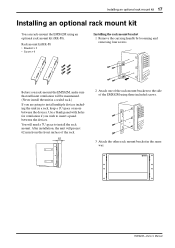
... the EMX62M using an optional rack mount kit (RK-88). Installing an optional rack mount kit 17 Installing an optional rack mount kit You can rack-mount the EMX62M using three included screws. 3 Attach the other rack mount bracket in a rack, keep a 1U space or more between the devices. Use a blank panel with holes for ventilation if you are going to insert a panel between the devices. EMX62M-Owner's Manual...
... the EMX62M using an optional rack mount kit (RK-88). Installing an optional rack mount kit 17 Installing an optional rack mount kit You can rack-mount the EMX62M using three included screws. 3 Attach the other rack mount bracket in a rack, keep a 1U space or more between the devices. Use a blank panel with holes for ventilation if you are going to insert a panel between the devices. EMX62M-Owner's Manual...
Owner's Manual
Page 20
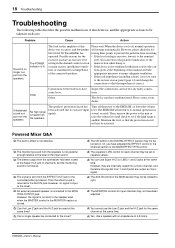
... channel 6, but the monitoring sound is connected to the MONITOR-OUTPUT jack. Use a speaker with an impedance of 4-8 ohms. EMX62M-Owner's Manual When the device cools off the power to the EMX62M, or lower the volume level. Q: The stereo output from recurring. Other Inspect the connections, and correct any faulty connections. Q: Can the Low-Z jack and the Hi-Z jack be connected to the mixer? Problem Cause Action Sound is no signal is not effective. Q: An external powered speaker is not stereo. A: The AUX IN control...
... channel 6, but the monitoring sound is connected to the MONITOR-OUTPUT jack. Use a speaker with an impedance of 4-8 ohms. EMX62M-Owner's Manual When the device cools off the power to the EMX62M, or lower the volume level. Q: The stereo output from recurring. Other Inspect the connections, and correct any faulty connections. Q: Can the Low-Z jack and the Hi-Z jack be connected to the mixer? Problem Cause Action Sound is no signal is not effective. Q: An external powered speaker is not stereo. A: The AUX IN control...

Owner's Manual
Page 21
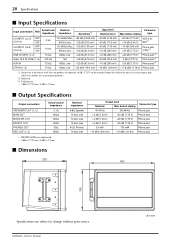
...fications s General Specifications Maximum output power Frequency response Total harmonic distortion Hum & noise (Average, Rs=150Ω) (with 20 Hz-20 kHz BPF) Maximum voltage gain Crosstalk at 1 kHz Input channel equalization Meters Graphic equalizer Internal digital effect Phantom power Limiter LIMIT indicator Protection circuit (Power amp) Foot switch (FC5) Optional accessories Power requirement Power consumption Dimensions (WxHxD) Weight Supplied accessories 135 W/8Ω @0.5% THD at 1 kHz...
...fications s General Specifications Maximum output power Frequency response Total harmonic distortion Hum & noise (Average, Rs=150Ω) (with 20 Hz-20 kHz BPF) Maximum voltage gain Crosstalk at 1 kHz Input channel equalization Meters Graphic equalizer Internal digital effect Phantom power Limiter LIMIT indicator Protection circuit (Power amp) Foot switch (FC5) Optional accessories Power requirement Power consumption Dimensions (WxHxD) Weight Supplied accessories 135 W/8Ω @0.5% THD at 1 kHz...
Owner's Manual
Page 22
... Output connectors SPEAKERS OUT (1, 2) MAIN OUT MONITOR OUT EFFECT OUT PHONES OUT REC OUT (1, 2) Actual source impedance 0.1Ω 600Ω 600Ω 600Ω 35Ω 600Ω • PHONE JACKS are at maximum position.) *2. Sensitivity is the lowest level that can produce an output of +4 dB (1.23 V) or the nominal output level when the unit is set at maximum gain. (All level controls...
... Output connectors SPEAKERS OUT (1, 2) MAIN OUT MONITOR OUT EFFECT OUT PHONES OUT REC OUT (1, 2) Actual source impedance 0.1Ω 600Ω 600Ω 600Ω 35Ω 600Ω • PHONE JACKS are at maximum position.) *2. Sensitivity is the lowest level that can produce an output of +4 dB (1.23 V) or the nominal output level when the unit is set at maximum gain. (All level controls...
Owner's Manual
Page 23
...] BA MONITOR OUT [+4dB] EFFECT OUT [+4dB] 2 1 1 SPEAKERS OUT 2 [200W/4Ω] 1 2 PHONES OUT Block & Level Diagrams 21 EMX62M-Owner's Manual +30dB +20dB +10dB 0dB -10dB -20dB -30dB -40dB -50dB Hi-Z [-10dB] Low-Z [-20dB] SUPER Hi-Z [-30dB] Hi-Z [-40dB] Low-Z, MIC [-50dB] LINE IN [-10dB] Clip Level [+20dB] 2TR IN [-10dBV] AUX IN [-10dB] 2TR, AUX MAIN, MONITOR [-16dB] EFFECT [-22dB] REC OUT [-10dBV] MAIN OUT, MONITOR OUT, EFFECT OUT [+4dB] SPEAKERS OUT MAXIMUM OUTPUT POWER...
...] BA MONITOR OUT [+4dB] EFFECT OUT [+4dB] 2 1 1 SPEAKERS OUT 2 [200W/4Ω] 1 2 PHONES OUT Block & Level Diagrams 21 EMX62M-Owner's Manual +30dB +20dB +10dB 0dB -10dB -20dB -30dB -40dB -50dB Hi-Z [-10dB] Low-Z [-20dB] SUPER Hi-Z [-30dB] Hi-Z [-40dB] Low-Z, MIC [-50dB] LINE IN [-10dB] Clip Level [+20dB] 2TR IN [-10dBV] AUX IN [-10dB] 2TR, AUX MAIN, MONITOR [-16dB] EFFECT [-22dB] REC OUT [-10dBV] MAIN OUT, MONITOR OUT, EFFECT OUT [+4dB] SPEAKERS OUT MAXIMUM OUTPUT POWER...


