

Owner's Manual
Page 7
...Random Access Preset Tuning • Multi-Functions for Recording to the KX-M5 CONTENTS PRECAUTIONS 2 NAMES OF BUTTONS, CONTROLS, AND INDICATORS 3 GETTING STARTED Connecting the system 4 Connecting other components 5 Preparing the remote control transmitter ........ 6 Setting the clock 7 Turning on/off the unit... recording for the KX-M5 .. 24 Manual recording 25 ADDITIONAL INFORMATION CD preventive care 26 Troubleshooting 26 Specifications 28 E-1 It will give you in operating your YAMAHA product. For the best performance, read this YAMAHA product. ENGLISH English INTRODUCTION...
...Random Access Preset Tuning • Multi-Functions for Recording to the KX-M5 CONTENTS PRECAUTIONS 2 NAMES OF BUTTONS, CONTROLS, AND INDICATORS 3 GETTING STARTED Connecting the system 4 Connecting other components 5 Preparing the remote control transmitter ........ 6 Setting the clock 7 Turning on/off the unit... recording for the KX-M5 .. 24 Manual recording 25 ADDITIONAL INFORMATION CD preventive care 26 Troubleshooting 26 Specifications 28 E-1 It will give you in operating your YAMAHA product. For the best performance, read this YAMAHA product. ENGLISH English INTRODUCTION...
Owner's Manual
Page 9
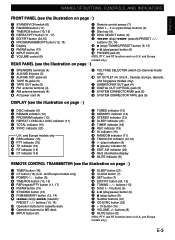
...) jack (5) $ SYSTEM CONNECTOR MD jack (5) % SYSTEM CONNECTOR TAPE jack (5) DISPLAY (see the illustration on page 5) 1 STANDBY/ON switch (8) " Remote control sensor (7) 2 RANDOM button (11) 3 TIME/RDS button (10, 15) # DISC 1 - 3 ) (open/close) buttons (9) $ Disc...TUNING/PRESET button (9, 13) ) 6 (play ) indicator (9) . 8 (pause) indicator (9) / EDIT A/B indicator (24) : Multi information display ; MUTE indicator (8) REMOTE CONTROL TRANSMITTER (see the illustration on page 6) 1 TIMER button (18) 2 CT button (16) (U.K. and Europe models only.) REAR PANEL (see the illustration on page...
...) jack (5) $ SYSTEM CONNECTOR MD jack (5) % SYSTEM CONNECTOR TAPE jack (5) DISPLAY (see the illustration on page 5) 1 STANDBY/ON switch (8) " Remote control sensor (7) 2 RANDOM button (11) 3 TIME/RDS button (10, 15) # DISC 1 - 3 ) (open/close) buttons (9) $ Disc...TUNING/PRESET button (9, 13) ) 6 (play ) indicator (9) . 8 (pause) indicator (9) / EDIT A/B indicator (24) : Multi information display ; MUTE indicator (8) REMOTE CONTROL TRANSMITTER (see the illustration on page 6) 1 TIMER button (18) 2 CT button (16) (U.K. and Europe models only.) REAR PANEL (see the illustration on page...
Owner's Manual
Page 12
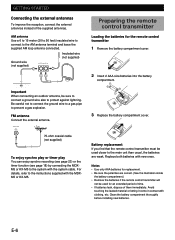
.... (See the illustration inside the battery compartment.) • Remove the batteries if the remote control transmitter will not be used closer to the system with the MDXM5 or KX-M5. GETTING STARTED Connecting the external antennas To improve the reception, connect the external antennas instead... of them immediately. Battery replacement If you find that the remote control transmitter must be sure to connect a ground ...
.... (See the illustration inside the battery compartment.) • Remove the batteries if the remote control transmitter will not be used closer to the system with the MDXM5 or KX-M5. GETTING STARTED Connecting the external antennas To improve the reception, connect the external antennas instead... of them immediately. Battery replacement If you find that the remote control transmitter must be sure to connect a ground ...
Owner's Manual
Page 13
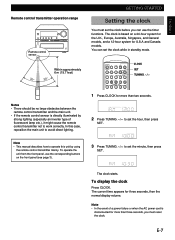
...before you can set the hour, then press SET. To display the clock Press CLOCK. The clock is directly illuminated by using the remote control transmitter mainly. to set the minute, then press SET. The clock starts. to set the clock while in standby mode. E-7 English... Within approximately 6 m (19.7 feet) 30° 30° Notes • There should be no large obstacles between the remote control transmitter and the main unit. • If the remote control sensor is based on the front panel (see page 3). 3 Press TUNING //? In this unit by strong lighting (especially an...
...before you can set the hour, then press SET. To display the clock Press CLOCK. The clock is directly illuminated by using the remote control transmitter mainly. to set the minute, then press SET. The clock starts. to set the clock while in standby mode. E-7 English... Within approximately 6 m (19.7 feet) 30° 30° Notes • There should be no large obstacles between the remote control transmitter and the main unit. • If the remote control sensor is based on the front panel (see page 3). 3 Press TUNING //? In this unit by strong lighting (especially an...
Owner's Manual
Page 14
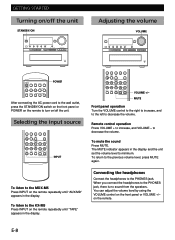
...Press VOLUME + to decrease the volume. to the PHONES jack, there is no sound from the speakers. To listen to the KX-M5 Press INPUT on the remote repeatedly until "AUX/MD" appears in the display. When you connect the headphones to decrease the volume. on the front panel or ... set the volume level to the previous volume level, press MUTE again. You can adjust the volume level by using the VOLUME control on the remote. E-8 GETTING STARTED Turning on/off the unit STANDBY/ON STANDBY/ON INPUT VOLUME RANDOM TIME RDS REPEAT PTY EDIT PROGRAM RT MEMORY DISC 1 DISC...
...Press VOLUME + to decrease the volume. to the PHONES jack, there is no sound from the speakers. To listen to the KX-M5 Press INPUT on the remote repeatedly until "AUX/MD" appears in the display. When you connect the headphones to decrease the volume. on the front panel or ... set the volume level to the previous volume level, press MUTE again. You can adjust the volume level by using the VOLUME control on the remote. E-8 GETTING STARTED Turning on/off the unit STANDBY/ON STANDBY/ON INPUT VOLUME RANDOM TIME RDS REPEAT PTY EDIT PROGRAM RT MEMORY DISC 1 DISC...
Owner's Manual
Page 28
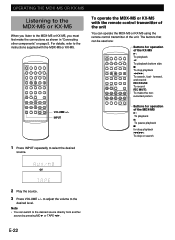
...refer to the instructions supplied with the remote control transmitter of the unit You can operate the MDX-M5 or KX-M5 using the remote control transmitter of the MDX-M5 3: To playback 8: To pause playback 7: for operation of the KX-M5 3: To playback 2: To playback bottom.../ PAUSE MUTE CD SYNC / +10 TAPE MD INPUT SLEEP MUTE VOLUME -+ VOLUME +/- UOSPIENRGATIHNEGBTUHILETM-INDXTI-ME5ROR KX-M5 Listening to the MDX-M5 or KX-M5 When you listen to the MDX-M5 or KX-M5, you must first make the nonrecorded portion INPUT SLEEP MUTE VOLUME -+ Buttons for operation of the unit. INPUT...
...refer to the instructions supplied with the remote control transmitter of the unit You can operate the MDX-M5 or KX-M5 using the remote control transmitter of the MDX-M5 3: To playback 8: To pause playback 7: for operation of the KX-M5 3: To playback 2: To playback bottom.../ PAUSE MUTE CD SYNC / +10 TAPE MD INPUT SLEEP MUTE VOLUME -+ VOLUME +/- UOSPIENRGATIHNEGBTUHILETM-INDXTI-ME5ROR KX-M5 Listening to the MDX-M5 or KX-M5 When you listen to the MDX-M5 or KX-M5, you must first make the nonrecorded portion INPUT SLEEP MUTE VOLUME -+ Buttons for operation of the unit. INPUT...
Owner's Manual
Page 33
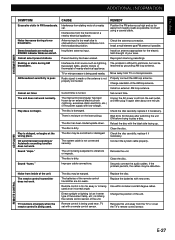
...cable properly. Securely connect the audio cables. Noise from TV or microprocessor. TV functions strangely when the remote control is moisture on and off. Remote control is too far away or is being used at the wrong place. Buzzing or static during stereo... properly connected. Connect using a coaxial cable. Properly connect the AM loop antenna. Clean the disc. The batteries of your area. Remote control is being used nearby. Replace the disc. Sound "hums." Insufficient antenna input. Check the antenna connection. Install a multi-element...
...cable properly. Securely connect the audio cables. Noise from TV or microprocessor. TV functions strangely when the remote control is moisture on and off. Remote control is too far away or is being used at the wrong place. Buzzing or static during stereo... properly connected. Connect using a coaxial cable. Properly connect the AM loop antenna. Clean the disc. The batteries of your area. Remote control is being used nearby. Replace the disc. Sound "hums." Insufficient antenna input. Check the antenna connection. Install a multi-element...


