
Owner's Manual
Page 2
.... Please record the serial number of the unit. 15 Damage Requiring Service - IMPORTANT! SAFETY INSTRUCTIONS CAUTION RISK OF ELECTRIC SHOCK DO NOT OPEN CAUTION: TO REDUCE THE RISK OF ELECTRIC SHOCK, DO NOT REMOVE COVER (OR BACK). The unit has been dropped, or the cabinet damaged. 16 Servicing - NO USER-SERVICEABLE PARTS INSIDE. All the safety and operating instructions should be situated...
.... Please record the serial number of the unit. 15 Damage Requiring Service - IMPORTANT! SAFETY INSTRUCTIONS CAUTION RISK OF ELECTRIC SHOCK DO NOT OPEN CAUTION: TO REDUCE THE RISK OF ELECTRIC SHOCK, DO NOT REMOVE COVER (OR BACK). The unit has been dropped, or the cabinet damaged. 16 Servicing - NO USER-SERVICEABLE PARTS INSIDE. All the safety and operating instructions should be situated...
Owner's Manual
Page 3
... filter/s. Follow all installations. Compliance with the requirements listed in wire to an antenna discharge unit, connection to grounding electrodes, and requirements for proper grounding and, in to accessories and/or another product use the product. 2. Utilize power outlets that your authority, granted by the interference. PART H) FCC INFORMATION (for Class "B" digital devices. This product, when installed as practical. Cable/s supplied with this product in a residential environment...
... filter/s. Follow all installations. Compliance with the requirements listed in wire to an antenna discharge unit, connection to grounding electrodes, and requirements for proper grounding and, in to accessories and/or another product use the product. 2. Utilize power outlets that your authority, granted by the interference. PART H) FCC INFORMATION (for Class "B" digital devices. This product, when installed as practical. Cable/s supplied with this product in a residential environment...

Owner's Manual
Page 7
... components 5 Preparing the remote control transmitter ........ 6 Setting the clock 7 Turning on/off the unit 8 Selecting the input source 8 Adjusting the volume 8 COMPACT DISC PLAYER OPERATIONS CD playback 9 Selecting the time display 10 Random-sequence play 11 Repeat play 11 Program play 18 Timer recording radio programs using the MDX-M5 or KX-M5 19 Checking the timer setting 20 Sleep timer operation 21 OPERATING THE MDX-M5 OR KX-M5 Listening to the radio 13 Presetting stations 14 RECEIVING RDS STATIONS (U.K. FEATURES The System • Minimum RMS Output power per channel...
... components 5 Preparing the remote control transmitter ........ 6 Setting the clock 7 Turning on/off the unit 8 Selecting the input source 8 Adjusting the volume 8 COMPACT DISC PLAYER OPERATIONS CD playback 9 Selecting the time display 10 Random-sequence play 11 Repeat play 11 Program play 18 Timer recording radio programs using the MDX-M5 or KX-M5 19 Checking the timer setting 20 Sleep timer operation 21 OPERATING THE MDX-M5 OR KX-M5 Listening to the radio 13 Presetting stations 14 RECEIVING RDS STATIONS (U.K. FEATURES The System • Minimum RMS Output power per channel...
Owner's Manual
Page 8
... direct exposure to turn the unit off . CLASS 1 LASER PRODUCT This compact disc player is turned off , then disconnect the AC power plug from the wall outlet, grasp the plug; PRECAUTIONS: READ THIS BEFORE OPERATING THE UNIT CAUTIONS • To assure the finest performance, please read the "TROUBLESHOOTING" section on common operating errors before starting an audio source play: increase the volume gradually to an appropriate level after play has started...
... direct exposure to turn the unit off . CLASS 1 LASER PRODUCT This compact disc player is turned off , then disconnect the AC power plug from the wall outlet, grasp the plug; PRECAUTIONS: READ THIS BEFORE OPERATING THE UNIT CAUTIONS • To assure the finest performance, please read the "TROUBLESHOOTING" section on common operating errors before starting an audio source play: increase the volume gradually to an appropriate level after play has started...
Owner's Manual
Page 9
... (5) % SYSTEM CONNECTOR TAPE jack (5) DISPLAY (see the illustration on page 5) 1 SPEAKERS terminals (4) 2 AUX/MD IN jacks (5) 3 AUX/MD OUT jacks (5) 4 TAPE IN jacks (5) 5 TAPE OUT jacks (5) 6 FM antenna terminal (4) 7 AM antenna terminals (4) 8 AC power cord (4) 9 VOLTAGE SELECTOR switch (2) (General model only) ! indicator (23) U.K. Number buttons (10) . and Europe models only.) REAR PANEL (see the illustration on page 6) 1 DISC indicator (9) 2 REMAIN indicator (10) 3 PROGRAM indicator (12) 4 REPEAT 1/DISC/ALL DISC indicator (11) 5 TOTAL indicator (10) 6 SYNC. VOLUME control...
... (5) % SYSTEM CONNECTOR TAPE jack (5) DISPLAY (see the illustration on page 5) 1 SPEAKERS terminals (4) 2 AUX/MD IN jacks (5) 3 AUX/MD OUT jacks (5) 4 TAPE IN jacks (5) 5 TAPE OUT jacks (5) 6 FM antenna terminal (4) 7 AM antenna terminals (4) 8 AC power cord (4) 9 VOLTAGE SELECTOR switch (2) (General model only) ! indicator (23) U.K. Number buttons (10) . and Europe models only.) REAR PANEL (see the illustration on page 6) 1 DISC indicator (9) 2 REMAIN indicator (10) 3 PROGRAM indicator (12) 4 REPEAT 1/DISC/ALL DISC indicator (11) 5 TOTAL indicator (10) 6 SYNC. VOLUME control...
Owner's Manual
Page 10
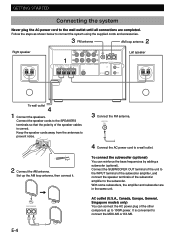
... models only) You can reinforce the bass frequencies by adding a subwoofer (optional). It is correct. Keep the speaker cords away from the antennas to connect the system using the supplied cords and accessories. 3 FM antenna 2 AM loop antenna Right speaker -+ AUX/MD TAPE C IN D OUT A IN B OUT L L FM 75 UNBAL GND AM 1R SPEAKERS 8 MIN. /SPEAKER 8 MIN. /HAUT-PARLEUR +R- - To connect the subwoofer (optional) You can connect the AC power plug of the speaker cables...
... models only) You can reinforce the bass frequencies by adding a subwoofer (optional). It is correct. Keep the speaker cords away from the antennas to connect the system using the supplied cords and accessories. 3 FM antenna 2 AM loop antenna Right speaker -+ AUX/MD TAPE C IN D OUT A IN B OUT L L FM 75 UNBAL GND AM 1R SPEAKERS 8 MIN. /SPEAKER 8 MIN. /HAUT-PARLEUR +R- - To connect the subwoofer (optional) You can connect the AC power plug of the speaker cables...
Owner's Manual
Page 13
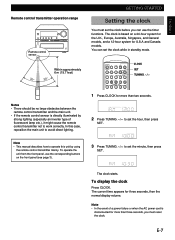
... seconds. 2 Press TUNING //? You can use the corresponding buttons on a 24-hour system for the U.K., Europe, Australia, Singapore, and General models, and a 12-hour system for U.S.A and Canada models. The clock starts. Note • This manual describes how to set the clock while in standby mode. To display the clock Press CLOCK. POWER CT / TIMER CLOCK SET RDS PTY RT TIME REP EDIT TUNING FM/AM ST/MONO DISC 1 2 3 MEMORY PRESET PGM / TUNER CD 1 2 3 4 5 CLOCK SET TUNING //? 1 Press CLOCK for three...
... seconds. 2 Press TUNING //? You can use the corresponding buttons on a 24-hour system for the U.K., Europe, Australia, Singapore, and General models, and a 12-hour system for U.S.A and Canada models. The clock starts. Note • This manual describes how to set the clock while in standby mode. To display the clock Press CLOCK. POWER CT / TIMER CLOCK SET RDS PTY RT TIME REP EDIT TUNING FM/AM ST/MONO DISC 1 2 3 MEMORY PRESET PGM / TUNER CD 1 2 3 4 5 CLOCK SET TUNING //? 1 Press CLOCK for three...
Owner's Manual
Page 14
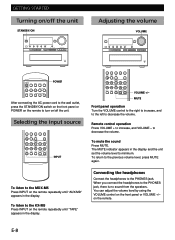
GETTING STARTED Turning on/off the unit. to turn on/off the unit STANDBY/ON STANDBY/ON INPUT VOLUME RANDOM TIME RDS REPEAT PTY EDIT PROGRAM RT MEMORY DISC 1 DISC 2 DISC 3 DISC SELECT FM/AM TUNING/PRESET PHONES Adjusting the volume STANDBY/ON VOLUME INPUT VOLUME RANDOM TIME RDS REPEAT PTY EDIT PROGRAM RT MEMORY DISC 1 DISC 2 DISC 3 DISC SELECT FM/AM TUNING/PRESET PHONES POWER CT / TIMER CLOCK SET RDS PTY RT TIME REP EDIT TUNING FM/AM ST/MONO DISC 1 2 3 POWER After connecting the AC power cord to the wall outlet...
GETTING STARTED Turning on/off the unit. to turn on/off the unit STANDBY/ON STANDBY/ON INPUT VOLUME RANDOM TIME RDS REPEAT PTY EDIT PROGRAM RT MEMORY DISC 1 DISC 2 DISC 3 DISC SELECT FM/AM TUNING/PRESET PHONES Adjusting the volume STANDBY/ON VOLUME INPUT VOLUME RANDOM TIME RDS REPEAT PTY EDIT PROGRAM RT MEMORY DISC 1 DISC 2 DISC 3 DISC SELECT FM/AM TUNING/PRESET PHONES POWER CT / TIMER CLOCK SET RDS PTY RT TIME REP EDIT TUNING FM/AM ST/MONO DISC 1 2 3 POWER After connecting the AC power cord to the wall outlet...
Owner's Manual
Page 15
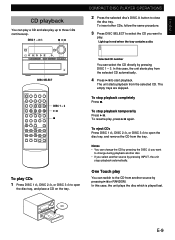
... red when the tray contains a disc 1 2 3 Selected CD number You can select the CD directly by pressing INPUT, the unit stops playback automatically. To play . DISC 1 - 3 ) 76 STANDBY/ON INPUT VOLUME RANDOM TIME RDS REPEAT PTY EDIT PROGRAM RT MEMORY DISC 1 DISC 2 DISC 3 DISC SELECT FM/AM TUNING/PRESET PHONES DISC SELECT POWER CT / TIMER CLOCK SET RDS PTY RT TIME REP EDIT TUNING FM/AM ST/MONO DISC 1 2 3 MEMORY PRESET PGM / TUNER CD 1 2 3 4 5 6 7 8 9 0 REC/ REC/ PAUSE MUTE CD SYNC / +10 TAPE MD INPUT SLEEP MUTE VOLUME -+ DISC...
... red when the tray contains a disc 1 2 3 Selected CD number You can select the CD directly by pressing INPUT, the unit stops playback automatically. To play . DISC 1 - 3 ) 76 STANDBY/ON INPUT VOLUME RANDOM TIME RDS REPEAT PTY EDIT PROGRAM RT MEMORY DISC 1 DISC 2 DISC 3 DISC SELECT FM/AM TUNING/PRESET PHONES DISC SELECT POWER CT / TIMER CLOCK SET RDS PTY RT TIME REP EDIT TUNING FM/AM ST/MONO DISC 1 2 3 MEMORY PRESET PGM / TUNER CD 1 2 3 4 5 6 7 8 9 0 REC/ REC/ PAUSE MUTE CD SYNC / +10 TAPE MD INPUT SLEEP MUTE VOLUME -+ DISC...
Owner's Manual
Page 16
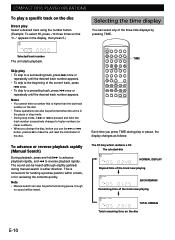
... within a track, or for reviewing the contents quickly. The sound can also be performed when the unit is in either direction. The CD tray which contains a CD The selected disc 1 2 3 TRACK NORMAL DISPLAY Elapsed time of the track now playing 1 REMAIN 2 3 TRACK EACH REMAIN Remaining time of the three time displays by pressing TIME. COMPACT DISC PLAYER OPERATIONS To play a specific track on the disc Direct play Select a desired track using the number button. (Example: To select...
... within a track, or for reviewing the contents quickly. The sound can also be performed when the unit is in either direction. The CD tray which contains a CD The selected disc 1 2 3 TRACK NORMAL DISPLAY Elapsed time of the track now playing 1 REMAIN 2 3 TRACK EACH REMAIN Remaining time of the three time displays by pressing TIME. COMPACT DISC PLAYER OPERATIONS To play a specific track on the disc Direct play Select a desired track using the number button. (Example: To select...

Owner's Manual
Page 18
... the display, then press PGM. When you change program data 1. To delete all program data • Press 7 during program play mode • press POWER to turn the unit off • Press INPUT to select other source • Press DISC 1 - 3 ) to stop program play . 2. POWER CT / TIMER CLOCK SET RDS PTY RT TIME REP EDIT TUNING FM/AM ST/MONO DISC 1 2 3 MEMORY PRESET PGM / TUNER CD 1 2 3 4 5 6 7 8 9 0 REC/ REC/ PAUSE MUTE CD SYNC / +10 TAPE MD INPUT SLEEP MUTE VOLUME -+ DISC...
... the display, then press PGM. When you change program data 1. To delete all program data • Press 7 during program play mode • press POWER to turn the unit off • Press INPUT to select other source • Press DISC 1 - 3 ) to stop program play . 2. POWER CT / TIMER CLOCK SET RDS PTY RT TIME REP EDIT TUNING FM/AM ST/MONO DISC 1 2 3 MEMORY PRESET PGM / TUNER CD 1 2 3 4 5 6 7 8 9 0 REC/ REC/ PAUSE MUTE CD SYNC / +10 TAPE MD INPUT SLEEP MUTE VOLUME -+ DISC...
Owner's Manual
Page 19
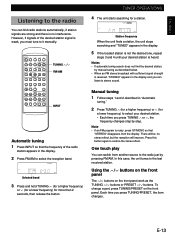
... DISC 1 2 3 MEMORY PRESET PGM / TUNER CD 1 2 3 4 5 6 7 8 9 0 REC/ REC/ PAUSE MUTE CD SYNC / +10 TAPE MD INPUT SLEEP MUTE VOLUME -+ TUNING / /? Manual tuning 1 Follow steps 1 and 2 described in the display and you press TUNING / or ?, the frequency changes step by pressing FM/AM. Press this case, the unit tunes to stereo sound. One touch play You can listen to the last received station. In this button again to the radio just by step. Using...
... DISC 1 2 3 MEMORY PRESET PGM / TUNER CD 1 2 3 4 5 6 7 8 9 0 REC/ REC/ PAUSE MUTE CD SYNC / +10 TAPE MD INPUT SLEEP MUTE VOLUME -+ TUNING / /? Manual tuning 1 Follow steps 1 and 2 described in the display and you press TUNING / or ?, the frequency changes step by pressing FM/AM. Press this case, the unit tunes to stereo sound. One touch play You can listen to the last received station. In this button again to the radio just by step. Using...
Owner's Manual
Page 20
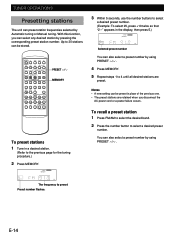
POWER CT / TIMER CLOCK SET RDS PTY RT TIME REP EDIT TUNING FM/AM ST/MONO DISC 1 2 3 MEMORY PRESET PGM / TUNER CD 1 2 3 4 5 6 7 8 9 0 REC/ REC/ PAUSE MUTE CD SYNC / +10 TAPE MD INPUT SLEEP MUTE VOLUME -+ PRESET //? MEMORY To preset stations 1 Tune in place of the previous one. • The preset stations are preset. To recall a preset station 1 Press FM/AM to select the desired band. 2 Press the number button to 4 until all desired stations are retained when...
POWER CT / TIMER CLOCK SET RDS PTY RT TIME REP EDIT TUNING FM/AM ST/MONO DISC 1 2 3 MEMORY PRESET PGM / TUNER CD 1 2 3 4 5 6 7 8 9 0 REC/ REC/ PAUSE MUTE CD SYNC / +10 TAPE MD INPUT SLEEP MUTE VOLUME -+ PRESET //? MEMORY To preset stations 1 Tune in place of the previous one. • The preset stations are preset. To recall a preset station 1 Press FM/AM to select the desired band. 2 Press the number button to 4 until all desired stations are retained when...
Owner's Manual
Page 21
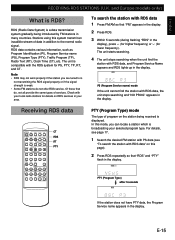
... system for lower frequency). The unit starts searching. 4 The unit stops searching when the unit find the station with RDS data" on RDS services in the display. Receiving RDS data POWER CT / TIMER CLOCK SET RDS PTY RT TIME REP EDIT TUNING FM/AM ST/MONO DISC 1 2 3 MEMORY PRESET PGM / TUNER CD 1 2 3 4 5 6 7 8 9 0 REC/ REC/ PAUSE MUTE CD SYNC / +10 TAPE MD INPUT SLEEP MUTE VOLUME -+ CT RDS RT PTY PTY (Program...
... system for lower frequency). The unit starts searching. 4 The unit stops searching when the unit find the station with RDS data" on RDS services in the display. Receiving RDS data POWER CT / TIMER CLOCK SET RDS PTY RT TIME REP EDIT TUNING FM/AM ST/MONO DISC 1 2 3 MEMORY PRESET PGM / TUNER CD 1 2 3 4 5 6 7 8 9 0 REC/ REC/ PAUSE MUTE CD SYNC / +10 TAPE MD INPUT SLEEP MUTE VOLUME -+ CT RDS RT PTY PTY (Program...
Owner's Manual
Page 24
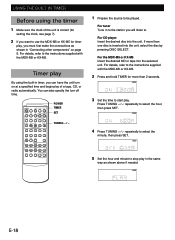
... to use the MDX-M5 or KX-M5 for more than 2 seconds. TIMER 3 Set the time to be played. POWER CT / TIMER CLOCK SET RDS PTY RT TIME REP EDIT TUNING FM/AM ST/MONO DISC 1 2 3 MEMORY PRESET PGM / TUNER CD 1 2 3 4 5 6 7 8 9 0 REC/ REC/ PAUSE MUTE CD SYNC / +10 TAPE MD INPUT SLEEP MUTE VOLUME -+ POWER TIMER SET TUNING //? 1 Prepare the source to start play , you can also specify the turn on page 5. For tuner Tune in timer, you must first make the connections as...
... to use the MDX-M5 or KX-M5 for more than 2 seconds. TIMER 3 Set the time to be played. POWER CT / TIMER CLOCK SET RDS PTY RT TIME REP EDIT TUNING FM/AM ST/MONO DISC 1 2 3 MEMORY PRESET PGM / TUNER CD 1 2 3 4 5 6 7 8 9 0 REC/ REC/ PAUSE MUTE CD SYNC / +10 TAPE MD INPUT SLEEP MUTE VOLUME -+ POWER TIMER SET TUNING //? 1 Prepare the source to start play , you can also specify the turn on page 5. For tuner Tune in timer, you must first make the connections as...
Owner's Manual
Page 25
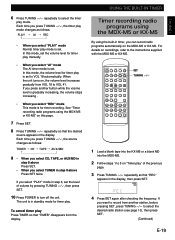
... display. When the unit turns on "Timer play manually. • When you select TUNER in the display, then press SET. POWER CT / TIMER CLOCK SET RDS PTY RT TIME REP EDIT TUNING FM/AM ST/MONO DISC 1 2 3 MEMORY PRESET PGM / TUNER CD 1 2 3 4 5 6 7 8 9 0 REC/ REC/ PAUSE MUTE CD SYNC / +10 TAPE MD INPUT SLEEP MUTE VOLUME -+ SET TUNING //? 1 Load a blank tape into the KX-M5 or a blank MD into the MDX-M5. 2 Follow steps 1 to select the desired radio station...
... display. When the unit turns on "Timer play manually. • When you select TUNER in the display, then press SET. POWER CT / TIMER CLOCK SET RDS PTY RT TIME REP EDIT TUNING FM/AM ST/MONO DISC 1 2 3 MEMORY PRESET PGM / TUNER CD 1 2 3 4 5 6 7 8 9 0 REC/ REC/ PAUSE MUTE CD SYNC / +10 TAPE MD INPUT SLEEP MUTE VOLUME -+ SET TUNING //? 1 Load a blank tape into the KX-M5 or a blank MD into the MDX-M5. 2 Follow steps 1 to select the desired radio station...
Owner's Manual
Page 28
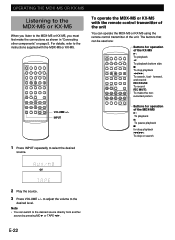
... remote control transmitter of the unit. POWER CT / TIMER CLOCK SET RDS PTY RT TIME REP EDIT TUNING FM/AM ST/MONO DISC 1 2 3 MEMORY PRESET PGM / TUNER CD 1 2 3 4 5 6 7 8 9 0 REC/ REC/ PAUSE MUTE CD SYNC / +10 TAPE MD INPUT SLEEP MUTE VOLUME -+ VOLUME +/- E-22 or 2 Play the source. 3 Press VOLUME +/- UOSPIENRGATIHNEGBTUHILETM-INDXTI-ME5ROR KX-M5 Listening to the MDX-M5 or KX-M5 When you listen to the MDX-M5 or KX-M5, you must first make...
... remote control transmitter of the unit. POWER CT / TIMER CLOCK SET RDS PTY RT TIME REP EDIT TUNING FM/AM ST/MONO DISC 1 2 3 MEMORY PRESET PGM / TUNER CD 1 2 3 4 5 6 7 8 9 0 REC/ REC/ PAUSE MUTE CD SYNC / +10 TAPE MD INPUT SLEEP MUTE VOLUME -+ VOLUME +/- E-22 or 2 Play the source. 3 Press VOLUME +/- UOSPIENRGATIHNEGBTUHILETM-INDXTI-ME5ROR KX-M5 Listening to the MDX-M5 or KX-M5 When you listen to the MDX-M5 or KX-M5, you must first make...
Owner's Manual
Page 29
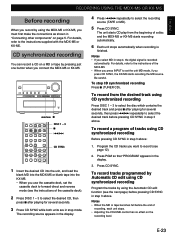
...; Adjusting the VOLUME control has no effect on the recording level. To record a program of a disc and the MDX-M5 or KX-M5 starts recording automatically. 6 Each unit stops automatically when recording is recorded automatically. E-23 STANDBY/ON INPUT VOLUME RANDOM TIME RDS REPEAT PTY EDIT PROGRAM RT MEMORY DISC 1 DISC 2 DISC 3 DISC SELECT FM/AM TUNING/PRESET PHONES 4/¢ 7 FM/AM ST/MONO DISC 1 2 3 MEMORY PRESET PGM / TUNER CD 1 2 3 4 5 6 7 8 9 0 REC/ REC/ PAUSE MUTE CD...
...; Adjusting the VOLUME control has no effect on the recording level. To record a program of a disc and the MDX-M5 or KX-M5 starts recording automatically. 6 Each unit stops automatically when recording is recorded automatically. E-23 STANDBY/ON INPUT VOLUME RANDOM TIME RDS REPEAT PTY EDIT PROGRAM RT MEMORY DISC 1 DISC 2 DISC 3 DISC SELECT FM/AM TUNING/PRESET PHONES 4/¢ 7 FM/AM ST/MONO DISC 1 2 3 MEMORY PRESET PGM / TUNER CD 1 2 3 4 5 6 7 8 9 0 REC/ REC/ PAUSE MUTE CD...
Owner's Manual
Page 31
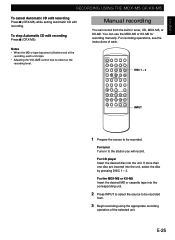
... recorded. Manual recording You can use the MDX-M5 or KX-M5 for recording manually. POWER CT / TIMER CLOCK SET RDS PTY RT TIME REP EDIT TUNING FM/AM ST/MONO DISC 1 2 3 MEMORY PRESET PGM / TUNER CD 1 2 3 4 5 6 7 8 9 0 REC/ REC/ PAUSE MUTE CD SYNC / +10 TAPE MD INPUT SLEEP MUTE VOLUME -+ DISC 1 - 3 INPUT 1 Prepare the source to the station you will record. For CD player Insert the desired disc into the unit, select the disc by pressing DISC 1 - 3. Notes...
... recorded. Manual recording You can use the MDX-M5 or KX-M5 for recording manually. POWER CT / TIMER CLOCK SET RDS PTY RT TIME REP EDIT TUNING FM/AM ST/MONO DISC 1 2 3 MEMORY PRESET PGM / TUNER CD 1 2 3 4 5 6 7 8 9 0 REC/ REC/ PAUSE MUTE CD SYNC / +10 TAPE MD INPUT SLEEP MUTE VOLUME -+ DISC 1 - 3 INPUT 1 Prepare the source to the station you will record. For CD player Insert the desired disc into the unit, select the disc by pressing DISC 1 - 3. Notes...
Owner's Manual
Page 33
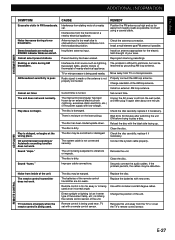
... cable connections. Install an antenna appropriate for the electric field strength of the AM loop antenna. Reprogram memory presettings. Change orientation of your area. Install an external AM loop antenna. Unplug the AC power cord from the broadcasting station. replace it if necessary. Connect the system cable properly. Securely connect the audio cables. The remote control transmitter does not work . Replace the batteries with low voltage. Change the position of the unit. Sound "skips." Insufficient antenna input. Current time...
... cable connections. Install an antenna appropriate for the electric field strength of the AM loop antenna. Reprogram memory presettings. Change orientation of your area. Install an external AM loop antenna. Unplug the AC power cord from the broadcasting station. replace it if necessary. Connect the system cable properly. Securely connect the audio cables. The remote control transmitter does not work . Replace the batteries with low voltage. Change the position of the unit. Sound "skips." Insufficient antenna input. Current time...


