
Owner's Manual
Page 2
... RECORDING PLAYBACK GETTING STARTED ENGLISH Introduction Thank you for 2 CDs Relay Play, Program Play Repeat Play, Random Play • CD TEXT Compatible Contents GETTING STARTED Contents 1 PRECAUTIONS 2 DISCS COMPATIBLE WITH THIS UNIT .. 3 PREPARATION 4 Supplied Accessories 4 Remote Control 5 Connections 6 CD Preventive Care 7 CONTROLS AND FUNCTIONS 8 Front Panel 8 Remote Control 9 Display 10 Menu Setting 11 RECORDING RECORDING TO A DISC 12 Basic Recording Operation 12 Selecting an Input Source 14 Selecting a Recording Mode 14 Setting the Recording Level 15 Manual Track...
... RECORDING PLAYBACK GETTING STARTED ENGLISH Introduction Thank you for 2 CDs Relay Play, Program Play Repeat Play, Random Play • CD TEXT Compatible Contents GETTING STARTED Contents 1 PRECAUTIONS 2 DISCS COMPATIBLE WITH THIS UNIT .. 3 PREPARATION 4 Supplied Accessories 4 Remote Control 5 Connections 6 CD Preventive Care 7 CONTROLS AND FUNCTIONS 8 Front Panel 8 Remote Control 9 Display 10 Menu Setting 11 RECORDING RECORDING TO A DISC 12 Basic Recording Operation 12 Selecting an Input Source 14 Selecting a Recording Mode 14 Setting the Recording Level 15 Manual Track...
Owner's Manual
Page 3
..., damage to ensure correct operation. this manual carefully. YAMAHA will not be cut off this unit must be set for Class 1. Contact qualified YAMAHA service personnel when any damage resulting from the wall outlet during an electrical storm. • Take care of this unit. • Burning objects (i.e. Finally, press POWER to turn off and an appropriate 3 pin plug fitted. The wire...
..., damage to ensure correct operation. this manual carefully. YAMAHA will not be cut off this unit must be set for Class 1. Contact qualified YAMAHA service personnel when any damage resulting from the wall outlet during an electrical storm. • Take care of this unit. • Burning objects (i.e. Finally, press POWER to turn off and an appropriate 3 pin plug fitted. The wire...
Owner's Manual
Page 4
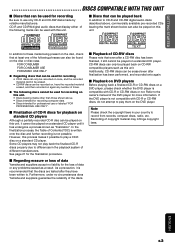
... DVD player. CD-R and CD-RW digital audio discs that display either of the following marks can be erased even after finalization has been performed, and recorded onto again. I Discs that can be played back In addition to the owner's manual of the DVD player for more information. FOR CONSUMER FOR CONSUMER USE FOR MUSIC USE ONLY G Regarding discs that can be used for recording • CD-R discs can...
... DVD player. CD-R and CD-RW digital audio discs that display either of the following marks can be erased even after finalization has been performed, and recorded onto again. I Discs that can be played back In addition to the owner's manual of the DVD player for more information. FOR CONSUMER FOR CONSUMER USE FOR MUSIC USE ONLY G Regarding discs that can be used for recording • CD-R discs can...
Owner's Manual
Page 6
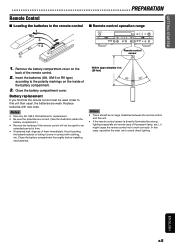
....), it come in the remote control 1 3 2 I Remote control operation range NATURAL SOUND CD RECORDER CDR-D651 POWER A DISC DISPLAY A TEXT/TIME DISPLAY B PHONES LEVEL MIN MAX COPY REC MODE TRACK NO. Insert the batteries (AA, UM-3 or R6 type) according to the polarity markings on the back of them immediately. Notes • Use only AA, UM-3, R6 batteries for an extended period of time. • If batteries leak, dispose of the remote control. 2. Avoid touching the leaked...
....), it come in the remote control 1 3 2 I Remote control operation range NATURAL SOUND CD RECORDER CDR-D651 POWER A DISC DISPLAY A TEXT/TIME DISPLAY B PHONES LEVEL MIN MAX COPY REC MODE TRACK NO. Insert the batteries (AA, UM-3 or R6 type) according to the polarity markings on the back of them immediately. Notes • Use only AA, UM-3, R6 batteries for an extended period of time. • If batteries leak, dispose of the remote control. 2. Avoid touching the leaked...

Owner's Manual
Page 7
.... • The ANALOG LINE IN (REC) and ANALOG LINE OUT (PLAY) jacks on the other component. • Keep the jack covers for DIGITAL IN OPTICAL and DIGITAL OUT OPTICAL before making any connections. • Correctly connect the input and output jacks on this unit with YAMAHA amplifier or receiver. Plug in this unit to the jacks with same numbers when connecting this unit to the input and output jacks on the other component. •...
.... • The ANALOG LINE IN (REC) and ANALOG LINE OUT (PLAY) jacks on the other component. • Keep the jack covers for DIGITAL IN OPTICAL and DIGITAL OUT OPTICAL before making any connections. • Correctly connect the input and output jacks on this unit with YAMAHA amplifier or receiver. Plug in this unit to the jacks with same numbers when connecting this unit to the input and output jacks on the other component. •...
Owner's Manual
Page 12
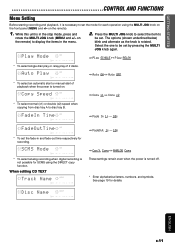
... R -6 -4 -2 -I 0 OVER * To set the fade-in and fade-out time respectively for each operation using the DIRECT copy function. Play Mode CD L dB -60 -30 -I0 R -6 -4 -2 -I 0 OVER * To select single disc play or relay play of 2 discs. ⇒ Play SINGLE ↔ Play RELAY Auto Play CD L dB -60 -30 -I0 R -6 -4 -2 -I 0 OVER * To select an automatic start or manual start of playback when the power is turned on the front panel (MENU and +/- See page...
... R -6 -4 -2 -I 0 OVER * To set the fade-in and fade-out time respectively for each operation using the DIRECT copy function. Play Mode CD L dB -60 -30 -I0 R -6 -4 -2 -I 0 OVER * To select single disc play or relay play of 2 discs. ⇒ Play SINGLE ↔ Play RELAY Auto Play CD L dB -60 -30 -I0 R -6 -4 -2 -I 0 OVER * To select an automatic start or manual start of playback when the power is turned on the front panel (MENU and +/- See page...
Owner's Manual
Page 13
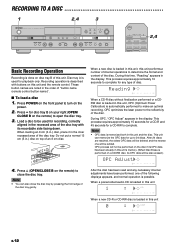
... B on this unit performs a number of the disc. RECORDING RECORDING TO A DISC 1 NATURAL SOUND CD RECORDER CDR-D651 POWER A DISC 2,4 3 DISPLAY A TEXT/TIME DISPLAY B PHONES LEVEL MIN MAX COPY REC MODE TRACK NO. Do not put a normal 12 cm (5 in the display. Press v for any necessary internal adjustments have been performed, one will be also erased.) OPC Adjust L dB -60 -30 -I0 R -6 -4 -2 -I 0 OVER E-12 INPUT DISC A DIGITAL ANALOG MULTI JOG PUSH MODE FINALIZE ERASE DIGITAL REC LEVEL B DISC Recordable ReWritable REC MUTE REC ANALOG REC LEVEL FADE IN...
... B on this unit performs a number of the disc. RECORDING RECORDING TO A DISC 1 NATURAL SOUND CD RECORDER CDR-D651 POWER A DISC 2,4 3 DISPLAY A TEXT/TIME DISPLAY B PHONES LEVEL MIN MAX COPY REC MODE TRACK NO. Do not put a normal 12 cm (5 in the display. Press v for any necessary internal adjustments have been performed, one will be also erased.) OPC Adjust L dB -60 -30 -I0 R -6 -4 -2 -I 0 OVER E-12 INPUT DISC A DIGITAL ANALOG MULTI JOG PUSH MODE FINALIZE ERASE DIGITAL REC LEVEL B DISC Recordable ReWritable REC MUTE REC ANALOG REC LEVEL FADE IN...
Owner's Manual
Page 14
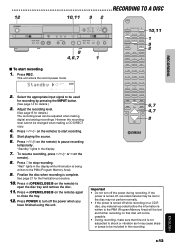
... STARTED RECORDING PLAYBACK RECORDING TO A DISC 12 10,11 9 2 COPY NATURAL SOUND CD RECORDER CDR-D651 POWER A DISC DISPLAY A TEXT/TIME DISPLAY B PHONES LEVEL MIN MAX COPY REC MODE TRACK NO. "Standby" lights in the recording. INPUT DISC A DIGITAL ANALOG MULTI JOG PUSH MODE FINALIZE ERASE DIGITAL REC LEVEL B DISC Recordable ReWritable REC MUTE REC ANALOG REC LEVEL FADE IN/OUT MIN MAX 8 4,6,7 1 A OPEN/CLOSE B FADE IN/OUT TRACK NO. Press POWER to turn off the power during recording. REC REC MUTE WRITE REC MODE FINALIZE ERASE DISPLAY...
... STARTED RECORDING PLAYBACK RECORDING TO A DISC 12 10,11 9 2 COPY NATURAL SOUND CD RECORDER CDR-D651 POWER A DISC DISPLAY A TEXT/TIME DISPLAY B PHONES LEVEL MIN MAX COPY REC MODE TRACK NO. "Standby" lights in the recording. INPUT DISC A DIGITAL ANALOG MULTI JOG PUSH MODE FINALIZE ERASE DIGITAL REC LEVEL B DISC Recordable ReWritable REC MUTE REC ANALOG REC LEVEL FADE IN/OUT MIN MAX 8 4,6,7 1 A OPEN/CLOSE B FADE IN/OUT TRACK NO. Press POWER to turn off the power during recording. REC REC MUTE WRITE REC MODE FINALIZE ERASE DISPLAY...

Owner's Manual
Page 15
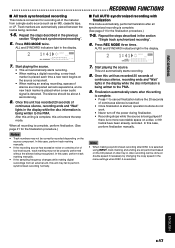
... tray A, press INPUT to light DISC A. E-14 I Manual recording In this recording mode, all recording operations (such as you have been recorded and "Track Full" appears in the display. I Full AUTO synchronized recording This mode automatically finalizes the disc after the last recorded track on the disc. A CD-R disc can be played on standard CD players - I All track synchronized recording This unit automatically starts recording all track synchronized recording. I Single track synchronized recording This unit automatically starts recording a single track when the...
... tray A, press INPUT to light DISC A. E-14 I Manual recording In this recording mode, all recording operations (such as you have been recorded and "Track Full" appears in the display. I Full AUTO synchronized recording This mode automatically finalizes the disc after the last recorded track on the disc. A CD-R disc can be played on standard CD players - I All track synchronized recording This unit automatically starts recording all track synchronized recording. I Single track synchronized recording This unit automatically starts recording a single track when the...
Owner's Manual
Page 16
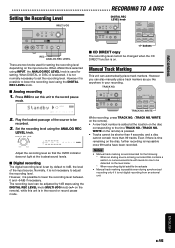
... 1. Play the loudest passage of the source to be adjusted by default to set by 1dB steps using the DIGITAL REC LEVEL knob. However, it is impossible once 99 tracks have been recorded. The recording level can be recorded. 3. on the disc, further recording is not digital recording from an external unit. INPUT DISC A DIGITAL ANALOG MULTI JOG PUSH MODE FINALIZE ERASE DIGITAL REC LEVEL B DISC Recordable ReWritable REC MUTE REC ANALOG REC LEVEL FADE IN/OUT MIN MAX DISPLAY A/B INPUT TIME TEXT DIMMER MENU EDIT DELETE SET +/- TRACK NO. COPY COPY REC MODE TRACK...
... 1. Play the loudest passage of the source to be adjusted by default to set by 1dB steps using the DIGITAL REC LEVEL knob. However, it is impossible once 99 tracks have been recorded. The recording level can be recorded. 3. on the disc, further recording is not digital recording from an external unit. INPUT DISC A DIGITAL ANALOG MULTI JOG PUSH MODE FINALIZE ERASE DIGITAL REC LEVEL B DISC Recordable ReWritable REC MUTE REC ANALOG REC LEVEL FADE IN/OUT MIN MAX DISPLAY A/B INPUT TIME TEXT DIMMER MENU EDIT DELETE SET +/- TRACK NO. COPY COPY REC MODE TRACK...
Owner's Manual
Page 17
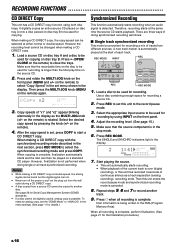
... stop mode. 6. REC MODE INPUT COPY REC MODE TRACK NO. Load a disc to be used for recording is possible. Select the appropriate input source to be digitally copied, analog copy is longer than the total play time on the source CD. 2. Start playing the source. • This unit automatically starts recording. • When playback of continuous silence as the MULTI JOG knob (+/- When all recording is in the display. Adjust the recording level. (See page 15.) 5. Press REC MODE. When making a CD DIRECT copy...
... stop mode. 6. REC MODE INPUT COPY REC MODE TRACK NO. Load a disc to be used for recording is possible. Select the appropriate input source to be digitally copied, analog copy is longer than the total play time on the source CD. 2. Start playing the source. • This unit automatically starts recording. • When playback of continuous silence as the MULTI JOG knob (+/- When all recording is in the display. Adjust the recording level. (See page 15.) 5. Press REC MODE. When making a CD DIRECT copy...
Owner's Manual
Page 18
... PMA. AUTO and SYNCHRO indicators light in the menu settings when DISC A is complete, this unit enters the stop mode. In this case, perform track marking manually. • If the sampling frequency changes while making a synchronized recording after DISC A is selected using INPUT, track marking and ending are automatically placed between the tracks being recorded. 1-5. PLAYBACK ADDITIONAL INFORMATION ENGLISH E-17 When all recording is detected. Press REC MODE three times. Finalization automatically starts after this unit has recorded 20...
... PMA. AUTO and SYNCHRO indicators light in the menu settings when DISC A is complete, this unit enters the stop mode. In this case, perform track marking manually. • If the sampling frequency changes while making a synchronized recording after DISC A is selected using INPUT, track marking and ending are automatically placed between the tracks being recorded. 1-5. PLAYBACK ADDITIONAL INFORMATION ENGLISH E-17 When all recording is detected. Press REC MODE three times. Finalization automatically starts after this unit has recorded 20...
Owner's Manual
Page 20
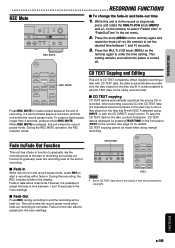
... 3 seconds. GETTING STARTED RECORDING PLAYBACK RECORDING FUNCTIONS REC Mute COPY REC MODE TRACK NO. Press the MULTI JOG knob (MENU on the newly recorded disc. A 4-second blank space is also possible to edit CD TEXT data on the remote) again to create a blank space at the end of recording. During the REC MUTE operation, the REC indicator blinks. Fade-out time can also be made when doing manual recording. When digitally recording a disc with CD TEXT...
... 3 seconds. GETTING STARTED RECORDING PLAYBACK RECORDING FUNCTIONS REC Mute COPY REC MODE TRACK NO. Press the MULTI JOG knob (MENU on the newly recorded disc. A 4-second blank space is also possible to edit CD TEXT data on the remote) again to create a blank space at the end of recording. During the REC MUTE operation, the REC indicator blinks. Fade-out time can also be made when doing manual recording. When digitally recording a disc with CD TEXT...
Owner's Manual
Page 22
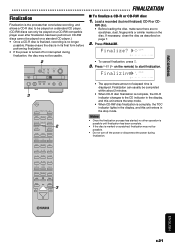
.... • If the power is the process that concludes recording, and allows a CD-R disc to be played on a standard CD player. (CD-RW discs can usually be usable. 2 COPY REC MODE TRACK NO. If necessary, clean the disc as described on the remote) to the CD indicator in the stop mode. • When CD-RW disc finalization is displayed. REC REC MUTE WRITE REC MODE FINALIZE ERASE DISPLAY A/B INPUT 2 TIME TEXT DIMMER MENU I 0 OVER • To...
.... • If the power is the process that concludes recording, and allows a CD-R disc to be played on a standard CD player. (CD-RW discs can usually be usable. 2 COPY REC MODE TRACK NO. If necessary, clean the disc as described on the remote) to the CD indicator in the stop mode. • When CD-RW disc finalization is displayed. REC REC MUTE WRITE REC MODE FINALIZE ERASE DISPLAY A/B INPUT 2 TIME TEXT DIMMER MENU I 0 OVER • To...
Owner's Manual
Page 23
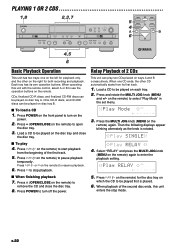
... the remote) to turn on the remote) to open the disc tray. 3. Play SINGLE Play RELAY 4. PLAYBACK PLAYING 1 OR 2 CDS 1,8 NATURAL SOUND CD RECORDER CDR-D651 POWER A DISC 2,3,7 DISPLAY A TEXT/TIME DISPLAY B PHONES LEVEL MIN MAX COPY REC MODE TRACK NO. Load a CD to be played first is rotated. Press w/d (w or d on the left for playback only, and the other CD automatically starts from the beginning of 2 CDs This unit can be played on the remote) to stop mode. Play Mode CD...
... the remote) to turn on the remote) to open the disc tray. 3. Play SINGLE Play RELAY 4. PLAYBACK PLAYING 1 OR 2 CDS 1,8 NATURAL SOUND CD RECORDER CDR-D651 POWER A DISC 2,3,7 DISPLAY A TEXT/TIME DISPLAY B PHONES LEVEL MIN MAX COPY REC MODE TRACK NO. Load a CD to be played first is rotated. Press w/d (w or d on the left for playback only, and the other CD automatically starts from the beginning of 2 CDs This unit can be played on the remote) to stop mode. Play Mode CD...
Owner's Manual
Page 24
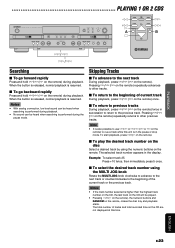
... is also possible to use r/y or t/e (y or t on the remote) to the beginning of current track During playback, press t/e (t on the remote) twice in the display. Example: To select track 25 Press +10 twice, then immediately press 5 once. GETTING STARTED RECORDING PLAYBACK PLAYING 1 OR 2 CDS NATURAL SOUND CD RECORDER CDR-D651 POWER A DISC DISPLAY A TEXT/TIME DISPLAY B PHONES LEVEL MIN MAX COPY REC MODE TRACK NO. When the button is released, normal playback is resumed. Note •...
... is also possible to use r/y or t/e (y or t on the remote) to the beginning of current track During playback, press t/e (t on the remote) twice in the display. Example: To select track 25 Press +10 twice, then immediately press 5 once. GETTING STARTED RECORDING PLAYBACK PLAYING 1 OR 2 CDS NATURAL SOUND CD RECORDER CDR-D651 POWER A DISC DISPLAY A TEXT/TIME DISPLAY B PHONES LEVEL MIN MAX COPY REC MODE TRACK NO. When the button is released, normal playback is resumed. Note •...
Owner's Manual
Page 25
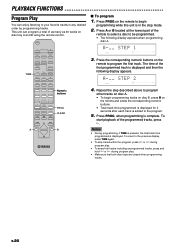
... program other tracks on disc tray A and B using the remote control. Press PROG, when programming is displayed and then the following display appears when programming disc A. The time of the first programmed track is complete. PLAYBACK FUNCTIONS Program Play You can program a total of as many as 40 tracks on disc A. • To begin programming while this unit is displayed. COPY A OPEN/CLOSE B FADE IN/OUT TRACK NO. Notes • During programming, if TIME is pressed, the total track time programmed...
... program other tracks on disc tray A and B using the remote control. Press PROG, when programming is displayed and then the following display appears when programming disc A. The time of the first programmed track is complete. PLAYBACK FUNCTIONS Program Play You can program a total of as many as 40 tracks on disc A. • To begin programming while this unit is displayed. COPY A OPEN/CLOSE B FADE IN/OUT TRACK NO. Notes • During programming, if TIME is pressed, the total track time programmed...
Owner's Manual
Page 28
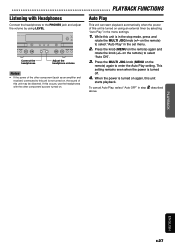
... and receiver) connected to this unit is turned on again, this unit starts playback. Press the knob (MENU on the remote) again to select "Auto Play" in the set menu. 2. on , the sound of the other component's power turned on the remote) to enter the Auto Play setting. This setting remains even when the power is in step 2 described above. ORDER CDR-D651 DISPLAY A TEXT/TIME DISPLAY B PHONES LEVEL MIN MAX COPY REC MOD FINALIZE Connect the headphones Adjust the headphone volume Notes...
... and receiver) connected to this unit is turned on again, this unit starts playback. Press the knob (MENU on the remote) again to select "Auto Play" in the set menu. 2. on , the sound of the other component's power turned on the remote) to enter the Auto Play setting. This setting remains even when the power is in step 2 described above. ORDER CDR-D651 DISPLAY A TEXT/TIME DISPLAY B PHONES LEVEL MIN MAX COPY REC MOD FINALIZE Connect the headphones Adjust the headphone volume Notes...
Owner's Manual
Page 29
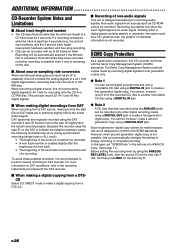
... CD DIRECT mode to the operating instructions provided with the Serial Copy Management System (SCMS) standards. I When making a digital copying from a DAT source, make a second generation copy using the DAT recorder's auto ID function record the start the source CD on DAT tapes are originally recorded using a DIGITAL OUT jack. For more information on the disc. G Rule 1 You can record 32, 44.1 and 48 kHz digital signals. DAT tapes that are in the set menu to a 44.1 kHz digital signal before...
... CD DIRECT mode to the operating instructions provided with the Serial Copy Management System (SCMS) standards. I When making a digital copying from a DAT source, make a second generation copy using the DAT recorder's auto ID function record the start the source CD on DAT tapes are originally recorded using a DIGITAL OUT jack. For more information on the disc. G Rule 1 You can record 32, 44.1 and 48 kHz digital signals. DAT tapes that are in the set menu to a 44.1 kHz digital signal before...
Owner's Manual
Page 31
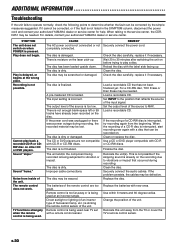
... YAMAHA dealer or service center for help. Play is dirty or damaged. Recording is dirty. The remote control does not work. TV functions strangely when the remote control is being subjected to the position that occurred during recording, the recorded material may be needed . The disc is not possible. The output level of the unit. Use a CD or DVD player compatible with new ones. The batteries of the unit. Remote control is being used near TV set...
... YAMAHA dealer or service center for help. Play is dirty or damaged. Recording is dirty. The remote control does not work. TV functions strangely when the remote control is being subjected to the position that occurred during recording, the recorded material may be needed . The disc is not possible. The output level of the unit. Use a CD or DVD player compatible with new ones. The batteries of the unit. Remote control is being used near TV set...

