
Owner's Manual
Page 2
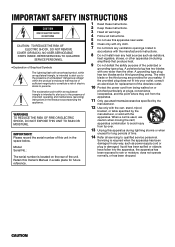
... in the space below. NO USER-SERVICEABLE PARTS INSIDE. Retain this apparatus during lightning storms or when unused for replacement of the obsolete outlet. 10 Protect the power cord from being walked on the rear of uninsulated "dangerous voltage" within an equilateral triangle is used, use this unit in any ventilation openings. CAUTION A grounding type plug has two blades and a third...
... in the space below. NO USER-SERVICEABLE PARTS INSIDE. Retain this apparatus during lightning storms or when unused for replacement of the obsolete outlet. 10 Protect the power cord from being walked on the rear of uninsulated "dangerous voltage" within an equilateral triangle is used, use this unit in any ventilation openings. CAUTION A grounding type plug has two blades and a third...
Owner's Manual
Page 3
...'s Consumer Electronics Group want you to coaxial type cable. NOTE: This product has been tested and found in to get the most importantly, without annoying blaring or distortion - Since hearing damage from excessive volume levels. FCC INFORMATION (for Class "B" digital devices. This equipment generates/uses radio frequencies and, if not installed and used . If the antenna lead-in is often undetectable until...
...'s Consumer Electronics Group want you to coaxial type cable. NOTE: This product has been tested and found in to get the most importantly, without annoying blaring or distortion - Since hearing damage from excessive volume levels. FCC INFORMATION (for Class "B" digital devices. This equipment generates/uses radio frequencies and, if not installed and used . If the antenna lead-in is often undetectable until...
Owner's Manual
Page 4
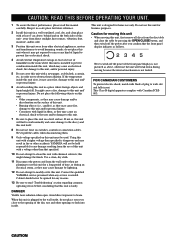
...button, and then switch off the power after you confirm that the front panel display indicates as follows. 2345 Never switch off the power if the front panel display is designed for business purposes. away from direct sunlight, heat sources, vibration, dust, moisture, and/or cold. 3 Position this unit away from the use this unit for future reference. 2 Install... to the user and/or damage to this unit. 7 Be sure to place this unit on switches, controls or connection cables. It might damage the finish. Use a clean, dry cloth. 11 Disconnect the power cord from the disc table and close...
...button, and then switch off the power after you confirm that the front panel display indicates as follows. 2345 Never switch off the power if the front panel display is designed for business purposes. away from direct sunlight, heat sources, vibration, dust, moisture, and/or cold. 3 Position this unit away from the use this unit for future reference. 2 Install... to the user and/or damage to this unit. 7 Be sure to place this unit on switches, controls or connection cables. It might damage the finish. Use a clean, dry cloth. 11 Disconnect the power cord from the disc table and close...
Owner's Manual
Page 5
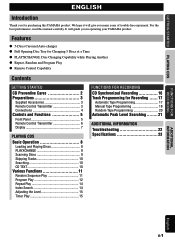
... Adjusting the Level 15 Timer Play 15 FUNCTIONS FOR RECORDING CD Synchronized Recording 16 Track Programming for Changing 5 Discs at a Time q PLAYXCHANGE; We hope it will guide you many years of trouble-free enjoyment. It will give you in operating your YAMAHA product. Features q 5-Discs Carousel Auto-changer q Full Opening Disc Tray for Recording ...... 17 Automatic Tape Programming 17 Manual Tape Programming 18 Random Tape Programming 20 Automatic Peak Level Searching ........ 21 ADDITIONAL INFORMATION Troubleshooting...
... Adjusting the Level 15 Timer Play 15 FUNCTIONS FOR RECORDING CD Synchronized Recording 16 Track Programming for Changing 5 Discs at a Time q PLAYXCHANGE; We hope it will guide you many years of trouble-free enjoyment. It will give you in operating your YAMAHA product. Features q 5-Discs Carousel Auto-changer q Full Opening Disc Tray for Recording ...... 17 Automatic Tape Programming 17 Manual Tape Programming 18 Random Tape Programming 20 Automatic Peak Level Searching ........ 21 ADDITIONAL INFORMATION Troubleshooting...
Owner's Manual
Page 8
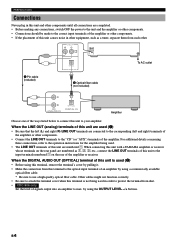
... input terminals numbered ! When the DIGITAL AUDIO OUT (OPTICAL) terminal of this unit is not being used (1) • Be sure that the left (L) and right (R) LINE OUT terminals are numbered !. When connecting this unit with a YAMAHA amplifier or receiver whose terminals on the rear of the amplifier or receiver. by using the OUTPUT LEVEL -/+ buttons. on the rear panel are numbered as a tuner, separate them from each other. When the LINE OUT (analog...
... input terminals numbered ! When the DIGITAL AUDIO OUT (OPTICAL) terminal of this unit is not being used (1) • Be sure that the left (L) and right (R) LINE OUT terminals are numbered !. When connecting this unit with a YAMAHA amplifier or receiver whose terminals on the rear of the amplifier or receiver. by using the OUTPUT LEVEL -/+ buttons. on the rear panel are numbered as a tuner, separate them from each other. When the LINE OUT (analog...
Owner's Manual
Page 9
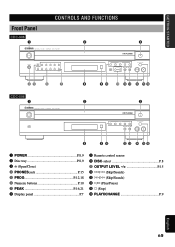
... CONTROLS AND FUNCTIONS Front Panel CDC-906 1 NATURAL SOUND COMPACT DISC PLAYER POWER PHONES PROG 1 2 3 4 5 +10 6 7 8 9 0 PEAK 2 3 DISC 1 2 3 4 5 OUTPUT LEVEL PLAYXCHANGE 45 6 7 CDC-506 1 NATURAL SOUND COMPACT DISC PLAYER POWER 8 9 0 q w e r ty 2 3 DISC 1 2 3 4 5 PLAYXCHANGE 8 90 w e r ty 1 POWER P.8,9 2 Disc tray P.8,9 3 v (Open/Close) 4 PHONES jack P.15 5 PROG P.12,18 6 Numeric buttons P.10 7 PEAK P.16,21 8 Display panel P.7 9 Remote control sensor 0 DISC-select P.8 q OUTPUT LEVEL P.15 w t/e (Skip/Search) e r/y (Skip/Search) r w/d (Play...
... CONTROLS AND FUNCTIONS Front Panel CDC-906 1 NATURAL SOUND COMPACT DISC PLAYER POWER PHONES PROG 1 2 3 4 5 +10 6 7 8 9 0 PEAK 2 3 DISC 1 2 3 4 5 OUTPUT LEVEL PLAYXCHANGE 45 6 7 CDC-506 1 NATURAL SOUND COMPACT DISC PLAYER POWER 8 9 0 q w e r ty 2 3 DISC 1 2 3 4 5 PLAYXCHANGE 8 90 w e r ty 1 POWER P.8,9 2 Disc tray P.8,9 3 v (Open/Close) 4 PHONES jack P.15 5 PROG P.12,18 6 Numeric buttons P.10 7 PEAK P.16,21 8 Display panel P.7 9 Remote control sensor 0 DISC-select P.8 q OUTPUT LEVEL P.15 w t/e (Skip/Search) e r/y (Skip/Search) r w/d (Play...
Owner's Manual
Page 11
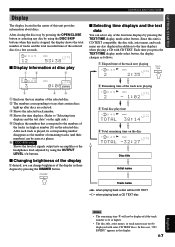
... name, and track name are selected. 3 Shows the selected track number. 4 Shows the time displays. (Refer to "Selecting time displays and the text data" on the right side.) 5 Displays the numbers that correspond to the time displays when playing a CD with some CD TEXT discs. DIMMER CONTROLS AND FUNCTIONS s Selecting time displays and the text data You can change brightness of signals output into an amplifier or the headphones level adjusted by pressing the DIMMER button.
... name, and track name are selected. 3 Shows the selected track number. 4 Shows the time displays. (Refer to "Selecting time displays and the text data" on the right side.) 5 Displays the numbers that correspond to the time displays when playing a CD with some CD TEXT discs. DIMMER CONTROLS AND FUNCTIONS s Selecting time displays and the text data You can change brightness of signals output into an amplifier or the headphones level adjusted by pressing the DIMMER button.
Owner's Manual
Page 12
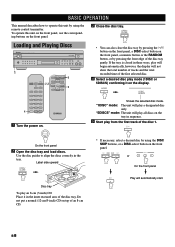
... front panel. OUTPUT LEVEL - 4 DISC SCAN DISC SKIP 1 Turn the power on. • You can also close the disc tray by pressing the w/d button on the front panel, a DISC-select button on the front panel, a numeric button or the RANDOM button, or by using the remote control transmitter. Label side upward OPEN/ CLOSE * If necessary, select a desired disc by pressing the front edge of the disc tray. OPEN/ CLOSE Loading and Playing Discs NATURAL SOUND COMPACT DISC PLAYER POWER PHONES...
... front panel. OUTPUT LEVEL - 4 DISC SCAN DISC SKIP 1 Turn the power on. • You can also close the disc tray by pressing the w/d button on the front panel, a DISC-select button on the front panel, a numeric button or the RANDOM button, or by using the remote control transmitter. Label side upward OPEN/ CLOSE * If necessary, select a desired disc by pressing the front edge of the disc tray. OPEN/ CLOSE Loading and Playing Discs NATURAL SOUND COMPACT DISC PLAYER POWER PHONES...
Owner's Manual
Page 13
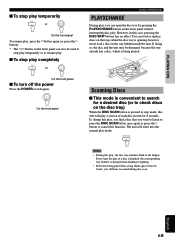
... the display. Scanning Discs s This mode is convenient to search for a desired disc (or to check discs on the disc tray) When the DISC SCAN button is changed from flashing to cancel this case, pressing the DISC SKIP buttons has no sound during this play of each disc in turn off the power Press the POWER switch again. Every time the play , the disc tray numbers blink in this function. English E-9 PLAYING CDS s To stop play temporarily...
... the display. Scanning Discs s This mode is convenient to search for a desired disc (or to check discs on the disc tray) When the DISC SCAN button is changed from flashing to cancel this case, pressing the DISC SKIP buttons has no sound during this play of each disc in turn off the power Press the POWER switch again. Every time the play , the disc tray numbers blink in this function. English E-9 PLAYING CDS s To stop play temporarily...
Owner's Manual
Page 14
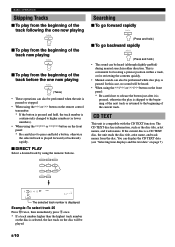
... is paused or stopped. • When using the t or y button on the remote control transmitter: * If the button is pressed and held, the track number is continuously changed to higher numbers (or lower numbers). • When using the t/e or r/y button on the front panel: * Be careful not to press and hold .) • The sound can be performed while disc play is paused. If the current...
... is paused or stopped. • When using the t or y button on the remote control transmitter: * If the button is pressed and held, the track number is continuously changed to higher numbers (or lower numbers). • When using the t/e or r/y button on the front panel: * Be careful not to press and hold .) • The sound can be performed while disc play is paused. If the current...
Owner's Manual
Page 16
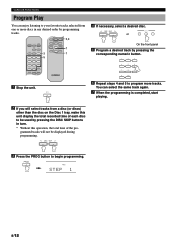
VARIOUS FUNCTIONS Program Play You can select the same track again. 7 When the programming is completed, start playing. 2 If you will not be used by pressing the DISC SKIP buttons in any desired order by pressing the corresponding numeric button. 1 2 3 4 5 6 7 8 9 0 -10 1 Stop the unit. 6 Repeat steps 4 and 5 to program more discs in turn. * Without this unit display the total recorded time of the pro- DISC SCAN DISC SKIP DISC SCAN...
VARIOUS FUNCTIONS Program Play You can select the same track again. 7 When the programming is completed, start playing. 2 If you will not be used by pressing the DISC SKIP buttons in any desired order by pressing the corresponding numeric button. 1 2 3 4 5 6 7 8 9 0 -10 1 Stop the unit. 6 Repeat steps 4 and 5 to program more discs in turn. * Without this unit display the total recorded time of the pro- DISC SCAN DISC SKIP DISC SCAN...
Owner's Manual
Page 17
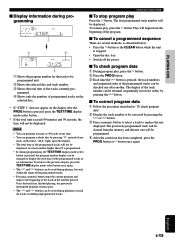
... program play , press the w button. s To correct program data 1 Follow the procedure described in reverse order) by pressing the t button. Once that time, "ALL" lights up in the display. • The total time of the programmed tracks will be corrected by pressing "0", instead of one displayed. s To check program data 1 During program play . • The e and r buttons can be used during programming, the TEXT/TIME display mode-select button is pressed, the program number display...
... program play , press the w button. s To correct program data 1 Follow the procedure described in reverse order) by pressing the t button. Once that time, "ALL" lights up in the display. • The total time of the programmed tracks will be corrected by pressing "0", instead of one displayed. s To check program data 1 During program play . • The e and r buttons can be used during programming, the TEXT/TIME display mode-select button is pressed, the program number display...
Owner's Manual
Page 18
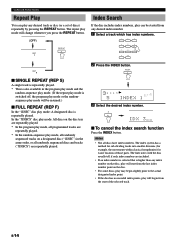
...") in the program play mode and the random-sequence play mode. (If the repeat play mode is switched off, the program play mode or the randomsequence play mode will change whenever you press the REPEAT button. (OFF) 1DISC REP RNDM SA 5DISCS S F PROG C RCH T T E ART ST TRAC REPEAT Index Search If the disc includes index numbers, play can play any index number on that disc, play will start of the selected track. TEXT...
...") in the program play mode and the random-sequence play mode. (If the repeat play mode is switched off, the program play mode or the randomsequence play mode will change whenever you press the REPEAT button. (OFF) 1DISC REP RNDM SA 5DISCS S F PROG C RCH T T E ART ST TRAC REPEAT Index Search If the disc includes index numbers, play can play any index number on that disc, play will start of the selected track. TEXT...
Owner's Manual
Page 19
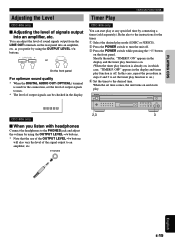
... 2 and 3 to set time comes, the unit turns on the front panel. You can be checked in the display and timer play function is off . 3 Press the POWER switch while pressing the w/d button on and starts play mode (1DISC or 5DISCS). 2 Press the POWER switch to turn the unit off . PLAYING CDS Adjusting the Level CDC-906 only s Adjusting the level of sound signals output from the LINE OUT terminals on the rear panel into an amplifier, etc.
... 2 and 3 to set time comes, the unit turns on the front panel. You can be checked in the display and timer play function is off . 3 Press the POWER switch while pressing the w/d button on and starts play mode (1DISC or 5DISCS). 2 Press the POWER switch to turn the unit off . PLAYING CDS Adjusting the Level CDC-906 only s Adjusting the level of sound signals output from the LINE OUT terminals on the rear panel into an amplifier, etc.
Owner's Manual
Page 20
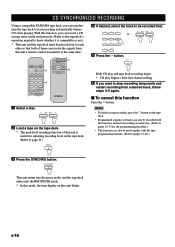
Functions for adjusting recording level on the tape deck. (Refer to page 21.) PEAK 4 If desired, select the track to be recorded first. 1 2 3 or 4 5 6 DISC SKIP 7 8 9 0 -10 5 Press the w button. Using a compatible YAMAHA tape deck, you can record a CD on the tape deck. • Programmed sequence of tracks can also be placed close to each other so that both of them can receive the signals from a desired track...
Functions for adjusting recording level on the tape deck. (Refer to page 21.) PEAK 4 If desired, select the track to be recorded first. 1 2 3 or 4 5 6 DISC SKIP 7 8 9 0 -10 5 Press the w button. Using a compatible YAMAHA tape deck, you can record a CD on the tape deck. • Programmed sequence of tracks can also be placed close to each other so that both of them can receive the signals from a desired track...
Owner's Manual
Page 21
... button. Notes • It is recommended that you use a tape that is useful for adjusting recording level on the tape deck. (Refer to page 16.) English E-17 The peak level searching function of unrecorded space remaining at the same time. 6 The unit will automatically program tracks on each end of tracks unchanged. OPEN/ SYNCHRO DIMMER CLOSE TEXT/ TIME PEAK TAPE CLEAR PROG 3 1 2 3 4 5 6 7 8 9 0 -10 INDEX MODE - OUTPUT LEVEL...
... button. Notes • It is recommended that you use a tape that is useful for adjusting recording level on the tape deck. (Refer to page 16.) English E-17 The peak level searching function of unrecorded space remaining at the same time. 6 The unit will automatically program tracks on each end of tracks unchanged. OPEN/ SYNCHRO DIMMER CLOSE TEXT/ TIME PEAK TAPE CLEAR PROG 3 1 2 3 4 5 6 7 8 9 0 -10 INDEX MODE - OUTPUT LEVEL...
Owner's Manual
Page 22
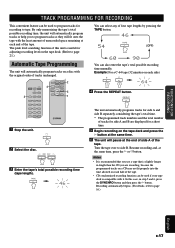
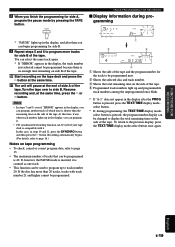
...- DISC SCAN DISC SKIP DISC SCAN REPEAT DISC SKIP RANDOM 2,5 1 1 Stop the unit. - - - OUTPUT LEVEL - If there is a disc to which this operation is omitted, tracks on the disc cannot be programmed. 3 Follow step 3 on the Disc 1 tray, make this unit display the total recorded time of the tape. You can select the same track again. * If "ERROR" appears in the display, the track number just selected cannot be used...
...- DISC SCAN DISC SKIP DISC SCAN REPEAT DISC SKIP RANDOM 2,5 1 1 Stop the unit. - - - OUTPUT LEVEL - If there is a disc to which this operation is omitted, tracks on the disc cannot be programmed. 3 Follow step 3 on the Disc 1 tray, make this unit display the total recorded time of the tape. You can select the same track again. * If "ERROR" appears in the display, the track number just selected cannot be used...
Owner's Manual
Page 23
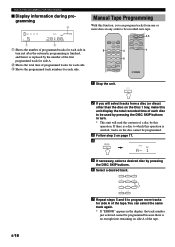
..., refer to program more than the remaining time on side B of the tape. In this time, if any other track number lights up in the display, and after the PROG button is pressed, press the TEXT/TIME display modeselect button. * If, during programming 1DISC REP RNDM SAVE BEST EDIT FILE 1 2 3 4 5 5DISCS S F PROG CD- Turn the tape over to the previous display, press the TEXT/TIME display mode-select button once again...
..., refer to program more than the remaining time on side B of the tape. In this time, if any other track number lights up in the display, and after the PROG button is pressed, press the TEXT/TIME display modeselect button. * If, during programming 1DISC REP RNDM SAVE BEST EDIT FILE 1 2 3 4 5 5DISCS S F PROG CD- Turn the tape over to the previous display, press the TEXT/TIME display mode-select button once again...
Owner's Manual
Page 25
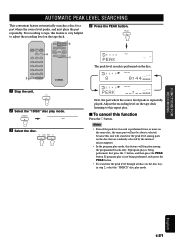
... level search is very helpful to this function Press the a button. FUNCTIONS FOR RECORDING AUTOMATIC PEAK LEVEL SEARCHING This convenient feature automatically searches a disc for the peak level among parts on the disc tray, in step 2, select the "5DISCS" disc play mode, this feature will function among the programmed tracks only. For recording to tape, this feature is performed on the tape deck listening to adjust the recording level on the tape deck...
... level search is very helpful to this function Press the a button. FUNCTIONS FOR RECORDING AUTOMATIC PEAK LEVEL SEARCHING This convenient feature automatically searches a disc for the peak level among parts on the disc tray, in step 2, select the "5DISCS" disc play mode, this feature will function among the programmed tracks only. For recording to tape, this feature is performed on the tape deck listening to adjust the recording level on the tape deck...
Owner's Manual
Page 26
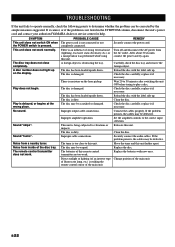
... the problem persists, the cables may be defective. Improper amplifier operation. The disc is striking the remote control sensor of fluorescent lamp, etc.) is dirty. Noise from a nearby tuner. Securely connect the audio cables. Direct sunlight or lighting (of an inverter type Change position of this unit. of the main unit. SYMPTOM PROBABLE CAUSE REMEDY This unit does not switch ON when The power cord is not connected...
... the problem persists, the cables may be defective. Improper amplifier operation. The disc is striking the remote control sensor of fluorescent lamp, etc.) is dirty. Noise from a nearby tuner. Securely connect the audio cables. Direct sunlight or lighting (of an inverter type Change position of this unit. of the main unit. SYMPTOM PROBABLE CAUSE REMEDY This unit does not switch ON when The power cord is not connected...


