
Owner's Manual
Page 2
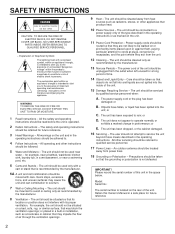
... of the unit. NO USER-SERVICEABLE PARTS INSIDE. For example, the unit should be moved with arrowhead symbol, within the product's enclosure that may be connected to a power supply only of electric shock to the presence of this Owner's Manual in the literature accompanying the appliance. or C. or E. An outdoor antenna should not be serviced by the manufacturer. 8 Ventilation...
... of the unit. NO USER-SERVICEABLE PARTS INSIDE. For example, the unit should be moved with arrowhead symbol, within the product's enclosure that may be connected to a power supply only of electric shock to the presence of this Owner's Manual in the literature accompanying the appliance. or C. or E. An outdoor antenna should not be serviced by the manufacturer. 8 Ventilation...
Owner's Manual
Page 3
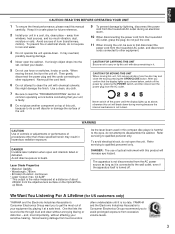
.... Never pull the cord itself is turned off the power by pressing the POWER switch, and then disconnect the power plug from the AC outlet. Refer servicing to beam. One that the display lights up as above, otherwise this product will increase eye hazard. Avoid sources of optical instrument with chemical solvents; When moving the set , contact your dealer. 5 Do not use of hum...
.... Never pull the cord itself is turned off the power by pressing the POWER switch, and then disconnect the power plug from the AC outlet. Refer servicing to beam. One that the display lights up as above, otherwise this product will increase eye hazard. Avoid sources of optical instrument with chemical solvents; When moving the set , contact your dealer. 5 Do not use of hum...
Owner's Manual
Page 4
... all installation instructions. The above statements apply ONLY to coaxial type cable. Disc Changing Capability while Playing Another q Random Access Programmable Play q Random-Sequence Play q Single Track/Entire Disc/All Disc Repeat Play q Adjustable Display Brightness q Remote Control Capability q Disc Scanning Capability Useful for Disc Searching or Disc Checking q CD Synchronized Recording with a Compatible YAMAHA Tape Deck CDC-902 only q Automatic Programming for Class "B" digital devices. Cable/s supplied with other electronic devices. NOTE : This product has been tested and...
... all installation instructions. The above statements apply ONLY to coaxial type cable. Disc Changing Capability while Playing Another q Random Access Programmable Play q Random-Sequence Play q Single Track/Entire Disc/All Disc Repeat Play q Adjustable Display Brightness q Remote Control Capability q Disc Scanning Capability Useful for Disc Searching or Disc Checking q CD Synchronized Recording with a Compatible YAMAHA Tape Deck CDC-902 only q Automatic Programming for Class "B" digital devices. Cable/s supplied with other electronic devices. NOTE : This product has been tested and...
Owner's Manual
Page 5
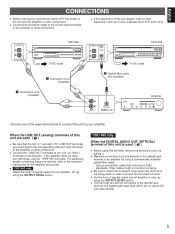
... any connections, switch OFF the power to the unit and the amplifier or other . q Connections should be connected to the "CD" (or "AUX") terminals of an amplifier by pulling it. If the amplifier does not have such terminals, use the "TAPE PB" terminals. Other cables might not function correctly. by using the OUTPUT LEVEL button. by using the OUTPUT LEVEL button. LINE OUT CDC-502 LINE OUT DIGITAL AUDIO OUT OPTICAL CDC-902 To AC outlet – Connection cord...
... any connections, switch OFF the power to the unit and the amplifier or other . q Connections should be connected to the "CD" (or "AUX") terminals of an amplifier by pulling it. If the amplifier does not have such terminals, use the "TAPE PB" terminals. Other cables might not function correctly. by using the OUTPUT LEVEL button. by using the OUTPUT LEVEL button. LINE OUT CDC-502 LINE OUT DIGITAL AUDIO OUT OPTICAL CDC-902 To AC outlet – Connection cord...
Owner's Manual
Page 6
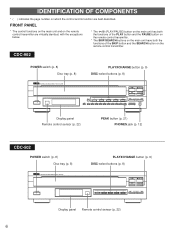
... panel Remote control sensor (p. 22) PEAK button (p. 21) PHONES jack (p. 12) CDC-502 POWER switch (p. 8) Disc tray (p. 8) NATURAL SOUND COMPACT DISC PLAYER POWER PLAYXCHANGE button (p. 9) DISC-select buttons (p. 8) DISC 1 2 3 4 5 / OPEN/CLOSE PLAYXCHANGE SKIP/SEARCH Display panel Remote control sensor (p. 22) 6 IDENTIFICATION OF COMPONENTS * ( ) indicates the page number on the remote control transmitter. FRONT PANEL * The control functions on the main unit and on the remote control transmitter are virtually identical, with the exceptions below. * The (PLAY/PAUSE) button...
... panel Remote control sensor (p. 22) PEAK button (p. 21) PHONES jack (p. 12) CDC-502 POWER switch (p. 8) Disc tray (p. 8) NATURAL SOUND COMPACT DISC PLAYER POWER PLAYXCHANGE button (p. 9) DISC-select buttons (p. 8) DISC 1 2 3 4 5 / OPEN/CLOSE PLAYXCHANGE SKIP/SEARCH Display panel Remote control sensor (p. 22) 6 IDENTIFICATION OF COMPONENTS * ( ) indicates the page number on the remote control transmitter. FRONT PANEL * The control functions on the main unit and on the remote control transmitter are virtually identical, with the exceptions below. * The (PLAY/PAUSE) button...
Owner's Manual
Page 7
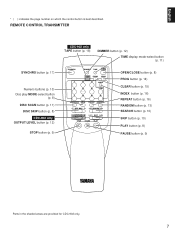
... 9) CDC-902 only TAPE button (p. 18) DIMMER button (p. 12) TIME display mode-select button (p. 11) SYNCHRO 1 4 DIMMER TIME OPEN/ CLOSE TAPE CLEAR PROG 2 3 INDEX 5 6 +10 7 8 9 0 DISC SCAN MODE REPEAT RANDOM DISC SKIP SEARCH - OUTPUT LEVEL + SKIP STOP PAUSE PLAY OPEN/CLOSE button (p. 8) PROG button (p. 14) CLEAR button (p. 15) INDEX button (p. 16) REPEAT button (p. 16) RANDOM button (p. 13) SEARCH button (p. 10) SKIP button (p. 10) PLAY button (p. 8) PAUSE button (p. 9) Parts in the shaded areas are provided for CDC-902 only. 7 English * ( ) indicates the page number...
... 9) CDC-902 only TAPE button (p. 18) DIMMER button (p. 12) TIME display mode-select button (p. 11) SYNCHRO 1 4 DIMMER TIME OPEN/ CLOSE TAPE CLEAR PROG 2 3 INDEX 5 6 +10 7 8 9 0 DISC SCAN MODE REPEAT RANDOM DISC SKIP SEARCH - OUTPUT LEVEL + SKIP STOP PAUSE PLAY OPEN/CLOSE button (p. 8) PROG button (p. 14) CLEAR button (p. 15) INDEX button (p. 16) REPEAT button (p. 16) RANDOM button (p. 13) SEARCH button (p. 10) SKIP button (p. 10) PLAY button (p. 8) PAUSE button (p. 9) Parts in the shaded areas are provided for CDC-902 only. 7 English * ( ) indicates the page number...
Owner's Manual
Page 8
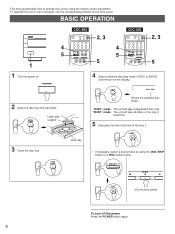
... CDC-902 SYNCHRO 1 4 DIMMER TIME OPEN/ CLOSE TAPE CLEAR PROG 2 3 INDEX 5 6 +I0 7 8 9 0 DISC SCAN MODE REPEAT RANDOM DISC SKIP SEARCH - OUTPUT LEVEL + SKIP STOP PAUSE PLAY 2, 3 5 4 5 CDC-502 SYNCHRO 1 4 DIMMER TIME OPEN/ CLOSE CLEAR PROG 2 3 INDEX 5 6 +I0 7 8 9 0 DISC SCAN MODE REPEAT RANDOM DISC SKIP SEARCH SKIP STOP PAUSE PLAY 2, 3 5 Disc tray 4 Select a desired disc play mode (1DISC or 5DISC) confirming it on . DISC SKIP DISC 2 3 4 PLAY (On the front panel) To turn off the power Press the POWER switch...
... CDC-902 SYNCHRO 1 4 DIMMER TIME OPEN/ CLOSE TAPE CLEAR PROG 2 3 INDEX 5 6 +I0 7 8 9 0 DISC SCAN MODE REPEAT RANDOM DISC SKIP SEARCH - OUTPUT LEVEL + SKIP STOP PAUSE PLAY 2, 3 5 4 5 CDC-502 SYNCHRO 1 4 DIMMER TIME OPEN/ CLOSE CLEAR PROG 2 3 INDEX 5 6 +I0 7 8 9 0 DISC SCAN MODE REPEAT RANDOM DISC SKIP SEARCH SKIP STOP PAUSE PLAY 2, 3 5 Disc tray 4 Select a desired disc play mode (1DISC or 5DISC) confirming it on . DISC SKIP DISC 2 3 4 PLAY (On the front panel) To turn off the power Press the POWER switch...
Owner's Manual
Page 9
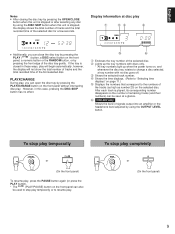
... (PLAY/PAUSE) button on the front panel without interrupting disc play will begin automatically, however, the display will not show the total number of tracks and the total recorded time of signals output into an amplifier or the headphone level adjusted by using the DISC SKIP button when this case, pressing the DISC SKIP button has no disc goes off. Ž Shows the selected track number. Shows the time displays. (Refer to "Selecting time displays...
... (PLAY/PAUSE) button on the front panel without interrupting disc play will begin automatically, however, the display will not show the total number of tracks and the total recorded time of signals output into an amplifier or the headphone level adjusted by using the DISC SKIP button when this case, pressing the DISC SKIP button has no disc goes off. Ž Shows the selected track number. Shows the time displays. (Refer to "Selecting time displays...

Owner's Manual
Page 10
.../SEARCH buttons on the remote control transmitter: If the button is pressed and held, the track number is selected, the last track on the front panel: Be careful not to the beginning of the current track. q When using the SKIP/SEARCH buttons on the disc will be played. q Manual search can be heard (although slightly garbled) during manual search in either direction. Example: To select...
.../SEARCH buttons on the remote control transmitter: If the button is pressed and held, the track number is selected, the last track on the front panel: Be careful not to the beginning of the current track. q When using the SKIP/SEARCH buttons on the disc will be played. q Manual search can be heard (although slightly garbled) during manual search in either direction. Example: To select...
Owner's Manual
Page 12
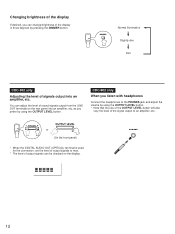
... DIMMER button. as you prefer by using the OUTPUT LEVEL button. PHONES 12 DIMMER Normal illumination Slightly dim Dim CDC-902 only Adjusting the level of signals output into an amplifier, etc. OUTPUT LEVEL + OUTPUT LEVEL or - + (On the front panel) * When the DIGITAL AUDIO OUT (OPTICAL) terminal is used for the connection, set the level of output signals to an amplifier, etc. - Changing brightness of the display If desired, you can be checked on the rear panel into an amplifier, etc...
... DIMMER button. as you prefer by using the OUTPUT LEVEL button. PHONES 12 DIMMER Normal illumination Slightly dim Dim CDC-902 only Adjusting the level of signals output into an amplifier, etc. OUTPUT LEVEL + OUTPUT LEVEL or - + (On the front panel) * When the DIGITAL AUDIO OUT (OPTICAL) terminal is used for the connection, set the level of output signals to an amplifier, etc. - Changing brightness of the display If desired, you can be checked on the rear panel into an amplifier, etc...
Owner's Manual
Page 13
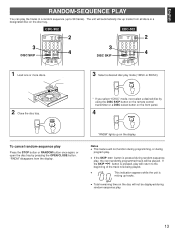
... panel. 4 RANDOM "RNDM" lights up tracks. OUTPUT LEVEL + SKIP STOP PAUSE PLAY 2 4 3 DISC SKIP CDC-502 SYNCHRO 1 4 DIMMER TIME OPEN/ CLOSE CLEAR PROG 2 3 INDEX 5 6 +I0 7 8 9 0 DISC SCAN MODE REPEAT RANDOM DISC SKIP SEARCH SKIP STOP PAUSE PLAY 2 4 1 Load one or more discs. 3 Select a desired disc play Press the STOP button or RANDOM button once again, or open the disc tray by using the DISC SKIP button on the remote control transmitter or a DISC-select button on the display...
... panel. 4 RANDOM "RNDM" lights up tracks. OUTPUT LEVEL + SKIP STOP PAUSE PLAY 2 4 3 DISC SKIP CDC-502 SYNCHRO 1 4 DIMMER TIME OPEN/ CLOSE CLEAR PROG 2 3 INDEX 5 6 +I0 7 8 9 0 DISC SCAN MODE REPEAT RANDOM DISC SKIP SEARCH SKIP STOP PAUSE PLAY 2 4 1 Load one or more discs. 3 Select a desired disc play Press the STOP button or RANDOM button once again, or open the disc tray by using the DISC SKIP button on the remote control transmitter or a DISC-select button on the display...
Owner's Manual
Page 14
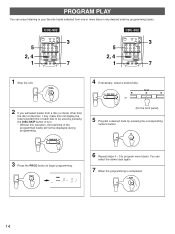
...; OUTPUT LEVEL + SKIP STOP PAUSE PLAY 3 7 5 2, 4 1 CDC-502 SYNCHRO 1 4 DIMMER TIME OPEN/ CLOSE CLEAR PROG 2 3 INDEX 5 6 +I0 7 8 9 0 DISC SCAN MODE REPEAT RANDOM DISC SKIP SEARCH SKIP STOP PAUSE PLAY 3 7 1 Stop the unit. STOP 2 If you will not be displayed during programming. You can enjoy listening to be used by pressing the DISC SKIP button in any desired order by programming tracks. 5 2, 4 1 CDC-902 SYNCHRO 1 4 DIMMER TIME OPEN/ CLOSE TAPE...
...; OUTPUT LEVEL + SKIP STOP PAUSE PLAY 3 7 5 2, 4 1 CDC-502 SYNCHRO 1 4 DIMMER TIME OPEN/ CLOSE CLEAR PROG 2 3 INDEX 5 6 +I0 7 8 9 0 DISC SCAN MODE REPEAT RANDOM DISC SKIP SEARCH SKIP STOP PAUSE PLAY 3 7 1 Stop the unit. STOP 2 If you will not be displayed during programming. You can enjoy listening to be used by pressing the DISC SKIP button in any desired order by programming tracks. 5 2, 4 1 CDC-902 SYNCHRO 1 4 DIMMER TIME OPEN/ CLOSE TAPE...

Owner's Manual
Page 15
... programming, the TIME display mode-select button is pressed, press the TIME display mode-select button. * If the total time exceeds 99 minutes and 59 seconds, the time will be used during playing to search all tracks, including unprogrammed tracks. ΠShows the program number for the track to be programmed. 4. q Press the STOP button or the CLEAR button while the unit is programmed. q Switch off the power. To correct program data 1. Press a numeric button...
... programming, the TIME display mode-select button is pressed, press the TIME display mode-select button. * If the total time exceeds 99 minutes and 59 seconds, the time will be used during playing to search all tracks, including unprogrammed tracks. ΠShows the program number for the track to be programmed. 4. q Press the STOP button or the CLEAR button while the unit is programmed. q Switch off the power. To correct program data 1. Press a numeric button...
Owner's Manual
Page 17
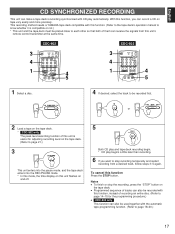
... mode. * In this mode, the time display on this unit flashes on the tape deck. OUTPUT LEVEL + SKIP STOP PAUSE PLAY 4 5 3 4 1 CDC-502 SYNCHRO 1 4 DIMMER TIME OPEN/ CLOSE CLEAR PROG 2 3 INDEX 5 6 +I0 7 8 9 0 DISC SCAN MODE REPEAT RANDOM DISC SKIP SEARCH SKIP STOP PAUSE PLAY 4 5 1 Select a disc. q Programmed sequence of tracks can also be recorded with this function. (Refer to the tape deck's operation manual to know whether it is useful for the programming procedure.) q CDC-902 only This function...
... mode. * In this mode, the time display on this unit flashes on the tape deck. OUTPUT LEVEL + SKIP STOP PAUSE PLAY 4 5 3 4 1 CDC-502 SYNCHRO 1 4 DIMMER TIME OPEN/ CLOSE CLEAR PROG 2 3 INDEX 5 6 +I0 7 8 9 0 DISC SCAN MODE REPEAT RANDOM DISC SKIP SEARCH SKIP STOP PAUSE PLAY 4 5 1 Select a disc. q Programmed sequence of tracks can also be recorded with this function. (Refer to the tape deck's operation manual to know whether it is useful for the programming procedure.) q CDC-902 only This function...

Owner's Manual
Page 18
... be programmed if the tape's length is useful for side A and side B separately considering the tape's total time. 7 Begin recording on the tape deck and press the PLAY button on this unit is not enough. STOP 6 Press the REPEAT button. DISC SKIP 3 The peak level searching function of unrecorded space remaining at each side) 6 4 Π18 The unit automatically programs tracks for adjusting recording level...
... be programmed if the tape's length is useful for side A and side B separately considering the tape's total time. 7 Begin recording on the tape deck and press the PLAY button on this unit is not enough. STOP 6 Press the REPEAT button. DISC SKIP 3 The peak level searching function of unrecorded space remaining at each side) 6 4 Π18 The unit automatically programs tracks for adjusting recording level...

Owner's Manual
Page 19
... 5 If necessary, select a desired disc. TAPE * "Pu" flashes on this operation is omitted, tracks on the disc cannot be used to program up to side B. Resume recording and, at the same time, press the PLAY or PAUSE button on the display, and after then you can be programmed. 3 Follow step 4 and 5 on tape programming q To check, cancel or correct program data, refer to program more discs in step...
... 5 If necessary, select a desired disc. TAPE * "Pu" flashes on this operation is omitted, tracks on the disc cannot be used to program up to side B. Resume recording and, at the same time, press the PLAY or PAUSE button on the display, and after then you can be programmed. 3 Follow step 4 and 5 on tape programming q To check, cancel or correct program data, refer to program more discs in step...

Owner's Manual
Page 20
... the PLAY button on this unit's remote control transmitter. OUTPUT LEVEL + SKIP STOP PAUSE PLAY 2 3, 4 1 Follow step 1 - 5 on a disc in turn just after the PROG button is pressed, press the TIME display mode-select button. * If, during programming, the TIME display mode-select button is pressed, the program number display can check the program data for side A and side B. Π* The unit will automatically program tracks for side A and side B separately considering the tape's total time. 3 Begin...
... the PLAY button on this unit's remote control transmitter. OUTPUT LEVEL + SKIP STOP PAUSE PLAY 2 3, 4 1 Follow step 1 - 5 on a disc in turn just after the PROG button is pressed, press the TIME display mode-select button. * If, during programming, the TIME display mode-select button is pressed, the program number display can check the program data for side A and side B. Π* The unit will automatically program tracks for side A and side B separately considering the tape's total time. 3 Begin...

Owner's Manual
Page 21
... 4 0 PEAK (On the front panel) 2 Select the "1DISC" disc play is not being performed, first press the STOP button, and then press the PEAK button. If program play mode. DISC SKIP 1DISC 8 9 10 11 12 REP 1DISC REP 8 9 10 11 12 Next, the part where the source level peaks is performed on the tape deck listening to adjust the recording level on a disc for CDC-902 only This convenient feature...
... 4 0 PEAK (On the front panel) 2 Select the "1DISC" disc play is not being performed, first press the STOP button, and then press the PEAK button. If program play mode. DISC SKIP 1DISC 8 9 10 11 12 REP 1DISC REP 8 9 10 11 12 Next, the part where the source level peaks is performed on the tape deck listening to adjust the recording level on a disc for CDC-902 only This convenient feature...
Owner's Manual
Page 22
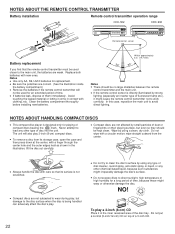
... the disc. NOTES ABOUT THE REMOTE CONTROL TRANSMITTER Battery installation Remote control transmitter operation range CDC-502 CDC-902 2 1 3 Battery replacement If you find that its storage case, open the case and then press down at the center; q If batteries leak, dispose of the disc tray. q Compact discs are correct. (See the illustration inside the battery compartment.) q Remove the batteries if the remote control transmitter will also play a 3-inch...
... the disc. NOTES ABOUT THE REMOTE CONTROL TRANSMITTER Battery installation Remote control transmitter operation range CDC-502 CDC-902 2 1 3 Battery replacement If you find that its storage case, open the case and then press down at the center; q If batteries leak, dispose of the disc tray. q Compact discs are correct. (See the illustration inside the battery compartment.) q Remove the batteries if the remote control transmitter will also play a 3-inch...
Owner's Manual
Page 23
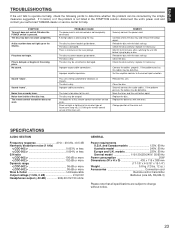
... ones. Connect the cables properly. SYMPTOM This unit does not switch ON when the POWER switch is not listed in the SYMPTOM column, disconnect the unit's power cord and contact your authorized YAMAHA dealer or service center for help. The batteries of the disc tray. Move the tuner and this unit. SPECIFICATIONS AUDIO SECTION Frequency response 2 Hz - 20 kHz, ±0.5 dB Harmonic distortion+noise (1 kHz) < > CDC-902 0.003...
... ones. Connect the cables properly. SYMPTOM This unit does not switch ON when the POWER switch is not listed in the SYMPTOM column, disconnect the unit's power cord and contact your authorized YAMAHA dealer or service center for help. The batteries of the disc tray. Move the tuner and this unit. SPECIFICATIONS AUDIO SECTION Frequency response 2 Hz - 20 kHz, ±0.5 dB Harmonic distortion+noise (1 kHz) < > CDC-902 0.003...


