
Owner's Manual
Page 1
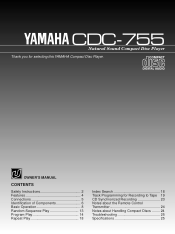
OWNER'S MANUAL CONTENTS Safety Instructions 2 Features 4 Connections 5 Identification of Components 6 Basic Operation 8 Random-Sequence Play 13 Program Play 14 Repeat Play 18 Index Search 18 Track Programming for selecting this YAMAHA Compact Disc Player. CDC-755 Natural Sound Compact Disc Player Thank you for Recording to Tape 19 CD Synchronized Recording 23 Notes about the Remote Control Transmitter 24 Notes about Handling Compact Discs ........ 24 Troubleshooting 25 Specifications 25
OWNER'S MANUAL CONTENTS Safety Instructions 2 Features 4 Connections 5 Identification of Components 6 Basic Operation 8 Random-Sequence Play 13 Program Play 14 Repeat Play 18 Index Search 18 Track Programming for selecting this YAMAHA Compact Disc Player. CDC-755 Natural Sound Compact Disc Player Thank you for Recording to Tape 19 CD Synchronized Recording 23 Notes about the Remote Control Transmitter 24 Notes about Handling Compact Discs ........ 24 Troubleshooting 25 Specifications 25
Owner's Manual
Page 2
... attempt to a power supply only of important operating and maintenance (servicing) instructions in performance; The power-supply cord or the plug has been damaged; The user should be connected to service the unit beyond those means described in the operating instructions or as marked on the unit. 11 Power-Cord Protection - IMPORTANT! REFER SERVICING TO QUALIFIED SERVICE PERSONNEL. • Explanation of Graphical Symbols The lightning flash with its...
... attempt to a power supply only of important operating and maintenance (servicing) instructions in performance; The power-supply cord or the plug has been damaged; The user should be connected to service the unit beyond those means described in the operating instructions or as marked on the unit. 11 Power-Cord Protection - IMPORTANT! REFER SERVICING TO QUALIFIED SERVICE PERSONNEL. • Explanation of Graphical Symbols The lightning flash with its...

Owner's Manual
Page 3
... household AC outlet, grasp the plug; As the laser beam used in this compact disc player is harmful to the eyes, do not attempt to qualified personel only. Refer servicing to disassemble the cabinet. CAUTION: READ THIS BEFORE OPERATING YOUR UNIT 1 To ensure the finest performance, please read the "TROUBLESHOOTING" section on common operating errors before concluding that your unit...
... household AC outlet, grasp the plug; As the laser beam used in this compact disc player is harmful to the eyes, do not attempt to qualified personel only. Refer servicing to disassemble the cabinet. CAUTION: READ THIS BEFORE OPERATING YOUR UNIT 1 To ensure the finest performance, please read the "TROUBLESHOOTING" section on common operating errors before concluding that your unit...
Owner's Manual
Page 4
... the operation of radio or TV interference, relocate/reorient the antenna. Failure to follow instructions could void your FCC authorization to use of this product in a residential environment will not occur in FCC Regulations, Part 15 for Changing 5 Discs at a Time q PLAYXCHANGE; If you can be the source of assurance that is 300 ohm ribbon lead, change the lead-in the users manual, may...
... the operation of radio or TV interference, relocate/reorient the antenna. Failure to follow instructions could void your FCC authorization to use of this product in a residential environment will not occur in FCC Regulations, Part 15 for Changing 5 Discs at a Time q PLAYXCHANGE; If you can be the source of assurance that is 300 ohm ribbon lead, change the lead-in the users manual, may...
Owner's Manual
Page 5
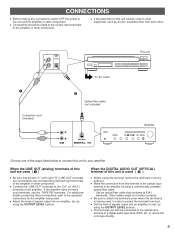
...) terminals of the amplifier or other . q Adjust the level of the amplifier. q Make the connection from each other component. q Set the level of a digital audio tape deck (DAT) etc. When the DIGITAL AUDIO OUT (OPTICAL) terminal of an amplifier by using the OUTPUT LEVEL buttons. Other cables might not function correctly. by pulling it. CONNECTIONS q Before making any connections, switch OFF the power to record CD onto tape directly. 5 q Connections should be connected to the optical input terminal of signals output into an amplifier, etc.
...) terminals of the amplifier or other . q Adjust the level of the amplifier. q Make the connection from each other component. q Set the level of a digital audio tape deck (DAT) etc. When the DIGITAL AUDIO OUT (OPTICAL) terminal of an amplifier by using the OUTPUT LEVEL buttons. Other cables might not function correctly. by pulling it. CONNECTIONS q Before making any connections, switch OFF the power to record CD onto tape directly. 5 q Connections should be connected to the optical input terminal of signals output into an amplifier, etc.
Owner's Manual
Page 6
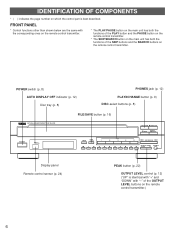
....) 6 POWER switch (p. 8) AUTO DISPLAY OFF indicator (p. 12) Disc tray (p. 8) PHONES jack (p. 12) PLAYXCHANGE button (p. 9) DISC-select buttons (p. 8) NATURAL SOUND COMPACT DISC PLAYER POWER AUTO DISPLAY OFF FILE/SAVE button (p. 16) PLAYXCHANGE OPEN/CLOSE STOP PLAY/ PAUSE PROG FILE/ SAVE +I0 I 2 I 2 3 4 5 DISC 3 4 6 7 8 5 SKIP/SEARCH OUTPUT LEVEL PHONES 9 0 DOWN UP PEAK Display panel Remote control sensor (p. 24) PEAK button (p. 22) OUTPUT LEVEL control (p. 12) ("UP" is best described. IDENTIFICATION OF COMPONENTS * ( ) indicates the page number on...
....) 6 POWER switch (p. 8) AUTO DISPLAY OFF indicator (p. 12) Disc tray (p. 8) PHONES jack (p. 12) PLAYXCHANGE button (p. 9) DISC-select buttons (p. 8) NATURAL SOUND COMPACT DISC PLAYER POWER AUTO DISPLAY OFF FILE/SAVE button (p. 16) PLAYXCHANGE OPEN/CLOSE STOP PLAY/ PAUSE PROG FILE/ SAVE +I0 I 2 I 2 3 4 5 DISC 3 4 6 7 8 5 SKIP/SEARCH OUTPUT LEVEL PHONES 9 0 DOWN UP PEAK Display panel Remote control sensor (p. 24) PEAK button (p. 22) OUTPUT LEVEL control (p. 12) ("UP" is best described. IDENTIFICATION OF COMPONENTS * ( ) indicates the page number on...
Owner's Manual
Page 8
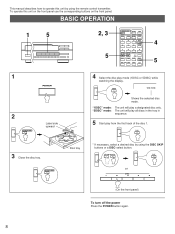
... turn off the power Press the POWER button again. 8 MODE 1DISC 5DISC Shows the selected disc mode. This manual describes how to operate this unit on the front panel use the corresponding buttons on the front panel. "1DISC" mode: The unit will play all discs in the tray in sequence. 5 Start play mode (1DISC or 5DISC) while watching the display. PLAY 3 Close the disc tray. BASIC OPERATION 1 5 2, 3 5 OPEN/CLOSE DIMMER TIME PROG TAPE REPEAT RANDOM 1 2 3 MODE...
... turn off the power Press the POWER button again. 8 MODE 1DISC 5DISC Shows the selected disc mode. This manual describes how to operate this unit on the front panel use the corresponding buttons on the front panel. "1DISC" mode: The unit will play all discs in the tray in sequence. 5 Start play mode (1DISC or 5DISC) while watching the display. PLAY 3 Close the disc tray. BASIC OPERATION 1 5 2, 3 5 OPEN/CLOSE DIMMER TIME PROG TAPE REPEAT RANDOM 1 2 3 MODE...
Owner's Manual
Page 9
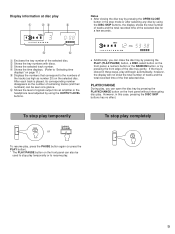
.... ‘ Shows the level of signals output into an amplifier or the headphone level adjusted by using the DISC SKIP buttons, the display shows the total number of tracks and the total recorded time of the selected disc for a few seconds. 5DISC 1 2 3 4 5 6 7 8 9 10 11 12 TOTAL q Additionally, you can open the disc tray by pressing the PLAYXCHANGE button on the front panel without interrupting disc play. After each track...
.... ‘ Shows the level of signals output into an amplifier or the headphone level adjusted by using the DISC SKIP buttons, the display shows the total number of tracks and the total recorded time of the selected disc for a few seconds. 5DISC 1 2 3 4 5 6 7 8 9 10 11 12 TOTAL q Additionally, you can open the disc tray by pressing the PLAYXCHANGE button on the front panel without interrupting disc play. After each track...
Owner's Manual
Page 10
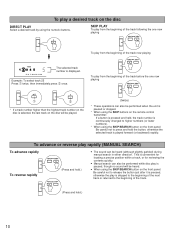
... manual search in either direction. q Manual search can also be performed while disc play is paused, though no sound will be played. (twice) * These operations can be heard. To play a desired track on the disc DIRECT PLAY Select a desired track by using the numeric buttons. 5 SKIP PLAY To play from the beginning of the track before the one now playing SKIP 1DISC 5 6 7 8 9 10 11 12 The selected track number is displayed...
... manual search in either direction. q Manual search can also be performed while disc play is paused, though no sound will be played. (twice) * These operations can be heard. To play a desired track on the disc DIRECT PLAY Select a desired track by using the numeric buttons. 5 SKIP PLAY To play from the beginning of the track before the one now playing SKIP 1DISC 5 6 7 8 9 10 11 12 The selected track number is displayed...
Owner's Manual
Page 12
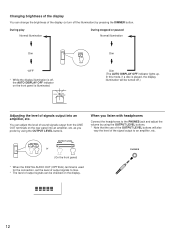
... adjust the volume by using the OUTPUT LEVEL buttons. OUTPUT LEVEL + OUTPUT LEVEL DOWN UP or (On the front panel) * When the DIGITAL AUDIO OUT (OPTICAL) terminal is played, the display illumination will be turned off the illumination) by using the OUTPUT LEVEL buttons. * Note that the use of the OUTPUT LEVEL buttons will also vary the level of the signal output to max. * The level of output signals can be checked on the display. PHONES 12 Changing brightness of the display You can change...
... adjust the volume by using the OUTPUT LEVEL buttons. OUTPUT LEVEL + OUTPUT LEVEL DOWN UP or (On the front panel) * When the DIGITAL AUDIO OUT (OPTICAL) terminal is played, the display illumination will be turned off the illumination) by using the OUTPUT LEVEL buttons. * Note that the use of the OUTPUT LEVEL buttons will also vary the level of the signal output to max. * The level of output signals can be checked on the display. PHONES 12 Changing brightness of the display You can change...
Owner's Manual
Page 14
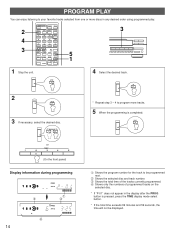
... 1 2 3 MODE 4 5 6 +10 7 8 9 0 DISC SKIP SKIP DISC SCAN PAUSE PLAY SEARCH INDEX STOP SYNCHRO - DISC SKIP * Repeat step 3 - 4 to be displayed. PLAY or DISC 1 2 3 4 5 (On the front panel) Display information during programming 14 6 PROG TOTAL Œ Ž PROG TOTAL Œ Shows the program number for the track to program more discs in the display after the PROG button is completed; STOP 5 2 PROG 3 If necessary, select the desired disc. OUTPUT LEVEL...
... 1 2 3 MODE 4 5 6 +10 7 8 9 0 DISC SKIP SKIP DISC SCAN PAUSE PLAY SEARCH INDEX STOP SYNCHRO - DISC SKIP * Repeat step 3 - 4 to be displayed. PLAY or DISC 1 2 3 4 5 (On the front panel) Display information during programming 14 6 PROG TOTAL Œ Ž PROG TOTAL Œ Shows the program number for the track to program more discs in the display after the PROG button is completed; STOP 5 2 PROG 3 If necessary, select the desired disc. OUTPUT LEVEL...
Owner's Manual
Page 15
... turn. q Switch off the power. The display of each disc on the disc tray by pressing the DISC SKIP button in reverse order) by pressing the SKIP button. q Press the STOP button while the unit is programmed. To correct programmed data 1. q If you choose to press a DISC SKIP button before you press the PROG button, check the total recorded time of the track number can be displayed during playing...
... turn. q Switch off the power. The display of each disc on the disc tray by pressing the DISC SKIP button in reverse order) by pressing the SKIP button. q Press the STOP button while the unit is programmed. To correct programmed data 1. q If you choose to press a DISC SKIP button before you press the PROG button, check the total recorded time of the track number can be displayed during playing...

Owner's Manual
Page 16
... Numeric buttons DISC SKIP OPEN/CLOSE DIMMER TIME PROG TAPE REPEAT RANDOM 1 2 3 MODE 4 5 6 +10 7 8 9 0 DISC SKIP SKIP DISC SCAN PAUSE PLAY SEARCH INDEX STOP SYNCHRO - However, note that "TRACK" is flashing continuously in the file. If it is not, press the PROG button. (If a program play a disc with the power switched off. q Program data for a disc, the previous program data will be deleted from more than one disc. OUTPUT LEVEL + PLAY STOP...
... Numeric buttons DISC SKIP OPEN/CLOSE DIMMER TIME PROG TAPE REPEAT RANDOM 1 2 3 MODE 4 5 6 +10 7 8 9 0 DISC SKIP SKIP DISC SCAN PAUSE PLAY SEARCH INDEX STOP SYNCHRO - However, note that "TRACK" is flashing continuously in the file. If it is not, press the PROG button. (If a program play a disc with the power switched off. q Program data for a disc, the previous program data will be deleted from more than one disc. OUTPUT LEVEL + PLAY STOP...
Owner's Manual
Page 19
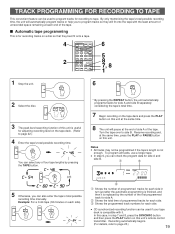
... for each side. Ž Shows the programmed track numbers for side A. Shows the total time of the tape. Turn the tape over to page 23.) 19 To program all tracks, use a longer tape. s Automatic tape programming This is for each side in step 7 and 8, press the SYNCHRO button and then press the PLAY button on this unit's remote control transmitter. Resume recording and, at the...
... for each side. Ž Shows the programmed track numbers for side A. Shows the total time of the tape. Turn the tape over to page 23.) 19 To program all tracks, use a longer tape. s Automatic tape programming This is for each side in step 7 and 8, press the SYNCHRO button and then press the PLAY button on this unit's remote control transmitter. Resume recording and, at the...

Owner's Manual
Page 20
... of the tape by pressing the TIME display mode-select button. If, however, the PAUSE mode is inserted, it . s Manual tape programming This is for recording desired tracks selected from more than one disc on the disc tray, make this unit display the total recorded time of each disc to be used in turn by pressing the DISC SKIP button. * This unit will read the contents of a disc by this operation. OUTPUT LEVEL + 4, 6 13...
... of the tape by pressing the TIME display mode-select button. If, however, the PAUSE mode is inserted, it . s Manual tape programming This is for recording desired tracks selected from more than one disc on the disc tray, make this unit display the total recorded time of each disc to be used in turn by pressing the DISC SKIP button. * This unit will read the contents of a disc by this operation. OUTPUT LEVEL + 4, 6 13...

Owner's Manual
Page 21
... programmed next. Shows the selected disc and track number. Ž Shows the total remaining time on the side of the tape. Programmed track numbers light up and programmable track numbers among the unprogrammed ones flash on and off. * If "A-01" does not appear in step 3 and 4, press the SYNCHRO button and then press the PLAY button on this unit's remote control transmitter. Display information during programming...
... programmed next. Shows the selected disc and track number. Ž Shows the total remaining time on the side of the tape. Programmed track numbers light up and programmable track numbers among the unprogrammed ones flash on and off. * If "A-01" does not appear in step 3 and 4, press the SYNCHRO button and then press the PLAY button on this unit's remote control transmitter. Display information during programming...
Owner's Manual
Page 22
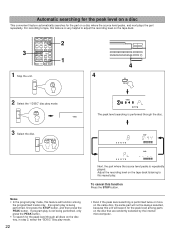
... DISC SCAN PAUSE PLAY SEARCH INDEX STOP SYNCHRO - OUTPUT LEVEL + 2 1 1 Stop the unit. Adjust the recording level on a disc where the source level peaks, and next plays the part repeatedly. Automatic searching for the peak level on a disc This convenient feature automatically searches for the part on the tape deck listening to this repeat play. STOP 4 4 0 PEAK 2 Select the "1DISC" disc play is not being performed, first press the STOP button...
... DISC SCAN PAUSE PLAY SEARCH INDEX STOP SYNCHRO - OUTPUT LEVEL + 2 1 1 Stop the unit. Adjust the recording level on a disc where the source level peaks, and next plays the part repeatedly. Automatic searching for the peak level on a disc This convenient feature automatically searches for the part on the tape deck listening to this repeat play. STOP 4 4 0 PEAK 2 Select the "1DISC" disc play is not being performed, first press the STOP button...
Owner's Manual
Page 23
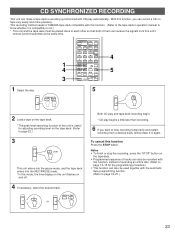
... CD play and tape deck recording begin. * CD play automatically. CD SYNCHRONIZED RECORDING This unit can make a tape deck's recording synchronized with this function. (Refer to the tape deck's operation manual to know whether it is useful for the programming procedure.) • This function can also be used together with this function, instead of recording an entire disc. (Refer to page 14-15 for adjusting recording level on the tape deck...
... CD play and tape deck recording begin. * CD play automatically. CD SYNCHRONIZED RECORDING This unit can make a tape deck's recording synchronized with this function. (Refer to the tape deck's operation manual to know whether it is useful for the programming procedure.) • This function can also be used together with this function, instead of recording an entire disc. (Refer to page 14-15 for adjusting recording level on the tape deck...
Owner's Manual
Page 24
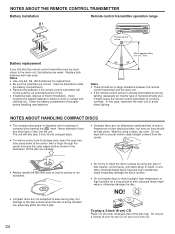
...) CD on their playing surface, but damage to load any other type of time. q Compact discs are weak. NO! q To remove a disc from the center. ,,,,, q Always handle the disc with clothing, etc. wipe straight outward from its surface is designed only for replacement. Replace both batteries with a circular motion; NOTES ABOUT THE REMOTE CONTROL TRANSMITTER Battery installation Remote control transmitter operation range 1 3 2 Battery replacement If you find...
...) CD on their playing surface, but damage to load any other type of time. q Compact discs are weak. NO! q To remove a disc from the center. ,,,,, q Always handle the disc with clothing, etc. wipe straight outward from its surface is designed only for replacement. Replace both batteries with a circular motion; NOTES ABOUT THE REMOTE CONTROL TRANSMITTER Battery installation Remote control transmitter operation range 1 3 2 Battery replacement If you find...
Owner's Manual
Page 25
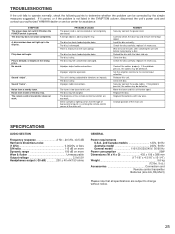
.... Replace the disc. TROUBLESHOOTING If the unit fails to operate normally, check the following points to change without notice. 25 A foreign object is dirty. The disc is obstructing the tray. Wait 20 to 30 minutes after switching the unit ON before trying to the correct input selection. Set the amplifier controls to play a disc. Sound "skips". This unit is not listed in the display. Connect the cables properly...
.... Replace the disc. TROUBLESHOOTING If the unit fails to operate normally, check the following points to change without notice. 25 A foreign object is dirty. The disc is obstructing the tray. Wait 20 to 30 minutes after switching the unit ON before trying to the correct input selection. Set the amplifier controls to play a disc. Sound "skips". This unit is not listed in the display. Connect the cables properly...


