

Owner's Manual
Page 2
... the operating instructions. or E. The user should be of sufficient magnitude to qualified service personnel. 17 Power Lines - Please record the serial number of time. 14 Object and Liquid Entry - NO USER-SERVICEABLE PARTS INSIDE. All the safety and operating instructions should be retained for a long period of this Owner's Manual in a safe place for example, near a bathtub, washbowl, kitchen sink, laundry tub, in installation...
... the operating instructions. or E. The user should be of sufficient magnitude to qualified service personnel. 17 Power Lines - Please record the serial number of time. 14 Object and Liquid Entry - NO USER-SERVICEABLE PARTS INSIDE. All the safety and operating instructions should be retained for a long period of this Owner's Manual in a safe place for example, near a bathtub, washbowl, kitchen sink, laundry tub, in installation...

Owner's Manual
Page 3
... plug; Avoid direct exposure to qualified personel only. As the laser beam used in hazardous radiation exposure. away from the AC outlet. If a foreign object drops into the set , first turn the unit off the power by pressing the OPEN/CLOSE button. When moving this unit, first remove all discs from the AC power source as long as it is connected...
... plug; Avoid direct exposure to qualified personel only. As the laser beam used in hazardous radiation exposure. away from the AC outlet. If a foreign object drops into the set , first turn the unit off the power by pressing the OPEN/CLOSE button. When moving this unit, first remove all discs from the AC power source as long as it is connected...

Owner's Manual
Page 4
... operation of radio or TV interference, relocate/reorient the antenna. FEATURES q 5-Disc Carousel Auto-changer q Full Opening Disc Tray for US customers only) 1. Compliance with the requirements listed in to Tape q Automatic Peak Level Searching Capability q Optical Digital Output CDC-765 only q Program Data Filing Capability 4 Utilize power outlets that is 300 ohm ribbon lead, change the lead-in FCC Regulations, Part 15 for Recording to coaxial type cable...
... operation of radio or TV interference, relocate/reorient the antenna. FEATURES q 5-Disc Carousel Auto-changer q Full Opening Disc Tray for US customers only) 1. Compliance with the requirements listed in to Tape q Automatic Peak Level Searching Capability q Optical Digital Output CDC-765 only q Program Data Filing Capability 4 Utilize power outlets that is 300 ohm ribbon lead, change the lead-in FCC Regulations, Part 15 for Recording to coaxial type cable...

Owner's Manual
Page 5
... be connected to the optical input terminal of the central controller for custom installation system, you can operate this unit to the REMOTE CONTROL IN terminal of the amplifier. q Connect the "LINE OUT" terminals to record CD onto tape directly. LINE OUT CDC-565 LINE OUT DIGITAL AUDIO OUT OPTICAL CDC-765, CDC-665 To AC outlet – Connection cord (included) – Connection cord (included) To AC outlet — Optical fiber cable (not included) Amplifier CD OPTICAL DIGITAL...
... be connected to the optical input terminal of the central controller for custom installation system, you can operate this unit to the REMOTE CONTROL IN terminal of the amplifier. q Connect the "LINE OUT" terminals to record CD onto tape directly. LINE OUT CDC-565 LINE OUT DIGITAL AUDIO OUT OPTICAL CDC-765, CDC-665 To AC outlet – Connection cord (included) – Connection cord (included) To AC outlet — Optical fiber cable (not included) Amplifier CD OPTICAL DIGITAL...

Owner's Manual
Page 6
...number on the remote control transmitter. CDC-765, CDC-665 CDC-765 only CDC-765 only FILE/SAVE button (p. 16) AUTO DISPLAY OFF indicater (p. 12) PHONES jack (p. 12) PLAYXCHANGE button (p. 9) Disc tray (p. 8) DISC-select buttons (p. 8) NATURAL SOUND COMPACT DISC PLAYER POWER AUTO DISPLAY OFF / OPEN/CLOSE PLAYXCHANGE FILE/ SAVE PROG 1 +10 1 2 3 DISC 2 3 4 4 5 6 7 8 5 SKIP/SEARCH PHONES 9 0 OUTPUT LEVEL PEAK - + Display panel Remote control sensor (p. 24) POWER switch (p. 8) PEAK button (p. 23) Parts in the shaded areas are best described. CDC-565 POWER...
...number on the remote control transmitter. CDC-765, CDC-665 CDC-765 only CDC-765 only FILE/SAVE button (p. 16) AUTO DISPLAY OFF indicater (p. 12) PHONES jack (p. 12) PLAYXCHANGE button (p. 9) Disc tray (p. 8) DISC-select buttons (p. 8) NATURAL SOUND COMPACT DISC PLAYER POWER AUTO DISPLAY OFF / OPEN/CLOSE PLAYXCHANGE FILE/ SAVE PROG 1 +10 1 2 3 DISC 2 3 4 4 5 6 7 8 5 SKIP/SEARCH PHONES 9 0 OUTPUT LEVEL PEAK - + Display panel Remote control sensor (p. 24) POWER switch (p. 8) PEAK button (p. 23) Parts in the shaded areas are best described. CDC-565 POWER...

Owner's Manual
Page 8
... DISC 2 3 4 PLAY (On the front panel) To turn off the power Press the POWER switch again. 8 OUTPUT LEVEL + SKIP STOP PAUSE PLAY 2, 3 5 CDC-565 4 5 SYNCHRO 1 4 DIMMER TIME OPEN/ CLOSE CLEAR PROG 2 3 INDEX 5 6 +I0 7 8 9 0 DISC SCAN MODE REPEAT RANDOM DISC SKIP SEARCH SKIP STOP PAUSE PLAY 2, 3 5 1 Turn the power on the display. OPEN/ CLOSE Label side upward Shows the selected disc mode. PLAY Disc tray 3 Close the disc tray * If necessary, select a desired disc by using the DISC SKIP button or a DISC-select button. "1DISC" mode...
... DISC 2 3 4 PLAY (On the front panel) To turn off the power Press the POWER switch again. 8 OUTPUT LEVEL + SKIP STOP PAUSE PLAY 2, 3 5 CDC-565 4 5 SYNCHRO 1 4 DIMMER TIME OPEN/ CLOSE CLEAR PROG 2 3 INDEX 5 6 +I0 7 8 9 0 DISC SCAN MODE REPEAT RANDOM DISC SKIP SEARCH SKIP STOP PAUSE PLAY 2, 3 5 1 Turn the power on the display. OPEN/ CLOSE Label side upward Shows the selected disc mode. PLAY Disc tray 3 Close the disc tray * If necessary, select a desired disc by using the DISC SKIP button or a DISC-select button. "1DISC" mode...

Owner's Manual
Page 9
... the numbers of signals output into an amplifier or the headphone level adjusted by using the DISC SKIP button when this case, pressing the DISC SKIP button has no disc goes off. Ž Shows the selected track number. Shows the time displays. (Refer to "Selecting time displays" on page 11.) Displays the numbers that correspond to resume play , press the PAUSE button again (or press the PLAY button). * The (PLAY/PAUSE) button on the selected disc. After...
... the numbers of signals output into an amplifier or the headphone level adjusted by using the DISC SKIP button when this case, pressing the DISC SKIP button has no disc goes off. Ž Shows the selected track number. Shows the time displays. (Refer to "Selecting time displays" on page 11.) Displays the numbers that correspond to resume play , press the PAUSE button again (or press the PLAY button). * The (PLAY/PAUSE) button on the selected disc. After...

Owner's Manual
Page 10
... while disc play rapidly (MANUAL SEARCH) To advance rapidly SEARCH To reverse rapidly (Press and hold .) 10 q When using the SKIP/SEARCH buttons on the remote control transmitter: If the button is pressed and held, the track number is continuously changed to the beginning of the current track. q When using the SKIP/SEARCH buttons on the disc will be heard. Example: To select track...
... while disc play rapidly (MANUAL SEARCH) To advance rapidly SEARCH To reverse rapidly (Press and hold .) 10 q When using the SKIP/SEARCH buttons on the remote control transmitter: If the button is pressed and held, the track number is continuously changed to the beginning of the current track. q When using the SKIP/SEARCH buttons on the disc will be heard. Example: To select track...

Owner's Manual
Page 12
... and CDC-665 only Adjusting the level of sound signals output from the LINE OUT terminals on the rear panel into an amplifier, etc. You can be turned off the illumination) by using the OUTPUT LEVEL button. * Note that the use of the OUTPUT LEVEL button will be checked on the front panel lights up . PHONES * When the DIGITAL AUDIO OUT (OPTICAL) terminal is used for the connection, set the level of output signals to max. * The level of the signal output...
... and CDC-665 only Adjusting the level of sound signals output from the LINE OUT terminals on the rear panel into an amplifier, etc. You can be turned off the illumination) by using the OUTPUT LEVEL button. * Note that the use of the OUTPUT LEVEL button will be checked on the front panel lights up . PHONES * When the DIGITAL AUDIO OUT (OPTICAL) terminal is used for the connection, set the level of output signals to max. * The level of the signal output...

Owner's Manual
Page 13
... sequence (up tracks. MODE 2 Close the disc tray. OUTPUT LEVEL + SKIP STOP PAUSE PLAY 2 4 CDC-565 3 DISC SKIP SYNCHRO 1 4 DIMMER TIME OPEN/ CLOSE CLEAR PROG 2 3 INDEX 5 6 +I0 7 8 9 0 DISC SCAN MODE REPEAT RANDOM DISC SKIP SEARCH SKIP STOP PAUSE PLAY 2 4 1 Load one or more discs. 3 Select a desired disc play will automatically mix up on the display. q If the SKIP button is pressed during program play , the next randomly programmed track will not be...
... sequence (up tracks. MODE 2 Close the disc tray. OUTPUT LEVEL + SKIP STOP PAUSE PLAY 2 4 CDC-565 3 DISC SKIP SYNCHRO 1 4 DIMMER TIME OPEN/ CLOSE CLEAR PROG 2 3 INDEX 5 6 +I0 7 8 9 0 DISC SCAN MODE REPEAT RANDOM DISC SKIP SEARCH SKIP STOP PAUSE PLAY 2 4 1 Load one or more discs. 3 Select a desired disc play will automatically mix up on the display. q If the SKIP button is pressed during program play , the next randomly programmed track will not be...
Owner's Manual
Page 14
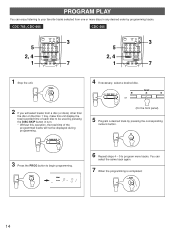
PLAY 14 CDC-765, CDC-665 CDC-565 5 2, 4 1 SYNCHRO 1 4 DIMMER TIME OPEN/ CLOSE TAPE CLEAR PROG 2 3 INDEX 5 6 +I0 7 8 9 0 DISC SCAN MODE REPEAT RANDOM DISC SKIP SEARCH - DISC SKIP 4 If necessary, select a desired disc. OUTPUT LEVEL + SKIP STOP PAUSE PLAY 3 7 5 2, 4 1 SYNCHRO 1 4 DIMMER TIME OPEN/ CLOSE CLEAR PROG 2 3 INDEX 5 6 +I0 7 8 9 0 DISC SCAN MODE REPEAT RANDOM DISC SKIP SEARCH SKIP STOP PAUSE PLAY 3 7 1 Stop the unit. DISC SKIP 2 or DISC 3 4 (On the front panel) 5 Program a desired track by programming tracks...
PLAY 14 CDC-765, CDC-665 CDC-565 5 2, 4 1 SYNCHRO 1 4 DIMMER TIME OPEN/ CLOSE TAPE CLEAR PROG 2 3 INDEX 5 6 +I0 7 8 9 0 DISC SCAN MODE REPEAT RANDOM DISC SKIP SEARCH - DISC SKIP 4 If necessary, select a desired disc. OUTPUT LEVEL + SKIP STOP PAUSE PLAY 3 7 5 2, 4 1 SYNCHRO 1 4 DIMMER TIME OPEN/ CLOSE CLEAR PROG 2 3 INDEX 5 6 +I0 7 8 9 0 DISC SCAN MODE REPEAT RANDOM DISC SKIP SEARCH SKIP STOP PAUSE PLAY 3 7 1 Stop the unit. DISC SKIP 2 or DISC 3 4 (On the front panel) 5 Program a desired track by programming tracks...
Owner's Manual
Page 15
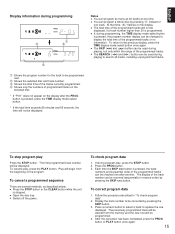
... be used during playing, but only within the range of programmed tracks on the selected disc. * If "P-01" does not appear on the display. q The SEARCH ( and ) button can be changed to be displayed. Play will not be corrected by pressing the SKIP button. q Switch off the power. Each time the SKIP button is pressed, the track numbers and sequential order of the program. Display the track number to be displayed...
... be used during playing, but only within the range of programmed tracks on the selected disc. * If "P-01" does not appear on the display. q The SEARCH ( and ) button can be changed to be displayed. Play will not be corrected by pressing the SKIP button. q Switch off the power. Each time the SKIP button is pressed, the track numbers and sequential order of the program. Display the track number to be displayed...

Owner's Manual
Page 16
... retained in the file. OUTPUT LEVEL + SKIP STOP PAUSE PLAY OPEN/CLOSE PROG PLAY FILE/SAVE PROG DISC / (PLAY/PAUSE) NATURAL SOUND COMPACT DISC PLAYER CDC-765 POWER AUTO DISPLAY OFF / OPEN/CLOSE PLAYXCHANGE FILE/ SAVE PROG 1 +10 1 2 3 DISC 2 3 4 4 5 6 7 8 5 SKIP/SEARCH PHONES 9 0 OUTPUT LEVEL PEAK - + OPEN/CLOSE (STOP) POWER Numeric buttons 0 To file program data 1 Follow step 1 - 4 on the display. If different program data is flashing continuously on page 14. 2 Select track numbers in a desired order...
... retained in the file. OUTPUT LEVEL + SKIP STOP PAUSE PLAY OPEN/CLOSE PROG PLAY FILE/SAVE PROG DISC / (PLAY/PAUSE) NATURAL SOUND COMPACT DISC PLAYER CDC-765 POWER AUTO DISPLAY OFF / OPEN/CLOSE PLAYXCHANGE FILE/ SAVE PROG 1 +10 1 2 3 DISC 2 3 4 4 5 6 7 8 5 SKIP/SEARCH PHONES 9 0 OUTPUT LEVEL PEAK - + OPEN/CLOSE (STOP) POWER Numeric buttons 0 To file program data 1 Follow step 1 - 4 on the display. If different program data is flashing continuously on page 14. 2 Select track numbers in a desired order...
Owner's Manual
Page 19
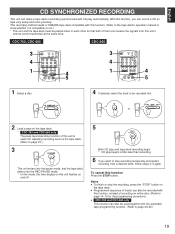
OUTPUT LEVEL + SKIP STOP PAUSE PLAY 4 5 3 4 1 SYNCHRO 1 4 DIMMER TIME OPEN/ CLOSE CLEAR PROG 2 3 INDEX 5 6 +I0 7 8 9 0 DISC SCAN MODE REPEAT RANDOM DISC SKIP SEARCH SKIP STOP PAUSE PLAY 4 5 1 Select a disc. To cancel this function Press the STOP button. This recording method needs a YAMAHA tape deck compatible with this function. (Refer to the tape deck's operation manual to know whether it is useful for the programming procedure.) q CDC-765 and CDC-665 only This function can also be...
OUTPUT LEVEL + SKIP STOP PAUSE PLAY 4 5 3 4 1 SYNCHRO 1 4 DIMMER TIME OPEN/ CLOSE CLEAR PROG 2 3 INDEX 5 6 +I0 7 8 9 0 DISC SCAN MODE REPEAT RANDOM DISC SKIP SEARCH SKIP STOP PAUSE PLAY 4 5 1 Select a disc. To cancel this function Press the STOP button. This recording method needs a YAMAHA tape deck compatible with this function. (Refer to the tape deck's operation manual to know whether it is useful for the programming procedure.) q CDC-765 and CDC-665 only This function can also be...

Owner's Manual
Page 20
... at the same time, press the PLAY or PAUSE button on the tape deck. (Refer to tape. Example: For a C-64 tape (32 minutes on each end of programmed tracks for each side. Ž Shows the programmed track numbers for adjusting recording level on this unit. REPEAT 2 Select the disc. Turn the tape over to page 19.) q CD synchronized recording function can be programmed if the tape's length is compatible...
... at the same time, press the PLAY or PAUSE button on the tape deck. (Refer to tape. Example: For a C-64 tape (32 minutes on each end of programmed tracks for each side. Ž Shows the programmed track numbers for adjusting recording level on this unit. REPEAT 2 Select the disc. Turn the tape over to page 19.) q CD synchronized recording function can be programmed if the tape's length is compatible...

Owner's Manual
Page 21
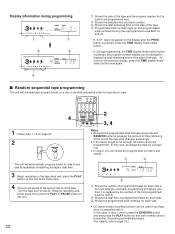
... button on the front panel. (Refer to track number 20. q The maximum number of the tape. s Manual tape programming This is for recording desired tracks selected from a disc (or discs) other track number is flashing continuously on the display, you finish the programming for side A, program the pause mode by this operation. OUTPUT LEVEL + SKIP STOP PAUSE PLAY 4, 11 13 12, 13 9 Follow step 5 and 6. 10 Repeat step 5 and 6 to which time...
... button on the front panel. (Refer to track number 20. q The maximum number of the tape. s Manual tape programming This is for recording desired tracks selected from a disc (or discs) other track number is flashing continuously on the display, you finish the programming for side A, program the pause mode by this operation. OUTPUT LEVEL + SKIP STOP PAUSE PLAY 4, 11 13 12, 13 9 Follow step 5 and 6. 10 Repeat step 5 and 6 to which time...
Owner's Manual
Page 22
... number of programmed tracks for each side. Turn the tape over to the previous display, press the TIME display modeselect button once again. To return to side B. Recording automatically begins. (For details, refer to tape. 4 SYNCHRO 1 4 DIMMER TIME OPEN/ CLOSE TAPE CLEAR PROG 2 3 INDEX 5 6 +I0 7 8 9 0 DISC SCAN MODE REPEAT RANDOM DISC SKIP SEARCH - Display information during programming, the TIME display mode-select button is pressed, the program number display can be programmed. OUTPUT LEVEL + SKIP STOP PAUSE PLAY...
... number of programmed tracks for each side. Turn the tape over to the previous display, press the TIME display modeselect button once again. To return to side B. Recording automatically begins. (For details, refer to tape. 4 SYNCHRO 1 4 DIMMER TIME OPEN/ CLOSE TAPE CLEAR PROG 2 3 INDEX 5 6 +I0 7 8 9 0 DISC SCAN MODE REPEAT RANDOM DISC SKIP SEARCH - Display information during programming, the TIME display mode-select button is pressed, the program number display can be programmed. OUTPUT LEVEL + SKIP STOP PAUSE PLAY...
Owner's Manual
Page 23
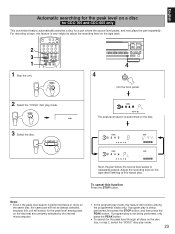
... PEAK button. Adjust the recording level on the tape deck listening to adjust the recording level on the tape deck. 2 3 1 SYNCHRO 1 4 DIMMER TIME OPEN/ CLOSE TAPE CLEAR PROG 2 3 INDEX 5 6 +I0 7 8 9 0 DISC SCAN MODE REPEAT RANDOM DISC SKIP SEARCH - If program play mode. 23 English Automatic searching for the peak level on a disc for CDC-765 and CDC-665 only This convenient feature automatically searches a disc for the peak level through all discs on the disc...
... PEAK button. Adjust the recording level on the tape deck listening to adjust the recording level on the tape deck. 2 3 1 SYNCHRO 1 4 DIMMER TIME OPEN/ CLOSE TAPE CLEAR PROG 2 3 INDEX 5 6 +I0 7 8 9 0 DISC SCAN MODE REPEAT RANDOM DISC SKIP SEARCH - If program play mode. 23 English Automatic searching for the peak level on a disc for CDC-765 and CDC-665 only This convenient feature automatically searches a disc for the peak level through all discs on the disc...

Owner's Manual
Page 24
... the disc's surface by using any type of fluorescent lamp etc.), it might warp or otherwise damage the disc. NO! wipe straight outward from its surface is not scratched. with new ones. q Do not expose discs to direct sunlight, high temperature or high humidity for replacement. NOTES ABOUT THE REMOTE CONTROL TRANSMITTER Battery installation Remote control transmitter operation range CDC-565 CDC-765, CDC-665 2 1 3 Battery replacement If...
... the disc's surface by using any type of fluorescent lamp etc.), it might warp or otherwise damage the disc. NO! wipe straight outward from its surface is not scratched. with new ones. q Do not expose discs to direct sunlight, high temperature or high humidity for replacement. NOTES ABOUT THE REMOTE CONTROL TRANSMITTER Battery installation Remote control transmitter operation range CDC-565 CDC-765, CDC-665 2 1 3 Battery replacement If...
Owner's Manual
Page 25
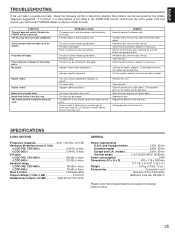
... the remote control sensor of the main unit. Change position of the main unit. The remote control transmitter does not work. The disc is delayed, or begins at the wrong place. REMEDY Securely connect the power cord. replace it if necessary. The disc may be warped. Clean the disc. Move the tuner and this unit. Play is damaged. Check the disc carefully; If the problem persists, the cables may...
... the remote control sensor of the main unit. Change position of the main unit. The remote control transmitter does not work. The disc is delayed, or begins at the wrong place. REMEDY Securely connect the power cord. replace it if necessary. The disc may be warped. Clean the disc. Move the tuner and this unit. Play is damaged. Check the disc carefully; If the problem persists, the cables may...


