

Owner's Manual
Page 2
... plug proceed as indicated in the instructions contained in this type of this product in a residential environment will not occur in the users manual, may cause interference harmful to use of product. This product, when installed as follows: The wire which is coloured BLUE must be used according to the instructions found in all installation instructions. IMPORTANT: When connecting this product in FCC Regulations, Part 15 for Class "B" digital devices...
... plug proceed as indicated in the instructions contained in this type of this product in a residential environment will not occur in the users manual, may cause interference harmful to use of product. This product, when installed as follows: The wire which is coloured BLUE must be used according to the instructions found in all installation instructions. IMPORTANT: When connecting this product in FCC Regulations, Part 15 for Class "B" digital devices...
Owner's Manual
Page 6
... Connect external devices and turn on the power 27 Loading the demo song 28 Playing the demo song 29 Mixing the demo song 30 4 Recording to a sound clip 33 Connecting your instrument or mic 33 Adjusting the input level 34 Recording/playing a sound clip 35 5 Track recording 39 Creating a new song 39 Direct recording and Bus recording 40 Assigning input signals to tracks (Direct recording 42 Assigning input signals to tracks (Bus recording) ......45 Enabling the metronome 47 Recording on a track 48 Pairing input channels/track channels...
... Connect external devices and turn on the power 27 Loading the demo song 28 Playing the demo song 29 Mixing the demo song 30 4 Recording to a sound clip 33 Connecting your instrument or mic 33 Adjusting the input level 34 Recording/playing a sound clip 35 5 Track recording 39 Creating a new song 39 Direct recording and Bus recording 40 Assigning input signals to tracks (Direct recording 42 Assigning input signals to tracks (Bus recording) ......45 Enabling the metronome 47 Recording on a track 48 Pairing input channels/track channels...
Owner's Manual
Page 7
... Erasing CD-RW media 105 Playing an audio CD 106 11 Quick loop sampler 107 About the quick loop sampler 107 Using sample libraries 109 Recording/playing a pad performance 110 Importing from an audio CD/WAV file to a pad ..... 112 Importing from an audio track/stereo track to a pad 114 Sampling an external input signal 115 Editing the sample name 117 Trimming the playback region 118 Switching the playback mode for each channel...
... Erasing CD-RW media 105 Playing an audio CD 106 11 Quick loop sampler 107 About the quick loop sampler 107 Using sample libraries 109 Recording/playing a pad performance 110 Importing from an audio CD/WAV file to a pad ..... 112 Importing from an audio track/stereo track to a pad 114 Sampling an external input signal 115 Editing the sample name 117 Trimming the playback region 118 Switching the playback mode for each channel...
Owner's Manual
Page 14
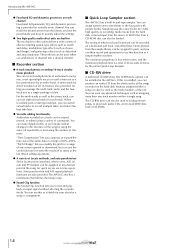
... channel. ■ Recorder section ● 8-track simultaneous recording/16-track simultaneous playback You can be installed in / out) and 99 markers can be loaded. The AW16G also has a metronome that follows the tempo map. ● Sound Clip function The Sound Clip function lets you compress or expand the time axis of the audio data in effect units deliver a wide variety of one , or set up multiple mics...
... channel. ■ Recorder section ● 8-track simultaneous recording/16-track simultaneous playback You can be installed in / out) and 99 markers can be loaded. The AW16G also has a metronome that follows the tempo map. ● Sound Clip function The Sound Clip function lets you compress or expand the time axis of the audio data in effect units deliver a wide variety of one , or set up multiple mics...
Owner's Manual
Page 18
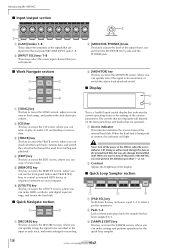
... will light. The screens that are operated. 1 Access indicator This indicator indicates the access status of the AW16G when the access indicator is output from the rear panel MIC/LINE INPUT jacks 1-8. Never turn off the power of these pads plays back the sample that is lit. D [EDIT] key This key accesses the EDIT screen, where you can quickly select the signal to be monitored, or switch the stereo track playback on...
... will light. The screens that are operated. 1 Access indicator This indicator indicates the access status of the AW16G when the access indicator is output from the rear panel MIC/LINE INPUT jacks 1-8. Never turn off the power of these pads plays back the sample that is lit. D [EDIT] key This key accesses the EDIT screen, where you can quickly select the signal to be monitored, or switch the stereo track playback on...

Owner's Manual
Page 22
... power to be exchanged with external devices. I MIDI IN connector J MIDI OUT/THRU connector These connectors allow digital audio signals to MIC/LINE INPUT (XLR) jacks 1/2. L Grounding terminal This is a terminal for this unit. Note When switching the power of the AW16G between ON and STANDBY. K DIGITAL STEREO IN/OUT jacks These are optical jacks that are received at the MIDI IN jack). They support the IEC958 consumer format. C Access indicator This indicator will light...
... power to be exchanged with external devices. I MIDI IN connector J MIDI OUT/THRU connector These connectors allow digital audio signals to MIC/LINE INPUT (XLR) jacks 1/2. L Grounding terminal This is a terminal for this unit. Note When switching the power of the AW16G between ON and STANDBY. K DIGITAL STEREO IN/OUT jacks These are optical jacks that are received at the MIDI IN jack). They support the IEC958 consumer format. C Access indicator This indicator will light...
Owner's Manual
Page 34
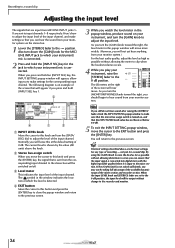
... units) above are the basic settings for any type of 0 dB. You will be output without allowing the meter to clip when the loudest volume occurs. 4 While you play your instrument/mic is connected. 2 Press and hold an [INPUT SEL] key, the INPUT SETTING popup window will appear, allowing you to make sure that the stereo bus assign switch is an example of the screen that...
... units) above are the basic settings for any type of 0 dB. You will be output without allowing the meter to clip when the loudest volume occurs. 4 While you play your instrument/mic is connected. 2 Press and hold an [INPUT SEL] key, the INPUT SETTING popup window will appear, allowing you to make sure that the stereo bus assign switch is an example of the screen that...
Owner's Manual
Page 37
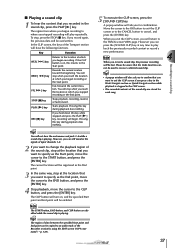
... to an audio track of the Recorder section by using the EDIT screen COPY command (→ p. 128). 5 To execute the CLIP screen, press the [SOUND CLIP] key. A popup window will stop at which you for each song. 4 37 Recording to play repeatedly. If the CLIP button is playing. You will ask you began recording. You will have the following functions. Pressing this returns to recover a deleted sound clip...
... to an audio track of the Recorder section by using the EDIT screen COPY command (→ p. 128). 5 To execute the CLIP screen, press the [SOUND CLIP] key. A popup window will stop at which you for each song. 4 37 Recording to play repeatedly. If the CLIP button is playing. You will ask you began recording. You will have the following functions. Pressing this returns to recover a deleted sound clip...
Owner's Manual
Page 47
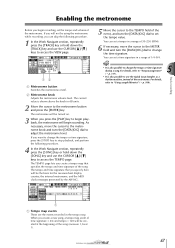
... Adjusts the metronome volume level. If you want to change the tempo or time signature, press the [STOP] key to stop playback, and perform the following procedure. 1 In the Work Navigate section, repeatedly press the [TRACK] key or hold down the [TRACK] key and use the CURSOR [ ]/[ ] keys to access the VIEW page. 12 1 Metronome button Switches the metronome on . 3 When you press the [PLAY...
... Adjusts the metronome volume level. If you want to change the tempo or time signature, press the [STOP] key to stop playback, and perform the following procedure. 1 In the Work Navigate section, repeatedly press the [TRACK] key or hold down the [TRACK] key and use the CURSOR [ ]/[ ] keys to access the VIEW page. 12 1 Metronome button Switches the metronome on . 3 When you press the [PLAY...
Owner's Manual
Page 65
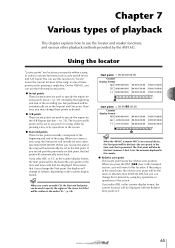
... you create an audio CD, the Start and End points can change as the counter display format, the Start point will be the basis (the zero point) of the time code that will initially be used to "locate" (move back. If you can be set End point, the End point will be displayed with the Relative Zero point as auto punch-in...
... you create an audio CD, the Start and End points can change as the counter display format, the Start point will be the basis (the zero point) of the time code that will initially be used to "locate" (move back. If you can be set End point, the End point will be displayed with the Relative Zero point as auto punch-in...
Owner's Manual
Page 72
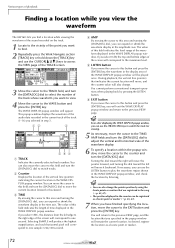
... to play the waveform region shown in the current track of the track (1-16) you select 0 dB, the top and bottom edges of the screen will appear. F EXIT button If you move the cursor to this area and turning the [DATA/JOG] dial, you can use the LISTEN button to switch tracks. This popup window displays the waveform of the audio data recorded in...
... to play the waveform region shown in the current track of the track (1-16) you select 0 dB, the top and bottom edges of the screen will appear. F EXIT button If you move the cursor to this area and turning the [DATA/JOG] dial, you can use the LISTEN button to switch tracks. This popup window displays the waveform of the audio data recorded in...
Owner's Manual
Page 78
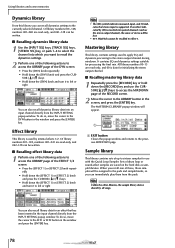
... that stereo input is data for processing the final mix. Sample library This library contains sets of up to effect 1. Using libraries and scene memories Dynamics library From this library you can immediately play them from the pads. Of library numbers 001-128, numbers 001-040 are saved on the hard disk as the stereo output channel), the sense of the RECORD screen...
... that stereo input is data for processing the final mix. Sample library This library contains sets of up to effect 1. Using libraries and scene memories Dynamics library From this library you can immediately play them from the pads. Of library numbers 001-128, numbers 001-040 are saved on the hard disk as the stereo output channel), the sense of the RECORD screen...
Owner's Manual
Page 151
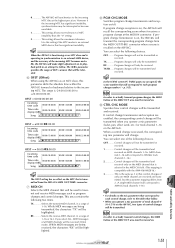
... number that will be tolerated. TX-RX ......Program changes will be highlighted. RX ...........Program change will be transmitted. In the SCENE screen PC TABLE page you select ALL, MIDI messages of control changes will be transmitted when you operate a mix parameter (fader, pan, effect send, etc.) for track channel 1-16 on . OFF .........Program changes will not be received. Tip! Note In order to actually transmit program changes...
... number that will be tolerated. TX-RX ......Program changes will be highlighted. RX ...........Program change will be transmitted. In the SCENE screen PC TABLE page you select ALL, MIDI messages of control changes will be transmitted when you operate a mix parameter (fader, pan, effect send, etc.) for track channel 1-16 on . OFF .........Program changes will not be received. Tip! Note In order to actually transmit program changes...
Owner's Manual
Page 155
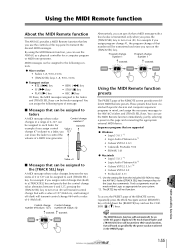
... MIDI Remote function, you use the controls of the top panel to transmit the desired MIDI messages. For transmit example if you turn on while this page and connecting the appropriate external MIDI device. Track assignments must be transmitted each time you assign control Value = change number 1 transmit transmit Using the MIDI Remote function presets The PRESET page of that number will be made within Logic as appropriate for a computer program...
... MIDI Remote function, you use the controls of the top panel to transmit the desired MIDI messages. For transmit example if you turn on while this page and connecting the appropriate external MIDI device. Track assignments must be transmitted each time you assign control Value = change number 1 transmit transmit Using the MIDI Remote function presets The PRESET page of that number will be made within Logic as appropriate for a computer program...
Owner's Manual
Page 164
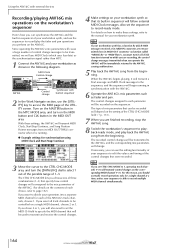
... will transmit control changes on the corresponding MIDI channel 1-16. Note If you set CTRL CHG MODE to 1, operating track channels 1-16 will change. For this function is turned on while you are finished recording, stop the AW16G song. 8 Switch the workstation's sequencer to playback-ready mode, and play the fader and pan operations you perform on the AW16G. Since operating the AW16G's mix parameters will cause a large number of control change messages to be...
... will transmit control changes on the corresponding MIDI channel 1-16. Note If you set CTRL CHG MODE to 1, operating track channels 1-16 will change. For this function is turned on while you are finished recording, stop the AW16G song. 8 Switch the workstation's sequencer to playback-ready mode, and play the fader and pan operations you perform on the AW16G. Since operating the AW16G's mix parameters will cause a large number of control change messages to be...
Owner's Manual
Page 196
... the MIDI button is turned on. • Is a scene assigned to the program change number being received together with the MTC messages? • Does the frame rate match between the AW16G and the external device? • SYNC OFFSET may have been set to LOOP and Slice is turned off the power? * * Disconnecting the power without performing the shut- match? ■ Can't use recorder editing operations to erase a track or other...
... the MIDI button is turned on. • Is a scene assigned to the program change number being received together with the MTC messages? • Does the frame rate match between the AW16G and the external device? • SYNC OFFSET may have been set to LOOP and Slice is turned off the power? * * Disconnecting the power without performing the shut- match? ■ Can't use recorder editing operations to erase a track or other...
Owner's Manual
Page 203
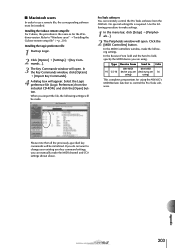
... the menu bar, click [Setup] → [Peripherals...]. 2 The Peripherals window will be made. Installing the Cubase remote setup file For Cubase, the procedure is required. Click the [MIDI Controllers] button. ■ Macintosh users In order to "Windows users" → "Installing the Cubase remote setup file" (→ p. 201). Installing the Logic preference file 1 Start up Logic. 2 Click [Option] → [Settings] → [Key Com- Refer to use a remote...
... the menu bar, click [Setup] → [Peripherals...]. 2 The Peripherals window will be made. Installing the Cubase remote setup file For Cubase, the procedure is required. Click the [MIDI Controllers] button. ■ Macintosh users In order to "Windows users" → "Installing the Cubase remote setup file" (→ p. 201). Installing the Logic preference file 1 Start up Logic. 2 Click [Option] → [Settings] → [Key Com- Refer to use a remote...

Owner's Manual
Page 204
... you set this setting adds an offset to MIDI CLOCK, MIDI clock messages can be transmitted during playback or recording. 1.6. MIDI Remote The faders, SEL keys, and RTZ / FF / REW / STOP / PLAY / REC keys can be used to control an external MIDI device. AW16G settings and operation 3.1. MIDI Setup Set basic MIDI operation. 3.1.1. MMC MODE Select whether the AW16G will be used for the parameters of the AW16G. 3.1.7. MTC SYNC MODE Select whether the AW16G will be used . MTC SYNC...
... you set this setting adds an offset to MIDI CLOCK, MIDI clock messages can be transmitted during playback or recording. 1.6. MIDI Remote The faders, SEL keys, and RTZ / FF / REW / STOP / PLAY / REC keys can be used to control an external MIDI device. AW16G settings and operation 3.1. MIDI Setup Set basic MIDI operation. 3.1.1. MMC MODE Select whether the AW16G will be used for the parameters of the AW16G. 3.1.7. MTC SYNC MODE Select whether the AW16G will be used . MTC SYNC...
Owner's Manual
Page 215
... connector 22 control change 151 controlling a tone genera- Index A A/B key 20 A/B point 65 A-B Repeat 70 Access indicator 18, 22 Accessing a screen/page/ channel 23 Adjusting the input level 34 AMP 72 Assigning input signals (Bus recording) 45 Assigning input signals (Direct recording) 42 ATT knob 160 audio CD 97 Basic settings 99 Disc At Once 98 Erasing 105 Finalizing 104 Methods 98 Playing 106 Track At Once 98 AUDIO WRITE SPEED 99 AUTO PUNCH key...
... connector 22 control change 151 controlling a tone genera- Index A A/B key 20 A/B point 65 A-B Repeat 70 Access indicator 18, 22 Accessing a screen/page/ channel 23 Adjusting the input level 34 AMP 72 Assigning input signals (Bus recording) 45 Assigning input signals (Direct recording) 42 ATT knob 160 audio CD 97 Basic settings 99 Disc At Once 98 Erasing 105 Finalizing 104 Methods 98 Playing 106 Track At Once 98 AUDIO WRITE SPEED 99 AUTO PUNCH key...
Owner's Manual
Page 216
... 112 Importing from an audio track/stereo track 114 Loop mode 108, 119 One shot mode 108, 119 Pad Track 108 Slice function 120 Switching the playback mode 119 Trigger 119 Trigger mode 108 WAV file 112 R Rear panel 21 REC key 21 RECALL CONFIRM ON/ OFF button 162 Recall Safe 80 RECORD key 18 Recording on a track 48 Recording/playing a sound clip 35 Relative zero point 65 REMOTE key 18 REPEAT...
... 112 Importing from an audio track/stereo track 114 Loop mode 108, 119 One shot mode 108, 119 Pad Track 108 Slice function 120 Switching the playback mode 119 Trigger 119 Trigger mode 108 WAV file 112 R Rear panel 21 REC key 21 RECALL CONFIRM ON/ OFF button 162 Recall Safe 80 RECORD key 18 Recording on a track 48 Recording/playing a sound clip 35 Relative zero point 65 REMOTE key 18 REPEAT...


