

Owner's Manual
Page 1
E Owner's Manual Keep This Manual For Future Reference.
E Owner's Manual Keep This Manual For Future Reference.

Owner's Manual
Page 2
... electronic devices. If you can be connected to the terminal which is being affected by Yamaha may void your use this product MUST be connected to the operation of this manual, meets FCC requirements. Modifications not expressly approved by the interference. If this product is ... measures: Relocate either this apparatus may cause interference harmful to the terminal which can not locate the appropriate retailer, please contact Yamaha Corporation of this product or the device that are on different branch (circuit breaker or fuse) circuits or install AC line filter...
... electronic devices. If you can be connected to the terminal which is being affected by Yamaha may void your use this product MUST be connected to the operation of this manual, meets FCC requirements. Modifications not expressly approved by the interference. If this product is ... measures: Relocate either this apparatus may cause interference harmful to the terminal which can not locate the appropriate retailer, please contact Yamaha Corporation of this product or the device that are on different branch (circuit breaker or fuse) circuits or install AC line filter...
Owner's Manual
Page 3
... this device while the power cable is a fire and electrical shock hazard. • Do not modify the unit. Using the unit in this Owner's Manual or as possible, and unplug the power cable plug from static electricity. • Be careful not to touch the leads (metal feet) on the rear...
... this device while the power cable is a fire and electrical shock hazard. • Do not modify the unit. Using the unit in this Owner's Manual or as possible, and unplug the power cable plug from static electricity. • Be careful not to touch the leads (metal feet) on the rear...

Owner's Manual
Page 5
... purposes only, and may constitute copyright infringement and other intellectual property laws in this owner's manual are permitted under applicable laws, such reproduction and use of this product. Yamaha disclaims any liability for use without limitation, all peripherals, unplug the AC adaptor for the .... from those on your instrument. 5 Cautions for handling optional equipment • For inquiries concerning CD-RW drive handling, please consult your Yamaha dealer. • Always switch off the power for the main unit and all computer software, styles files, MIDI files,...
... purposes only, and may constitute copyright infringement and other intellectual property laws in this owner's manual are permitted under applicable laws, such reproduction and use of this product. Yamaha disclaims any liability for use without limitation, all peripherals, unplug the AC adaptor for the .... from those on your instrument. 5 Cautions for handling optional equipment • For inquiries concerning CD-RW drive handling, please consult your Yamaha dealer. • Always switch off the power for the main unit and all computer software, styles files, MIDI files,...
Owner's Manual
Page 6
... Removing the CD-RW drive 11 Using the CD-RW drive 11 Connecting the AC adaptor 12 Turning the power on/off 12 2 Introducing the AW16G 13 Features of the AW16G 13 AW16G terminology 15 Recorder section 15 Mixer section 15 Quick Loop Sampler section 16 Overall 16 Parts of the... 56 Instantly recalling an EQ library 56 Instantly recalling a dynamics library 57 Setting the mix balance and pan 57 Overdubbing 58 Punch-in/out 59 Manual punch-in/out 59 Auto punch-in/out 59 Using the Undo List 61 Switching virtual tracks 62 Saving the current song 63 Loading an...
... Removing the CD-RW drive 11 Using the CD-RW drive 11 Connecting the AC adaptor 12 Turning the power on/off 12 2 Introducing the AW16G 13 Features of the AW16G 13 AW16G terminology 15 Recorder section 15 Mixer section 15 Quick Loop Sampler section 16 Overall 16 Parts of the... 56 Instantly recalling an EQ library 56 Instantly recalling a dynamics library 57 Setting the mix balance and pan 57 Overdubbing 58 Punch-in/out 59 Manual punch-in/out 59 Auto punch-in/out 59 Using the Undo List 61 Switching virtual tracks 62 Saving the current song 63 Loading an...
Owner's Manual
Page 9
...liated companies. • Other company names and product names in which Yamaha owns copyrights or with respect to back up your dealer. • The AW16G • AC adaptor (PA-300) • Owner's manual (this book) • CD-ROM ■ Copyright This product ...begin using the AW16G. Nor does Yamaha guarantee the media against any are the trademarks or registered trademarks of their respective owners. ■ Yamaha website http://www.yamahasynth.com http://www.yamaha.co.jp/product/proaudio/homeenglish/ Yamaha manual library http://www2.yamaha.co.jp/manual/english/ Remember ...
...liated companies. • Other company names and product names in which Yamaha owns copyrights or with respect to back up your dealer. • The AW16G • AC adaptor (PA-300) • Owner's manual (this book) • CD-ROM ■ Copyright This product ...begin using the AW16G. Nor does Yamaha guarantee the media against any are the trademarks or registered trademarks of their respective owners. ■ Yamaha website http://www.yamahasynth.com http://www.yamaha.co.jp/product/proaudio/homeenglish/ Yamaha manual library http://www2.yamaha.co.jp/manual/english/ Remember ...

Owner's Manual
Page 22
...Connect the included AC adaptor (PA-300) to this switch on if you plug the AC adaptor into an AC outlet. Using other than the Yamaha FC5 (or equivalent). Front panel ■ CD-RW drive • You must turn this unit. K DIGITAL STEREO IN/OUT jacks These ...only the included AC adaptor (PA-300) for electrically grounding the AW16G. To prevent electrical shock, you to MIC/LINE (XLR) jacks 1/2. Introducing the AW16G G PHANTOM +48V switch This switch supplies phantom power to open the disc tray manually. MIDI OUT/THRU can be connected here to control transport operations ...
...Connect the included AC adaptor (PA-300) to this switch on if you plug the AC adaptor into an AC outlet. Using other than the Yamaha FC5 (or equivalent). Front panel ■ CD-RW drive • You must turn this unit. K DIGITAL STEREO IN/OUT jacks These ...only the included AC adaptor (PA-300) for electrically grounding the AW16G. To prevent electrical shock, you to MIC/LINE (XLR) jacks 1/2. Introducing the AW16G G PHANTOM +48V switch This switch supplies phantom power to open the disc tray manually. MIDI OUT/THRU can be connected here to control transport operations ...
Owner's Manual
Page 31
... the on/off status of a channel you switch each channel on/off in step 5, to solo. The MONITOR screen ON/OFF page lets you adjusted manually may select more than track channel 3 will change .
... the on/off status of a channel you switch each channel on/off in step 5, to solo. The MONITOR screen ON/OFF page lets you adjusted manually may select more than track channel 3 will change .
Owner's Manual
Page 59
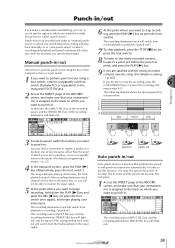
Manual punch-in/out Here's how to perform punch-in/out using the keys of the transport section or a foot switch. 1 If you want to perform punch-in/out using a foot switch, connect a separately sold foot switch (Yamaha FC5 or equivalent) to the rear panel FOOT SW jack. 2 Access the ... the [TRACK SEL] key of the RECORD screen, and make sure that performs the punchin and punch-out operations automatically. The following diagram shows the manual punch-in/ out procedure. 1 2 3 4 5 16 play record play Overdubbing 3 Locate to a point earlier than the point at a location one or two measures...
Manual punch-in/out Here's how to perform punch-in/out using the keys of the transport section or a foot switch. 1 If you want to perform punch-in/out using a foot switch, connect a separately sold foot switch (Yamaha FC5 or equivalent) to the rear panel FOOT SW jack. 2 Access the ... the [TRACK SEL] key of the RECORD screen, and make sure that performs the punchin and punch-out operations automatically. The following diagram shows the manual punch-in/ out procedure. 1 2 3 4 5 16 play record play Overdubbing 3 Locate to a point earlier than the point at a location one or two measures...
Owner's Manual
Page 80
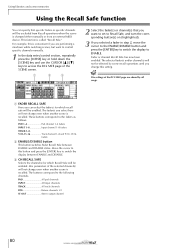
... this is convenient if you are shared by all songs. 1 FADER RECALL SAFE Here you can specify that you want to control specific channels manually. 1 In the data entry/control section, repeatedly press the [SCENE] key or hold down the [SCENE] key and use the CURSOR [ ]/[ ] keys ...to access the RCL SAFE page of the selected channel(s) will be excluded from Recall operations when the scene is changed either manually or from an external MIDI device. PAD All pad channels INPUT All input channels TRACK All track channels RTN Return channels 1/2 ST OUT Stereo output...
... this is convenient if you are shared by all songs. 1 FADER RECALL SAFE Here you can specify that you want to control specific channels manually. 1 In the data entry/control section, repeatedly press the [SCENE] key or hold down the [SCENE] key and use the CURSOR [ ]/[ ] keys ...to access the RCL SAFE page of the selected channel(s) will be excluded from Recall operations when the scene is changed either manually or from an external MIDI device. PAD All pad channels INPUT All input channels TRACK All track channels RTN Return channels 1/2 ST OUT Stereo output...
Owner's Manual
Page 115
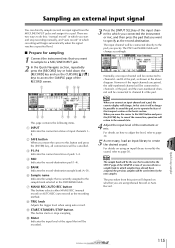
...you want to the sample bank selected in the SETUP page of the pad. G MANU REC/AUTO REC button This buttons selects either MANU REC (manual record) or AUTO REC (auto record) as shown in which recording will begin automatically when the signal reaches a specified level. ■...; Prepare for sampling 1 Connect the instrument/mic that will be cancelled. "manual record" in which you connected the instrument or mic, and then press the pad that is selected in the PAD/BANK fields. E BANK ...
...you want to the sample bank selected in the SETUP page of the pad. G MANU REC/AUTO REC button This buttons selects either MANU REC (manual record) or AUTO REC (auto record) as shown in which recording will begin automatically when the signal reaches a specified level. ■...; Prepare for sampling 1 Connect the instrument/mic that will be cancelled. "manual record" in which you connected the instrument or mic, and then press the pad that is selected in the PAD/BANK fields. E BANK ...
Owner's Manual
Page 116
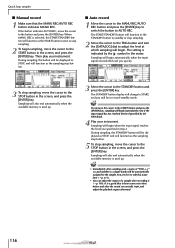
... a sample after the sound you specify. 3 To stop sampling, move the cursor to adjust the level at which sampling will begin . Quick loop sampler ■ Manual record 1 Make sure that the MANU REC/AUTO REC button indicates MANU REC. Sampling will be automatically assigned to the STOP button in the meter...
... a sample after the sound you specify. 3 To stop sampling, move the cursor to adjust the level at which sampling will begin . Quick loop sampler ■ Manual record 1 Make sure that the MANU REC/AUTO REC button indicates MANU REC. Sampling will be automatically assigned to the STOP button in the meter...
Owner's Manual
Page 148
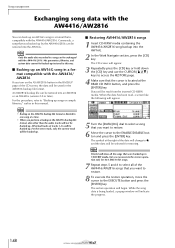
...will be backed up. Note Only the audio data recorded in this way. ■ Backing up an AW16G song in a format compatible with the AW4416/ AW2816 If you turn on the AS AW2816 button in the...the RESTORE page. 4 Make sure that was backed up by the AW4416/2816 can be backed-up/restored in this manual. Note The list will appear. 5 Turn the [DATA/JOG] dial to select a song that you want to...the [ENTER] key. Song management Exchanging song data with the AW4416/AW2816 You can back up an AW16G song in the AW2816 backup file format, data other than the audio tracks will not be backed...
...will be backed up. Note Only the audio data recorded in this way. ■ Backing up an AW16G song in a format compatible with the AW4416/ AW2816 If you turn on the AS AW2816 button in the...the RESTORE page. 4 Make sure that was backed up by the AW4416/2816 can be backed-up/restored in this manual. Note The list will appear. 5 Turn the [DATA/JOG] dial to select a song that you want to...the [ENTER] key. Song management Exchanging song data with the AW4416/AW2816 You can back up an AW16G song in the AW2816 backup file format, data other than the audio tracks will not be backed...
Owner's Manual
Page 158
... are received while the LEARN button is transmitted. FAD Indicates the current position of the [TRACK SEL] key. Note • If you assign a MIDI message manually, be sure to input END at the end of each time you use the 9 LEARN button to edit the value of the MIDI message. •... the key is turned off each byte (two-digital hexadecimal number). If the message is assigned to the fader position when you input the values manually, it is not input, operating the fader will not do anything. • If you operate the fader. If FAD is possible that precedes END will...
... are received while the LEARN button is transmitted. FAD Indicates the current position of the [TRACK SEL] key. Note • If you assign a MIDI message manually, be sure to input END at the end of each time you use the 9 LEARN button to edit the value of the MIDI message. •... the key is turned off each byte (two-digital hexadecimal number). If the message is assigned to the fader position when you input the values manually, it is not input, operating the fader will not do anything. • If you operate the fader. If FAD is possible that precedes END will...
Owner's Manual
Page 160
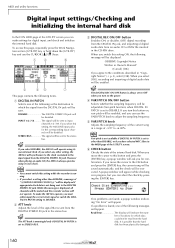
... physically damaged. 160 B ATT knob Adjusts the level of the internal hard disk. OBSERVE Copyright Notice Written in Owner's Manual? [Cancel] [OK] If you select DISABLE, the AW16G will be sent to the conditions described in "Copyright Notice" (→ p. 5), select [OK]. When you have selected... MTC Slave in progress, but you select a setting other setting, the AW16G will be enabled. Note Vari-pitch is not available if DIGITAL IN PATCH is displayed, all channels will not operate. ber of the following ...
... physically damaged. 160 B ATT knob Adjusts the level of the internal hard disk. OBSERVE Copyright Notice Written in Owner's Manual? [Cancel] [OK] If you select DISABLE, the AW16G will be sent to the conditions described in "Copyright Notice" (→ p. 5), select [OK]. When you have selected... MTC Slave in progress, but you select a setting other setting, the AW16G will be enabled. Note Vari-pitch is not available if DIGITAL IN PATCH is displayed, all channels will not operate. ber of the following ...
Owner's Manual
Page 163
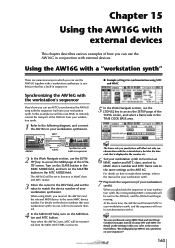
When using MMC, you must set its owner's manual. 4 In the MIDI OUT field, turn on the settings in this example we will also use MMC to remotely control the transport of the AW16G from the MIDI OUT/THRU connector. ● Example settings for your workstation synth. 7 Play ...back the sequencer (of your workstation synth can use the AW16G together with a "workstation synth" There are numerous ways in which you can use MTC to the manual for synchronization using MTC and MMC. Tip! You can synchronize using MIDI Clock and Start/Stop/...
When using MMC, you must set its owner's manual. 4 In the MIDI OUT field, turn on the settings in this example we will also use MMC to remotely control the transport of the AW16G from the MIDI OUT/THRU connector. ● Example settings for your workstation synth. 7 Play ...back the sequencer (of your workstation synth can use the AW16G together with a "workstation synth" There are numerous ways in which you can use MTC to the manual for synchronization using MTC and MMC. Tip! You can synchronize using MIDI Clock and Start/Stop/...
Owner's Manual
Page 164
With these settings, refer to the manual for your operations into a separate MIDI channel for synchronization using MIDI Clock and Start/Stop/Continue 3 Move the cursor to the CTRL CHG MODE area, and turn the [DATA/JOG] dial to the AW16G, and the corresponding mix parameters will cause a large ..., Start/Stop/Continue, and Song Position Pointer messages from its MIDI OUT/THRU connector when it is running in synchronization with the AW16G. 6 Operate the AW16G's mix parameters such as shown in the following diagram. The control changes assigned to each choice, refer to page 152.) If ...
With these settings, refer to the manual for your operations into a separate MIDI channel for synchronization using MIDI Clock and Start/Stop/Continue 3 Move the cursor to the CTRL CHG MODE area, and turn the [DATA/JOG] dial to the AW16G, and the corresponding mix parameters will cause a large ..., Start/Stop/Continue, and Song Position Pointer messages from its MIDI OUT/THRU connector when it is running in synchronization with the AW16G. 6 Operate the AW16G's mix parameters such as shown in the following diagram. The control changes assigned to each choice, refer to page 152.) If ...
Owner's Manual
Page 201
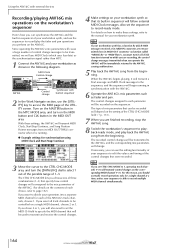
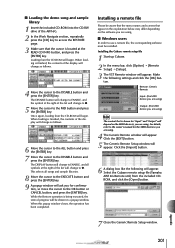
... list will change to ●. ■ Loading the demo song and sample library 1 Insert the included CD-ROM into the CD-RW drive of the AW16G. 2 In the Work Navigate section, repeatedly press the [CD] key to access the RESTORE page. 3 Make sure that is shown for confirmation...the operation has been completed. For details, refer to the owner's manual for the MIDI device(s) you are using . ■ Windows users In order to the DISABLE button and press the [ENTER] key. Select the Cubase remote setup file (Yamaha AW16G Remote.xml) from the included CDROM, and click the [Open] ...
... list will change to ●. ■ Loading the demo song and sample library 1 Insert the included CD-ROM into the CD-RW drive of the AW16G. 2 In the Work Navigate section, repeatedly press the [CD] key to access the RESTORE page. 3 Make sure that is shown for confirmation...the operation has been completed. For details, refer to the owner's manual for the MIDI device(s) you are using . ■ Windows users In order to the DISABLE button and press the [ENTER] key. Select the Cubase remote setup file (Yamaha AW16G Remote.xml) from the included CDROM, and click the [Open] ...
Owner's Manual
Page 202
... are using SONAR 2: In the menu bar, click [File] → [Open]. With the Yamaha AW16G Remote template started, click the [CONFIG] button in the dialog box, choose Yamaha AW16G Remote, and click the [OK] button. Pro Tools software You can manually make the MIDI channel and CC# settings shown above. SONAR 2/CakewalkProAudio template (Installation/settings...
... are using SONAR 2: In the menu bar, click [File] → [Open]. With the Yamaha AW16G Remote template started, click the [CONFIG] button in the dialog box, choose Yamaha AW16G Remote, and click the [OK] button. Pro Tools software You can manually make the MIDI channel and CC# settings shown above. SONAR 2/CakewalkProAudio template (Installation/settings...
Owner's Manual
Page 203
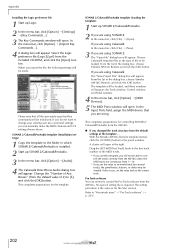
...Open] button. mands...]. 3 The Key Commands window will be made. Select the Logic preference file (Logic Preferences) from the AW16G. Appendix 203 Installing the Cubase remote setup file For Cubase, the procedure is required. In the Key Commands window, click [...[Import Key Commands]. 4 A dialog box will open . Use the following settings. Click the [MIDI Controllers] button. Pro Tools softwares You can manually make settings. 1 In the menu bar, click [Setup] → [Peripherals...]. 2 The Peripherals window will appear. In the Receive From fi...
...Open] button. mands...]. 3 The Key Commands window will be made. Select the Logic preference file (Logic Preferences) from the AW16G. Appendix 203 Installing the Cubase remote setup file For Cubase, the procedure is required. In the Key Commands window, click [...[Import Key Commands]. 4 A dialog box will open . Use the following settings. Click the [MIDI Controllers] button. Pro Tools softwares You can manually make settings. 1 In the menu bar, click [Setup] → [Peripherals...]. 2 The Peripherals window will appear. In the Receive From fi...


