

Owner's Manual
Page 12
... to save the current song. This will prevent the cable from your external monitor system may be damaged. If the power is disconnected while the AW16G is in the diagram. If you must first connect it . Before you turn on the hard disk, and damaging or drastically shortening the lifespan... page. 2 Press the [ENTER] key located in the screen) to the YES button if you want to the input/output jacks of the AW16G When turning off ..." Tip! Turning the power on the rear panel. If you fail to turn on in the following order. 1 External devices such as audio sources and...
... to save the current song. This will prevent the cable from your external monitor system may be damaged. If the power is disconnected while the AW16G is in the diagram. If you must first connect it . Before you turn on the hard disk, and damaging or drastically shortening the lifespan... page. 2 Press the [ENTER] key located in the screen) to the YES button if you want to the input/output jacks of the AW16G When turning off ..." Tip! Turning the power on the rear panel. If you fail to turn on in the following order. 1 External devices such as audio sources and...
Owner's Manual
Page 20
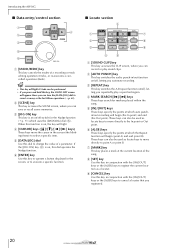
Introducing the AW16G ■ Data entry/control section 1 4 2 3 5 6 1 [UNDO/REDO] key This key cancels the results of a parameter. D [CURSOR] keys keys) These keys move the cursor in the ... song. I [CANCEL] key Use this key to operate a button displayed in conjunction with the [IN]/[OUT] keys or the [A]/[B] keys to select a specific item. Tip! • This key will appear. G [MARK] key This key places a mark at which auto punchin/out recording will light. F [ENTER] key Use this key in...
Introducing the AW16G ■ Data entry/control section 1 4 2 3 5 6 1 [UNDO/REDO] key This key cancels the results of a parameter. D [CURSOR] keys keys) These keys move the cursor in the ... song. I [CANCEL] key Use this key to operate a button displayed in conjunction with the [IN]/[OUT] keys or the [A]/[B] keys to select a specific item. Tip! • This key will appear. G [MARK] key This key places a mark at which auto punchin/out recording will light. F [ENTER] key Use this key in...
Owner's Manual
Page 21
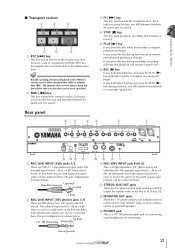
... can be connected here. Devices such as an electric guitar or bass with balanced output jacks can be freely specified. Tip! The absolute time zero location is -46 to recording ("punch-in conjunction with unbalanced outputs can be either absolute time (ABS)... 16x speed. The pin configuration is stopped, recording will begin. F PHONES jack This is -46 to the relative zero time location. Introducing the AW16G ■ Transport section 1 2 3 4 5 6 1 RTZ [ ] key This key moves directly to +4 dB. If you will resume ("punch-out"). The nominal ...
... can be connected here. Devices such as an electric guitar or bass with balanced output jacks can be freely specified. Tip! The absolute time zero location is -46 to recording ("punch-in conjunction with unbalanced outputs can be either absolute time (ABS)... 16x speed. The pin configuration is stopped, recording will begin. F PHONES jack This is -46 to the relative zero time location. Introducing the AW16G ■ Transport section 1 2 3 4 5 6 1 RTZ [ ] key This key moves directly to +4 dB. If you will resume ("punch-out"). The nominal ...
Owner's Manual
Page 23
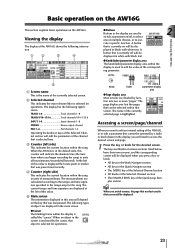
...in the Work Navigate section • All keys in units of the Quick Loop Sampler section Tip! C Counter (left of the AW16G shows the following significance. When the AW16G is selected for the desired screen. Viewing the display The display of this value is displayed... • All knobs of the Selected Channel section • The [SAMPLE EDIT] key of hours/minutes/seconds/milliseconds. Introducing the AW16G Basic operation on the AW16G This section explains basic operations on /off will be selected within the song. The display has the following information. 1 2 3 ...
...in the Work Navigate section • All keys in units of the Quick Loop Sampler section Tip! C Counter (left of the AW16G shows the following significance. When the AW16G is selected for the desired screen. Viewing the display The display of this value is displayed... • All knobs of the Selected Channel section • The [SAMPLE EDIT] key of hours/minutes/seconds/milliseconds. Introducing the AW16G Basic operation on the AW16G This section explains basic operations on /off will be selected within the song. The display has the following information. 1 2 3 ...
Owner's Manual
Page 29
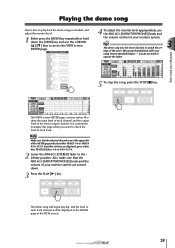
... [VIEW] key and use the CURSOR [ ]/[ ] keys to access the VIEW screen METER page. 4 To adjust the monitor level appropriately, use the AW16G's [MONITOR PHONES] knob and the volume control of the mixer. Also make sure that playback will be displayed in finity position. It is convenient...song you loaded, and adjust the monitor level. 1 Either press the [VIEW] key repeatedly or hold down . 3 Press the PLAY [ ] key. Tip! This means that the AW16G's [MONITOR PHONES] knob and the volume of each track channel will occur using the pre-specified balance - The demo song uses...
... [VIEW] key and use the CURSOR [ ]/[ ] keys to access the VIEW screen METER page. 4 To adjust the monitor level appropriately, use the AW16G's [MONITOR PHONES] knob and the volume control of the mixer. Also make sure that playback will be displayed in finity position. It is convenient...song you loaded, and adjust the monitor level. 1 Either press the [VIEW] key repeatedly or hold down . 3 Press the PLAY [ ] key. Tip! This means that the AW16G's [MONITOR PHONES] knob and the volume of each track channel will occur using the pre-specified balance - The demo song uses...
Owner's Manual
Page 34
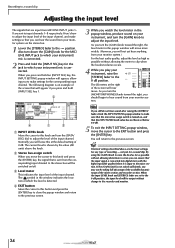
... play your monitor system via the stereo bus. 1 Lower the [STEREO] fader to the -∞ position. Here's how to adjust the input level of recording --- Tip! When you press and hold an [INPUT SEL] key, the INPUT SETTING popup window will appear, allowing you to make sure that the INPUT LEVEL...
... play your monitor system via the stereo bus. 1 Lower the [STEREO] fader to the -∞ position. Here's how to adjust the input level of recording --- Tip! When you press and hold an [INPUT SEL] key, the INPUT SETTING popup window will appear, allowing you to make sure that the INPUT LEVEL...
Owner's Manual
Page 36
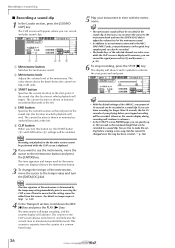
C START button Specifies the current location as the start point and end point. Tip! • With the default settings of the AW16G, a maximum of 30 seconds can also be changed once the song has been created. (→ p. 162) 36 D END button Specifies the ...the volume level of the metronome. This counter is determined by EQ and dynamics (→ p. 50). 6 To stop recording, press the STOP [■] key. Tip! • The metronome sound will advance. The display will show S and E symbols to accessing the CLIP screen. The counter in the sound clip. If ...
C START button Specifies the current location as the start point and end point. Tip! • With the default settings of the AW16G, a maximum of 30 seconds can also be changed once the song has been created. (→ p. 162) 36 D END button Specifies the ...the volume level of the metronome. This counter is determined by EQ and dynamics (→ p. 50). 6 To stop recording, press the STOP [■] key. Tip! • The metronome sound will advance. The display will show S and E symbols to accessing the CLIP screen. The counter in the sound clip. If ...
Owner's Manual
Page 37
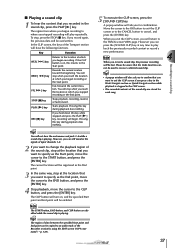
...to the START button, and press the [ENTER] key. Please be aware that you began recording. Pressing this returns to recover a deleted sound clip. Tip! You will begin. However, you can press the [SOUND CLIP] key at which you began recording to where you will be lost. The region ...from where you began recording or the Start point. Tip! The current location will return to confirm that you stopped recording or the End point. When you exit the CLIP screen, you ...
...to the START button, and press the [ENTER] key. Please be aware that you began recording. Pressing this returns to recover a deleted sound clip. Tip! You will begin. However, you can press the [SOUND CLIP] key at which you began recording to where you will be lost. The region ...from where you began recording or the Start point. Tip! The current location will return to confirm that you stopped recording or the End point. When you exit the CLIP screen, you ...
Owner's Manual
Page 39
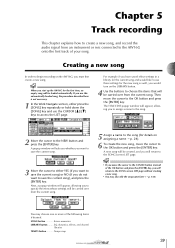
Tip! A new song will be loaded automatically. Creating a new song In order to begin recording on assigning a name → ... a new song, and record the audio signal from the current song. 5 Assign a name to the song (for details on the AW16G, you must first create a new song. Then move the cursor to the CANCEL button (instead of the OK button) and ...LIBRARY button. 4 Use the buttons to choose the items that will return to the OK button and press the [ENTER] key. Tip! • If you move the cursor to the SONG screen LIST page without creating a new song. • You may ...
Tip! A new song will be loaded automatically. Creating a new song In order to begin recording on assigning a name → ... a new song, and record the audio signal from the current song. 5 Assign a name to the song (for details on the AW16G, you must first create a new song. Then move the cursor to the CANCEL button (instead of the OK button) and ...LIBRARY button. 4 Use the buttons to choose the items that will return to the OK button and press the [ENTER] key. Tip! • If you move the cursor to the SONG screen LIST page without creating a new song. • You may ...
Owner's Manual
Page 42
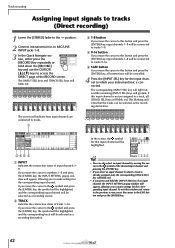
.... • If you select an input channel to which your instrument/mic is not yet assigned to a track, all connections will be connected to tracks 1-8. Tip! • You can be cancelled. 4 Press the [INPUT SEL] key for the corresponding input channel. Track recording Assigning input signals to tracks (Direct recording) 1 Lower...
.... • If you select an input channel to which your instrument/mic is not yet assigned to a track, all connections will be connected to tracks 1-8. Tip! • You can be cancelled. 4 Press the [INPUT SEL] key for the corresponding input channel. Track recording Assigning input signals to tracks (Direct recording) 1 Lower...
Owner's Manual
Page 43
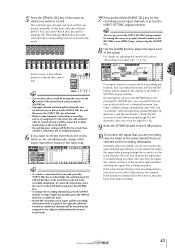
...record. For details on which the level is detected between "prefader" (default setting; This lets you adjust the volume and tone of the signal. Tip! • To cancel a connection that is selected as the recording destination. 6 If you want to a recording-destination, that is actually being ...affecting the signal that you selected as the playback level after recording. 43 The blinking [TRACK SEL] key indicates that is being recorded. Tip! • You can switch the location at for a track channel that the corresponding track is set to make it is selected as...
...record. For details on which the level is detected between "prefader" (default setting; This lets you adjust the volume and tone of the signal. Tip! • To cancel a connection that is selected as the recording destination. 6 If you want to a recording-destination, that is actually being ...affecting the signal that you selected as the playback level after recording. 43 The blinking [TRACK SEL] key indicates that is being recorded. Tip! • You can switch the location at for a track channel that the corresponding track is set to make it is selected as...
Owner's Manual
Page 45
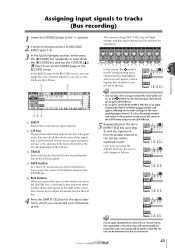
B L/R bus The two horizontal lines indicate the bus L/R signal route. Tip! You can check the on /off. E BUS button When you move the cursor to bus L or R, and check the tracks that will be selected for ... channel to which you connected your instrument or mic. The current setting [INPUT SEL] key will light orange, and that is connected to the bus. 5 Tip! • You can use the CURSOR [ ]/ [ ] keys to this button and press the [ENTER] key. To close this popup window and return to the previous...
B L/R bus The two horizontal lines indicate the bus L/R signal route. Tip! You can check the on /off. E BUS button When you move the cursor to bus L or R, and check the tracks that will be selected for ... channel to which you connected your instrument or mic. The current setting [INPUT SEL] key will light orange, and that is connected to the bus. 5 Tip! • You can use the CURSOR [ ]/ [ ] keys to this button and press the [ENTER] key. To close this popup window and return to the previous...
Owner's Manual
Page 46
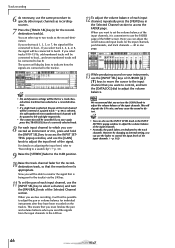
...the track channel will be possible to adjust the pan or volume balance for a track channel whose track has been selected as the record-destination. Tip! • EQ and dynamics settings will be flat for individual instruments after they have been recorded on your instruments, use the [GAIN]...the VIEW screen. Here you select track 1, 3, 5, or 7, the signal will degrade the S/N ratio, and may cause the sound to the track channels. Tip! • You can select up to control the input levels of the input channels. (→ p. 162) 46 You can also use the faders to ...
...the track channel will be possible to adjust the pan or volume balance for a track channel whose track has been selected as the record-destination. Tip! • EQ and dynamics settings will be flat for individual instruments after they have been recorded on your instruments, use the [GAIN]...the VIEW screen. Here you select track 1, 3, 5, or 7, the signal will degrade the S/N ratio, and may cause the sound to the track channels. Tip! • You can select up to control the input levels of the input channels. (→ p. 162) 46 You can also use the faders to ...
Owner's Manual
Page 47
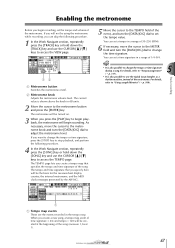
... page. The metronome will not be the basis for the measure/beat display counter, the internal metronome, and the MIDI clock messages generated by the AW16G. 5 Move the cursor to the TEMPO field of the event, and turn the [DATA/JOG] dial to set a tempo in a range of 30-250..., repeatedly press the [TRACK] key or hold down the [TRACK] key and use the CURSOR [ ]/[ ] keys to change the tempo or time signature during a song. Tip! • It is also possible to adjust the metronome level. The tempo and time signature that specifies the tempo and time signature of...
... page. The metronome will not be the basis for the measure/beat display counter, the internal metronome, and the MIDI clock messages generated by the AW16G. 5 Move the cursor to the TEMPO field of the event, and turn the [DATA/JOG] dial to set a tempo in a range of 30-250..., repeatedly press the [TRACK] key or hold down the [TRACK] key and use the CURSOR [ ]/[ ] keys to change the tempo or time signature during a song. Tip! • It is also possible to adjust the metronome level. The tempo and time signature that specifies the tempo and time signature of...
Owner's Manual
Page 49
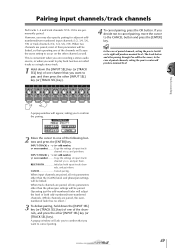
... cause the same setting to pair, and then press the other [INPUT SEL] key (or [TRACK SEL] key). 4 To cancel pairing, press the OK button. Tip! INPUT (TRACK) x → y (x= odd number, y= even number)........ Copy the settings of input (track) channel y to y, and pair them . When two channels are recording a stereo audio...
... cause the same setting to pair, and then press the other [INPUT SEL] key (or [TRACK SEL] key). 4 To cancel pairing, press the OK button. Tip! INPUT (TRACK) x → y (x= odd number, y= even number)........ Copy the settings of input (track) channel y to y, and pair them . When two channels are recording a stereo audio...
Owner's Manual
Page 51
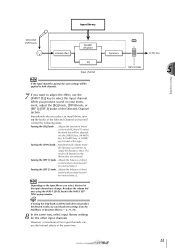
... section. Re-adjust the volume balance using the INPUT LEVEL knob in the INPUT SETTING popup window. However, a maximum of the input channel may change. Tip! Note Depending on the library that will be applied to both channels. 7 If you can use the internal effects at the right. If turning the...
... section. Re-adjust the volume balance using the INPUT LEVEL knob in the INPUT SETTING popup window. However, a maximum of the input channel may change. Tip! Note Depending on the library that will be applied to both channels. 7 If you can use the internal effects at the right. If turning the...
Owner's Manual
Page 52
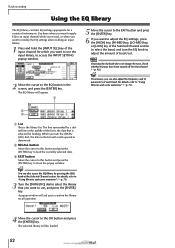
... by pressing the [EQ] knob of instruments. Track recording Using the EQ library The EQ library contains EQ settings appropriate for that channel (→ p. 92). Tip! Note If turning the EQ knob does not change the tone, check whether EQ may have been turned off for a variety of the Selected Channel...
... by pressing the [EQ] knob of instruments. Track recording Using the EQ library The EQ library contains EQ settings appropriate for that channel (→ p. 92). Tip! Note If turning the EQ knob does not change the tone, check whether EQ may have been turned off for a variety of the Selected Channel...
Owner's Manual
Page 53
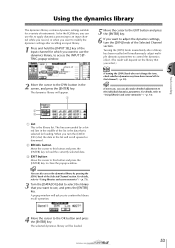
Tip! For details, refer to close the popup window. As for that channel (→ p. 93). When you want to the EXIT button and press the [ENTER] ... to modify the dynamics settings after a library has been recalled will simultaneously adjust multiple dynamics parameters to the OK button and press the [ENTER] key. Tip! You can also make detailed adjustments to the DYN button in the screen, and press the [ENTER] key. For details, refer to "Using libraries and...
Tip! For details, refer to close the popup window. As for that channel (→ p. 93). When you want to the EXIT button and press the [ENTER] ... to modify the dynamics settings after a library has been recalled will simultaneously adjust multiple dynamics parameters to the OK button and press the [ENTER] key. Tip! You can also make detailed adjustments to the DYN button in the screen, and press the [ENTER] key. For details, refer to "Using libraries and...
Owner's Manual
Page 56
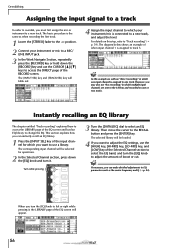
Tip! Then move the cursor to adjust the amount of boost or cut. The selected library will be selected for which your instrument/mic is the ... this step, refer to one or two tracks. The corresponding input channel will use "bus recording," in which multiple input channels are sent to track 5. Tip! For details on this example we will be loaded. 4 If you want to change the EQ. When you turn it , the LIBRARY page of the...
Tip! Then move the cursor to adjust the amount of boost or cut. The selected library will be selected for which your instrument/mic is the ... this step, refer to one or two tracks. The corresponding input channel will use "bus recording," in which multiple input channels are sent to track 5. Tip! For details on this example we will be loaded. 4 If you want to change the EQ. When you turn it , the LIBRARY page of the...
Owner's Manual
Page 57
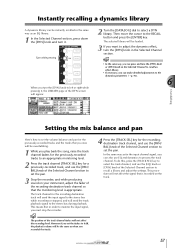
...recording-destination track channel so that is appropriate. However if you set the pan. 3 Stop the recorder, and while producing sound on the track. 57 Tip! • In the same way, you can make detailed adjustments to the dynamics parameters (→ p. 93). 6 Overdubbing Setting the mix balance and ...track, and use the [EQ] knob or [DYN] knob of the Selected Channel section to the RECALL button and press the [ENTER] key. Tip! The track channel for the input channel signal, you must stop the recorder. The selected library will not affect the signal that the monitoring level...
...recording-destination track channel so that is appropriate. However if you set the pan. 3 Stop the recorder, and while producing sound on the track. 57 Tip! • In the same way, you can make detailed adjustments to the dynamics parameters (→ p. 93). 6 Overdubbing Setting the mix balance and ...track, and use the [EQ] knob or [DYN] knob of the Selected Channel section to the RECALL button and press the [ENTER] key. Tip! The track channel for the input channel signal, you must stop the recorder. The selected library will not affect the signal that the monitoring level...