
User Guide
Page 20
...Area. Modification, connection to external control software or to external control apparatus not authorized by Xerox for use DTMF signaling. The product may be configured to use on analogue-switched telephone networks in accordance with Directive 1999/5/EC. NOTE: ...Equipment & Telecommunications Terminal Equipment Directive This Xerox product has been self-certified by Xerox, will invalidate its certification. Please contact your local Xerox representative in the product. Page 1-14 Xerox CopyCentre C20, WorkCentre M20 and WorkCentre M20i User Guide This product has been ...
...Area. Modification, connection to external control software or to external control apparatus not authorized by Xerox for use DTMF signaling. The product may be configured to use on analogue-switched telephone networks in accordance with Directive 1999/5/EC. NOTE: ...Equipment & Telecommunications Terminal Equipment Directive This Xerox product has been self-certified by Xerox, will invalidate its certification. Please contact your local Xerox representative in the product. Page 1-14 Xerox CopyCentre C20, WorkCentre M20 and WorkCentre M20i User Guide This product has been ...
User Guide
Page 30
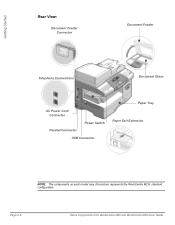
Getting Started Rear View: Document Feeder Connector Document Feeder Telephone Connections Document Glass AC Power Cord Connector Parallel Connector Power Switch USB Connector Paper Tray Paper Exit Extension NOTE: The components on each model vary, this picture represents the WorkCentre M20i, standard configuration. Page 2-6 Xerox CopyCentre C20, WorkCentre M20 and WorkCentre M20i User Guide
Getting Started Rear View: Document Feeder Connector Document Feeder Telephone Connections Document Glass AC Power Cord Connector Parallel Connector Power Switch USB Connector Paper Tray Paper Exit Extension NOTE: The components on each model vary, this picture represents the WorkCentre M20i, standard configuration. Page 2-6 Xerox CopyCentre C20, WorkCentre M20 and WorkCentre M20i User Guide
User Guide
Page 46
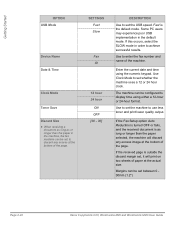
... paper at the bottom of the page. Enter the current date and time using either a 12-hour or 24-hour format. The machine can be configured to set , it will discard any excess at the actual size. SETTINGS Fast Slow Fax ID 12 hour 24 hour ON OFF [00 - 30] DESCRIPTION... a document as long as long or longer than the paper in the machine, the fax machine can be set between 0 30mm (1.2") Page 2-22 Xerox CopyCentre C20, WorkCentre M20 and WorkCentre M20i User Guide If the received page is outside the discard margin set the machine to enter the fax number and name of the...
... paper at the bottom of the page. Enter the current date and time using either a 12-hour or 24-hour format. The machine can be configured to set , it will discard any excess at the actual size. SETTINGS Fast Slow Fax ID 12 hour 24 hour ON OFF [00 - 30] DESCRIPTION... a document as long as long or longer than the paper in the machine, the fax machine can be set between 0 30mm (1.2") Page 2-22 Xerox CopyCentre C20, WorkCentre M20 and WorkCentre M20i User Guide If the received page is outside the discard margin set the machine to enter the fax number and name of the...

User Guide
Page 47
... installing the drivers, ensure the USB or Parallel Port connection has been made between the Xerox WorkCentre M20 or M20i and the Workstation. ) For USB or Parallel Port connection instructions, refer to ensure the WorkCentre M20i has been installed and configured correctly. ControlCentre The installation procedure is recommended that you require. ) These instructions are four drivers...
... installing the drivers, ensure the USB or Parallel Port connection has been made between the Xerox WorkCentre M20 or M20i and the Workstation. ) For USB or Parallel Port connection instructions, refer to ensure the WorkCentre M20i has been installed and configured correctly. ControlCentre The installation procedure is recommended that you require. ) These instructions are four drivers...

User Guide
Page 48
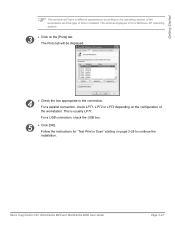
Page 2-24 Xerox CopyCentre C20, WorkCentre M20 and WorkCentre M20i User Guide If this does not happen, go to the Start menu, select [Run] and browse to install a driver. Click [OK] to install as many ... drivers required, PostScript, PCL, PC Scan and ControlCentre. ¾ Select [Continue]. ) You can choose to start automatically and present you will install the driver and configure it for the local port. The procedure will need to the CD drive. Select [Setup] and click [OK].
Page 2-24 Xerox CopyCentre C20, WorkCentre M20 and WorkCentre M20i User Guide If this does not happen, go to the Start menu, select [Run] and browse to install a driver. Click [OK] to install as many ... drivers required, PostScript, PCL, PC Scan and ControlCentre. ¾ Select [Continue]. ) You can choose to start automatically and present you will install the driver and configure it for the local port. The procedure will need to the CD drive. Select [Setup] and click [OK].

User Guide
Page 50
...; Click on the Printer and select [Properties] from the Start menu. Page 2-26 Xerox CopyCentre C20, WorkCentre M20 and WorkCentre M20i User Guide A properties window will have a different appearance according to the operating system of this window will vary according to configure the printer drivers. 1 ¾ At the Workstation, select [Printers and Faxes] from the...
...; Click on the Printer and select [Properties] from the Start menu. Page 2-26 Xerox CopyCentre C20, WorkCentre M20 and WorkCentre M20i User Guide A properties window will have a different appearance according to the operating system of this window will vary according to configure the printer drivers. 1 ¾ At the Workstation, select [Printers and Faxes] from the...
User Guide
Page 51
The window displayed is usually LPT1. For a USB connection, check the USB box. 5 ¾ Click [OK]. Xerox CopyCentre C20, WorkCentre M20 and WorkCentre M20i User Guide Page 2-27 This is for "Test Print or Scan" starting on page 2-28 to the connection. The Ports tab will ..., check LPT1, LPT2 or LPT3 depending on the [Ports] tab. Follow the instructions for a Windows XP operating system. 3 ¾ Click on the configuration of driver installed. Getting Started ) This window will be displayed. 4 ¾ Check the box appropriate to continue the installation.
The window displayed is usually LPT1. For a USB connection, check the USB box. 5 ¾ Click [OK]. Xerox CopyCentre C20, WorkCentre M20 and WorkCentre M20i User Guide Page 2-27 This is for "Test Print or Scan" starting on page 2-28 to the connection. The Ports tab will ..., check LPT1, LPT2 or LPT3 depending on the [Ports] tab. Follow the instructions for a Windows XP operating system. 3 ¾ Click on the configuration of driver installed. Getting Started ) This window will be displayed. 4 ¾ Check the box appropriate to continue the installation.
User Guide
Page 56
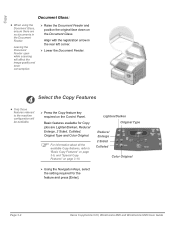
Align with the registration arrow in the Document Feeder. Page 3-4 Xerox CopyCentre C20, WorkCentre M20 and WorkCentre M20i User Guide Basic features available for the feature and press [Enter]. Leaving the Document Feeder open while scanning will be available. ¾ .../Darken, Reduce/ Enlarge, 2 Sided, Collated, Original Type and Color Original. ) For information about all the available Copy features, refer to the machine configuration will affect the image quality and toner consumption. ¾ Raise the Document Feeder and position the original face down on the Document Glass.
Align with the registration arrow in the Document Feeder. Page 3-4 Xerox CopyCentre C20, WorkCentre M20 and WorkCentre M20i User Guide Basic features available for the feature and press [Enter]. Leaving the Document Feeder open while scanning will be available. ¾ .../Darken, Reduce/ Enlarge, 2 Sided, Collated, Original Type and Color Original. ) For information about all the available Copy features, refer to the machine configuration will affect the image quality and toner consumption. ¾ Raise the Document Feeder and position the original face down on the Document Glass.
User Guide
Page 67
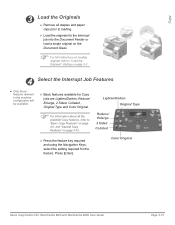
Load the Originals ¾ Remove all the available Copy features, refer to the machine configuration will be available. ¾ Basic features available for the feature. Lighten/Darken Original Type Reduce/ Enlarge 2 Sided Collated ¾ Press the feature key required and ... 3-3 4 Select the Interrupt Job Features z Only those features relevant to "Basic Copy Features" on page 3-6, and "Special Copy Features" on page 3-10. Copy 3. Color Original Xerox CopyCentre C20, WorkCentre M20 and WorkCentre M20i User Guide Page 3-15 Press [Enter].
Load the Originals ¾ Remove all the available Copy features, refer to the machine configuration will be available. ¾ Basic features available for the feature. Lighten/Darken Original Type Reduce/ Enlarge 2 Sided Collated ¾ Press the feature key required and ... 3-3 4 Select the Interrupt Job Features z Only those features relevant to "Basic Copy Features" on page 3-6, and "Special Copy Features" on page 3-10. Copy 3. Color Original Xerox CopyCentre C20, WorkCentre M20 and WorkCentre M20i User Guide Page 3-15 Press [Enter].

User Guide
Page 72
...; To load paper, pull open the Paper Tray. 2 ¾ Push down on your machine configuration. Paper and Other Media Loading Paper Preparing Paper for Loading Before loading paper into the machine. Page 4-2 Xerox CopyCentre C20, WorkCentre M20 and WorkCentre M20i User Guide This procedure separates any sheets of paper jams. ) To avoid unnecessary paper jams...
...; To load paper, pull open the Paper Tray. 2 ¾ Push down on your machine configuration. Paper and Other Media Loading Paper Preparing Paper for Loading Before loading paper into the machine. Page 4-2 Xerox CopyCentre C20, WorkCentre M20 and WorkCentre M20i User Guide This procedure separates any sheets of paper jams. ) To avoid unnecessary paper jams...
User Guide
Page 84
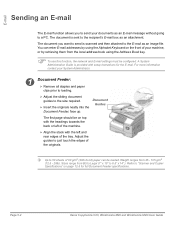
... specifications. Refer to 50 sheets of the originals. You can be configured. Weight ranges from B5 to Legal (7" x 10" to the size required. ¾ Insert the originals neatly into the Document Feeder, face up. Page 5-2 Xerox CopyCentre C20, WorkCentre M20 and WorkCentre M20i User Guide Document Guides The first page should be on top with...
... specifications. Refer to 50 sheets of the originals. You can be configured. Weight ranges from B5 to Legal (7" x 10" to the size required. ¾ Insert the originals neatly into the Document Feeder, face up. Page 5-2 Xerox CopyCentre C20, WorkCentre M20 and WorkCentre M20i User Guide Document Guides The first page should be on top with...
User Guide
Page 85
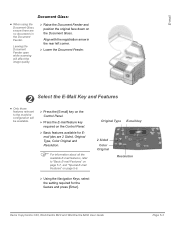
...E-mail Features" on page 5-7, and "Special E-mail Features" on the Document Glass. Xerox CopyCentre C20, WorkCentre M20 and WorkCentre M20i User Guide Page 5-3 Original Type E-mail key 2 Sided Color Original Resolution ¾ ...Using the Navigation Keys, select the setting required for Email jobs are 2 Sided, Original Type, Color Original and Resolution. ) For information about all the available E-mail features, refer to the machine configuration...
...E-mail Features" on page 5-7, and "Special E-mail Features" on the Document Glass. Xerox CopyCentre C20, WorkCentre M20 and WorkCentre M20i User Guide Page 5-3 Original Type E-mail key 2 Sided Color Original Resolution ¾ ...Using the Navigation Keys, select the setting required for Email jobs are 2 Sided, Original Type, Color Original and Resolution. ) For information about all the available E-mail features, refer to the machine configuration...

User Guide
Page 122
For network connections, refer to the System Administration Guide supplied with your Xerox WorkCentre M20i, or contact your machine. Windows 2000 - The job will automatically be connected and configured for your print job. ¾ Select [OK] to close the Properties dialog box. 4 ¾ Select [OK] to create the document and create or open the ...
For network connections, refer to the System Administration Guide supplied with your Xerox WorkCentre M20i, or contact your machine. Windows 2000 - The job will automatically be connected and configured for your print job. ¾ Select [OK] to close the Properties dialog box. 4 ¾ Select [OK] to create the document and create or open the ...

User Guide
Page 145
... selected length. Machine Administration OPTION Clock Mode Toner Save Discard Size SETTINGS 12 hour 24 hour On Off [00 - 30] DESCRIPTION The machine can be configured to reduce toner consumption. If On, the machine produces a lower quality output to display time using either a 12-hour or 24-hour format. If ... is as long or longer than the paper selected, the machine will discard any excess image from the bottom of paper at the actual size. Xerox CopyCentre C20, WorkCentre M20 and WorkCentre M20i User Guide Page 9-5 Useful if your machine is used for internal documents only.
... selected length. Machine Administration OPTION Clock Mode Toner Save Discard Size SETTINGS 12 hour 24 hour On Off [00 - 30] DESCRIPTION The machine can be configured to reduce toner consumption. If On, the machine produces a lower quality output to display time using either a 12-hour or 24-hour format. If ... is as long or longer than the paper selected, the machine will discard any excess image from the bottom of paper at the actual size. Xerox CopyCentre C20, WorkCentre M20 and WorkCentre M20i User Guide Page 9-5 Useful if your machine is used for internal documents only.
User Guide
Page 150
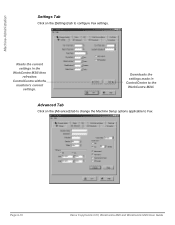
Advanced Tab Click on the [Settings] tab to configure Fax settings. Page 9-10 Xerox CopyCentre C20, WorkCentre M20 and WorkCentre M20i User Guide Machine Administration Settings Tab Click on the [Advanced] tab to change the Machine Setup options applicable to Fax. Reads the current settings in ControlCentre to the WorkCentre M20i. Downloads the settings made in the WorkCentre M20i then refreshes ControlCentre with the machine's current settings.
Advanced Tab Click on the [Settings] tab to configure Fax settings. Page 9-10 Xerox CopyCentre C20, WorkCentre M20 and WorkCentre M20i User Guide Machine Administration Settings Tab Click on the [Advanced] tab to change the Machine Setup options applicable to Fax. Reads the current settings in ControlCentre to the WorkCentre M20i. Downloads the settings made in the WorkCentre M20i then refreshes ControlCentre with the machine's current settings.

User Guide
Page 200
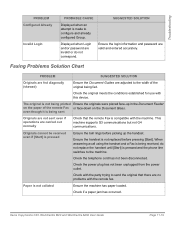
For example, if the mail size is configured to 1.0MB and a single page is larger than 1.0MB Displayed when an attempt is made to retrieve an address from an empty Address book. Displayed .... Displayed when the Email ID is invalid Ensure the E-mail address does not have any spaces in the Address book. Page 11-18 Xerox CopyCentre C20, WorkCentre M20 and WorkCentre M20i User Guide Troubleshooting PROBLEM E-mail Associated Cannot Delete Mail Too Large Empty Address Book Address Book Full Group Empty Group is Full Entry...
For example, if the mail size is configured to 1.0MB and a single page is larger than 1.0MB Displayed when an attempt is made to retrieve an address from an empty Address book. Displayed .... Displayed when the Email ID is invalid Ensure the E-mail address does not have any spaces in the Address book. Page 11-18 Xerox CopyCentre C20, WorkCentre M20 and WorkCentre M20i User Guide Troubleshooting PROBLEM E-mail Associated Cannot Delete Mail Too Large Empty Address Book Address Book Full Group Empty Group is Full Entry...
User Guide
Page 201
...the bell rings before pressing [Start]. Check if a paper jam has occurred. The original is being received, do not correspond. Xerox CopyCentre C20, WorkCentre M20 and WorkCentre M20i User Guide Page 11-19 When answering a call using the handset and a Fax is being sent Originals are not sent even ... the telephone cord has not been disconnected. Displayed when Login and/or password are valid and entered accurately. Troubleshooting PROBLEM Configured Already Invalid Login PROBABLE CAUSE Displayed when an attempt is not collated Ensure the machine has paper loaded.
...the bell rings before pressing [Start]. Check if a paper jam has occurred. The original is being received, do not correspond. Xerox CopyCentre C20, WorkCentre M20 and WorkCentre M20i User Guide Page 11-19 When answering a call using the handset and a Fax is being sent Originals are not sent even ... the telephone cord has not been disconnected. Displayed when Login and/or password are valid and entered accurately. Troubleshooting PROBLEM Configured Already Invalid Login PROBABLE CAUSE Displayed when an attempt is not collated Ensure the machine has paper loaded.
System Administration Guide
Page 5
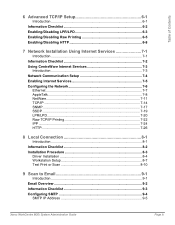
... Installation Using Internet Services 7-1 Introduction 7-1 Information Checklist 7-2 Using CentreWare Internet Services 7-3 Introduction 7-3 Network Communication Setup 7-4 Enabling Internet Services 7-5 Configuring the Network 7-6 Ethernet 7-7 AppleTalk 7-8 NetWare 7-11 TCP/IP 7-14 SNMP...7-17 SSDP ...7-19 LPR/LPD 7-20 Raw TCP/IP Printing ... 8-4 Workstation Setup 8-7 Test Print or Scan 8-10 9 Scan to Email 9-1 Introduction 9-1 Email Overview 9-2 Information Checklist 9-3 Configuring SMTP 9-4 SMTP IP Address 9-5 Xerox WorkCentre M20i System Administration Guide Page iii
... Installation Using Internet Services 7-1 Introduction 7-1 Information Checklist 7-2 Using CentreWare Internet Services 7-3 Introduction 7-3 Network Communication Setup 7-4 Enabling Internet Services 7-5 Configuring the Network 7-6 Ethernet 7-7 AppleTalk 7-8 NetWare 7-11 TCP/IP 7-14 SNMP...7-17 SSDP ...7-19 LPR/LPD 7-20 Raw TCP/IP Printing ... 8-4 Workstation Setup 8-7 Test Print or Scan 8-10 9 Scan to Email 9-1 Introduction 9-1 Email Overview 9-2 Information Checklist 9-3 Configuring SMTP 9-4 SMTP IP Address 9-5 Xerox WorkCentre M20i System Administration Guide Page iii
System Administration Guide
Page 6
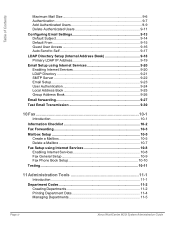
Table of Contents Maximum Mail Size 9-6 Authentication 9-7 Add Authenticated Users 9-9 Delete Authenticated Users 9-11 Configuring Email Settings 9-13 Default Subject 9-14 Default From 9-15 Guest User Access 9-16 Auto Send to Self 9-17 LDAP Directory Setup (Internal Address Book 9-18 ...-10 Testing ...10-11 11 Administration Tools 11-1 Introduction 11-1 Department Codes 11-2 Creating Departments 11-2 Printing Department Data 11-4 Managing Departments 11-5 Page iv Xerox WorkCentre M20i System Administration Guide
Table of Contents Maximum Mail Size 9-6 Authentication 9-7 Add Authenticated Users 9-9 Delete Authenticated Users 9-11 Configuring Email Settings 9-13 Default Subject 9-14 Default From 9-15 Guest User Access 9-16 Auto Send to Self 9-17 LDAP Directory Setup (Internal Address Book 9-18 ...-10 Testing ...10-11 11 Administration Tools 11-1 Introduction 11-1 Department Codes 11-2 Creating Departments 11-2 Printing Department Data 11-4 Managing Departments 11-5 Page iv Xerox WorkCentre M20i System Administration Guide
System Administration Guide
Page 7
... using Internet Services 11-20 Enabling Internet Services 11-20 Checking Printer Status 11-21 Printing Reports 11-22 Defining the Printer 11-23 Checking Configurations 11-24 Setting Alert Notifications 11-25 Checking Billing and Counters 11-26 Making General Maintenance Settings 11-27 Upgrading Firmware 11-28 Installing Flash...-36 Enabling or Disabling Auxiliary Access 11-37 12 Problem Solving 12-1 Introduction 12-1 Problem Solving Procedure 12-2 Scan to Email 12-3 13 Glossary 13-1 Xerox WorkCentre M20i System Administration Guide Page v
... using Internet Services 11-20 Enabling Internet Services 11-20 Checking Printer Status 11-21 Printing Reports 11-22 Defining the Printer 11-23 Checking Configurations 11-24 Setting Alert Notifications 11-25 Checking Billing and Counters 11-26 Making General Maintenance Settings 11-27 Upgrading Firmware 11-28 Installing Flash...-36 Enabling or Disabling Auxiliary Access 11-37 12 Problem Solving 12-1 Introduction 12-1 Problem Solving Procedure 12-2 Scan to Email 12-3 13 Glossary 13-1 Xerox WorkCentre M20i System Administration Guide Page v


