Readme file
Page 1
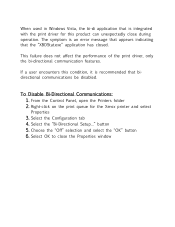
.... If a user encounters this condition, it is integrated with the print driver for the Xerox printer and select Properties 3. button 5. The symptom is an error message that appears indicating that bidirectional communications be disabled. From the Control Panel, open the Printers folder 2. Right-click on the print queue for this product can unexpectedly...
.... If a user encounters this condition, it is integrated with the print driver for the Xerox printer and select Properties 3. button 5. The symptom is an error message that appears indicating that bidirectional communications be disabled. From the Control Panel, open the Printers folder 2. Right-click on the print queue for this product can unexpectedly...
Getting Started Guide
Page 10
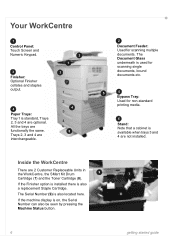
... scanning multiple documents. If the Finisher option is installed there is also located here. Inside the WorkCentre There are not installed. All the trays are optional. The Serial Number (9) is also a replacement Staple Cartridge. Your WorkCentre 1 Control Panel: Touch Screen and Numeric Keypad. 3 Finisher: Optional Finisher collates and staples output. 4 Paper Trays: Tray 1 is...
... scanning multiple documents. If the Finisher option is installed there is also located here. Inside the WorkCentre There are not installed. All the trays are optional. The Serial Number (9) is also a replacement Staple Cartridge. Your WorkCentre 1 Control Panel: Touch Screen and Numeric Keypad. 3 Finisher: Optional Finisher collates and staples output. 4 Paper Trays: Tray 1 is...
Getting Started Guide
Page 11
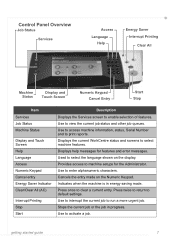
Use to select machine features. Displays the current WorkCentre status and screens to view the current job status and other job queues. Displays help messages for the Administrator. Press once to machine setups for ... a more urgent job. Use to interrupt the current job to print reports. Used to enable selection of features. Indicates when the machine is in progress. Control Panel Overview Job Status Services Access Language Help Energy Saver Interrupt Printing Clear All Machine Status Display and Touch Screen Numeric Keypad Cancel Entry Start Stop...
Use to select machine features. Displays the current WorkCentre status and screens to view the current job status and other job queues. Displays help messages for the Administrator. Press once to machine setups for ... a more urgent job. Use to interrupt the current job to print reports. Used to enable selection of features. Indicates when the machine is in progress. Control Panel Overview Job Status Services Access Language Help Energy Saver Interrupt Printing Clear All Machine Status Display and Touch Screen Numeric Keypad Cancel Entry Start Stop...

Getting Started Guide
Page 13
...RJ45 Network Connector Network Setup Using DHCP 1 After the WorkCentre starts, it negotiates with the DHCP server for the network setup to complete and then check the allocated IP address as follows: • On the Control Panel, select the Access button and then enter the Administrator ...IP address. If copying is a 4150s, 4150x or 4150xf, follow these instructions to connect the WorkCentre to Troubleshooting on to the next step to manually assign an IP address provided by Xerox. 2 Continue on page 31. Test the WorkCentre Before connecting the WorkCentre to your network, make 3 copies....
...RJ45 Network Connector Network Setup Using DHCP 1 After the WorkCentre starts, it negotiates with the DHCP server for the network setup to complete and then check the allocated IP address as follows: • On the Control Panel, select the Access button and then enter the Administrator ...IP address. If copying is a 4150s, 4150x or 4150xf, follow these instructions to connect the WorkCentre to Troubleshooting on to the next step to manually assign an IP address provided by Xerox. 2 Continue on page 31. Test the WorkCentre Before connecting the WorkCentre to your network, make 3 copies....
Getting Started Guide
Page 14
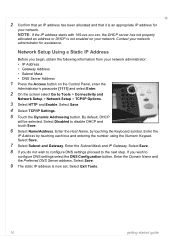
... Host Name, by touching each box and entering the number using the Numeric Keypad. Select Save. 9 The static IP address is not enabled on the Control Panel, enter the Administrator's passcode [1111] and select Enter. 2 On the screen select Go to configure DNS settings select the DNS Configuration button. Select Save. 8 If...
... Host Name, by touching each box and entering the number using the Numeric Keypad. Select Save. 9 The static IP address is not enabled on the Control Panel, enter the Administrator's passcode [1111] and select Enter. 2 On the screen select Go to configure DNS settings select the DNS Configuration button. Select Save. 8 If...
Getting Started Guide
Page 21
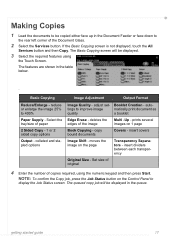
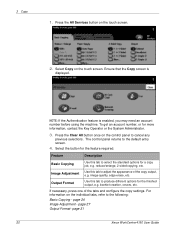
... original 4 Enter the number of the Document Glass. 2 Select the Services button. NOTE: To confirm the Copy job, press the Job Status button on the Control Panel to 400% Paper Supply - If the Basic Copying screen is not displayed, touch the All Services button and then Copy. The Basic Copying screen will...
... original 4 Enter the number of the Document Glass. 2 Select the Services button. NOTE: To confirm the Copy job, press the Job Status button on the Control Panel to 400% Paper Supply - If the Basic Copying screen is not displayed, touch the All Services button and then Copy. The Basic Copying screen will...
Getting Started Guide
Page 25
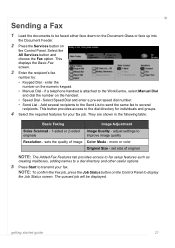
... recipients. set speed dial number. • Send List - enter the number on the Control Panel. Sending a Fax 1 Load the documents to be displayed. if a telephone handset is attached to the WorkCentre, select Manual Dial and dial the number on the Control Panel to the dial directory for individuals and groups. 4 Select the required features for...
... recipients. set speed dial number. • Send List - enter the number on the Control Panel. Sending a Fax 1 Load the documents to be displayed. if a telephone handset is attached to the WorkCentre, select Manual Dial and dial the number on the Control Panel to the dial directory for individuals and groups. 4 Select the required features for...

Getting Started Guide
Page 27
... versus file size NOTE: The Option tab enables Document Management options. NOTE: To confirm the scan job, press the Job Status button on the Control Panel to scan your documents. You can be used Original Size - Scan the complete page Original Type - Text or photo Scan Presets - Sets the... Template you to display the Job Status screen. Touch the All Services button and choose the Network Scanning option. from the options on the Control Panel. The Refresh Destinations tab will be scanned either face down on the Document Glass or face up into the Document Feeder. 2 Press the...
... versus file size NOTE: The Option tab enables Document Management options. NOTE: To confirm the scan job, press the Job Status button on the Control Panel to scan your documents. You can be used Original Size - Scan the complete page Original Type - Text or photo Scan Presets - Sets the... Template you to display the Job Status screen. Touch the All Services button and choose the Network Scanning option. from the options on the Control Panel. The Refresh Destinations tab will be scanned either face down on the Document Glass or face up into the Document Feeder. 2 Press the...
Getting Started Guide
Page 29
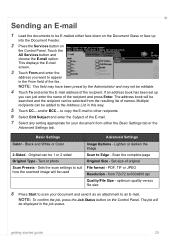
If an address book has been set up into the Document Feeder. 2 Press the Services button on the Control Panel. Multiple recipients can just enter the name of the fax . Basic Settings Advanced Settings Color - PDF, TIF or JPEG how the scanned image will be ... it as an attachment to an E-mail. Scan the complete page Original Type - NOTE: To confirm the job, press the Job Status button on the Control Panel. This displays the E-mail screen. 3 Touch From and enter the address you can be added to the Address List in the From field of the...
If an address book has been set up into the Document Feeder. 2 Press the Services button on the Control Panel. Multiple recipients can just enter the name of the fax . Basic Settings Advanced Settings Color - PDF, TIF or JPEG how the scanned image will be ... it as an attachment to an E-mail. Scan the complete page Original Type - NOTE: To confirm the job, press the Job Status button on the Control Panel. This displays the E-mail screen. 3 Touch From and enter the address you can be added to the Address List in the From field of the...

Getting Started Guide
Page 34
..., meaning you to the E-mail features is an excellent feature for scanning documents for inclusion in color and sent to call out a Xerox service representative. Access to reduce down time. Moments later it for a presentation, as handouts or as meeting notes. This enables you ...mail recipient or recipients. Presentation packs can replace the consumable without having to yourself using the Services button on the Control Panel and the All Services button on the WorkCentre that need replenishing or replacing, such as E-mail attachments to your needs, be it will be in your own...
..., meaning you to the E-mail features is an excellent feature for scanning documents for inclusion in color and sent to call out a Xerox service representative. Access to reduce down time. Moments later it for a presentation, as handouts or as meeting notes. This enables you ...mail recipient or recipients. Presentation packs can replace the consumable without having to yourself using the Services button on the Control Panel and the All Services button on the WorkCentre that need replenishing or replacing, such as E-mail attachments to your needs, be it will be in your own...
Getting Started Guide
Page 35
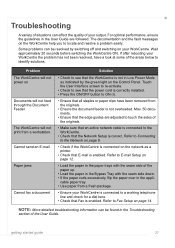
...50 documents. • Ensure that the edge guides are followed. Refer to the WorkCentre. • Check that an active network cable is correctly installed. • Press the ON/OFF button to E-mail Setup on the Control Panel. NOTE: More detailed troubleshooting information can be resolved by the green light on ...that all staples or paper clips have a look at some of the areas below to the Network on page 9. • Check if the WorkCentre is connected on page 14. The documentation and the fault messages on your output. Cannot send an E-mail Paper jams Cannot fax a document ...
...50 documents. • Ensure that the edge guides are followed. Refer to the WorkCentre. • Check that an active network cable is correctly installed. • Press the ON/OFF button to E-mail Setup on the Control Panel. NOTE: More detailed troubleshooting information can be resolved by the green light on ...that all staples or paper clips have a look at some of the areas below to the Network on page 9. • Check if the WorkCentre is connected on page 14. The documentation and the fault messages on your output. Cannot send an E-mail Paper jams Cannot fax a document ...
Quick Reference Poster
Page 1
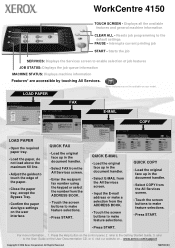
Interrupts current printing job START - Press the Help button on ... refer to the default settings PAUSE - www.xerox.com/support Copyright © 2006 Xerox Corporation. LOAD PAPER FAX E-MAIL COPY LOAD PAPER • Open the required paper tray. • Load the ... the All Services screen. • Input the E-mail address or make feature selections. • Press START. visit our website on the control panel, 2. WorkCentre 4150 TOUCH SCREEN - Displays all the available features and general machine information CLEAR ALL - QUICK FAX • Load the original face up in...
Interrupts current printing job START - Press the Help button on ... refer to the default settings PAUSE - www.xerox.com/support Copyright © 2006 Xerox Corporation. LOAD PAPER FAX E-MAIL COPY LOAD PAPER • Open the required paper tray. • Load the ... the All Services screen. • Input the E-mail address or make feature selections. • Press START. visit our website on the control panel, 2. WorkCentre 4150 TOUCH SCREEN - Displays all the available features and general machine information CLEAR ALL - QUICK FAX • Load the original face up in...
User Guide
Page 26
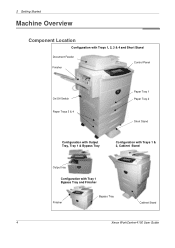
2 Getting Started Machine Overview Component Location Configuration with Trays 1, 2, 3 & 4 and Short Stand Document Feeder Finisher Control Panel On/Off Switch Paper Trays 3 & 4 Paper Tray 1 Paper Tray 2 Short Stand Configuration with Output Tray, Tray 1 & Bypass Tray Configuration with Trays 1 & 2, Cabinet Stand Output tray Configuration with Tray 1 Bypass Tray and Finisher Finisher Bypass Tray Cabinet Stand 4 Xerox WorkCentre 4150 User Guide
2 Getting Started Machine Overview Component Location Configuration with Trays 1, 2, 3 & 4 and Short Stand Document Feeder Finisher Control Panel On/Off Switch Paper Trays 3 & 4 Paper Tray 1 Paper Tray 2 Short Stand Configuration with Output Tray, Tray 1 & Bypass Tray Configuration with Trays 1 & 2, Cabinet Stand Output tray Configuration with Tray 1 Bypass Tray and Finisher Finisher Bypass Tray Cabinet Stand 4 Xerox WorkCentre 4150 User Guide
User Guide
Page 27
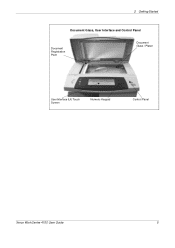
2 Getting Started Document Glass, User Interface and Control Panel Document Registration Point Document Glass / Platen User Interface (UI) Touch Screen Numeric Keypad Control Panel Xerox WorkCentre 4150 User Guide 5
2 Getting Started Document Glass, User Interface and Control Panel Document Registration Point Document Glass / Platen User Interface (UI) Touch Screen Numeric Keypad Control Panel Xerox WorkCentre 4150 User Guide 5

User Guide
Page 29
... of the machine. Access Numeric Keypad Cancel Entry Energy Saver Clear All (AC) Accesses Tools, used to an alternative language. Xerox WorkCentre 4150 User Guide 7 Press to wake up the machine. 2 Getting Started Control Panel Overview Job Status Services Display and Touch Screen Help Language Access Energy Saver Clear All Interrupt Printing Display Brightness Machine...
... of the machine. Access Numeric Keypad Cancel Entry Energy Saver Clear All (AC) Accesses Tools, used to an alternative language. Xerox WorkCentre 4150 User Guide 7 Press to wake up the machine. 2 Getting Started Control Panel Overview Job Status Services Display and Touch Screen Help Language Access Energy Saver Clear All Interrupt Printing Display Brightness Machine...
User Guide
Page 30
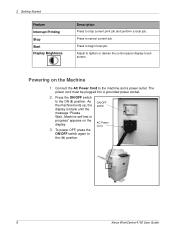
... and a power outlet. ON/OFF switch AC Power Cord 8 Xerox WorkCentre 4150 User Guide As the machine boots up, the display is blank until the message "Please Wait...Machine self test in progress" appears on the Machine 1. Press to lighten or darken the control panel display touch screen. Adjust to cancel current job. Press the...
... and a power outlet. ON/OFF switch AC Power Cord 8 Xerox WorkCentre 4150 User Guide As the machine boots up, the display is blank until the message "Please Wait...Machine self test in progress" appears on the Machine 1. Press to lighten or darken the control panel display touch screen. Adjust to cancel current job. Press the...

User Guide
Page 32
To Log Off: 1) Press Access on the control panel. 2) Select Logout on the touch screen. When the Auditron is enabled, use the keypad to enter a 4 digit password and then select Enter. 2. When Network Accounting has been enabled, enter a valid User ID and Account ID and select Enter. 3. Complete your job. 4. Machine Status The Machine Status feature displays the following: • Machine Information • Error Messages • Service Information 10 Xerox WorkCentre 4150 User Guide 2 Getting Started 1.
To Log Off: 1) Press Access on the control panel. 2) Select Logout on the touch screen. When the Auditron is enabled, use the keypad to enter a 4 digit password and then select Enter. 2. When Network Accounting has been enabled, enter a valid User ID and Account ID and select Enter. 3. Complete your job. 4. Machine Status The Machine Status feature displays the following: • Machine Information • Error Messages • Service Information 10 Xerox WorkCentre 4150 User Guide 2 Getting Started 1.
User Guide
Page 34
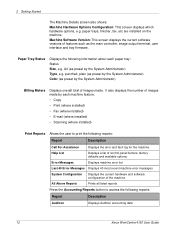
...: Report Description Auditron Displays Auditron accounting data 12 Xerox WorkCentre 4150 User Guide A4 (as preset by the System Administrator) Billing Meters Displays overall total of images made . It also displays the number of images made by the System Administrator) Type, e.g. Help List Displays a list of control panel buttons, factory defaults and available options Error...
...: Report Description Auditron Displays Auditron accounting data 12 Xerox WorkCentre 4150 User Guide A4 (as preset by the System Administrator) Billing Meters Displays overall total of images made . It also displays the number of images made by the System Administrator) Type, e.g. Help List Displays a list of control panel buttons, factory defaults and available options Error...

User Guide
Page 37
... the Machine Status button on the control panel. The Tools facility is recommended that the settings and options are customized to fully meet the requirements of the machine, therefore the screens are critical to the operation of the Users. Xerox WorkCentre 4150 User Guide 15 For additional Help If... you need any time to access the online help on using the Access button on the control panel. NOTE: The serial number can : 1) Refer to the Getting ...
... the Machine Status button on the control panel. The Tools facility is recommended that the settings and options are customized to fully meet the requirements of the machine, therefore the screens are critical to the operation of the Users. Xerox WorkCentre 4150 User Guide 15 For additional Help If... you need any time to access the online help on using the Access button on the control panel. NOTE: The serial number can : 1) Refer to the Getting ...
User Guide
Page 42
Select Copy on the control panel to select the standard options for the feature required. To get an account number, or for the finished output, e.g. reduce/enlarge, 2 sided copying, etc. booklet creation, covers, etc. page 31 20 Xerox WorkCentre 4150 User Guide Ensure that the Copy screen... page 24 Image Adjustment - NOTE: If the Authentication feature is displayed. Press the Clear All button once on the touch screen. The control panel returns to the following: Basic Copying - image quality, edge erase, etc. For information on the touch screen. 2. 3 Copy 1. ...
Select Copy on the control panel to select the standard options for the feature required. To get an account number, or for the finished output, e.g. reduce/enlarge, 2 sided copying, etc. booklet creation, covers, etc. page 31 20 Xerox WorkCentre 4150 User Guide Ensure that the Copy screen... page 24 Image Adjustment - NOTE: If the Authentication feature is displayed. Press the Clear All button once on the touch screen. The control panel returns to the following: Basic Copying - image quality, edge erase, etc. For information on the touch screen. 2. 3 Copy 1. ...


