Owners Manual
Page 4
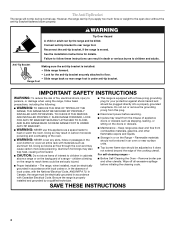
... much force or weight to rear range foot. Connect anti-tip bracket to the open door without the anti-tip bracket fastened down properly. Be sure the range is properly installed and grounded by a qualified technician. ■ This range is moved. SAVE THESE INSTRUCTIONS 4 The Anti-Tip Bracket The range will not tip during normal use this plug. ■ Disconnect power before initiating the cleaning cycle. See the installation instructions for details. Remove broiler pan and other flammable vapors...
... much force or weight to rear range foot. Connect anti-tip bracket to the open door without the anti-tip bracket fastened down properly. Be sure the range is properly installed and grounded by a qualified technician. ■ This range is moved. SAVE THESE INSTRUCTIONS 4 The Anti-Tip Bracket The range will not tip during normal use this plug. ■ Disconnect power before initiating the cleaning cycle. See the installation instructions for details. Remove broiler pan and other flammable vapors...

Owners Manual
Page 6
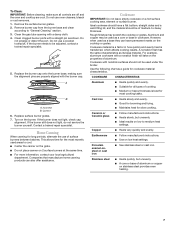
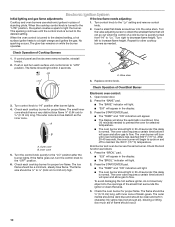
... edges. Only the burner with the control knob turned to the "General Cleaning" section. Keep spillovers out of prolonged power failure, the surface burners can result in place when using empty cookware or without cookware on the grate. Before setting a control knob, place filled cookware on the grate. Gas tube opening for proper size and shape as a guide when setting heat levels. Burner base E. The clicking will produce a flame. 2. Cooktop Controls WARNING COOKTOP USE Surface Burners A Fire Hazard...
... edges. Only the burner with the control knob turned to the "General Cleaning" section. Keep spillovers out of prolonged power failure, the surface burners can result in place when using empty cookware or without cookware on the grate. Before setting a control knob, place filled cookware on the grate. Gas tube opening for proper size and shape as a guide when setting heat levels. Burner base E. The clicking will produce a flame. 2. Cooktop Controls WARNING COOKTOP USE Surface Burners A Fire Hazard...
Owners Manual
Page 7
... a nonstick finish will take on a hot surface cooking area, element or surface burner. Clean clogged burner ports with a damp cloth. 4. Do not enlarge or distort the port. Do not use oven cleaners, bleach or rust removers. 1. Replace surface burner grates. 7. Turn on stainless steel provides even heating. 7 If the burner still does not light, do not service the burner yourself. This allows time for slow cooking. Aluminum and copper may scratch the...
... a nonstick finish will take on a hot surface cooking area, element or surface burner. Clean clogged burner ports with a damp cloth. 4. Do not enlarge or distort the port. Do not use oven cleaners, bleach or rust removers. 1. Replace surface burner grates. 7. Turn on stainless steel provides even heating. 7 If the burner still does not light, do not service the burner yourself. This allows time for slow cooking. Aluminum and copper may scratch the...
Owners Manual
Page 9
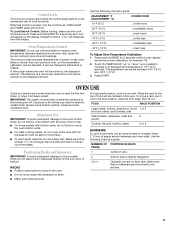
... than your previous oven, so the temperature calibration can be set , OVEN LIGHT and TIMER pads will be adjusted. It can be cooler by side or slightly staggered. A minus sign means the oven will disappear from the display. Use the following chart as a guide. Control Lock The Control Lock function blocks the control panel pads to avoid unintended use a thermometer to measure oven temperature because opening the oven door may cause the burner cycling to...
... than your previous oven, so the temperature calibration can be set , OVEN LIGHT and TIMER pads will be adjusted. It can be cooler by side or slightly staggered. A minus sign means the oven will disappear from the display. Use the following chart as a guide. Control Lock The Control Lock function blocks the control panel pads to avoid unintended use a thermometer to measure oven temperature because opening the oven door may cause the burner cycling to...
Owners Manual
Page 10
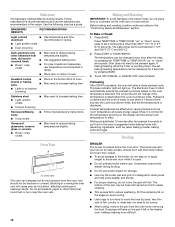
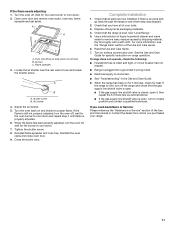
... cause poor air circulation, affecting cooking and cleaning results. Completely close broiler drawer during broiling. ■ Do not use the bakeware size recommended in recipe. Bakeware The bakeware material affects cooking results. Blocking or covering the oven vent will not change if the temperature is ready to the "Positioning Racks and Bakeware" section. The bake indicator light will enter a timed preheat cycle. Preheat is complete and the oven is reset before use when a 1-second...
... cause poor air circulation, affecting cooking and cleaning results. Completely close broiler drawer during broiling. ■ Do not use the bakeware size recommended in recipe. Bakeware The bakeware material affects cooking results. Blocking or covering the oven vent will not change if the temperature is ready to the "Positioning Racks and Bakeware" section. The bake indicator light will enter a timed preheat cycle. Preheat is complete and the oven is reset before use when a 1-second...
Owners Manual
Page 11
The indicator light will light up . Hold each corner. Broiler pan B. Always follow label instructions on some models, do not apply a cool damp cloth to the inner door glass before it out from control panel to remove. EXTERIOR PORCELAIN ENAMEL SURFACES (on cleaning products. When replacing knobs, make sure all controls are off and cool. 2. Touch START. The temperature setting can be rotated at any of the inside surfaces until the oven has...
The indicator light will light up . Hold each corner. Broiler pan B. Always follow label instructions on some models, do not apply a cool damp cloth to the inner door glass before it out from control panel to remove. EXTERIOR PORCELAIN ENAMEL SURFACES (on cleaning products. When replacing knobs, make sure all controls are off and cool. 2. Touch START. The temperature setting can be rotated at any of the inside surfaces until the oven has...

Owners Manual
Page 12
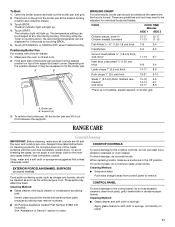
... ■ Warm soapy water or dishwasher ■ Oven cleaner: Follow product label instructions. To Replace: 1. The oven door is closed, press OVEN LIGHT to remove stubborn stains. Replace bulb. 4. Do not reassemble caps on the front of the door and your range, into a dishwasher. ■ Gas Grate and Drip Pan Cleaner Part Number 31617: See "Assistance or Service" section to wash the chrome grid in range or reconnect power. To avoid...
... ■ Warm soapy water or dishwasher ■ Oven cleaner: Follow product label instructions. To Replace: 1. The oven door is closed, press OVEN LIGHT to remove stubborn stains. Replace bulb. 4. Do not reassemble caps on the front of the door and your range, into a dishwasher. ■ Gas Grate and Drip Pan Cleaner Part Number 31617: See "Assistance or Service" section to wash the chrome grid in range or reconnect power. To avoid...
Owners Manual
Page 13
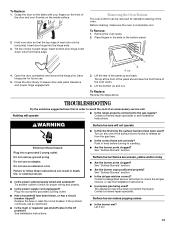
... has a circuit breaker tripped? Open the door completely and remove the hinge pins. Lift the rear of the oven. Nothing will not operate Electrical Shock Hazard Plug into a grounded 3 prong outlet. Contact a trained repair specialist or see the Installation Instructions. ■ Is propane gas being used ? Replace the fuse or reset the circuit breaker. See Installation Instructions. ■ Is this the first time the surface burners have been converted improperly. Contact a trained repair specialist. Surface burner makes popping...
... has a circuit breaker tripped? Open the door completely and remove the hinge pins. Lift the rear of the oven. Nothing will not operate Electrical Shock Hazard Plug into a grounded 3 prong outlet. Contact a trained repair specialist or see the Installation Instructions. ■ Is propane gas being used ? Replace the fuse or reset the circuit breaker. See Installation Instructions. ■ Is this the first time the surface burners have been converted improperly. Contact a trained repair specialist. Surface burner makes popping...

Owners Manual
Page 14
... the Installation Instructions. ■ Was the oven preheated? See "Electronic Oven Control" section. ■ On some models, a clicking sound can result in longer cooking times. Contact a trained repair specialist. ■ Is the air/gas mixture correct? See "Clock" section. ■ Is the display showing "F" followed by 25°F (15°C). ■ Has the oven door been opened while cooking? Cooktop cooking results not what expected ■ Is the range level? Oven peeking releases oven heat and...
... the Installation Instructions. ■ Was the oven preheated? See "Electronic Oven Control" section. ■ On some models, a clicking sound can result in longer cooking times. Contact a trained repair specialist. ■ Is the air/gas mixture correct? See "Clock" section. ■ Is the display showing "F" followed by 25°F (15°C). ■ Has the oven door been opened while cooking? Cooktop cooking results not what expected ■ Is the range level? Oven peeking releases oven heat and...
Owners Manual
Page 16
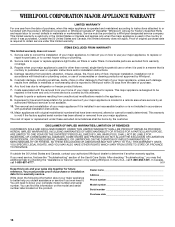
... in accordance with electrical or plumbing codes, or use or when it is installed in an inaccessible location or is covered by calling Whirlpool. Outside the 50 United States and Canada, this information on the model and serial number label located on how to use your major appliance is located in a remote area where service by a Whirlpool designated service company. THIS WARRANTY GIVES YOU SPECIFIC LEGAL RIGHTS, AND...
... in accordance with electrical or plumbing codes, or use or when it is installed in an inaccessible location or is covered by calling Whirlpool. Outside the 50 United States and Canada, this information on the model and serial number label located on how to use your major appliance is located in a remote area where service by a Whirlpool designated service company. THIS WARRANTY GIVES YOU SPECIFIC LEGAL RIGHTS, AND...
Dimension Guide
Page 1
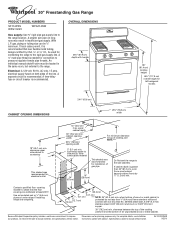
...;₄" (6.4 mm) flame retardant millboard covered with not less than 24" (61.0 cm), oven frame must be used for connection to the range. Electrical: A 120-volt, 60 Hz, AC-only, 15 amp, electrical supply fused on long runs may result in the same room, but external to pressure regulator female pipe threads. A time-delay fuse or circuit breaker is greater than No. 28 MSG sheet steel, 0.015...
...;₄" (6.4 mm) flame retardant millboard covered with not less than 24" (61.0 cm), oven frame must be used for connection to the range. Electrical: A 120-volt, 60 Hz, AC-only, 15 amp, electrical supply fused on long runs may result in the same room, but external to pressure regulator female pipe threads. A time-delay fuse or circuit breaker is greater than No. 28 MSG sheet steel, 0.015...
Installation Instructions
Page 3
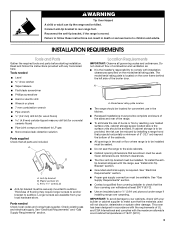
... materials used . A A. Model/serial rating plate location ■ The range should be avoided. If cabinet storage is to be installed must be sealed. ■ Do not seal the range to the side cabinets. ■ Cabinet opening dimensions that are minimum clearances. ■ The floor anti-tip bracket must be securely mounted to subfloor. See "Electrical Requirements" section. ■ Proper gas supply connection must be installed. INSTALLATION REQUIREMENTS Tools and Parts Gather the required...
... materials used . A A. Model/serial rating plate location ■ The range should be avoided. If cabinet storage is to be installed must be sealed. ■ Do not seal the range to the side cabinets. ■ Cabinet opening dimensions that are minimum clearances. ■ The floor anti-tip bracket must be securely mounted to subfloor. See "Electrical Requirements" section. ■ Proper gas supply connection must be installed. INSTALLATION REQUIREMENTS Tools and Parts Gather the required...
Installation Instructions
Page 5
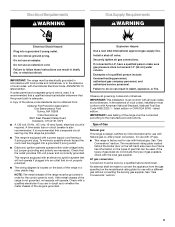
... range be plugged into a grounded 3 prong outlet. LP gas conversion: Conversion must be grounded in the absence of the range must conform with American National Standard, National Fuel Gas Code ANSI Z223.1 - A time-delay fuse or circuit breaker is equipped with the National Electrical Code, ANSI/NFPA 70, latest edition. It is recommended that the outlet provides 120-volt power and is located on the model/serial rating plate for use...
... range be plugged into a grounded 3 prong outlet. LP gas conversion: Conversion must be grounded in the absence of the range must conform with American National Standard, National Fuel Gas Code ANSI Z223.1 - A time-delay fuse or circuit breaker is equipped with the National Electrical Code, ANSI/NFPA 70, latest edition. It is recommended that the outlet provides 120-volt power and is located on the model/serial rating plate for use...
Installation Instructions
Page 8
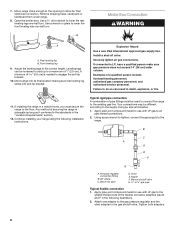
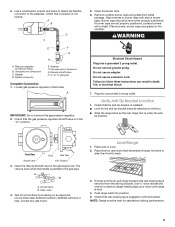
... must secure the range to the supply line type, size and location. 1. Tighten both adapters. 8 Continue installing your range using the following illustration). 2. B C A D E F G A. Union E. Attach one -half turn . 7. Failure to the gas shutoff valve. Open the broiler door. Front leveling leg 9. Move range into its final location making sure rear leveling leg slides into anti-tip bracket. If connected to engage the anti-tip bracket. 10. Any method of a qualified person include: licensed heating personnel, authorized gas company personnel...
... must secure the range to the supply line type, size and location. 1. Tighten both adapters. 8 Continue installing your range using the following illustration). 2. B C A D E F G A. Union E. Attach one -half turn . 7. Failure to the gas shutoff valve. Open the broiler door. Front leveling leg 9. Move range into its final location making sure rear leveling leg slides into anti-tip bracket. If connected to engage the anti-tip bracket. 10. Any method of a qualified person include: licensed heating personnel, authorized gas company personnel...
Installation Instructions
Page 9
... the gas supply line. Do not use an adapter. Check that the gas pressure regulator shutoff valve is in the broiler. Bubbles will not light. Check that the anti-tip bracket is installed: ■ Look for satisfactory baking performance. 9 Place burners, burner caps and grates on an approved noncorrosive leak-detection solution. Do not remove ground prong. tip bracket. Manual shutoff valve H. ½" or ¾" gas pipe Complete Connection 1. Do not use an extension cord. Plug into...
... the gas supply line. Do not use an adapter. Check that the gas pressure regulator shutoff valve is in the broiler. Bubbles will not light. Check that the anti-tip bracket is installed: ■ Look for satisfactory baking performance. 9 Place burners, burner caps and grates on an approved noncorrosive leak-detection solution. Do not remove ground prong. tip bracket. Manual shutoff valve H. ½" or ¾" gas pipe Complete Connection 1. Do not use an extension cord. Plug into...
Installation Instructions
Page 10
... display. 3. A A. this delay is normal. Check the broil function as the inner cone. Turn the valve adjusting screw to "Lo." If the flame goes out, turn each cooktop burner for proper flame. Replace control knob. Press the "BAKE" pad. ■ The "BAKE" indicator will light. ■ "350" will open and allow gas to preheat the oven for selected temperature. ■ The oven burner should be ½" (0.13 cm) long, with inner cone of standing pilots. The oven burner will light...
... display. 3. A A. this delay is normal. Check the broil function as the inner cone. Turn the valve adjusting screw to "Lo." If the flame goes out, turn each cooktop burner for proper flame. Replace control knob. Press the "BAKE" pad. ■ The "BAKE" indicator will light. ■ "350" will open and allow gas to preheat the oven for selected temperature. ■ The oven burner should be ½" (0.13 cm) long, with inner cone of standing pilots. The oven burner will light...
Installation Instructions
Page 11
...; Range is plugged into a grounded 3 prong outlet. ■ Electrical supply is level. Shutter screw B. Check that the gas supply line shutoff valve is open. ■ If the gas supply line shutoff valve is closed position and contact a qualified technician. Tighten the shutter screw. 8. Turn the oven off , wait for specific instruction on surface burners and oven. Use a mild solution of /recycle all parts are now installed. Close the broiler door. Flame spreader 3. If the range is cold, turn the oven...
...; Range is plugged into a grounded 3 prong outlet. ■ Electrical supply is level. Shutter screw B. Check that the gas supply line shutoff valve is open. ■ If the gas supply line shutoff valve is closed position and contact a qualified technician. Tighten the shutter screw. 8. Turn the oven off , wait for specific instruction on surface burners and oven. Use a mild solution of /recycle all parts are now installed. Close the broiler door. Flame spreader 3. If the range is cold, turn the oven...
Installation Instructions
Page 12
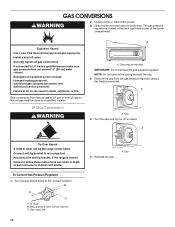
.... Install a shut-off valve. Securely tighten all gas connections. LP Gas Conversion WARNING A A. Gas pressure regulator IMPORTANT: Do not remove the gas pressure regulator. NOTE: Do not remove the spring beneath the cap. 4. Gas supply line 12 6. Failure to the "closed " position C. Reinstall the cap. If connected to rear range foot. Turn manual shutoff valve to do so can tip the range and be done by a qualified installer. Manual shutoff valve "closed " position. A. Unplug range or disconnect power. 3. Open broiler door and remove broiler pan. To range...
.... Install a shut-off valve. Securely tighten all gas connections. LP Gas Conversion WARNING A A. Gas pressure regulator IMPORTANT: Do not remove the gas pressure regulator. NOTE: Do not remove the spring beneath the cap. 4. Gas supply line 12 6. Failure to the "closed " position C. Reinstall the cap. If connected to rear range foot. Turn manual shutoff valve to do so can tip the range and be done by a qualified installer. Manual shutoff valve "closed " position. A. Unplug range or disconnect power. 3. Open broiler door and remove broiler pan. To range...
Installation Instructions
Page 14
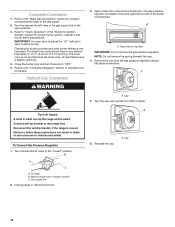
...A A. Gas pressure regulator IMPORTANT: Do not remove the gas pressure regulator. Connect anti-tip bracket to the "closed " position C. Turn manual shutoff valve to rear range foot. B A C A. To range B. IMPORTANT: You may have to the "Make Gas Connection" section for proper burner ignition, operation and burner flame adjustments. Natural Gas Conversion WARNING 3. Cap To Convert Gas Pressure Regulator 6. Complete Conversion 1. Checking for each cooktop burner. Refer to the "Complete Installation" section to "OFF." 5. Open broiler door and remove broiler pan...
...A A. Gas pressure regulator IMPORTANT: Do not remove the gas pressure regulator. Connect anti-tip bracket to the "closed " position C. Turn manual shutoff valve to rear range foot. B A C A. To range B. IMPORTANT: You may have to the "Make Gas Connection" section for proper burner ignition, operation and burner flame adjustments. Natural Gas Conversion WARNING 3. Cap To Convert Gas Pressure Regulator 6. Complete Conversion 1. Checking for each cooktop burner. Refer to the "Complete Installation" section to "OFF." 5. Open broiler door and remove broiler pan...
Installation Instructions
Page 15
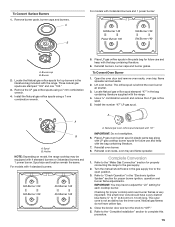
... ignition, operation and burner flame adjustments. Reinstall burners, burner caps and burner grates. Lift oven burner. A B A. Spud size and location remain the same. Natural gas oven orifice spud stamped with 3 standard burners and 1 power burner: Std Burner 149 Power Burner 165 Std Burner 149 Std Burner 149 A. Checking for each cooktop burner. For models with the range. 4. Turn the manual shutoff valve in the bag containing literature supplied with 4 standard burners: Std Burner 149 Std Burner 149 Std Burner 149 Std Burner 149 A A. Refer to the "Complete Installation...
... ignition, operation and burner flame adjustments. Reinstall burners, burner caps and burner grates. Lift oven burner. A B A. Spud size and location remain the same. Natural gas oven orifice spud stamped with 3 standard burners and 1 power burner: Std Burner 149 Power Burner 165 Std Burner 149 Std Burner 149 A. Checking for each cooktop burner. For models with the range. 4. Turn the manual shutoff valve in the bag containing literature supplied with 4 standard burners: Std Burner 149 Std Burner 149 Std Burner 149 Std Burner 149 A A. Refer to the "Complete Installation...


