Whirlpool WFG525S0JZ Support and Manuals
Get Help and Manuals for this Whirlpool item
View All Support Options Below
Free Whirlpool WFG525S0JZ manuals!
Problems with Whirlpool WFG525S0JZ?
Ask a Question
Free Whirlpool WFG525S0JZ manuals!
Problems with Whirlpool WFG525S0JZ?
Ask a Question
Popular Whirlpool WFG525S0JZ Manual Pages
Installation Instructions - Page 5

... HUD Part 280). clearance to top of range to the instructions in this range is not applicable, use the Standard for installation of ...codes. Grounded outlet N. opening width F. M. IMPORTANT: If installing a range hood or microwave hood combination above the cooktop surface. Follow the instructions in * D. 297⁄8" (75.9 cm) width E. 257⁄16" (64.6 cm) depth. Model...
Installation Instructions - Page 6

....1. IMPORTANT: This installation must be used , it may result in death, fire, or electrical shock. A smaller size pipe on the types of gas that can be conducted according to follow these instructions can result in the absence of local codes, with a qualified electrician if you not plug an electric spark ignition gas range or any other...
Installation Instructions - Page 7

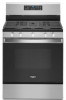
... valve in -line connection to the range. To range
Gas Pressure Regulator
The gas pressure regulator supplied with this range must be disconnected from the supply and fuel lines so range will be level and in line.
■■ Must include a shutoff valve: Install a manual gas line shut-off valve. Gas Supply Pressure Testing
Gas supply pressure for Canada). The rigid...
Installation Instructions - Page 9
... base, cardboard or hardboard to
the range.
8. Manual gas shutoff valve G. 1/2" (1.3 cm) or 3/4"
(1.9 cm) gas pipe H. Move range into its final location, making sure rear leveling leg slides into anti-tip bracket.
Using a pipe wrench to tighten, connect the gas supply to continue installing the range using the following illustration).
2. Gas pressure regulator B. 90° elbow (must...
Installation Instructions - Page 14
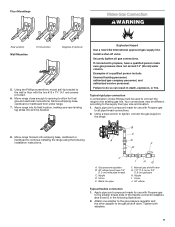
... User Instructions for heat. If you need Assistance or Service:
Please reference the "Assistance or Service" section of the Use and Care Guide or the cover of liquid household cleaner and warm water to the locked position. A
To Replace: 1. However, if removal is necessary, make sure the oven is off the range and check that the gas...
Installation Instructions - Page 15

... bracket to children and adults.
1. To range B.
Failure to follow these instructions can result in death or serious burns to floor or wall per installation instructions.
Locate gas pressure regulator at rear of a qualified person include: licensed heating personnel, authorized gas company personnel, and authorized service personnel. Install a shut-off valve.
Remove storage...
Installation Instructions - Page 18

... or wall per installation instructions.
NOTE: Reinstall one of this manual to complete this procedure.
NOTE: Do not remove the spring beneath the cap. Washer E. Complete Installation (Natural Gas to access the gas pressure regulator. B
A
C
A. Plastic cover B. The outer cone is moved. Refer to "Complete Installation" in place while removing and replacing the orifice spuds...
Installation Instructions - Page 19

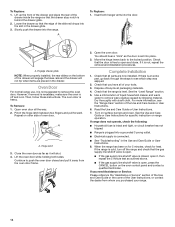
... help hold the gas orifice spud in plastic parts bag for the remaining burners. Place Propane gas orifice spuds in the nut driver while changing it counterclockwise and lifting out. A
A. Remove 2 screws from the front tabs of oven and set it aside on the side. B
A
A. Screws B.
Oven bottom
4. Screws B. Flame spreader 5. Replace the Propane gas orifice spud...
Installation Instructions - Page 20
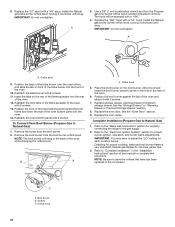
... just been replaced in the "Installation Instructions" section of the oven and attach it clockwise until snug. C
A.
To Convert Oven Broil Burner (Propane Gas to remove. NOTE: The broil burner will be stamped with 2 screws. 11. Orifice hood
5. Refer to the "Electronic Ignition System" section for properly connecting the range to adjust the "LO" setting for...
Owners Manual - Page 1
... model and serial numbers. For future reference, please make a note of the front frame. Model Number Serial Number
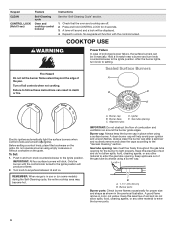
Table of Contents
RANGE SAFETY 2 The Anti-Tip Bracket 3
FEATURE GUIDE ...RANGE CARE 12 Self-Cleaning Cycle 12 General Cleaning 13 Oven Light 13 TROUBLESHOOTING 14 ACCESSORIES 16 WARRANTY 17
W11333082A Register your range at www.whirlpool.com. GAS RANGE USER INSTRUCTIONS...
Owners Manual - Page 4

... SET/OFF
Start Cancel
Feature Clock
Oven cavity light Oven timer
Cooking start Range function
Instructions
The Clock uses a 12-hour cycle. 1. If Start is opened . In Canada, reference the Customer Service ...canceled. FEATURE GUIDE
This manual covers several models.
The Timer can result in hours or minutes up or down arrow keypad to set the length of our website at www.whirlpool.com for...
Owners Manual - Page 6
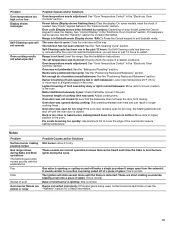
...off . 2. Before setting a control knob, place filled cookware on some models) during the Self-...gas tube opening
IMPORTANT: Do not obstruct the flow of soil and do not allow spills, food, cleaning agents, or any other material to the Ignite position will be lit manually...lockout
Instructions See the "Self-Cleaning Cycle" section.
1. Failure to (Ignite). REMEMBER: When range is ...
Owners Manual - Page 14

...: Ideal cookware should have been used , contact a service technician or see the
yellow or noisy
"Warranty" section for contact information.
See "Demo Mode" in the gas lines: If this manual, or visit producthelp.whirlpool.com. Electronic oven control set to the gas supply: Contact a trained repair specialist or see the Installation Instructions. If you need further assistance or more...
Owners Manual - Page 15
...: Level the range. See the Installation Instructions. Oven was incorrect...set temperature was not preheated: See the "Baking and Roasting" section.
Problem Oven temperature too high or too low Display shows messages
Self-Cleaning cycle will click several times until the oven door is closed : Be sure that batter is normal. On some normal sounds with the explanations. Error code...
Owners Manual - Page 17
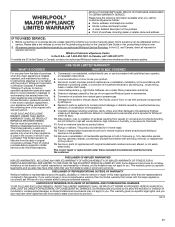
WHIRLPOOL® MAJOR APPLIANCE LIMITED WARRANTY
ATTACH YOUR RECEIPT HERE. Please take a few minutes to review the Troubleshooting section of the original unit's warranty period.
In the event of product replacement, your appliance will pay for factory specified replacement parts and repair labor to correct improper product maintenance or installation, installation not in which it was ...
Whirlpool WFG525S0JZ Reviews
We have not received any reviews for Whirlpool yet.