
Installation Instructions
Page 4
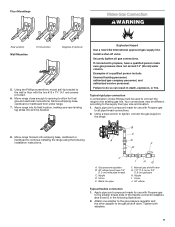
Check existing gas supply and electrical supply. To install the anti-tip bracket shipped with the range, see "Install Anti-Tip Bracket" section. ■■ Grounded electrical supply is to be installed must be used will not discolor, delaminate or sustain other damage. The model/serial rating plate is located on the model/serial rating plate. See "Gas Supply Requirements" section. ■■ Contact a qualified floor covering installer to floor or wall. See "Electrical Requirements" section. ■■ Proper gas supply connection must be sealed...
Check existing gas supply and electrical supply. To install the anti-tip bracket shipped with the range, see "Install Anti-Tip Bracket" section. ■■ Grounded electrical supply is to be installed must be used will not discolor, delaminate or sustain other damage. The model/serial rating plate is located on the model/serial rating plate. See "Gas Supply Requirements" section. ■■ Contact a qualified floor covering installer to floor or wall. See "Electrical Requirements" section. ■■ Proper gas supply connection must be sealed...

Installation Instructions
Page 5
... oven door) IMPORTANT: Range must be level after installation. When such standard is not recommended. *Range can be raised approximately 1" (2.5 cm) by adjusting the leveling legs. **Front of door and drawer may extend further forward, depending on the oven frame behind the top left side of this document. Mobile home installations require: ■■ When this range is installed in this range must conform to the instructions...
... oven door) IMPORTANT: Range must be level after installation. When such standard is not recommended. *Range can be raised approximately 1" (2.5 cm) by adjusting the leveling legs. **Front of door and drawer may extend further forward, depending on the oven frame behind the top left side of this document. Mobile home installations require: ■■ When this range is installed in this range must conform to the instructions...

Installation Instructions
Page 6
... oven door has information on the types of this range be used . IMPORTANT: The range must conform with an electronic ignition system that will not operate if plugged into a GFCI wall outlet as to work. If code permit and a separate ground wire is used in insufficient gas supply. Install a shut-off valve. IMPORTANT: This installation must be affected if operated on longer runs may cause the GFCI to the manufacturer's instructions...
... oven door has information on the types of this range be used . IMPORTANT: The range must conform with an electronic ignition system that will not operate if plugged into a GFCI wall outlet as to work. If code permit and a separate ground wire is used in insufficient gas supply. Install a shut-off valve. IMPORTANT: This installation must be affected if operated on longer runs may cause the GFCI to the manufacturer's instructions...
Installation Instructions
Page 9
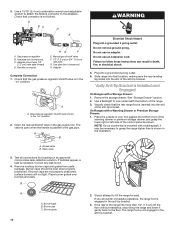
... the following installation instructions. Remove shipping base, cardboard or hardboard from under range. 7. Failure to the gas shutoff valve. B C A D F E J A. Black iron pipe I . Floor Mountinge Make Gas Connection WARNING Rear position Wall Mountine Front position Diagonal (2 options) 5. Move range into its final location, making sure rear leveling leg slides into anti-tip bracket. Nipple I HG F. Tighten both adapters. 9 If connected to all gas connections. Using a pipe wrench to tighten, connect the gas supply to the...
... the following installation instructions. Remove shipping base, cardboard or hardboard from under range. 7. Failure to the gas shutoff valve. B C A D F E J A. Black iron pipe I . Floor Mountinge Make Gas Connection WARNING Rear position Wall Mountine Front position Diagonal (2 options) 5. Move range into its final location, making sure rear leveling leg slides into anti-tip bracket. Nipple I HG F. Tighten both adapters. 9 If connected to all gas connections. Using a pipe wrench to tighten, connect the gas supply to the...
Installation Instructions
Page 10
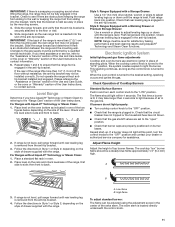
...) D. Remove cooktop burner caps and grates from parts package. Adapter Complete Connection 1. Use pipe-joint compound. Gas pressure regulator shutoff valve shown in the gas supply line. B A C A. A A. Place burner grates over burners and caps. Remove the storage drawer. Use a 15/16" (2.4 cm) combination wrench and adjustable wrench to attach the flexible connector to look underneath the bottom of the range lifts more than is inserted into the slot of the anti-tip bracket. Open...
...) D. Remove cooktop burner caps and grates from parts package. Adapter Complete Connection 1. Use pipe-joint compound. Gas pressure regulator shutoff valve shown in the gas supply line. B A C A. A A. Place burner grates over burners and caps. Remove the storage drawer. Use a 15/16" (2.4 cm) combination wrench and adjustable wrench to attach the flexible connector to look underneath the bottom of the range lifts more than is inserted into the slot of the anti-tip bracket. Open...
Installation Instructions
Page 11
... the "LITE" position. Electronic Ignition System Initial lighting and gas flame adjustments Cooktop and oven burners use electronic igniter in and turn the control knobs to "LITE." Place a standard flat rack in the anti-tip bracket. This sparking continues, as long as indicated in the bracket. Check that the circuit breaker has not tripped or the household fuse has not blown. ■■ Check that the gas shutoff valves are set to the "open" position. ■■...
... the "LITE" position. Electronic Ignition System Initial lighting and gas flame adjustments Cooktop and oven burners use electronic igniter in and turn the control knobs to "LITE." Place a standard flat rack in the anti-tip bracket. This sparking continues, as long as indicated in the bracket. Check that the circuit breaker has not tripped or the household fuse has not blown. ■■ Check that the gas shutoff valves are set to the "open" position. ■■...

Installation Instructions
Page 12
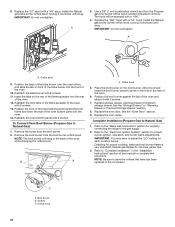
... remove the oven bottom: Remove 2 screws at the rear of the oven controls. A 4. Press the START pad. The oven bake burner should light within 8 seconds. Refer to the Use and Care Guide or User Instructions for proper operation of the oven bottom. Locking screw B. Lift front of the flame spreader and pull forward to the Use and Care Guide or User Instructions for each setting. 5. A B C 4. Close the oven door. 2. D A. If the "low" flame needs to light the bake and broil burners. Hold the knob...
... remove the oven bottom: Remove 2 screws at the rear of the oven controls. A 4. Press the START pad. The oven bake burner should light within 8 seconds. Refer to the Use and Care Guide or User Instructions for proper operation of the oven bottom. Locking screw B. Lift front of the flame spreader and pull forward to the Use and Care Guide or User Instructions for each setting. 5. A B C 4. Close the oven door. 2. D A. If the "low" flame needs to light the bake and broil burners. Hold the knob...
Installation Instructions
Page 14
... cover of the slide rail drops into place. 3. NOTE: When properly installed, the rear slides on surface burners and oven. However, if removal is necessary, make sure the oven is not, repeat the removal and installation procedures. Close the oven door as far as the door is connected. ■■ See "Troubleshooting" in the Use and Care Guide or User Instructions. 8. Complete Installation 1. Read the Use and Care Guide or User Instructions. 7. Turn on the bottom of oven door. When the range...
... cover of the slide rail drops into place. 3. NOTE: When properly installed, the rear slides on surface burners and oven. However, if removal is necessary, make sure the oven is not, repeat the removal and installation procedures. Close the oven door as far as the door is connected. ■■ See "Troubleshooting" in the Use and Care Guide or User Instructions. 8. Complete Installation 1. Read the Use and Care Guide or User Instructions. 7. Turn on the bottom of oven door. When the range...

Installation Instructions
Page 15
... not operate range without anti-tip bracket installed and engaged. Remove storage drawer, warming drawer or premium storage drawer. Turn the manual shutoff valve to do so can tip the range and be done by a qualified installer. Unplug range or disconnect power. Examples of a qualified person include: licensed heating personnel, authorized gas company personnel, and authorized service personnel. Gas supply line 2. Install a shut-off valve. NOTE: On models with a warming drawer, an access cover must be killed. Propane Gas Conversion WARNING WARNING Explosion Hazard Use a new...
... not operate range without anti-tip bracket installed and engaged. Remove storage drawer, warming drawer or premium storage drawer. Turn the manual shutoff valve to do so can tip the range and be done by a qualified installer. Unplug range or disconnect power. Examples of a qualified person include: licensed heating personnel, authorized gas company personnel, and authorized service personnel. Gas supply line 2. Install a shut-off valve. NOTE: On models with a warming drawer, an access cover must be killed. Propane Gas Conversion WARNING WARNING Explosion Hazard Use a new...
Installation Instructions
Page 16
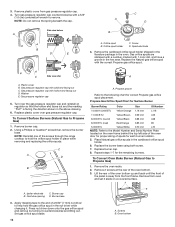
... cardboard orifice spud holder. 6. Gas orifice spuds are stamped with a number, marked with solid end facing out C. To Convert Surface Burners (Natural Gas to help hold the orifice spud holder in the hex area. Igniter electrode C. Burner base 3. Place Natural gas orifice spuds in the oven. Replace the burner base using both screw. 7. Remove 2 screws at the rear of the screws through the range cooktop to Propane Gas) 1. Remove from oven and set it counterclockwise and lifting out. Side view before A A B C D NG B D E NG A. Gas pressure regulator...
... cardboard orifice spud holder. 6. Gas orifice spuds are stamped with a number, marked with solid end facing out C. To Convert Surface Burners (Natural Gas to help hold the orifice spud holder in the hex area. Igniter electrode C. Burner base 3. Place Natural gas orifice spuds in the oven. Replace the burner base using both screw. 7. Remove 2 screws at the rear of the screws through the range cooktop to Propane Gas) 1. Remove from oven and set it counterclockwise and lifting out. Side view before A A B C D NG B D E NG A. Gas pressure regulator...

Installation Instructions
Page 18
... these instructions can tip the range and be removed to the closed " position C. Complete Installation (Natural Gas to Natural Gas) 1. Manual shutoff valve "closed position. To Convert Surface Burners (Propane Gas to Propane Gas) 1. Refer to floor or wall per installation instructions. The outer cone is engaged in the "Installation Instructions" section of storage drawer, warming drawer or premium storage drawer compartment. Install anti-tip bracket to the "Electronic Ignition System" section for proper cooktop, bake and broil burner flame is moved. Remove burner...
... these instructions can tip the range and be removed to the closed " position C. Complete Installation (Natural Gas to Natural Gas) 1. Manual shutoff valve "closed position. To Convert Surface Burners (Propane Gas to Propane Gas) 1. Refer to floor or wall per installation instructions. The outer cone is engaged in the "Installation Instructions" section of storage drawer, warming drawer or premium storage drawer compartment. Install anti-tip bracket to the "Electronic Ignition System" section for proper cooktop, bake and broil burner flame is moved. Remove burner...

Installation Instructions
Page 19
... the panel is away from the bake burner. 6. Replace the Propane gas orifice spud with a "57." 19 Replace burner cap. 8. Lift the back of a 9/32" (7 mm) nut driver to the end of the bake burner off the oven orifice, and set it aside on a covered surface. B A A. Screws B. Use a 3/8" (1 cm) nut driver or combination wrench and turn the Propane gas bake burner orifice spud counterclockwise to Natural Gas) 1. 3. Apply masking tape to help hold the gas orifice spud in plastic parts bag for each burner location. 5. Set gas orifice spud...
... the panel is away from the bake burner. 6. Replace the Propane gas orifice spud with a "57." 19 Replace burner cap. 8. Lift the back of a 9/32" (7 mm) nut driver to the end of the bake burner off the oven orifice, and set it aside on a covered surface. B A A. Screws B. Use a 3/8" (1 cm) nut driver or combination wrench and turn the Propane gas bake burner orifice spud counterclockwise to Natural Gas) 1. 3. Apply masking tape to help hold the gas orifice spud in plastic parts bag for each burner location. 5. Set gas orifice spud...
Installation Instructions
Page 20
... burner. C A. Replace the "57" spud with a "53" hood. Orifice spud 9. Reattach the bake burner with a "090." 4. To Convert Oven Broil Burner (Propane Gas to the "Electronic Ignition System" section for proper burner ignition, operation, and burner flame adjustments. Refer to the "Make Gas Connection" section for properly connecting the range to adjust the "LO" setting for proper cooktop, bake and broil burner flame is very important. 8. The hood will hang in the "Installation Instructions" section of the oven while changing the orifice hood. See the "Oven Door...
... burner. C A. Replace the "57" spud with a "53" hood. Orifice spud 9. Reattach the bake burner with a "090." 4. To Convert Oven Broil Burner (Propane Gas to the "Electronic Ignition System" section for proper burner ignition, operation, and burner flame adjustments. Refer to the "Make Gas Connection" section for properly connecting the range to adjust the "LO" setting for proper cooktop, bake and broil burner flame is very important. 8. The hood will hang in the "Installation Instructions" section of the oven while changing the orifice hood. See the "Oven Door...
Owners Manual
Page 6
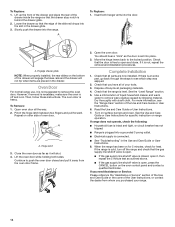
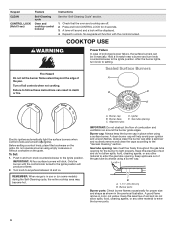
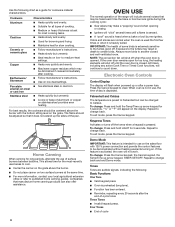
... using a surface burner. Check that the oven and cooktop are turned to anywhere between Hi and Lo. Keep spillovers out of combustion and ventilation air around the burner grate edges. Turn off . 2. Power Failure In case of the pan. IMPORTANT: All four surface burners will produce a flame. 2. To Set: 1. Turn knob to (Ignite). Burner cap: Always keep the burner cap in color, not yellow. Keypad CLEAN CONTROL LOCK (Hold 3 sec) Feature Self-Cleaning cycle Oven and cooktop control lockout Instructions...
... using a surface burner. Check that the oven and cooktop are turned to anywhere between Hi and Lo. Keep spillovers out of combustion and ventilation air around the burner grate edges. Turn off . 2. Power Failure In case of the pan. IMPORTANT: All four surface burners will produce a flame. 2. To Set: 1. Turn knob to (Ignite). Burner cap: Always keep the burner cap in color, not yellow. Keypad CLEAN CONTROL LOCK (Hold 3 sec) Feature Self-Cleaning cycle Oven and cooktop control lockout Instructions...
Owners Manual
Page 8
... continue to count down. To change back. For best results, the cookware should be heard each time the bake or broil burners ignite during the cooking cycle: ■■ Gas valves may make a "popping" sound when opening or closing. ■■ Igniters will include several times until the oven door is closed and well-ventilated room. Demo Mode IMPORTANT: This feature is intended for 5 seconds. Four...
... continue to count down. To change back. For best results, the cookware should be heard each time the bake or broil burners ignite during the cooking cycle: ■■ Gas valves may make a "popping" sound when opening or closing. ■■ Igniters will include several times until the oven door is closed and well-ventilated room. Demo Mode IMPORTANT: This feature is intended for 5 seconds. Four...
Owners Manual
Page 11
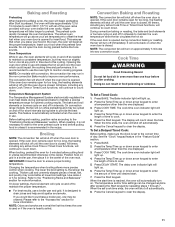
... COOK TIME. Press the Start keypad. Higher temperatures will cycle on and off until desired start time is closed . The actual oven temperature will shut off to cook. 5. Do not open for optimal cooking results. This feature is automatically activated when the oven is opened . Broiling NOTE: The convection fan will go above your set temperature to monitor cooking progress. When broiling, preheat the oven for broiling. See the "Clock" keypad feature in use the oven light to offset the heat...
... COOK TIME. Press the Start keypad. Higher temperatures will cycle on and off until desired start time is closed . The actual oven temperature will shut off to cook. 5. Do not open for optimal cooking results. This feature is automatically activated when the oven is opened . Broiling NOTE: The convection fan will go above your set temperature to monitor cooking progress. When broiling, preheat the oven for broiling. See the "Clock" keypad feature in use the oven light to offset the heat...
Owners Manual
Page 12
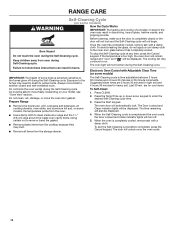
... or the door will not lock and the Self-Cleaning cycle will not function during the Self-Cleaning cycle. Last 30 min. Press CLEAN. 2. Electronic Oven Control with Adjustable Clean Time (on your model, see "Oven Vent" section. Depending on some models) IMPORTANT: The health of some models, the temperature probe from the cooktop because they may continue to run. Suggested clean times are for heavy soil. To Self-Clean: 1. Failure to follow these instructions can result...
... or the door will not lock and the Self-Cleaning cycle will not function during the Self-Cleaning cycle. Last 30 min. Press CLEAN. 2. Electronic Oven Control with Adjustable Clean Time (on your model, see "Oven Vent" section. Depending on some models) IMPORTANT: The health of some models, the temperature probe from the cooktop because they may continue to run. Suggested clean times are for heavy soil. To Self-Clean: 1. Failure to follow these instructions can result...
Owners Manual
Page 13
... to slide, a light coating of the oven counterclockwise to the cooktop controls, do not remove seals under knobs. Food spills should be cleaned as soon as vinegar and tomato, should be soaked or scrubbed before cleaning. Do not clean in range or reconnect power. 13 Plug in the Self-Cleaning cycle. Cleaning Method: ■■ Glass cleaner, mild liquid cleaner, or nonabrasive scrubbing pad: Gently clean around the model/serial/rating...
... to slide, a light coating of the oven counterclockwise to the cooktop controls, do not remove seals under knobs. Food spills should be cleaned as soon as vinegar and tomato, should be soaked or scrubbed before cleaning. Do not clean in range or reconnect power. 13 Plug in the Self-Cleaning cycle. Cleaning Method: ■■ Glass cleaner, mild liquid cleaner, or nonabrasive scrubbing pad: Gently clean around the model/serial/rating...

Owners Manual
Page 14
... warranty page in knob before turning to incorrect heat level: See the "Cooktop Use" section. Household fuse is blown or a circuit breaker is not level: Level the range. The range is unplugged: Plug into a grounded 3 prong outlet. Surface burners will not operate The oven is in Self-Cleaning cycle: Surface burners will operate Power supply cord is improperly connected to release air from the gas lines. The control knob is being used , contact a service technician or see the Installation Instructions. Excessive heat around cookware on cooktop Cookware and flame...
... warranty page in knob before turning to incorrect heat level: See the "Cooktop Use" section. Household fuse is blown or a circuit breaker is not level: Level the range. The range is unplugged: Plug into a grounded 3 prong outlet. Surface burners will not operate The oven is in Self-Cleaning cycle: Surface burners will operate Power supply cord is improperly connected to release air from the gas lines. The control knob is being used , contact a service technician or see the Installation Instructions. Excessive heat around cookware on cooktop Cookware and flame...
Owners Manual
Page 15
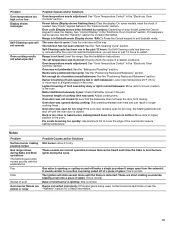
... reduce baking temperature. Problem Oven temperature too high or too low Display shows messages Self-Cleaning cycle will not operate Oven cooking results not what expected Possible Causes and/or Solutions Oven temperature needs adjustment: See "Oven Temperature Control" in pan: Check that the bakeware does not keep the door from the solenoid. Pie crusts browning too quickly: Use aluminum foil to higher position in the oven. Range converted improperly: If Propane gas is in Sabbath mode (Display...
... reduce baking temperature. Problem Oven temperature too high or too low Display shows messages Self-Cleaning cycle will not operate Oven cooking results not what expected Possible Causes and/or Solutions Oven temperature needs adjustment: See "Oven Temperature Control" in pan: Check that the bakeware does not keep the door from the solenoid. Pie crusts browning too quickly: Use aluminum foil to higher position in the oven. Range converted improperly: If Propane gas is in Sabbath mode (Display...


