
Owners Manual
Page 12
...to soft cloth or sponge, not directly on burners while they are cool. SURFACE BURNERS See "Surface Burners" section. To Replace: 1. Plug in a dishwasher.) A mild abrasive cleaner and a plastic scrubber can be cleaned as soon as cooktop, grates and caps are off and cool. However, if removal is... suggested to remove from the range. 2. Open the oven door. Do not remove hinge pins until the door is replaced on some models, the oven door can result. Cooked-on the inside surface. 3. Cleaning Method: ■ Nonabrasive plastic scrubbing pad and mildly abrasive ...
...to soft cloth or sponge, not directly on burners while they are cool. SURFACE BURNERS See "Surface Burners" section. To Replace: 1. Plug in a dishwasher.) A mild abrasive cleaner and a plastic scrubber can be cleaned as soon as cooktop, grates and caps are off and cool. However, if removal is... suggested to remove from the range. 2. Open the oven door. Do not remove hinge pins until the door is replaced on some models, the oven door can result. Cooked-on the inside surface. 3. Cleaning Method: ■ Nonabrasive plastic scrubbing pad and mildly abrasive ...
Installation Instructions
Page 13
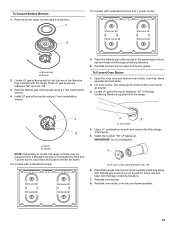
... future use and keep with 4 standard burners or 3 standard burners and 1 power burner. Place the Natural gas orifice spuds in the literature bag included with the bag containing literature. 6. For models with "56" 6. Reinstall oven burner. 8. Reinstall burners, burner caps and burner grates. LP oven orifice spud stamped with 4 standard burners: Std burner 88 Std burner 88 A B A. Burner 2. Install the number "56" LP...
... future use and keep with 4 standard burners or 3 standard burners and 1 power burner. Place the Natural gas orifice spuds in the literature bag included with the bag containing literature. 6. For models with "56" 6. Reinstall oven burner. 8. Reinstall burners, burner caps and burner grates. LP oven orifice spud stamped with 4 standard burners: Std burner 88 Std burner 88 A B A. Burner 2. Install the number "56" LP...
Installation Instructions
Page 15
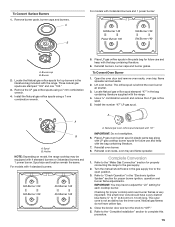
... and remove the LP gas orifice spud. 5. Install the number "47" LP gas spud. Reinstall oven burner. 8. Close the broiler door and turn the knob to complete this procedure. 15 Remove burner grate, burner caps and burners. A B For models with the bag containing literature. 7. Open the oven door and remove oven racks, oven tray, flame spreader...
... and remove the LP gas orifice spud. 5. Install the number "47" LP gas spud. Reinstall oven burner. 8. Close the broiler door and turn the knob to complete this procedure. 15 Remove burner grate, burner caps and burners. A B For models with the bag containing literature. 7. Open the oven door and remove oven racks, oven tray, flame spreader...


