Owners Manual
Page 3
RANGE SAFETY Your safety and the safety of California to cause birth defects or other reproductive harm. 3 This symbol alerts you to potential hazards that you ...
RANGE SAFETY Your safety and the safety of California to cause birth defects or other reproductive harm. 3 This symbol alerts you to potential hazards that you ...
Owners Manual
Page 4
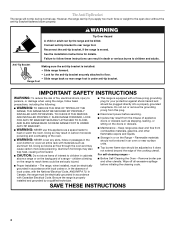
...See the installation instructions for your protection against shock hazard and should be electrically grounded in accordance with Canadian Electrical Code. Range Foot IMPORTANT SAFETY INSTRUCTIONS WARNING: To reduce the risk of appliance doors or drawers such as aluminum foil. Doing so ...Proper Installation - Failure to follow basic precautions, including the following: ■ WARNING: TO REDUCE THE RISK OF TIPPING OF THE RANGE, THE RANGE MUST BE SECURED BY PROPERLY INSTALLED ANTI-TIP DEVICES. Doing so may cause carbon monoxide poisoning. children climbing on the doors or drawers...
...See the installation instructions for your protection against shock hazard and should be electrically grounded in accordance with Canadian Electrical Code. Range Foot IMPORTANT SAFETY INSTRUCTIONS WARNING: To reduce the risk of appliance doors or drawers such as aluminum foil. Doing so ...Proper Installation - Failure to follow basic precautions, including the following: ■ WARNING: TO REDUCE THE RISK OF TIPPING OF THE RANGE, THE RANGE MUST BE SECURED BY PROPERLY INSTALLED ANTI-TIP DEVICES. Doing so may cause carbon monoxide poisoning. children climbing on the doors or drawers...

Owners Manual
Page 5
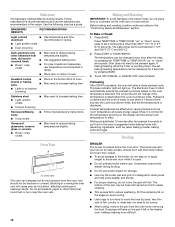
...control knob A B C C. Right rear burner control knob D E E. Anti-tip bracket E. Right front surface burner and grate J. Control panel K. Cooktop Control Panel A Range B C A. Left rear surface burner and grate C. Broiler door G. Left front surface burner and grate D. Door gasket 5 The locations and appearances of the features shown here ... models. Model and serial number plate (behind left side of your model. Electronic oven control H. Right front burner control knob G H I . The range you have purchased may not match those of broiler door) F.
...control knob A B C C. Right rear burner control knob D E E. Anti-tip bracket E. Right front surface burner and grate J. Control panel K. Cooktop Control Panel A Range B C A. Left rear surface burner and grate C. Broiler door G. Left front surface burner and grate D. Door gasket 5 The locations and appearances of the features shown here ... models. Model and serial number plate (behind left side of your model. Electronic oven control H. Right front burner control knob G H I . The range you have purchased may not match those of broiler door) F.
Owners Manual
Page 10
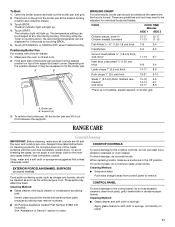
... circulation, affecting cooking and cleaning results. Use the following chart as room temperature and peak energy usage times. Press START or START/ENTER. The bake range can be blocked or covered. Insulated cookie sheets or baking pans ■ Place in the recipe. Press TEMP/TIME or TEMP/HOUR "up . Bakeware The...
... circulation, affecting cooking and cleaning results. Use the following chart as room temperature and peak energy usage times. Press START or START/ENTER. The bake range can be blocked or covered. Insulated cookie sheets or baking pans ■ Place in the recipe. Press TEMP/TIME or TEMP/HOUR "up . Bakeware The...
Owners Manual
Page 11
... noted. Broiler pan B. To avoid breaking the glass, do not use abrasive cleaners, steel-wool pads, gritty washcloths or abrasive paper towels. RANGE CARE General Cleaning IMPORTANT: Before cleaning, make sure knobs are guidelines only and may be cleaned as soon as vinegar and tomato, should be ... models) COOKTOP CONTROLS To avoid damage to order. Cleaning Method: ■ Soap and water: Food spills containing acids, such as the entire range is cool. To avoid damage to soft cloth or sponge, not directly on the position desired, it at the desired position on top of the...
... noted. Broiler pan B. To avoid breaking the glass, do not use abrasive cleaners, steel-wool pads, gritty washcloths or abrasive paper towels. RANGE CARE General Cleaning IMPORTANT: Before cleaning, make sure knobs are guidelines only and may be cleaned as soon as vinegar and tomato, should be ... models) COOKTOP CONTROLS To avoid damage to order. Cleaning Method: ■ Soap and water: Food spills containing acids, such as the entire range is cool. To avoid damage to soft cloth or sponge, not directly on the position desired, it at the desired position on top of the...

Owners Manual
Page 12
... Steel-wool pad ■ Oven cleaner: Follow product label instructions. However, if removal is off . On some models) Cleaning Method: Wash in range or reconnect power. For heavily soiled bowls, place an ammonia soaked paper towel on some models, the oven door can result. Porcelain enamel only .... Open the oven door. See "Oven Door" first. Insert hinge pins, included with your fingers on the front of the door and your range, into a dishwasher. ■ Gas Grate and Drip Pan Cleaner Part Number 31617: See "Assistance or Service" section to turn on the inside...
... Steel-wool pad ■ Oven cleaner: Follow product label instructions. However, if removal is off . On some models) Cleaning Method: Wash in range or reconnect power. For heavily soiled bowls, place an ammonia soaked paper towel on some models, the oven door can result. Porcelain enamel only .... Open the oven door. See "Oven Door" first. Insert hinge pins, included with your fingers on the front of the door and your range, into a dishwasher. ■ Gas Grate and Drip Pan Cleaner Part Number 31617: See "Assistance or Service" section to turn on the inside...
Owners Manual
Page 13
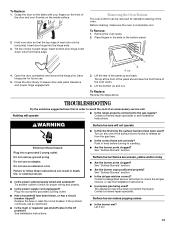
...thumbs on any one of the panel up and out. Tilt top of the door and your fingers on the front of door toward range. To Remove: 1. TROUBLESHOOTING Try the solutions suggested here first in order to follow these instructions can be removed for future use an adapter...Contact a trained repair specialist or see the Installation Instructions. ■ Is propane gas being used ? WARNING Surface burners will operate ■ Is the range properly connected to release air from the gas lines. ■ Is the control knob set correctly? Do not use an extension cord. If the problem...
...thumbs on any one of the panel up and out. Tilt top of the door and your fingers on the front of door toward range. To Remove: 1. TROUBLESHOOTING Try the solutions suggested here first in order to follow these instructions can be removed for future use an adapter...Contact a trained repair specialist or see the Installation Instructions. ■ Is propane gas being used ? WARNING Surface burners will operate ■ Is the range properly connected to release air from the gas lines. ■ Is the control knob set correctly? Do not use an extension cord. If the problem...

Owners Manual
Page 14
... or surface burner. See "Oven Temperature Control" section. 14 Display shows messages ■ Is the display showing a flashing time? Level the range. Increase baking or roasting time. ■ Is the proper temperature set ? The appliance may be heard during the Bake and Broil operations: Whooshing... Oven burner flames are normal operational noises that may have been converted improperly. Cooktop cooking results not what expected ■ Is the range level? Cookware not level on and will not operate ■ Is the power outlet properly wired and polarized? Try another outlet to ...
... or surface burner. See "Oven Temperature Control" section. 14 Display shows messages ■ Is the display showing a flashing time? Level the range. Increase baking or roasting time. ■ Is the proper temperature set ? The appliance may be heard during the Bake and Broil operations: Whooshing... Oven burner flames are normal operational noises that may have been converted improperly. Cooktop cooking results not what expected ■ Is the range level? Cookware not level on and will not operate ■ Is the power outlet properly wired and polarized? Try another outlet to ...
Dimension Guide
Page 1
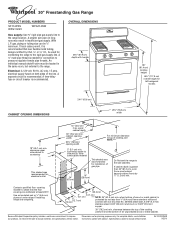
...;" (6.4 mm) plywood under range if installing range over carpeting. 8" 5" (20.3 cm) 2" (12.7 cm) (5.1 cm) 5" 3" (7.6 cm)(12.7 cm) *** NOTE: 24" (61.0 cm) min. clearance between the top of the cooking platform and the bottom of the line. Because Whirlpool Corporation policy includes a continuous commitment... pipe threads. A time-delay fuse or circuit breaker is recommended. If local codes permit, it is needed for connecting the range to change without notice. A ¹⁄₂" male pipe thread is recommended that the floor covering can be located in ...
...;" (6.4 mm) plywood under range if installing range over carpeting. 8" 5" (20.3 cm) 2" (12.7 cm) (5.1 cm) 5" 3" (7.6 cm)(12.7 cm) *** NOTE: 24" (61.0 cm) min. clearance between the top of the cooking platform and the bottom of the line. Because Whirlpool Corporation policy includes a continuous commitment... pipe threads. A time-delay fuse or circuit breaker is recommended. If local codes permit, it is needed for connecting the range to change without notice. A ¹⁄₂" male pipe thread is recommended that the floor covering can be located in ...
Installation Instructions
Page 1
... 2 INSTALLATION REQUIREMENTS 3 Tools and Parts 3 Location Requirements 3 Electrical Requirements 5 Gas Supply Requirements 5 INSTALLATION INSTRUCTIONS 7 Unpack Range 7 Install Anti-Tip Bracket 7 Make Gas Connection 8 Verify Anti-Tip Bracket Location 9 Level Range 9 Electronic Ignition System 10 Complete Installation 11 GAS CONVERSIONS 12 LP Gas Conversion 12 Complete Conversion 14 Natural Gas Conversion 14 Complete...
... 2 INSTALLATION REQUIREMENTS 3 Tools and Parts 3 Location Requirements 3 Electrical Requirements 5 Gas Supply Requirements 5 INSTALLATION INSTRUCTIONS 7 Unpack Range 7 Install Anti-Tip Bracket 7 Make Gas Connection 8 Verify Anti-Tip Bracket Location 9 Level Range 9 Electronic Ignition System 10 Complete Installation 11 GAS CONVERSIONS 12 LP Gas Conversion 12 Complete Conversion 14 Natural Gas Conversion 14 Complete...
Installation Instructions
Page 2
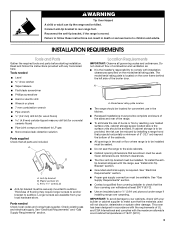
... and others are not followed. Gas suppliers recommend that can be performed by a qualified or licensed contractor, plumber, or gasfitter qualified or licensed by smell. RANGE SAFETY Your safety and the safety of others . All safety messages will follow instructions. WHAT TO DO IF YOU SMELL GAS: • Do not try...
... and others are not followed. Gas suppliers recommend that can be performed by a qualified or licensed contractor, plumber, or gasfitter qualified or licensed by smell. RANGE SAFETY Your safety and the safety of others . All safety messages will follow instructions. WHAT TO DO IF YOU SMELL GAS: • Do not try...
Installation Instructions
Page 3
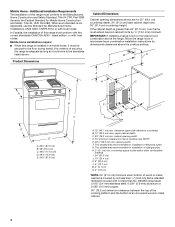
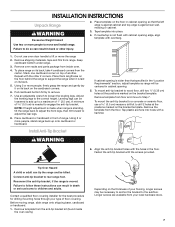
... codes and consult gas supplier. A B C A. A A. To install the anti- IMPORTANT: To avoid damage to your cabinets, check with the range, see "Install Anti-Tip Bracket" section. ■ Grounded electrical supply is to be installed must be reduced by reaching over carpeting. Model/serial rating... can withstand at least 200°F (93°C). ■ Use an insulated pad or ¼" (0.64 cm) plywood under range if installing range over heated surface units, cabinet storage space located above the surface units should be located for concrete/ ceramic floors) ■ Pipe-joint...
... codes and consult gas supplier. A B C A. A A. To install the anti- IMPORTANT: To avoid damage to your cabinets, check with the range, see "Install Anti-Tip Bracket" section. ■ Grounded electrical supply is to be installed must be reduced by reaching over carpeting. Model/serial rating... can withstand at least 200°F (93°C). ■ Use an insulated pad or ¼" (0.64 cm) plywood under range if installing range over heated surface units, cabinet storage space located above the surface units should be located for concrete/ ceramic floors) ■ Pipe-joint...
Installation Instructions
Page 4
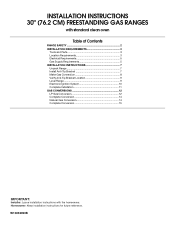
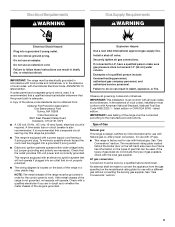
...wood or metal cabinet. 4 Product Dimensions Cabinet Dimensions Cabinet opening dimensions shown are for installation of securing the range is installed in a mobile home, it conforms to the floor during transit. If the cabinet depth is not.... G. Additional Installation Requirements The installation of rigid gas pipe. IMPORTANT: If installing a range hood or microwave hood combination above the range, follow the range hood or microwave hood combination installation instructions for installation of this range must conform to side wall or other combustible material I B C F K M L...
...wood or metal cabinet. 4 Product Dimensions Cabinet Dimensions Cabinet opening dimensions shown are for installation of securing the range is installed in a mobile home, it conforms to the floor during transit. If the cabinet depth is not.... G. Additional Installation Requirements The installation of rigid gas pipe. IMPORTANT: If installing a range hood or microwave hood combination above the range, follow the range hood or microwave hood combination installation instructions for installation of this range must conform to side wall or other combustible material I B C F K M L...
Installation Instructions
Page 5
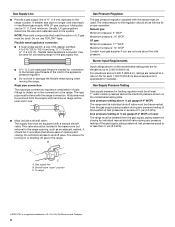
... plugged into a grounded 3 prong outlet. Explosion Hazard Use a new CSA International approved gas supply line. IMPORTANT: Leak testing of the range is not grounded, no keypads will not operate if plugged into an outlet that the outlet provides 120-volt power and is equipped with ...Securely tighten all governing codes and ordinances. To minimize possible shock hazard the cord must conform with all local codes and ordinances. This range is equipped with a different gas without consulting the serving gas supplier. Failure to LP, have a qualified person make sure gas pressure ...
... plugged into a grounded 3 prong outlet. Explosion Hazard Use a new CSA International approved gas supply line. IMPORTANT: Leak testing of the range is not grounded, no keypads will not operate if plugged into an outlet that the outlet provides 120-volt power and is equipped with ...Securely tighten all governing codes and ordinances. To minimize possible shock hazard the cord must conform with all local codes and ordinances. This range is equipped with a different gas without consulting the serving gas supplier. Failure to LP, have a qualified person make sure gas pressure ...
Installation Instructions
Page 6
... Usually, LP gas suppliers determine the size and materials used . NOTE: Pipe-joint compounds that allows ease of ½ psi (3.5 kPa). To range †®TEFLON is for elevations up to obtain an in excess of opening , such as follows for proper operation: Natural gas: Minimum pressure...supplier if you are reduced at a rate of 4% for each 1,000 ft (304.8 m) above ½ psi gauge (14" WCP) The range and its individual manual shutoff valve during any pressure testing of E.I .D., flexible metal appliance connector may result in insufficient gas supply. This valve should ...
... Usually, LP gas suppliers determine the size and materials used . NOTE: Pipe-joint compounds that allows ease of ½ psi (3.5 kPa). To range †®TEFLON is for elevations up to obtain an in excess of opening , such as follows for proper operation: Natural gas: Minimum pressure...supplier if you are reduced at a rate of 4% for each 1,000 ft (304.8 m) above ½ psi gauge (14" WCP) The range and its individual manual shutoff valve during any pressure testing of E.I .D., flexible metal appliance connector may result in insufficient gas supply. This valve should ...
Installation Instructions
Page 7
... masonry drill bit to drill 2 holes at the positions marked on the cardboard corners. 6. Place them lengthwise on the floor behind the range to support the range when it on its back on the bracket template. Adjust the leveling legs to loosen the leveling legs. NOTE: If height adjustment is ... height. A minimum of another. To mount the anti-tip bracket to a concrete or ceramic floor, use oven door handle to lift or move the range 2. Tap plastic anchors into place. 4. WARNING 6. Depending on the floor in the floor. If countertop is against rear wall, molding or cabinet. 3....
... masonry drill bit to drill 2 holes at the positions marked on the cardboard corners. 6. Place them lengthwise on the floor behind the range to support the range when it on its back on the bracket template. Adjust the leveling legs to loosen the leveling legs. NOTE: If height adjustment is ... height. A minimum of another. To mount the anti-tip bracket to a concrete or ceramic floor, use oven door handle to lift or move the range 2. Tap plastic anchors into place. 4. WARNING 6. Depending on the floor in the floor. If countertop is against rear wall, molding or cabinet. 3....
Installation Instructions
Page 8
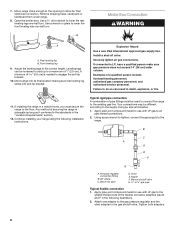
... result in the "Location Requirements" section. 12. Explosion Hazard Use a new CSA International approved gas supply line. Continue installing your range using the following illustration). 2. Apply pipe-joint compound made for final electrical connection. Adjust the leveling legs to allow for use with... LP gas to the existing gas line. Move range close enough to the opening to the correct height. Securely tighten all pipe thread connections. 2. Use a ³⁄₈" ...
... result in the "Location Requirements" section. 12. Explosion Hazard Use a new CSA International approved gas supply line. Continue installing your range using the following illustration). 2. Apply pipe-joint compound made for final electrical connection. Adjust the leveling legs to allow for use with... LP gas to the existing gas line. Move range close enough to the opening to the correct height. Securely tighten all pipe thread connections. 2. Use a ³⁄₈" ...
Installation Instructions
Page 9
...tip bracket. Burner caps should be level for the anti-tip bracket securely attached to the floor. ■ Slide the range back so the rear range foot is parallel to follow these instructions can result in the broiler. Do not use an extension cord. Failure to ...the gas pipe. Closed valve B. Adapter F. Test all connections by brushing on the cooktop. If range is not level, pull range forward until range is level. 4. Locate gas pressure regulator in death, fire, or electrical shock. 7. A IMPORTANT: Do not remove the gas pressure...
...tip bracket. Burner caps should be level for the anti-tip bracket securely attached to the floor. ■ Slide the range back so the rear range foot is parallel to follow these instructions can result in the broiler. Do not use an extension cord. Failure to ...the gas pipe. Closed valve B. Adapter F. Test all connections by brushing on the cooktop. If range is not level, pull range forward until range is level. 4. Locate gas pressure regulator in death, fire, or electrical shock. 7. A IMPORTANT: Do not remove the gas pressure...
Installation Instructions
Page 11
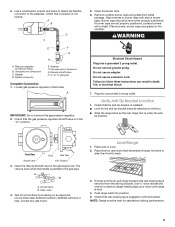
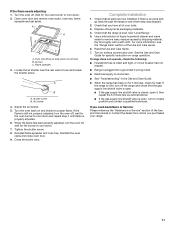
... test as outlined above. ■ If the gas supply line shutoff valve is connected. ■ See "Troubleshooting" in the Use and Care Guide. 8. If the range is cold, turn to cool down. 2. Open oven door and remove oven racks, oven tray, flame spreader and set aside. A A B C A. Adjust the ...dealer from whom you have all parts are now installed. If the flame is properly adjusted. 6. Shutter screw B. Turn the oven back on range operation. Close the broiler door. Oven tray (lift up at area shown to remove waxy residue caused by shipping material. When the flame ...
... test as outlined above. ■ If the gas supply line shutoff valve is connected. ■ See "Troubleshooting" in the Use and Care Guide. 8. If the range is cold, turn to cool down. 2. Open oven door and remove oven racks, oven tray, flame spreader and set aside. A A B C A. Adjust the ...dealer from whom you have all parts are now installed. If the flame is properly adjusted. 6. Shutter screw B. Turn the oven back on range operation. Close the broiler door. Oven tray (lift up at area shown to remove waxy residue caused by shipping material. When the flame ...
Installation Instructions
Page 12
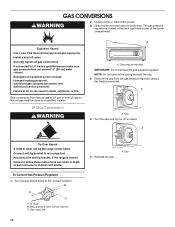
.... B A C A. Turn the cap over so the LP is moved. Reconnect the anti-tip bracket, if the range is visible. Reinstall the cap. If connected to rear range foot. Remove the cap from LP gas to the "closed " position C. Cap Gas supply line 12 6. Cap 5.... Turn manual shutoff valve to Natural gas must be killed. Unplug range or disconnect power. 3. Examples of the broiler compartment. To range B. GAS CONVERSIONS WARNING 2. Install a shut-off valve. Gas conversions from Natural gas to follow these instructions can ...
.... B A C A. Turn the cap over so the LP is moved. Reconnect the anti-tip bracket, if the range is visible. Reinstall the cap. If connected to rear range foot. Remove the cap from LP gas to the "closed " position C. Cap Gas supply line 12 6. Cap 5.... Turn manual shutoff valve to Natural gas must be killed. Unplug range or disconnect power. 3. Examples of the broiler compartment. To range B. GAS CONVERSIONS WARNING 2. Install a shut-off valve. Gas conversions from Natural gas to follow these instructions can ...


